Pattern for a knitted nightgown. Nightgown
Regardless of the variety of nightwear, many women still prefer a regular nightgown. It does not hinder movements and allows the body to completely relax, making the rest truly complete. Since stores do not always offer comfortable clothes at reasonable prices, needlewomen opt for their own reproduction of a nightgown. In addition, the variety of styles and patterns makes it easy to choose the right option. Based on the instructions, which describe how to sew a nightgown with your own hands, you can get a comfortable item quickly and at no extra cost.
One of the simplest ways to sew a nightgown is to follow a ready-made pattern. Since most models have a loose fit, one pattern can fit several sizes at once. The model of a nightgown with one-piece sleeves is equipped with such a universal design.
The sleeve here is designed together with the base and also has a free shape so that the product does not interfere with restriction of movement.

But such shirts were worn in ancient times, and most women still want to look modern. Therefore, preference is given to more feminine models that allow you to add a touch of playfulness to the product. Many people like a thing that bares their shoulders and creates a flirty image.
A Midsummer Night's Dream
The proposed shirt with straps will be a constant companion for a night's rest in the warm season. In order for the product to allow the skin to “breathe”, it is recommended to select natural materials.

To sew such a nightie, you need to prepare:
- Textile;
- Needle and thread to match the material;
- Scissors;
- Pins;
- Centimeter tape;
- An elastic band.
If you don’t have a ready-made pattern, you can create it yourself. Using a tailor's centimeter, the circumference of the chest, waist, hips is measured, and the desired length is determined.
The fabric is folded in half. A rectangle is constructed based on the measurements.

The width of the rectangle is calculated using the larger girth measurement, to which seam allowances are added. The length increases by 8 cm. Now you should design the silhouette of the product. To do this, the lower part expands slightly, forming a trapezoid, as in the photo.

When designing an armhole, an old T-shirt works great. Based on it, you can draw the armhole of the future product. The tailored piece is cut out.

There should be two parts of the product.

The parts are folded together with the wrong side up and stitched along the side sections to the armhole line. Next comes the processing of the bottom of the shirt. It should be folded and stitched. Then the edges of the armholes are stitched.
The upper cut of the product is folded and processed with two parallel machine lines. The width between them should correspond to the width of the prepared elastic band.

An elastic band is inserted. It is advisable to immediately measure the required length in order to avoid excessive tightening. The product should be tried on to determine the length of the straps. They are sewn from leftover material in the form of two strips. If desired, you can decorate the straps with ruffles from the same material.
As a decoration, a modest bow made of satin ribbon, sewn to the front of the shirt, is suitable.
This shirt is suitable for both women and girls. The only difference is in the selection of material. For a girl, it is appropriate to make the product from colored cotton, adding ruffles.
A woman will look more elegant in a cambric shirt with lace. In this case, you can replace the straps with lace, making them a little wider, and also decorate the bottom of the product.

If you want to slightly open your shoulders, but straps are too daring for this, you can use a shirt pattern with an additional top insert. To do this, it is enough to modify the basic pattern of the nightgown, removing the one-piece sleeve.
The upper part consists of a rounded strip of fabric, for which it is quite possible to use openwork fabric.

A nightgown equipped with a detachable insert that smoothly turns into wide straps is called a nightgown with a yoke. This model is attractive because it allows you to easily combine different fabrics in a product and add variety to the product.

Sleepwear in the form of a nightie is widespread among girls. Lovers of elegant dresses do not want to part with a piece of clothing dear to their hearts, even while sleeping. Therefore, mothers go to different lengths, trying to please their daughter and sew an elegant and at the same time comfortable nightgown.
Used materials in action
It’s attractive that when making a nightie for a girl, you don’t have to stock up on a piece of fabric and select the appropriate pattern.

The product can be created from a pair of old knitted T-shirts. The corresponding master class will tell you how to do this so that the baby is satisfied.
To work you will need:
- 2 old knitted T-shirts (contrasting colors);
- Pattern paper;
- Sewing supplies.
The product is designed for a 5-6 year old girl. 50 cm is laid out on paper. 1 cm is measured from the upper end of the segment and fixed with a dot.

A second point is placed 2.5 cm to the side and connects to the previous one. 6 cm is measured horizontally to the right, and then 2.5 cm is measured down vertically. The points are aligned with smooth lines.

A line of 40 cm is drawn down, which then goes 20 cm to the right, forming a trapezoidal silhouette.

From the lower end of the initial segment, the next point is laid 3 cm to the side. It is connected by a smooth curve to the previous mark. The resulting simple pattern will form the basis of the future product.

One of the T-shirts is unraveling at the seams. The pattern is transferred to the material.
Large size bra pattern. Underbust circumference 100 and 105
Large size bra pattern. Circumference under the bust is 100 and 105 cm.
This bra model perfectly models the shape of the breast up to the largest sizes.
The bra cup is soft, without wires, and consists of three parts: the lower part - two parts and one upper part.
The straps are wide.
Patterns are given in actual size with seam allowances (at the rate of 0.7 cm for all seams except the front; allowance for the front seam is 0.5 cm).
The patterns are suitable for women whose parameters fall within the limits indicated in the table below.
|
Pattern |
SIZE |
Underbust circumference |
Bust (by protruding points) |
|
Blue line |
|||
|
Black line |
In any case, it is recommended to first check the patterns on cheap fabric: cut, baste, try on, make adjustments if necessary, clarify the length of the side parts of the bra, taking into account the degree of elasticity and type of fastener, and only after that start sewing.
It is advisable to make large-sized bras from dense fabrics, since a bra made from thin materials (guipure, thin knitwear) will not support large breasts well.
It is advisable to cut the back from an elastic fabric with a high cotton content for maximum support. The larger the size, the wider the back part (barrel).
The clasp is wide, with at least 3 hooks in 3 positions.
In large bra sizes, it is recommended to widen the width of the straps to 3-5 cm, since narrow straps deform the shoulder muscles and interfere with proper blood circulation in the arms, which leads to discomfort, fatigue, etc.
The bra cups are lined. For this purpose, fabrics are used that have properties that match the material of the top of the cup: elasticity, density, etc. And do not forget that the best option for the human body is natural materials that meet all hygienic requirements, improve the microclimate of the skin and do not cause irritation.
According to statistics, underwear created using 100% cotton membrane is recognized by customers as one of the most comfortable.
 Sew the front seam.
The upper sections of the bra cups can be trimmed with narrow lace, openwork elastic, or edged with bias tape.
The pattern on the side of the bra is designed to use elastic fabric. To prevent this part from being too small, when cutting, add a few centimeters to the length of the barrel. Finalize the girth of the bra (the length of the barrels) during the fitting, taking into account the elasticity of the material and the size of the clasp.
We connect cups with barrels. We close the stitching seam with tape. Fixing plastic bones can be inserted into the resulting pocket.
The upper side cut of the cups and back (barrel) is treated with linen openwork elastic or elastic braid.
An elastic band is attached to the bottom of the bra.
You can use a wide elastic band (see photo), it will serve as additional support for large breasts.
Attach the straps to the protrusion of the upper part of the cup.
The straps can be either combined (elastic plus tape) or solid (only elastic or only tape).
The straps can also be sewn from the main fabric. In this case, the length of the straps will be 40.5 cm for a girth of 100 cm and 41 cm for a girth of 105 cm. Check the final length of the straps during the fitting.
Don't forget about the existence of strap adjusters. They consist of a fastening buckle and a ring.
The lining parts are cut according to the main parts.
Sewing Tips:
First, we assemble the lower part of the bra cup, which consists of two parts.
Then we connect the upper and lower parts of the cup.
Download the pattern from here:
A person spends most of his life sleeping, and therefore he should be comfortable while sleeping, and for this he needs comfortable clothes made from natural fabrics. For most women, it’s easier to buy a sleep accessory in a store, but there are also those who would like to sew a nightgown themselves. You will ask a completely natural question: how to sew a nightgown with your own hands? There is nothing simpler: first you need to choose a fabric. It all depends on which model you choose and for which season: chintz is a summer option, cotton or flannel is an autumn-winter option. We bring to your attention several easy-to-sew nightgown models
Below are master classes with photos.
Full sleeve model
Before you start sewing, you need to take measurements of the chest circumference, the length of the product, and if the woman is plump, you need to take another measurement - the circumference of the upper arm.
Making patterns requires skills, but not everyone has these skills. Therefore they will be simple.
When sewing we will need:
- Fabric - approximately length 2 m, width 70 cm.
- Lace ribbon.
- Scissors.
- Chalk.
- Ruler.
You choose the material to your taste, but natural fabrics are better for the body; you will feel comfortable in such a product.
For the pattern, you need two measurements: chest circumference and length of the product; you can play with sizes and shapes as your imagination dictates.
To cut the product, the pattern must be on thick paper.
Let's start designing the pattern:
On whatman paper we build a figure with the designation ABVG (built according to the measurements taken of the chest and the length of the product).
First, let's draw an ABC figure. Distance AG is the length of the product, AB is the chest circumference + 2 cm.
Mark A: set aside 7 cm to the right and 2 cm down and put D and D1. We draw a line between them, marking the neckline from the back. Then we put 8 cm down and put a mark D2. Line AD2 indicates the front neckline.
We draw a sleeve on the pattern, set aside 10 cm from mark B, mark as K. Set aside 16 cm from the bottom, this mark will be K1. From K1 we draw a perpendicular line to the BV line. Let's denote the place of intersection as J. Set aside 7 cm to the left and downwards, denote E and E1, connect the marks with a line. Draw out the bottom part of the product.
Point B: set aside 7 cm to the right B1. We connect marks B1 and E. B1 set aside 2 cm from the top point I. Marks I and B are combined. The pattern is ready, cut it out. The fabric should be folded in half with the right side inward, place the pattern on the fabric, pin it with needles, and carefully begin tracing at a distance of 1.5 cm from the pattern, these are seam allowances.
Carefully cut out the details of the nightgown and fold them right sides to each other. The lines of the shoulder and sides are sewn on with temporary thread, the bottom is folded twice and also hemmed with temporary thread, then stitched on a sewing machine.
Now we process the neckline, we also need to temporarily sew bias tape or a strip of fabric to it, and sew it on a machine. We turn it to the right side, iron it with an iron so that the fold line is as even as possible, bend the remaining binding or strip of fabric, stitch it with a temporary stitch, and then stitch it on a machine, remove the temporary thread after stitching the part.
You can sew an openwork braid along the neckline and along the edges of the sleeves, decorate as your imagination dictates. The nightgown with one-piece sleeves is ready, all that remains is to iron it.
Model nightgown with straps
For this model, measurements are not needed; a summer sundress can be used as a pattern.
To work we need:
- Fabric (choose according to your taste).
- Bias tape.
- Pieces of wide satin ribbons.
- Scissors.
We will sew the shirt with straps.
To make the product wavy when cutting, the fabric must be cut at an angle of 45% to the hem. Leave seam allowances of 0.5 to 1 cm.
After the fabric has been cut, fold the pieces right side inward, the sides need to be basted and stitched. Then iron the seams from the wrong side with a track, process the edges of the seams using an overlocker or a fine zigzag seam.
Let's take care of the neckline: sew bias tape to it with temporary thread, and at the same time mark the places where the straps will be in the front and on the back. We sew the binding on the machine to the marks, insert the straps and sew the binding along with them.
Let's move on to the bottom of the shirt: if you want the hem to be wavy, the bias tape needs to be sewn with a zigzag seam.
The nightgown is ready, all that remains is to decorate it, here your imagination will help you.
Model nightgown with yoke
We have chosen the fabric, we need two lengths of the product, for work we will need: fabric, thread, scissors, sewing machine.
Now you need to make a pattern for the selected model.
Pattern
As a basis, take some T-shirt in your size, thick paper, pin it to the paper and trace it along the contours. From the shoulder down, draw a line of the desired length of the product. From the bottom edge of the armholes we draw a trapezoid or a straight style, everything according to your desire. We connect the lower points of the drawing with a line, this will be the bottom of the nightgown. Draw the lines of the yoke, then cut it off from the main pattern. Let's adjust the armholes a little, you need to cut two centimeters on the top of the armholes along an oblique line. Now the pattern is ready. We cut out the pattern of each part, 2 pieces each.
Tip: don’t forget to allow seam allowances of 1.5-2 cm. The fabric is cut.
We fold the parts with the right side inward, sew them with a temporary seam, sew the side seams on a sewing machine, and process the seams using an overlocker or a zigzag seam. We unfold the side seams and iron them with an iron, this is necessary so that the seam is even.
We take the yoke, fold its top edge and sew it on a machine, then sew the yoke to the top of the nightgown, and process the seam on it in the same way as the side ones. The hem of the shirt needs to be folded twice and sewn on a machine. Our nightgown with a yoke is almost ready, all that remains is to iron it and decorate it, your imagination will let you do it.
Lawn model with lace
We buy cambric fabric meter according to your size, lace with embroidery on mesh, it will not fray when worn and washed.
When cutting this model, we used a dress pattern; do not forget to leave seam allowances of approximately 1.5-2 cm.
Assembling the nightgown: first we assemble the parts of the front, then the back. We tuck the edges of the armhole, stitch it, sew the cambric strips left in advance and sew on the straps. Sew the front and back pieces together. We bend the bottom of the shirt and stitch it. Nightgown made of cambric with lace is ready
Model of a shirt for girls
You will need: light fabric, thread, scissors, sewing machine.
We will need a child's T-shirt, thick paper, pin the T-shirt to the paper and trace it along the contours. From the shoulder down, draw a line of the desired length of the product. From the bottom edge of the armholes we draw a trapezoid or a straight style, everything according to your desire. We connect the lower points of the drawing with a line, this will be the bottom of the nightgown. Draw the lines of the yoke, then cut it off from the main pattern. Let's adjust the armholes a little: you need to cut two centimeters on the top of the armholes along an oblique line. Now the pattern is ready. We cut out the pattern of each part, 2 pieces each.
Tip: do not forget to allow seam allowances of 1.5-2 cm.
We fold the parts with the right side inward, sew them with a temporary seam, sew the side seams on a sewing machine, and process the seams using an overlocker or a zigzag seam. We unfold the side seams and iron them with an iron, this is necessary so that the seam is even. We take the yoke, fold its upper edge and sew it on a machine, then sew the yoke to the top of the nightgown, slightly gathering it, and process the seam on it in the same way as the side ones. The hem of the shirt needs to be folded twice and sewn on a machine.
Our nightgown for girls is ready, you can decorate it with flowers or butterflies, or make a edging for the yoke under the bust.
Video on the topic of the article
Charming and sensual, the nightgown is a comfortable and practical item, which is why it should be in every woman's wardrobe. It’s so difficult to buy a universal shirt model that it’s easier to sew it yourself in a couple of hours than to spend half a day shopping.
Nightgowns usually require some skill and skill when making them. However, there are models that are easy to sew and undemanding in taking measurements.
The nightgown, the pattern of which is below, is just one of these.
For work you will need:
Fabric 1.5x0.7 m;
Small lace;
Nightie pattern;
Tools (scissors, thread, etc.).
You can use any material for sewing, but it is better if it is environmentally friendly and natural: such fabrics are hygroscopic, they will not be hot in stuffy summers or cold in severe frosts, they do not stretch or shrink. Flannel, satin and other cotton-based materials that are easy to work with fit the description. If you have experience working with a sewing machine, then you can use silk or satin as a basis.
To draw up a pattern, you need to know the chest circumference and the length of the future shirt.
The pattern lines can be changed depending on your tastes. You can shorten the entire nightie or remove the sleeves, change the shape of the neckline.
for women is drawn up on whatman paper or any other piece of paper of sufficient size, for example, wallpaper.
First, the ABC figure is constructed. The segment AG in this case is equal to the length of the nightgown, AB - the chest circumference + 2 cm.
From mark A, 7 cm are laid to the right 2 downwards and marks D and D1 are placed, respectively. A line is drawn between them, indicating the neck of the back. From mark A, lay down 8 cm and mark D2. Line AD2 indicates the head of the front.
To construct the sleeve, 10 cm are laid off from mark B, the mark is designated as K. From K downwards, 16 cm are laid down (K1). A perpendicular line is drawn from K1 to the BV line. The place where the two lines intersect is designated as Zh. From the mark Zh they are laid 7 cm to the left and downwards, designated E and E1. The last marks are connected by a line.
The lower features of the product are constructed. From mark B, 7 cm are laid to the right (B1). Marks B1 and E are connected. From B1 2 cm are deposited upward (I). Labels I and B are combined.
The pattern is cut out.
The fabric is folded in half, face down. The pattern is placed parallel to the fold and traced. The front and back parts are cut out taking into account allowances of 10-15 mm.
The parts are stacked face to face. The line of the shoulder and side is basted, stitched and processed using an overlocker or a zigzag seam.
Bias tape is sewn to the neckline. Then, the latter is turned inside out and machine stitched.
The edge of the bottom of the shirt is folded twice, basted, then stitched. The product is ironed.
The result is a cute nightgown model. It will look even more elegant and attractive if you decorate it with lace, sewing, decorative bows or buttons.
In addition to its direct purpose, clothing should bring aesthetic pleasure, even if we are talking about a nightgown.
And in the bedroom you can feel queen, no matter who is nearby. Even if today you fall asleep alone, what you are wearing should contribute to a good mood, and therefore great well-being, which in turn fuels a sense of self-confidence, gives strength and gives inspiration.
Continuing the theme of loungewear, let's create a nightgown. The style is simple, and we can achieve a splendid appearance through a successful selection of fabric and finishing materials (lace, stitching, braid, contrasting trim, etc.). After all, for this type of clothing the main thing is to fulfill the requirement of comfort, which is achieved by using natural fabrics and a loose fit.
When designing women's underwear, namely nightgowns, the allowance for loose fitting increases. For example, an increase along the chest line can reach 10 cm or more. Therefore, you can create a new pattern for the base specifically for nightgowns, taking into account the increased allowances. This base may also be useful for modeling loose-fitting dressing gowns.
But, there is another option. In our example, we will consider the averaged option and use dress base pattern, and we will achieve freedom in fit through gathers.
If you have not yet created a pattern for the base of the dress, we recommend using our step-by-step instructions and doing so. You will need this drawing in the future when mastering the modeling of various types and styles of clothing.
Copy the back and shelf separately onto a blank sheet of paper.
Since we are creating a pattern for a loose-fitting nightgown, it is necessary to match the side lines. To ensure freedom of movement, let's slightly widen the shirt along the bottom line.
Let's start from the back.
To do this, along the bottom line of the back from point H4 to the right, set aside 6 - 10 cm and place point H5. We connect points P and H5 with a straight line.
Along the line of the middle of the back, we put 1 - 2 cm down from point H, put point 1 and adjust the line of the bottom of the back by connecting points 1 and H5 with a smooth curve.
We will do the same manipulations with the shelf.
Along the bottom line of the shelf from point H3 to the left, set aside 6 - 10 cm and place H6. We connect points P and H6 with a straight line.
We also adjust the bottom line of the shelf.
Neck line
We expand and deepen the neck of the shelf and back. The configuration of the neckline can be very diverse. The choice is yours.
In our model we will widen and deepen the neck by 2cm.
To do this, we set aside 2 cm along the shoulder line and along the middle lines of the front and back and draw a new neck line.
To ensure freedom, let's deepen the armhole a little.
From point P down the side sections of the shelf and back, set aside 1-2 cm, place points P1 on the back and P2 on the shelf. We create a new armhole line.
While constructing the yoke, we will move the chest dart to the side line. To do this, we arbitrarily place a point on the side line, in the drawing this is point P3, connect it to the top of the chest dart (G7) with a straight line and make a cut along this line. We close the chest dart, opening it to the side line.
Determine the location of the shelf yoke line.
You remember that our example is one of many possible options. You proceed from your desires and plans.
The yoke line can be of different configurations and located at different heights.
From the neckline, extending the shoulder line of the shelf, set aside 14 cm, put point K. Along the middle line from the neck down, set aside 10 cm, put point K1. By connecting points K and K1 with a smooth curve, we draw a line for the yoke of the shelf.
At the intersection of the yoke line with the armhole line, we set a control point, mark it with the letter O. When cutting the yoke, be sure to make a notch on the yoke at this point, thus marking the junction of the yoke with the shelf.
We return the chest dart to its original position.
Parallel to the middle line of the shelf, with an interval of 7 cm, we draw two auxiliary lines, along which we cut and expand the shelf by the size of the gathers. In our example, the total increase for assemblies is 10 cm. (Two cuts of 5cm each).
We glue paper inserts underneath to secure all parts of the shelf.
You can lay out the pattern directly on the fabric, maintaining the distance between the parts of the shelf, shallow it and cut it. Don't forget to allow seam allowances.
We will decorate the upper cut of the shelf with a smooth line.
Back.
Yoke back We build it in the same way as on the shelf. From the neck, extending the shoulder line of the back, we set aside 14 cm. Let’s not forget to take into account the 2cm dart, the total is 16cm and put point K2.
Along the middle line of the back from the neck down we put 12 cm and put point K3. We connect points K2 and K3 with a smooth curve, thereby creating the line of the back yoke.
At the intersection of the yoke line with the armhole line, we set a control point, denoting it with the letter O1. When cutting the yoke, be sure to make a notch on the yoke at this point, thus marking the junction of the yoke with the back.
Cut off the yoke and set it aside.
To form gathers, we expand the back in the same way as the shelf.
Parallel to the middle line of the back, with an interval of 6 cm, we draw two auxiliary lines, along which we cut and spread the back by the size of the gathers. In our example, the total increase for assemblies is 8 cm. (Two cuts of 4cm each).
We glue paper inserts underneath to secure all parts of the back. Or we’ll immediately lay out the pattern on the fabric, keeping the distance between the parts of the pattern. Don't forget to allow seam allowances.
The upper cut of the back will be shaped into a smooth curve.
That's probably all. The main patterns for the nightgown are ready.
As a finishing touch, you can add a frill or flounce along the edge of the yoke and along the bottom of the shirt. With different frill widths we will get different models.
You can add lace, piping, embroidery, etc. Give free rein to your imagination. Create and enjoy the fruits of your labor.
There is a huge variety of styles of nightgowns. We will look at some of them in our next articles.
We are also preparing a separate section on the intricacies of cutting and the features of processing technology for garments.
In the near future we will continue the theme of home clothes. Follow the site news and you will always be up to date.
Good luck! Valentina Nivina.
Download in one file | Turbobit | | |
Don't forget to add it to your bookmarks. The bookmark buttons are below.
The rights to this article belong exclusively to the author. Full or partial use of the materials of this article in electronic publications on the Internet is possible only if the following conditions are met:
Information about the author must be preserved. In the title or at the end of the published reprint the source must be indicated: www.site, the Internet resource "Sewing Crafts Master" with a direct, active, visible to the user, not blocked from indexing by search engines hyperlink to this article.
Republication of texts in newspapers, magazines or other replication outside the Internet is possible only with the written consent of the author.
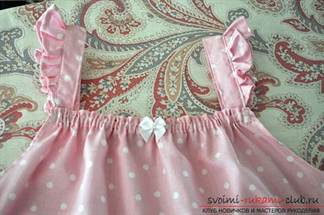
One of the components of a comfortable sleep is the clothes you sleep in. It should be comfortable, pleasant to the body and beautiful. I propose to sew such a nightgown with your own hands. It is spacious, with short one-piece sleeves, shirring (small pleats) at the front and lace.
Do-it-yourself nightgown, pattern and sewing are discussed in detail in this article. By following the instructions below, you can sew a nightgown according to your measurements, in which you will be pleasant and comfortable to sleep.
We will model the nightgown pattern on the pattern - the basis of the dress; if you don’t have one yet, build it according to the recommendations proposed in the article.
Modeling a nightgown front pattern:
- Mark the required length, which we want to see in the finished product (mine is 90 cm). We ignore the tackle dart. From the bottom point of the armhole down along the side seam line, set aside 3 cm, draw a line to the top of the chest dart (blue line in the drawing below), cut and push apart, thereby close the chest dart(we combine both sides into one line).
Constructing a side seam line: from the bottom point of the armhole, extend a 3-centimeter segment to the level of the hem line. We complete the bottom line until it intersects with the side seam line (red lines in the drawing below).
- Neck line: set aside 5 cm from the top point of the neckline along the shoulder line, and 2 cm from the bottom along the middle line of the shelf. Draw a new neckline.
- Construction of a one-piece sleeve: extend the shoulder line by 10 cm. From the top point of the armhole, draw a perpendicular to the shoulder line 0.5 cm long (line 1 in the drawing). We build an arc through the end of segment 1, as shown in the drawing. Along the side seam line we retreat from the lower point of the armhole by 6 cm. At an angle of 45 degrees we draw a segment 5 cm long (line 2 in the drawing). We control the value between the ends of the shoulder seam line and line 2, it should not be less than ½ of the desired width of the bottom of the sleeve, otherwise, line 2 needs to be moved down. Draw a line for the bottom of the sleeve. We design the line of the lower seam of the sleeve in the form of a smooth arc line.
- Simulation of assembly (small folds): from the transition point of the bottom seam of the sleeve to the side seam of the front, we retreat along the line of the side seam down 3 cm. From the chest line along the line of the middle of the front, we set aside 5 cm. We draw an arc. Along this arc we cut the shelf into two parts: upper and lower. We attach a rectangle to the middle line of the bottom of the shelf, the width equal to approximately ¼ the length of the waist line on ½ of the shelf (in the case of such a “modest” assembly like mine). If you want to get a more magnificent assembly, the width of the rectangle needs to be increased. It should be remembered that the fabric has a limited width, and if ½ of the front with seam allowances turns out to be wider than the fabric folded in half, the front will need to be cut in two parts and connected with a vertical seam.
Modeling the pattern for the back of a nightgown:
- Mark the length line. We ignore the tackle dart.
Neck line: set aside 5 cm from the top point of the neck along the shoulder line, and 5 cm from the bottom along the middle of the back. Draw a new neckline.
- We build the shoulder line similar to the shoulder line of the shelf, copy the side seam line from the shelf. The lines of the shoulder and side seam of the back should be the same as the lines of the shoulder and side seam of the front.
Draw a line for the bottom of the sleeve (green line in the drawing below).
Nightgown pattern
When cutting fabric, you need to add allowances for seams and processing of the bottom of the sleeve and neckline - 1 cm. For the hem of the bottom - 3 cm. If you plan to hem the bottom of the sleeves, then add an allowance of 2 cm along the bottom of the sleeves.
The direction of the grain of the fabric should coincide with the lines of the middle of the front and back.
How to cut out an oblique strip for processing the neckline and bottom of the sleeves, see the article.
The photo below shows the layout of the shelf parts on the fabric and the construction of allowances. I did not glue the tracing paper to the bottom part of the shelf to add a rectangle for the frill, but immediately left the rectangle on the fabric, 7 cm away from the fold line.
Stages of sewing a nightgown
- To avoid fraying (“fringe”) on the fabric sections, I sew a zig-zag seam over all parts of the nightgown immediately after cutting. You can use your own discretion and overcast the edges of the fabric after sewing the corresponding seams.
- On top of the bottom part of the shelf we lay two auxiliary parallel lines with a stitch length of 4 mm, at distances of 0.7 and 1.5 cm from the edge, leaving long ends of the threads:
We tighten the threads to the size of the bottom of the part of the top of the shelf, this way the fabric is gathered and a gather is formed. We distribute the folds so that the greatest density is in the center above the mammary glands, and there are practically no folds along the edges of the fabric under the arms. We pin with tailor's pins or baste the bottom part of the shelf to the top (face to face):
We sew with a straight line at a distance of 1 cm from the edge, in this case it will just go between the auxiliary lines.
We remove the bottom auxiliary line, the top one can be left. Iron the seam allowance up onto the top of the front:
Place a stitch securing the seam allowances, moving 2 mm up from the seam:
We put lace on the stitching, fix it with tailor's pins and sew it with a straight stitch..
5. Fold the bottom by 1.5 cm and again by 1.5 cm, iron or baste, lay a straight line at a distance of 2 mm from the edge of the hem fold.
The nightgown is ready.
Today we reviewed and sewed a nightgown with full sleeves, gathered and lace at the front. I am sure that creating a nightgown with your own hands, cutting and sewing did not cause you any difficulties, and you now have something new for a comfortable sleep.
Class: 7Subject: Construction of a drawing of a nightgown M1: 4
Target: 1. to develop the ability and skills of the rules for measuring a figure; to familiarize and teach students the methods of calculating the construction of a drawing;
2.develop spatial imagination and the ability to perform structural calculations using formulas, taking into account individual measurement results;
3.instill accuracy and precision when performing calculations and drawing drawings.
Visuals and equipment: instruction cards, task cards, mannequin, drawing tools, tables, diagrams, presentation.
Lesson type: application of knowledge and skills in practice.
Methods: explanatory and illustrative.
Lesson progress
I.Organizational moment
Checking homework and students' readiness for the lesson. Communicating the topic and purpose of the lesson, writing in a notebook.
II.Repetition
Frontal survey and work on task cards (one group works on a task card, the other orally):
1. Why is the increase given and to what measurements? (for loose fit, measurements Sg and Op)
2.What is the measurement used to take into account the size of the shoulder product? (Str:2)
3. Rules for measuring the figure (they are on the right side, see do not tighten or loosen the tape too much, half-girth measurements are written in half size, lengths - in full)
4.Why are half-girths written in half size? (the drawing is built in half)
5.By what measure is fabric consumption calculated? (di and fabric width)
6. What measurements are needed to draw a drawing of a shirt? (Ssh, SgII, St, Di, Op, Dst), Show the measurements of the figure on the mannequin. Write the letter designations of measurements and increases on the board, give an explanation.
Task card No. 1
Write down the requirements for clothing.
Aesthetic__________________________________________________________.
Hygienic:__________________________________________________________.
Operational: _____________________________________________________.
Economic:_________________________________________________.
Task card No. 2
Fill in the blanks in the table
Measurement name
Symbol of measurement
Rules for taking measurements
Purpose of measurement
Half chest
At the base of the neck above the seventh vertebra
Determining sleeve width
Card – task No. 3
Write down the correct answers against each measure
Purpose of measurements
1.To calculate the width of products
2.To determine the neck size
3.For defined sleeve width
4.To determine the length of the belt
Card – task No. 4
Card – task No. 5
Name the seam shown in the figure and write down the processing sequence (where applicable)
III. Presentation of new material
To sew a product we need a pattern. Before building the basis of a drawing of a shoulder product with an all-blood sleeve, let’s get acquainted with the main details of this product. The pattern of this product consists of two parts: front and back. The front and back are the same size. The difference is that the front neckline is deeper than the back.
Now, knowing what parts we should build and the dimensional characteristics of the figure, it would seem that we can begin to design the product. But the measurements taken suggest a very tight fit of the product to the body. But it is impossible to move and feel good in such clothes, so it must be larger in size than the clothes and the person’s body, called a loose fit allowance. It is designated by the letter “P”, next to it is the area to which the increase “P horizontal” is given.
The construction of the drawing begins with a basic grid, which determines the overall size of the product in width and length. Because the human figure is symmetrical, the drawing is made on the right half of the figure. In addition, since the back and front are the same, the only difference is the neckline, the drawing of these parts will be built simultaneously on the same basic grid.
Based on the technological map, simultaneously with the teacher, students build a drawing of a nightgown M 1: 4 in a notebook. (slide)
Constructing a drawing of a nightgown
І V .Practical work
Work order:
In the instruction card, carry out the necessary calculations according to your standards;
Construct a pattern drawing on paper in M 1: 1 , prepare and cut the pattern;
Current briefing
Targeted walkthroughs of students’ workplaces:
Walk-through to check the start of work;
Walk-through to check students’ ability to use instruction cards;
Walking around to check the correctness of the work performed;
Walk-through for the purpose of individual instruction with lagging students - explanation of educational material, demonstration of the implementation of work techniques.
Self-control: Correctness and accuracy of drawing lines, correctness of calculations
V . Reinforcing the material covered.
Testing your knowledge with a test task
What measurement was used to determine the width of the product?
СгІІ
Which segment in the drawing corresponds to the dimensional attribute Di?
B 1 B 5
B 1 G
What formula is used to determine the depth of the armhole?
СгІІ:2+Пгх0.5
Op:2+Pg
What measurement was used to determine your waistline?
What is the difference between the back and front neck?
depth
Which segment in the drawing corresponds to the length of the sleeve?
BB 1
BB 2
IN 1 IN 5
How many cm is the extension of the hemline?
What is the measurement used to determine clothing size?
Which segment in the drawing corresponds to segment B 1 B 5?
BB 2
BB 3
GG 1
Which segment in the drawing corresponds to segment GG 2?
B 1 B 5
G 1 G
G 3 G 4
V I. Summing up
- analysis of students’ independent work performance,
- analysis of typical student mistakes,
Causes of errors
- explanation of how to resolve errors,
- self-analysis of work.
WITH communication about the achievement of lesson goals, evaluation of work results
V II.Homework
pp. 48-52 , textbook Technology 7th grade.Draw a model of a shirt or robe and write a brief description.
Models for creating warm and cozy nightgowns differ from each other not only in appearance, but also in the degree of complexity of sewing and design. This article will look at several options for nightgowns that you can make with your own hands, including both very simple and complex ones. After reading this article, every needlewoman will be able to choose a suitable shirt for herself, depending on her preferences, as well as the level of skill and experience in sewing.
We sew a simple model of nightgowns with adjustable straps

This nightgown model is probably the simplest. Its creation does not even require constructing a pattern from paper - just draw two identical trapezoids directly on the fabric with an allowance on top to create a drawstring. The two resulting panels are sewn together at the side seams, and a ribbon is inserted into the drawstring on top, which will serve as straps. The length of the straps on such a shirt is easy to adjust - after all, they are not sewn, but simply tied with a bow. The bottom of the product can be decorated with lace or flounces - but you should remember the rule: inelastic fabric - inelastic lace and vice versa. Ruffles made of stretch fabric will look good only on knitted shirts. This model is very easy to implement, so it can be used as a teaching model in labor lessons for girls. Sewing a nightgown is usually included in the school curriculum for the 7th grade.
Model with cutout at the chest:
The shirt model shown in this photo is somewhat more complex in execution than the previous one. However, it also cannot be called complex, and creating a pattern is generally very easy - for this you need to know only two values: chest girth and length of the product.
First of all, draw a rectangle ABCD. From point A we put down a segment equal to the length of the nightgown and put point D, and to the right we put a value equal to the circumference of the chest + 2 cm for the freedom of fit and put point B.
From point A, 7 cm is laid off to the right and mark D is placed, and 2 cm is laid down and point D1 is placed. Between them, a line is drawn by hand, or using a special pattern, showing the neck of the back. From point A, 8 cm is laid down and mark D2 is placed. Line AD2 shows the front head.
To build a sleeve, we put 10 mi down from point B and put point K. At a distance of 16 cm down from K - point K! From K1 a perpendicular line is drawn to the segment BV. In the place where the two lines intersect, we place a point Zh. From the point Zh they are laid 7 cm to the left and downwards, designated E and E1. The last points are connected by a line.
From mark B, 7 cm are laid to the right (B1). Marks B1 and E are connected. From B1 2 cm are deposited upward (I). From point I to point B, draw a smooth line for the bottom of the product.
This model will look even more elegant if you decorate it with lace or sewing, and sew small decorative buttons near the neckline.
Model with straps according to an individual pattern.This truly sexy design will look its best when tailored to your own individual measurements. To do this, you will need a basic dress pattern, which you can build yourself or print on one of the specialized sites, entering your parameters in special fields. To design and sew such a shirt, you must have at least basic design and sewing skills.
Once the basic pattern is ready, you need to modify it according to our instructions. First you need to cut the pattern as shown in the figure below, and at the same time mark a new bottom line.
We finish the yoke by smoothly drawing the line of the top of the product - in the picture below it is drawn in red. We transfer the waist dart to the side seam - in the end it will turn out to be sharply concave inward. And since the nightgown should be loose and not restrict movement, it is necessary to straighten the lower part of the front as shown in the figure below:

Having dealt with the description of modeling the shelf, we take on the pattern of the back. Mark the cutting line as shown in the figure below with a dotted line. After this, we slightly modify the intended line in accordance with our model, which is shown by the red line. Of course, we remove the dart, draw a new bottom line and straighten the side seam again.
After all the changes made, we get three details:
 Thus, we have an individual pattern for an exquisite nightgown that will fit perfectly on the figure.
Video master classes on the topic of the article
We invite you to watch several videos with master classes on sewing nightgowns.
If you accidentally have a piece of silk fabric left over, for example, after sewing a dress, do not rush to be upset. It turns out that you can sew a lot of useful things from it, for example, this charming nightgown. And Svetlana Kuksa shares with us the “recipe” for such a magical transformation in her master class.
Master class. Silk nightgown on the bias
Many needlewomen have scraps of dress fabric at home, for example, left over after sewing a dress. Turns out they can make an adorable spaghetti strap nightgown. And how to sew it, Svetlana Kuksa tells in her master class.
Svetlana Kuksa: “I’ve been doing needlework all my life. It seems to me – almost from early childhood, from the moment my mother decided to learn to sew. She took cutting and sewing courses. Threads, needles, pieces of fabric appeared in the house... We bought a foot-operated sewing machine “Chaika” "Mom learned to sew an apron and panties... After school, while my mother was at work, I slowly mastered the sewing machine. And one day my mother caught the eye of machine-made doll dresses... I was 10 years old. Since then, the sewing machine has been in my possession .
At first I sewed for dolls. Cloth. Bed sheets. Using available materials, she assembled and glued doll furniture and interior items. Under the desk there was an entire residential mansion... At school I had very gentle labor teachers: I sewed easily and quickly for myself and for my friends. Then, older, out of boredom - even to teachers. The first self-sewn school uniform is for the eighth grade. Not according to the rules. With a front bodice fastening with 29 buttons. Then everything becomes one multi-colored carpet: a lot of sewing, knitting, embroidery. Both for yourself and for your friends. Then the first wedding dresses for my friends. Then - to myself.
And today I sew with great pleasure and a lot: costumes for ballroom dancing, complex wedding dresses, I love sewing corsets. In other words, I sew what is put on, but not worn. Which requires complex cutting and careful fit. I've been looking at Osinka's website for quite some time now. There's always something interesting to find. I enjoy looking at the latest in the fashion world. I read with interest the exchange of opinions in the Forum. I definitely look into the Master Classes: there is always something useful.
And it seems that Svetlana’s first pancake didn’t turn out lumpy at all... What do you think?