How to sew a headband from a sleeve. DIY headband made of fabric: how to sew a headband in the pin-up style, a headband from children's nylon tights, as well as several design options for soft accessories
A headband with a hook is an original and extremely versatile wardrobe item. It can be made of cotton and worn in the summer as a decoration, or you can take woolen material, then you won’t be afraid to go to the skating rink in not very severe frosts. The headband will look magical on both newborn babies and older girls, and will perfectly complete the romantic image of a modern woman.
How to properly crochet a headband for a girl

This style of headband for a girl can be made either casually from acrylic or wool yarn depending on the season of the year, or formally, for example, from cotton (and it is better to take light shades).
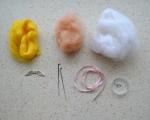
Prepare the necessary materials: a needle and thread, a centimeter, decorative elements (rhinestones, sequins, buttons, beads), a ruler, a hook (select the number according to the thickness of the threads used) and, of course, skeins of yarn.
Let's move on to the master class:
- Take measurements. Use a centimeter to calculate your head circumference. This will be the length of the product. The width is according to your wishes. For example, in children under one year old it is usually 33-35 cm.
- Make a test sample to see if the pattern and dimensions are suitable.
- Next, you can use one of two common methods. The first one is almost simple and is well suited for beginners. It is called longitudinal knitting and is advantageous in that the item is seamless.
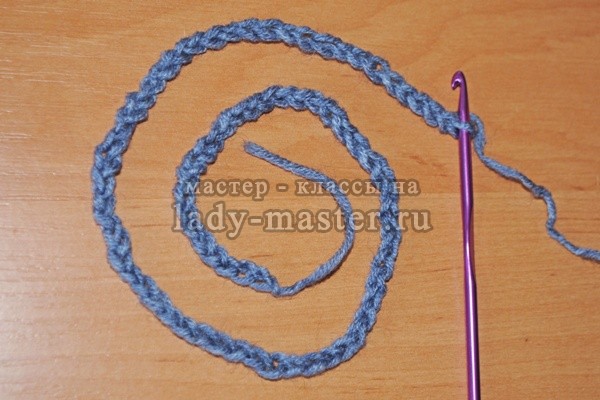
- Longitudinal knitting: cast on a chain of air loops, making its length according to the just measured circumference of the head. You can also calculate it using a sample. To do this, multiply the number of loops by 1 cm by the size of the head circumference. Remember that the chain must be a multiple of the repeat of 9 loops. Loop the chain and continue knitting until the 5th row. And the next 5 need to be mirrored.
Warm headband for women made of lush columns.

Materials:
Hook No. 3, 5; 50–60 grams of Alize Cashmere Batik yarn (100% wool, 100 g/300 m).
Make the upper and lower parts in lush columns according to the scheme:

The middle will consist of five rows of relief columns. You do the tying with a “crawfish step”.
Lush columns:
- You dial the chain and close it. The first row is made of single crochets.
- Second row: three lifting stitches, skip the base loop, make one double crochet, 1 double crochet, knit over the skipped stitch, repeat everything except the first 3 stitches.
- The third is the same, but in the opposite direction.
- From the 4th to the 8th row, perform relief columns.
- The 9th is similar to the second.
- The 10th row is like the third.
You can, of course, knit it entirely from lush ones, but this will increase consumables. And if you alternate in a circle with turning rows, you will get all kinds of patterns.
Let's look at a master class on a bandage for a newborn girl
A headband for a newborn will make her look as tender, fragile and innocent as possible. It is so beautiful!
You will need: white and pink yarn; a bead to decorate a rosette; hook number 1.
First you need to measure the circumference of your head; it will be equal to the length of the chain of air loops. The first row is knitted using single crochets. At the end of it, make three lifting air loops.
Second: one double crochet in the third loop from the hook, two chain crochets, a double crochet in the third loop from the original. Repeat until the end, and then add an air loop.
Third row: in the same way with single crochets. You break away from the pink thread and start working with the white one.
Fourth: three chain loops, one half-stitch in the second loop from the hook, three chain stitches again, a half-stitch in the second loop from the original one. Repeat until the end.
Fifth row: knit five single crochets into the first arch in the previous row, one single crochet into the next arch in the fourth. Do this until the end, and then attach the thread to the second edge of the bandage. The opposite one is knitted as the first one (from the 4th to the 5th row). You should get something like this:

Now you need to connect both ends of the bandage with half-columns or just fasten it with a seam.
Now the rose.
First row: thirty chain stitches, then turn the chain inside out.
Second: three air lifting loops, one double crochet in the fourth loop from the hook, chain crochet, one double crochet in the same stitch as the first stitch, one double crochet in the third loop from the hook, chain crochet, one double crochet in the same loop. The result is a chain with V-shaped patterns.
Third row: three chain stitches, place 8 double crochets between the posts of the V-shaped pattern. Do all of the above to the end.
Twist the finished chain in a spiral and secure the ends with threads. Sew a pink or white bead into the middle.
Attach a rosette to the seam of the ends of the headband. Insert an elastic band into the free spaces between the second and fourth rows. Ready!

Video on the topic of the article
Especially for you, we have collected interesting and creative videos that will definitely help you quickly decide on your future creation. Knit and wear with pleasure!
I've always noticed how cute little girls look with bright colorful headbands covering their ears. In stores you can find a huge variety of headbands for young fashionistas. And mothers are not far behind. They knit wide multi-colored elastic bands with ribbons, beads or flowers for their beauties. However, girls and women have completely forgotten about this once fashionable accessory. But why? This headdress is perfect for warm windy weather, when it will be a little hot in the hat, but you really want to cover your ears.
Why not bring headbands back into our wardrobe? Unusual modern products can decorate any haircut and will be an excellent addition to a spring or autumn look. In my master class, I would like to tell you how you can knit an interesting headband that will compete with berets and hats. In addition, this accessory can be made in 1 day. For knitting I will need: hook No. 4.5 and acrylic threads + wool. I used thicker yarn so that the headband could be worn in cool weather.
1. First, I cast on a chain of air loops that will correspond to the circumference of the head. I try it on myself. A chain of 89 loops suited me. Please note that their number must be odd.
2. The bandage is knitted in straight and reverse rows. I start the first row (front side) by casting on 5 new loops on the hook. Starting from the second chain loop after the hook, I pull the thread out of the 5 loops of the braid. This is done according to the principle of making unfinished single crochets: I insert the hook into a loop of the chain, pull out the thread, two loops are formed on the hook, but I don’t finish the stitch further, that is, I don’t tie these loops together, but leave them on the hook and move on to the next loop of the chain.
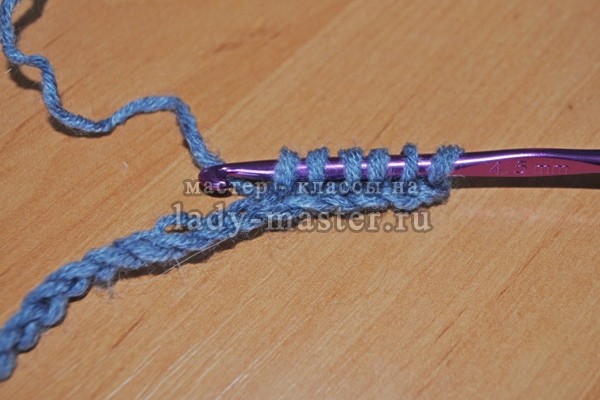
3. When there are 6 loops on the hook, I yarn over and pull it through all 6 loops. I knit a chain stitch so that a hole is formed above the 6 loops.

4. Again I put 6 loops on the hook, but I perform this action as follows: I pull 1 loop from the hole, 1 loop from the last of 6 loops, 1 loop from the air loop into which the last of 6 loops was cast and 1 stitch from the next 2 chain stitches. Total 6 loops on the hook.

5. I put the thread on the hook and pull it through all 6 loops, completing the element with 1 chain loop.

6. According to the pattern described in points 4 and 5, I knit the row to the end. In the last chain stitch I perform 1 half double crochet and turn the work over.
7. I knit the second row (wrong side) like this: 2 chain stitches, 2 half double crochets in the hole of each element. I finish the row with 1 half double crochet in the last loop. I'm turning the job around.

8. In the first row I got 44 “stars” and 2 half double crochets in each hole.

9. I knit the third row (front side) according to the principle of the first. I cast on 3 chain loops, pull out 1 loop from the 2nd and 3rd chain loops from the hook, then 3 loops from the first 3 loops of the row. Total 6 loops on the hook. I yarn over, pull the thread through all 6 loops and finish the element with a chain loop.

10. I knit the remaining stars to the end of the row according to this pattern: I pull 1 loop from the hole, 1 loop from the last of 6 loops, 1 loop from the same loop into which the 6th loop was cast and 1 loop each from the next 2 columns of the previous row. There are 6 loops on the hook.

11. Yarn over, pull the thread through all 6 loops and make a chain loop.

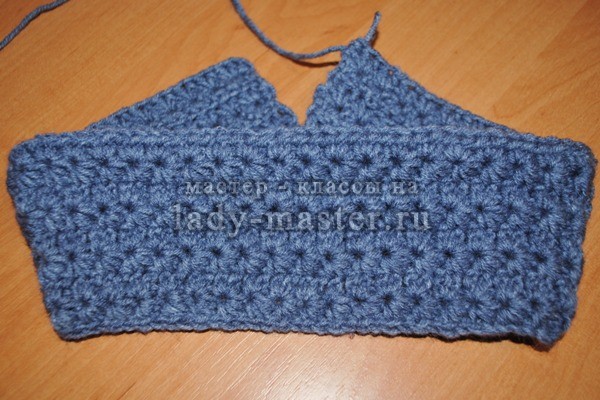
12. Having completed the row, I make 1 half double crochet in the last loop and turn the work over. Next, we knit purl rows following the example of points 4, 5, 6 and knit rows in accordance with points 9, 10, 11,12.
13. We complete the product with a purl row. The number of rows will depend on the desired width of the bandage. I made 8 rows.
Evgenia Smirnova
To send light into the depths of the human heart - this is the purpose of the artist
Content
One of the cutest accessories is a headband for girls. Creating such an original piece of clothing interests many mothers, because everyone wants to create something special for their child. If you also have the desire to crochet a headband for a girl, study the tips and master classes below.
How to make a crochet headband

Beginning needlewomen are recommended to divide the entire process of creating a headband into stages. The first step is to choose the right yarn and prepare the necessary tools. As for the material for knitting, the specific option depends on the purpose of the finished product. If some kind of celebration awaits you in the near future, take cotton threads of predominantly light shades. Bright acrylic yarn is suitable for the summer heat. To take your baby for a walk in spring or autumn, buy woolen threads.
Additionally, decorative elements may be required, for example, sequins, beads, buttons or rhinestones. Among the tools, the main one is the hook. Its number is selected based on the type and thickness of the yarn. Beginners in the field of knitting should give preference to a product with a wooden handle. In addition to this you will need:
- tape measure;
- scissors;
- ruler;
- needle and thread.
If all the necessary materials and tools are prepared, start taking measurements. Using a centimeter, determine the circumference of the baby's head. This will be the required length of the product. The width is made according to your wishes. For babies under one year old, it varies between 33-35 cm. After taking measurements, make a control sample to see how well the dimensions were determined and the pattern chosen. To ensure that your headband is crocheted efficiently the first time, follow the instructions exactly.
Longitudinal bandage
In the process of creating a dressing, one of two methods can be used. The first is longitudinal knitting, in which the product is seamless. The operating principle is as follows:
- Cast on a chain of chain stitches. Its length should correspond to the circumference of the girl’s head. It can also be determined using a control sample. To do this, you need to multiply the number of loops per 1 cm by the circumference of the head. When making a pattern, cast on the chain in multiples of 9 stitches.
- Close the chain with a ring and continue knitting rows 1-5 according to the pattern.
- Knit the next 5 rows in a mirror manner.
Cross knitting

Here the knitting occurs crosswise, i.e. from one side seam to the other. The principle of creating a product is to set a chain of air loops of such a length that corresponds to the width of the finished product. Then the first row is knitted, the future accessory is turned over, and the same steps are repeated until the product reaches the length of the head circumference.
The finished item is often tied with a hair elastic, which is inserted at the beginning of knitting, or you can simply sew the short sides together. Then all that remains is to decorate the product with decorations to your taste. Often they are small or large flowers, for example, roses. It's easy to link them:
- Cast on 30 chain stitches and turn the chain inside out.
- Raise 3 chain loops, make a hole with a double crochet 4 times from the hook.
- Knit the chain stitch again and work an additional double crochet into the same hole. Continue until the end of the chain.
- Turn over, raise 3 air loops, make 8 double crochets in all V-shaped holes. Between the elements of the pattern, knit only 1.
- Twist the resulting strip into a spiral, and place a large bead in the center.
- Sew the flower to the cross seam.
A headband is a thing that cannot be called a full-fledged headdress; it has become a real accessory, especially if this headband is intended for a baby. Plain and colored, with knitted berries and flowers, with ribbon decor. There can be many variations. But today we want to present to your attention knitted headband with a flower. She will knit crochet.
For a children's headband we will need:
- main yarn of bright lilac color (Alize cashmira) 100% Wool;
- pink and violet yarn for tying;
- rhinestones;
- glue;
- hook No. 1.5;
- needle;
- scissors.
Before you start knitting you need measure head circumference your daughter. If the future owner of the headband is far away, for example, it is a goddaughter or daughter of a friend, and you want to give a gift, i.e. tie a decoration on your head, then you will need information about head circumference indicators for children.
Head circumference in children
We invite you to familiarize yourself with the average indicators head circumference in children from 6 to 57 months (in the first column - the child’s age in a year/month, in the second - a month, in the third - the head circumference in centimeters).
Year/month - Month - Head circumference for girls (for boys)
0: 0 - 0 - 33.9 (34.5) cm;
0: 1 - 1 - 36.5 (37.3) cm;
0: 2 - 2 - 38.5 (39.1) cm;
0: 3 - 3 - 39.5 (40.5) cm;
0: 4 - 4 - 40.6 (41.6) cm;
0: 5 - 5 - 41.5 (42.6) cm;
0: 6 - 6 - 42.2 (43.3) cm;
0: 7 - 7 - 42.8 (44.0) cm;
0: 8 - 8 - 43.4 (44.5) cm;
0: 9 - 9 - 43.8 (45.0) cm;
0: 10 - 10 - 44.2 (45.4) cm;
0: 11 - 11 - 44.6 (45.8) cm;
1: 0 - 12 - 44.9 (46.1) cm;
1: 3 - 15 - 45.7 (46.8) cm;
1: 6 - 18 - 46.2 (47.4) cm;
1: 9 - 21 - 46.7 (47.8) cm;
2: 0 - 24 - 47.2 (48.3) cm;
2: 3 - 27 - 47.6 (48.6) cm;
2: 6 - 30 - 47.9 (48.9) cm;
2: 9 - 33 - 48.2 (49.2) cm;
3: 0 - 36 - 48.5 (49.5) cm;
3: 3 - 39 - 48.7 (49.7) cm;
4: 0 - 48 - 49.3 (50.2) cm;
4: 3 - 51 - 49.5 (50.4) cm;
4: 6 - 54 - 49.6 (50.5) cm;
4: 9 - 57 - 49.8 (50.6) cm;
Crochet headbands for a 1.5 year old girl
Having decided on the girth of the head, we begin knitting. We will crochet according to this pattern.
We make a sample and calculate the number of loops for the set.
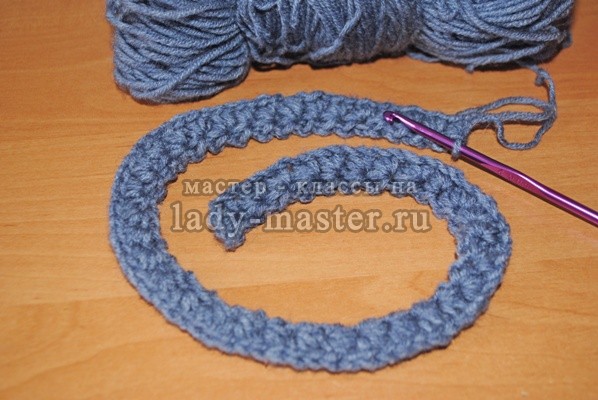
For our bandage we dial 161 air. p. We knit according to the pattern of 3 rows.

We connect the resulting strip into a circle.

We knit 3 rows according to the pattern in the opposite direction from the knitted pattern.

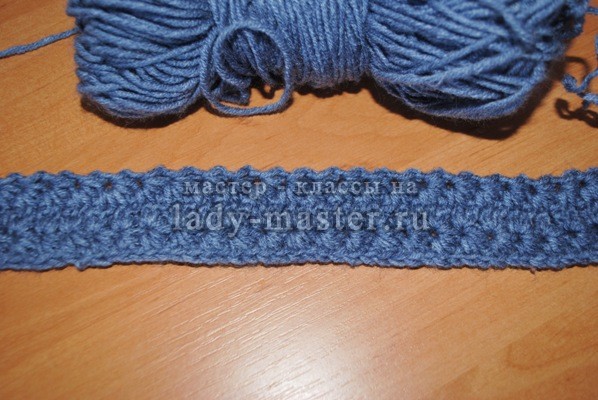
To tie the bandage, change the thread. We tie it with a triple picot.

We tie it in this way until the end of the row.

We make a “frame” on both sides of the bandage.
Smooth it out (steam it through damp gauze).

Flower for headband
To knit a flower, we will first use the melange yarn we created from bright pink and violet, then we will separate it, leaving only pink. Let's finish the knitting with lilac.
Knitted flower.
Upper tier. We dial 6 air. p., close it in a ring, tie 12 tbsp. b/n.
We make 6 arches from 3 air. n. and one tbsp. b/n. between them, which we knit after 1 tbsp. b/n. the underlying row.
In each arch we knit: st. b/n., 5 tbsp. double crochet, st. b/n. We make a connection between them. Art.

Lower tier. At the end of the row, we leave only the pink thread in the work. We knit arches consisting of 9 air. etc., hooking them to the posts from the previous arches.
We fill each arch: 2 tbsp. b/n., 12 tbsp. double crochet, 2 tbsp. b/n. Between them there is a connection. Art.

We tie the edge of the flower with lilac thread. b/n. in each column.

We bring the thread to the front side of the flower from the center. We knit the middle in the following way: st. b/n., 3 air. p., art. with a double crochet at the base of the st. b/n., 3 air. p. to the beginning. Repeat 6 times. It turns out to be such a tiered flower. Lightly steam the flower.

Postpone knitted flower and knit something like a “lace”.
We dial 4 air. p. At the base of the first we make a “ball” from 5 tbsp. b/n. knitted together.
We connect the resulting loop with the initial one to form a ball.
We knit a long chain of air. p. Leave a little thread and cut it off. 
We crochet a chain through the posts as shown in the photo.

Having threaded the rope, we make a similar “ball” at the other end.
We select suitable rhinestones and glue them to the flower.

We sew the flower to the headband so that in no case does it touch the stretched rope. Since it plays the role of a lace that can be relaxed and tightened. We tie it with a bow.

Alize cashmira yarn has stretch properties - it stretches and returns to its original size.
But if there is none, then a rope (lace) will come to the rescue in this case.

Advice. Choose soft, non-prickly yarn for the headband (if the product is for the spring-autumn period). In the store you can buy special yarn for children.

When there are no curls on the baby’s head, almost the only decoration is some kind of headdress or accessory. In related crochet wearing a headband with a two-tiered flower, your sweet daughter will become the most beautiful little lady.
The master class was prepared by Anna Dranovskaya specifically for Handicraft Lessons.
An active mother-handicrafter will not sit still for a minute so as not to knit a new thing for her baby. But when a young princess’s wardrobe is already bursting with hats, booties and dresses, it’s difficult to come up with something new. A great addition to the collection will be a crochet headband for girls. You will find diagrams and descriptions of this product in our article.
A cute ribbon on your head can be the first accessory of a young fashionista. It can be used as an attribute for a photo shoot or simply put on the baby’s head during periods of sudden cold weather. Be that as it may, knitting a headband for a girl with your own hands is quite simple: you just need to strictly follow our instructions.
Necessary materials:
- 1 skein of cotton yarn;
- hook size 3 mm;
- 1 hair elastic;
- sewing needle.
Process description:

Light bandage for baby

The summer version of the baby headband is best knitted using light cotton, linen or worsted yarn. If you are knitting for a newborn baby, additionally make sure that the selected materials are hypoallergenic and only then start working.
This openwork headband for girls is crocheted in sizes up to 5 mm and smaller in a circular pattern.
Necessary materials:
- four-ply worsted yarn;
- crochet hook 5 mm.
Process description:

We create a beautiful accessory with our own hands
During the off-season, when no one wears hats anymore, the weather can be very changeable and dangerous to health. Tie a warm headband and it will help hide your ears and head from the piercing wind, and the modest decor will be appropriate for any outerwear. In the process of crocheting a headband for women, not only the diagram will help you, but also the detailed instructions presented in this master class.

Necessary materials:
- crochet hook size 6 mm;
- linen yarn;
- scissors and needle.
Process description: