Crafts from flowers and leaves: in summer and all year round. DIY leaf crafts
Children love everything new and unusual. Today we will look for real masterpieces in the world around us. Natural materials are an inexhaustible source of inspiration that is available to everyone!
Don't wait until autumn to start creating with freshly picked chestnuts and acorns. Summer is a great time for creative activities in nature. Think back to your childhood. Have you ever done a petal manicure? It's time to teach your daughter how to “sculpt” them!
In fact, this is just the tip of the iceberg. You can create real masterpieces from flowers, petals and leaves. In principle, this purely summer creative material can be used all year round if you collect the plants and dry the herbarium.
Flower men
Children love funny people. So let's tell them the secret of making cute and funny inhabitants of the flower country!
To make a flat man, you will need some flowers and leaves. They can be laid directly on the lawn or asphalt, but it is best to glue them to a paper base. This way you can take the funny applique with you and show the masterpiece to everyone: at home, in the yard, at school or kindergarten.
You can make little people as an option for one of the creative competitions. Don’t forget to take pictures of your crafts right away, because fresh petals will quickly wither and become deformed.


Flower dolls
In my childhood yard there were hollyhocks, or hollyhocks. We made dolls out of them. Manufacturing is very simple. You need a thin flexible stick for the base, several buds and mallow flowers. We string flowers on a stick in any order and get a pupa. Any flowers and leaves are suitable for making.


Fashionable looks made from petals
With older girls you can do fashion decorating. To create dresses or paintings with images of women in dresses from flower petals, just draw the outline of the dress and make a petal appliqué. It is not necessary to glue delicate petals - just lay out the desired composition and take a photo!


Postcards from fresh flowers
There are many design techniques. Complete your collection of ideas by decorating with dried flowers. Agree, it looks beautiful and unusual!


Animals made from petals
Flower petals, like bright puzzles, can be put together into a variety of images. These can be animals, birds, fish.


Paintings from plants
Having mastered the petal appliqué technique, you can move on to making paintings. This painstaking work will require time and a lot of carefully collected and dried plants. But what a great result awaits you!
Painting with flowers is called "mistake". It turns out that this is a fairly popular direction of creativity.


Leaf and Flower Portraits by Justina Blakeney
Serious adult designers and artists also use flowers and leaves as materials for their creative works. Let's admire their works.


For a birthday or other family holiday, you and your child can make a family portrait-caricature of leaves and flowers. The result will be a fun and memorable craft!
Kathy Klein Flower and Leaf Crafts
Popular today, interest in images and coloring books - mandalas, kaleidoscopes with colored glass from childhood - perhaps Kathy Klein was inspired by some of them when creating her crafts from flowers and leaves.


Now you have no doubt that summer is a great time for crafts made from natural materials? And if you dry the flowers and leaves by collecting a herbarium, then for a whole year you can do creative work for school and kindergarten, organize children's contests and competitions, congratulate loved ones on the holiday with original cards or portraits, make anti-stress “mandalas” or kaleidoscopes!
Photos used from the sites: worldhobbies.ru, youloveit.ru, newfound.ru, 2301302.ru, toponogova.ru, vecherkom.com, artfulparent.com, green.jofo.ru, portalidei.ru, liveinternet.ru, moi-detki .blogspot.ru, greendom.net, dimchenko.ucoz.ru, boombob.ru, vashsad.ua, xallyava.ru, vashsad.ua, radostklub.ucoz.com, allwantsimg.com, chudo-sad.com.ua, liveinternet .ru, dddeti.ru, era2012.ru, babyblog.ru, searchmasterclass.net, s30893898787.mirtesen.ru, bestin.ua, foxyshazam.ru, dou70.ru, trozo.ru, liveinternet.ru, 3010203.ru, prigodina .vkrugudruzei, m.babyblog.ru, livemaster.ru, blog.i.ua, avivas.ru, subscription.ru, good-deeds.ua, portal-bliznetsy.ru, lolgirl.ru, m.goodhouse.ru, kleinburd .ru, triinochka.ru, livemaster.ru, numama.ru, blog.7ya.ru, postila.ru, maniaexpress.ru, forum.prihoz.ru, pictures11.ru, xvastunishka.mirtesen, bolshoyvopros.ru, by.livemaster .ru, penzamama.ru, nail-on.ru, baby.ru, cmlt.ru, klub-rukodeliya.ru, strana-sovetov.com, znaj-vse.ru, secrets-of-love.ru, trendinfo.biz , blogs.porti.ru
You can return from a walk not only with a bunch of pleasant impressions and a good mood, but also with a bouquet of flowers or leaves. Their lifespan is short, and in their pure form it is difficult to find a use for them. But leaves can always become an excellent material for a variety of crafts made from them, especially if you involve children in the matter.


The simplest and most interesting crafts made from leaves, which even a child can make, are various combinations of leaves and drawings: appliqués. The most famous online drawings by a foreign stylist show female paper silhouettes “dressed” in dresses made of petals of various colors. With children, of course, it is worth doing an easier option: for example, a maple leaf will become a dress with sleeves, which is glued to a sheet of paper, and legs emerge from under it, and at the very top is a head.
Older children can make a butterfly from the same leaf: then the maple leaf will act as a large figured wing, the butterfly itself will “sit” in profile, you only need to finish drawing the body, head and antennae. And if you wish, you can paint the leaf with acrylic paints to add color and patterns. According to a similar scheme, the body of a bug or even a turtle shell will come out of an oak or birch leaf, and a nettle leaf can turn into a bird’s wing. And the associations with leaves don’t end there!
In applications, several types of leaves can be used at once, and at the same time the need to paint on the details will remain. For example, a large prickly hedgehog will consist of several alder leaves, a heap of rowan leaves, and 1-2 maple leaves. For authenticity, between them you can place double berries on stalks, taken from a wild tree in the fall. Figures of “summer” or “autumn” fairies are made in approximately the same way: leaves of different sizes are glued onto large, pencil-drawn silhouettes as clothes and shoes - you can even make up a fluffy princess dress from them. Long wheatgrass leaves disassembled into fibers can act as hair, and translucent thin petals of any flower can serve as wings.
In addition, dried flowers and leaves are ideal for creating small decorations when filled with epoxy resin, placed in a mold, or stamped on salt dough or clay. This move looks especially attractive if you use it to decorate a plate, tray or even a photo frame. Leaves floating, as if in an aquarium, will become a worthy design for something that is tired of its monotony.
DIY children's crafts from leaves and flowers


If a child wants to make a pleasant surprise for his mother with his own hands, the easiest way out for him would be to create a postcard. Colored thick paper is an ideal basis for this: just fold it in half and cut it to the required size. Then leaves and dried flowers are laid out on the front side in the desired order, which are fixed with transparent (so that there are no whitish streaks left) glue. But you can spend a little more time and get a more complex card, without using glue. In this case, the composition will be secured with a transparent thin film, which will best preserve the beauty of the collected flowers and leaves.
Before starting to draw up a design, the materials for it must be dried and smoothed according to all the rules of planar floristry. The easiest way to do this is to use a lukewarm iron: a hot one will instantly burn thin leaves and petals. If you have enough time left, leaves and flowers can be placed between layers of thin paper and placed under a press in the form of several thick and heavy books. 2-3 days will be more than enough to prepare the material for further work with it.
To make a card with a laminated composition of leaves, it is made up of 2 identical sheets of cardboard. On the first of them you need to make a kind of “window”, choose the shape arbitrarily: this sheet will be external, work with it is done at the last stage. First, on the lower (inner) sheet in the area where the outer “window” is located, a composition of previously collected and prepared leaves and dried flowers is laid out. It needs to be covered with a layer of regular cling film, trying not to disturb the pattern. Then the outer part of the card on the reverse side is smeared with glue, special attention is paid to the perimeter of the “window”, and it is applied to the inner sheet. The postcard will need 30-40 minutes under book press.
In addition, children can be asked to “draw” how they see their autumn using leaves. On thick cardboard or whatman paper, the oval of the face is sketched out with several lines, and the remaining details are already laid out from the materials that were collected during the walk. A closed or open eye, lips and nose can also be outlined with a pencil, but it is better to try and construct them from leaves, petals or even dried berries. And the natural blush of an autumn girl can be easily achieved by rubbing a crushed berry in the right place on the cardboard. Thin long leaves will act as hair, and clusters of rowan berries and flowers will be “woven” into a braid or hug the head like a wreath. If you wish, you can go further and decorate your autumn outfit with the same leaves and flowers. To ensure that the resulting composition is preserved for a long time, all materials are pre-dried, and the painting itself is finally placed in a frame under glass.
DIY crafts from autumn leaves

Whole bouquets, especially floral ones, are made perfectly from autumn leaves. Such crafts should already be done with older children, since they require accuracy and composure. In addition, ordinary glue is no longer enough - a heat gun filled with an adhesive substance is used. The most complex, but at the same time the most attractive, are real open rose buds that are made up of autumn leaves. It is recommended to collect only reddish ones, since golden ones do not look so impressive. The preferred shape is the leaves of aspen or birch - they are large, not elongated, and really look very similar to rose petals.
A large, voluminous flower requires at least 45 leaves. Those that will be located in the center are rolled into a tube, overlapping each other and gluing over almost the entire area: only 3-4 sheets are used for this. The next 6-7 pcs. will not hug this dense “tube” completely, only with the lower part to the middle of its height, so that the bud begins to open little by little. The more leaves you add, the weaker the curl. At the moment of fixing the 23rd sheet, this is no longer required - the “petals” are glued in a straightened state in order to obtain a flat bottom on the reverse side by the end.
If you decide to place the bud on the surface, the stems of the leaves are cut off. If you want to make a full-fledged rose with a stem, then you need to tie them together with flexible wire, then twist it and bend it randomly, giving it the shape of the stem. Finally, it is wrapped in dark green velvet paper, which is also fixed with glue.
If desired, apply 2-3 drops of glue from a gun to the “petals” of the flower obtained from the leaves: as soon as the substance hardens, it will look like artificial moisture that is present on non-living flowers. And the most luxurious autumn bouquet will be obtained if you collect 2-3 lush buds from the leaves, among which stick a bunch of rowan berries and several large leaves from other trees, and place the whole composition in a low pot-bellied vase. Such a decorative element can become both a unique gift and an original decoration for the interior of your apartment.
Also, autumn leaves can become a design element for packaging that frames a gift.
In particular, various baskets with alcohol and sweets often need material to fill them. Why not use leaves collected during a walk for this purpose? Taking into account the time of year, this is most relevant when making a gift for teachers: in an ordinary wicker basket, the bottom and walls inside are covered with dried but still soft leaves, after which the gift itself is placed there, and the empty areas are covered with small flower buds twisted from wide leaves, as well as bunches of rowan. If desired, you can cover the outside of the basket with leaves, and entwine the handle with a bindweed stem.
Crafts made from leaves can hardly be called something of practical value: there is only an aesthetic side to the issue. In addition, this is a good opportunity to spend time with children, teach them simple but pleasant things created with your own hands. At least as a gift to a loved one, crafts such as bouquets or entire baskets are very good.
Application of their autumn leaves. MASTER CLASS
Master class with step-by-step photos “Autumn Beauty”.
Merinova Irina Vitalievna, teacher of additional education, MBOU DOD Palace of Children and Youth Creativity, Kemerovo region, city of Topki.The master class is designed for children of primary school age.
Purpose. The work can be used for presentation at an exhibition, as a gift for autumn birthdays, or as a decoration and addition to the interior.
Target: Instill in children a love for the natural environment.
Tasks:
- teach techniques for working with autumn leaves;
- develop imaginative thinking;
- develop accuracy and perseverance.
Autumn. Ancient Corner
Old books, clothes, weapons,
Where is the treasure catalog
Flipping through the cold.
Like at a painting exhibition:
Halls, halls, halls, halls
Elm, ash, aspen
Unprecedented in gilding.
Pasternak B.L.
Materials and tools.
- album sheet;
- felt-tip pens;
- PVA glue;
- gouache and brush.

Press-dried autumn leaves

Step-by-step execution
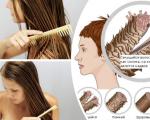
In the center of the album sheet we draw or translate a female profile.

We place dried leaves on a landscape sheet around the female profile. We fantasize about how to beautifully create an image.

Carefully apply glue to each sheet.

Then, we sequentially glue the leaves, creating the chosen image.


Having chosen a sheet with an interesting texture, we apply paint (yellow, orange or red) to it.

This is how the sheet turned out.

Using this sheet, we will print in those places where autumn leaves are not glued. It’s easy to print with a leaf - apply the painted side to the paper and press down. We constantly change the color of the sheet.

We outline the silhouette with felt-tip pens, paint the eyebrows, eyes, lips.

Draw the cheeks with pink color.

The result is a portrait of “Autumn Beauty”
The application is ready. Now you can place it in the interior and admire and remember the bygone, golden autumn on long winter evenings.

Birds, butterflies, animals
This is the most common type of autumn creativity. We make cute little animals from dry leaves of different colors and shapes (the female portrait on the left is the only image of a person that I found).
To have a choice, dry not only autumn ones, but also green leaves too, then the color palette will be much wider and you will definitely get something from this. By the way, dry rose petals look great on a peacock's tail, take note:


Impossibly handsome... He bit off an apple. This collage is made using colored cardboard pieces.

<<>>
Here is another option for those who can draw these simple drawings. Draw the lion's head and fish large - on the entire album sheet. Cardboard is preferable. The rest is clear from the illustration!

Cutting figures from fallen leaves
I highlighted these collages separately because autumn leaves are used a little differently - they are just material for cutting out simple shapes and letters. This needs to be done BEFORE the sheet dries, otherwise it will crumble . First we cut it out, then dry it in the usual way in an old book or between sheets of newspaper. This way you can cut out entire words and phrases.
To ensure that the letters are neat, print them on a printer of the desired size.
Now we put copy paper on the autumn sheet, and your printout on top. We outline so that the drawing remains on the yellow sheet. All that's left to do is cut!
This way you can make not only letters of the alphabet, but also simple silhouettes (animals, houses, clouds).


Multicolored collages
Autumn leaves are so beautiful on their own that they look great framed and without any plot. Look how beautiful it is! The first layer is dark leaves, then put the contrasting and most beautiful ones, so you will feel the volume. Everything is framed.
I also liked the idea: on a collage of leaves we put a sheet of thick cardboard, in which a letter or a simple figure is cut out with a stationery knife.

Another unusual technique, which for some reason is called “iris folding” , I discovered on the “Country of Masters” website. A detailed master class is here:

Here are two more wonderful works in muted tones. It’s easier to repeat than to come up with it yourself! We use pieces of wallpaper or designer cardboard:


Interesting examples of paintings from autumn leaves:
These images are collected on a computer monitor, but the idea can be taken, it looks very nice...

And you can get an idea from this picture. The woman's profile is simply drawn, but the leaves in her hair could be not paper ones, but real ones ! Is it difficult to find them in different sizes and shapes to make such a beauty?

Here are some cute owls. A silhouette is cut out of paper, then we glue the leaves, as shown in the figure, and at the end of the work, we trim all the protruding excess along the contour of the cardboard blank. We make the eyes from paper of a contrasting color.

Photo frame
For the autumn exhibition, you can make frames for photographs and for the design of essays and poems on the theme of autumn. Here are the options I found. In my opinion, it is very simple and effective.

Interior decoration
Crafts made from autumn leaves can be very romantic.
To get such a tree, you need to dry the leaves in advance, and then reattach them to a beautiful branch with transparent adhesive tape.

We work with a hammer...
Unusual technique. I saw it on an American website, translation and . The idea is that fallen leaves are placed between watercolor paper and a napkin and carefully tapped over the entire surface with a hammer so that the coloring pigment remains on the paper.

Roses from autumn leaves - master class
I didn’t make my own master class, I found a great video with beautiful music. A bouquet is made from fallen, but not dry leaves!!! Watch and repeat!


Collecting beautiful leaves on a fine autumn day is a most exciting activity. And when you return home, you want to somehow preserve this splendor or use it to create something beautiful - the material simply begs for it! The most interesting thing is to make various compositions and applications from colorful autumn leaves. This type of creativity develops the child’s fantasy and imagination. In it, images can be created from ready-made shapes by simply placing them on top of each other, rather than cutting them out of paper. And the color palette of leaf fall will put any largest set of colored paper to shame!
YOU WILL NEED:
Colorful autumn leaves
Multi-colored cardboard or velvet paper
PVA glue (you can use starch glue or rubber glue)
Brush
Scissors
Tweezers
Oilcloth
DRYING AUTUMN LEAVES
Applications can be made from either freshly picked or dried leaves. If you want to preserve the leaves, two drying methods can be recommended.
The first, well-known, method is to insert leaves between the pages of an old unnecessary book. It is better to lay each leaf on both sides with a paper napkin.
The second method is express drying of the leaves using an iron. Just remember that the leaves are not sterile, so it is better to iron them on a surface that you don’t mind throwing away later, for example, on large sheets of paper. You also need to put a sheet of newsprint or a paper napkin on top of the sheet before ironing.

AUTUMN LEAVE APPLICATION TECHNIQUE
Before you start work, cover the table with oilcloth so as not to stain it with glue. Prepare the base - a sheet of cardboard, collected leaves, scissors, glue, tweezers.
First you need to come up with a future picture. Then arrange it on a separate sheet of paper. And only then start gluing the individual leaf parts to the base. It is best to apply the glue in droplets along the edges. If you apply glue to the entire surface of the sheet, it will warp when the application dries.
The finished picture should be placed under a press for one or two days.
Don't forget to frame it!
4.
TYPES OF APPLICATIONS
Overlay applique. Try to start by coming up with pictures that do not require cutting out any details from the leaves, but are created by overlaying the leaves. You can come up with a lot of such pictures: butterflies, mushrooms, chickens and other birds... The missing elements can be drawn in with a felt-tip pen or made from other natural materials.
Having mastered simple pictures, children can begin to come up with multi-tiered images. In this technique, leaves are glued on top of each other in layers. The application will turn out bright and cheerful if the leaves are different in color.
5.
6.
Silhouette applique.
In this type of appliqué, excess parts of the leaf are cut off so that the result is exactly what the little artist intended.
7.
8.
9.
10.
11.
12.
Modular application (mosaic).
Using this technique, a picture is created by gluing many leaves of the same or similar shape and size (or, for example, maple seeds). This way you can make the scales of a fish, the tail of a cockerel or a firebird.
13.
Symmetrical applique.
It is used to create individual images or entire paintings with a symmetrical structure, as well as to obtain two completely identical images (for example, reflection in water). To do this, you need to select similar leaves to get an image with its “reflection” or symmetrical in itself (“Butterfly”, “Dragonfly”, “Landscape with a lake”, “Boat on the river”).
14.
15.
Ribbon applique- a type of symmetrical appliqué.
Its difference is that it allows you to get not one or two, but many identical images - ornaments. You get a whole “round dance” of trees, flowers, mushrooms, butterflies, etc.
In conclusion, here is a small selection of pictures collected from different parts of the Internet - to awaken the first associations in you and your baby. One has only to show the child how this is done, and his imagination will allow him to create more and more pictures from this amazingly beautiful natural material - autumn leaves!
16.
17.
18.
19.
20.
21.
22.
23.
24.
25.
26.
27.
28.
29.
30.
31.
32.
33.
34.
35.
36.
37.

Source: http://allforchildren.ru/article/autumn01.php

And these work samples are taken from
1.
2.
3.
4.
5.
6.
7.
8.
9.
10.
11.
12.
13.
14.
15.
16.
17.
18.
19.
20.
21.
22.
23.
24.
25.
26.
27.
28.