Technology of sewing leather bags. A bag pattern with a butterfly or shopping bags can also inspire...
Hello Craftswoman!
On this page I will tell you about my inspiration, which, oddly enough, came from a shopping bag I saw on the “weird moms” website.
I make this butterfly using the reverse appliqué technique in different handbags; my clients and my mother loved it. I also wanted a faux leather bag like this.
I share the dimensions, pattern of the bag and the stages of its creation:
The size of the finished bag is height 31.5 cm, width at the top 36 cm, width at the bottom 25 cm, bottom depth 12 cm.
We need faux leather, fabric for lining, zipper for back pocket, zipper for bag.
Cut:
1. Top parts 2 pieces, size 38*35 cm (mark the corners of the bottom 6*6 cm).
2. Top bar 2 pieces, size 38*4 cm.
3. Lining 2 parts, size 38*32 cm (mark the corners of the bottom 6*6 cm).
4. Handle part 115*6 cm.
5. Bar for handle – 2 parts, size 26*7cm.
6. Back pocket lining, 2 parts, size 24*18cm and 24*20cm
7. Pocket for lining, size as desired.
Detailed pattern of my bag, how I made it.
On the main part we mark all the necessary marks and lines:
- Corners of the future bottom
- Middle line for future application
- Line of the future pocket (from the top edge 5-6 cm, 20 cm long)
- Along the top edge we mark marks for the bar into which the handle will be pulled. When finished, it is 22 cm, which means we set aside the width from the side edge by the side seam allowance + 11 cm (1\2 strips).
We sew pockets onto the lining if desired. I have a double, open pocket + cell phone pocket.
Sew the zipper to the back pocket lining details.


We make appliqué on the outer part of the leather bag. I have a butterfly made using the reverse appliqué technique.


We sew the upper strips of leatherette to the upper edges of the lining, inserting a zipper.


Connect the sides and bottom, leaving an opening for turning. We stitch in the corners to form the bottom.


Prepare the hole for the back pocket. Insert the pocket lining with a zipper.


We connect the sides of the top part of the bag, stitch the corners, forming the bottom.


In my version, the handle did not turn out to be one-piece and I will join 2 parts together, the seams will be hidden in the upper strips. Forming a handle


We wrap the edges of the handle bar 2 cm towards the wrong side, laying a fastening one. A line. Fold it across and attach it to the top strip of the lining, keeping the middle of the strip piece aligned with the side seam of the lining.


We turn the outer part of the bag inside out and put it inside the lining face to face, matching the sides and middle of the parts. We stitch connecting them.
Turn the bag inside out through the hole left when stitching the lining.
We lay a finishing stitch and thread the handle into special strips. We connect the handle into a ring and hide the seam inside the bar.
Sew up the hole in the lining.

I looked at forums and workshops on processing bags in the community and found that some people have difficulty processing welt pockets on the lining of a bag. I hope that after watching the master class, many will agree that it is much simpler than it seems at first glance. The method described in this master class is suitable for beautifully and competently designing welt pockets with a zipper, with an applied leather frame, lined inside the bag.
I'll tell you a little about the linings. This topic is vigorously discussed - some like beautiful painted linings, some prefer quilted ones, which would be stronger, some scold thin viscose linings and, for this reason, duplicate them for strength, some do not like synthetics at all. In my opinion, synthetics are different from synthetics. Silk and viscose linings, in fact, are not very suitable for bags, since they have very low strength, are cut through the seams, wear out a lot and often fall apart, in addition, they crumble and, as a result, it can be quite difficult to properly process the pocket frame. Maybe I’ll tell someone a secret - there is a special group of haberdashery linings for bags. Although they are synthetic, they have nothing in common with the huge number of inexpensive synthetic linings that can be found in stores. Haberdashery linings come in different colors and designs, have high density, strength, do not electrify, practically do not crumble, and have a special coating on the inside or are treated with special impregnations to impart water-repellent properties. I usually use these linings for sewing my bags.
Well, now about the main thing. Actually, the master class itself.
For this we will need the following materials:

1. Lining;
2. Leather for processing the pocket frame;
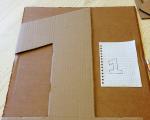
3. A piece of spunbond (a special non-woven padding to strengthen the parts of bags; if someone doesn’t have one, you can use thick non-adhesive non-woven interlining);
4. Semi-kraft paper for the frame (if someone doesn’t have it, it can be replaced with a piece of regular writing paper);
5. Rolled zipper and slider (I use plastic rolled zippers No. 5 or No. 7, but if someone doesn’t have them, it’s quite possible to pick up a regular suitable zipper);
6. Marker for fabric (either a piece of chalk or a sharp piece of soap - this is someone who is already used to making markings on fabric);
7. Nairite glue (or Moment glue);
8. Shoe threads (or other durable threads for leather);
9. Regular glue stick for paper;
10. Mallet or hammer for tapping leather (I don’t have one here in the photo, but I think everyone already knows what this tool looks like);
11. Lighter.
12. Scissors, or breadboard knife
13. Glue brush.
14. Sewing machine.
For my bags, I always first create a complete set of patterns for absolutely everything: for the top parts, for the gaskets, for the lining, and for all the auxiliary patterns for markings. It’s a professional habit, and I can’t escape it. But it is very convenient, at any time I can repeat any of the products, or rework the design, change the cut, design, and so on. In addition, any bag contains a very large number of different parts, details and very small details, in which it is quite easy to get confused or forget something. And this is important when cutting, and when calculating the amount of materials needed for a bag. If we talk about pockets, their size is usually standard, so some parts (for example, spunbond frames and paper frames) are cut into a pack at once. And when the need arises to process a pocket, I simply take ready-made parts.
So, we will assume that we have already cut and prepared everything and we have reached the processing of the lining. We will need a piece of lining on which there will be a pocket and a piece of burlap for the pocket. I make the burlap one-piece, that is, just one piece. The width of the part is equal to the width of the pocket entrance + no less than 2 allowances for the width of the frame + 2 allowances for the seams of the burlap stitching on the sides. Let me explain with an example: if the entrance to the pocket is 18 cm, and the width of the frame on the side is 1.5 cm, then the width of the burlap will be (18 + 1.5 + 1.5 + 1.0 + 1.0) = 23 cm. The depth of the pocket depends from the model, but usually it is about 15 cm. If we again remember that this is a pocket for documents, then we start from a standard passport, its dimensions together with the cover are 14 length * 10 width, respectively, the pocket, with some margin, will have dimensions 15*18. Total: 15 cm depth and 18 cm width. Based on the given parameters, in this case the length of the burlap will be equal to 2 pocket depths + seam allowances. Total: (15 + 15 + 1.5 + 1.5) = 33 cm. So, for example, we have burlap 23*33 cm. To process the pocket, we need a piece of rolled zipper 20 centimeters long (18 cm length of entrance to the pocket + 1 centimeter allowance along the length on both sides. Total: 18 + 1 + 1 = 20 cm).
For those who are very familiar with sewing, I’ll just give you the assembly diagram itself. The numbers and arrows in the figure indicate the order and direction of the lines.

For those who are not used to assembly diagrams, I will tell you step by step, in detail, with a lot of photographs.
We prepare a frame from kraft paper. Our frame will have the following dimensions: the distance between the pocket entry lines is 1.2 cm, the length of the pocket entrance is 18 cm. The width of the frame itself is 1 centimeter on each side. Cut out the frame along the contour. Using a craft knife or scissors, carefully cut the outline of the paper frame in the center, along the lines of entry into the pocket.
On the wrong side of the lining wall piece, using a marker (or soap, or chalk), using a pattern, we mark the line of entry into the pocket.

Then we take a glue stick for paper and, having thoroughly coated our kraft paper frame with glue, glue it to the fabric. Let it dry - the paper glue dries quickly.

Next step: carefully cut the lining in the middle, between the edges of the frame, along the intended line, and cut into a corner at the ends.

Again we use a glue stick, lubricate the frame with it, then wrap the fabric allowances onto the frame and glue it. All. You can put the lining piece aside for now.

Why do I use paper glue and not special leather glue or tape? Firstly, the fabric and paper stick together well. Secondly, this pencil has no odor and does not get dirty. And even if suddenly, by accident, one of you stains the lining, the marks can be easily removed with a damp cotton swab - the glue stick is water-soluble. Thirdly, here it is not at all necessary to glue it to death, since in the future these glued allowances will fall into the seam and will be firmly secured with machine stitching. Now our main task is to stabilize the lining so that it is denser, does not “walk”, does not stretch, and does not crumble during further processing. It’s probably also worth saying that I generally don’t like tape for leather and try to use it as little as possible. Or rather, I use it little, or practically not at all. There are two reasons. First. When a stitch accidentally gets caught in tape, it does not always turn out to be of high quality - even on a good, powerful haberdashery machine, the needle often gets dirty, and the thread gets stuck in the layers, as a result, the stitch itself turns out to be quite lumpy and sometimes knotty, in the worst case, the thread even breaks. Second. The adhesive tape, when removed from the backing and glued inside the product, dries out quite quickly, breaks and peels off. As a result, inside a bag (by the way, a jacket or sheepskin coat - they also like to use it there for speed) a heap of garbage and trash forms. In general, it is correct to use leather tape only between layers, as a temporary connection, where it will be further covered with stitches nearby. It is better to glue seam allowances not with tape, but with professional glue. And if you use adhesive tape, then it should be glued not under the line, but at a distance, nearby.
Next, the next operation. We prepare a frame from spunbond. Its internal contours are the same as those of a paper frame, that is, the distance between the entry lines into the pocket is 1.2 centimeters, the length is 18 centimeters. Taking into account a certain thickness of the leather, due to the bending of the leather around the frame, the inner contour of the frame will be slightly narrower than the corresponding contour on the lined frame. I write a little bit, and that's right, the difference will be within 1 millimeter. But this is just enough so that the lower frame made of lining does not protrude anywhere beyond the contours of the leather frame. The external contours of the frame can be any: rounded, curly, rectangular. It depends on your imagination or on the design of the model. Here I have a fairly simple rectangular frame, 1.2 cm wide with corners at the ends. Using nairite glue, we glue the spunbond frame onto the leather frame part. You can simply roughly cut out a piece of leather for the frame, stick it on a spunbond frame, and then trim the hem allowance around the frame in place. You shouldn't make them too big - there's no need for extra thickness and layers. In my case, the hem allowance is 0.6 cm along the inner contour and 0.7 cm along the outer contour. After the leather is wrapped and sealed around the spunbond frame, the edges of the leather inside will match and there will be no unnecessary differences in thickness.

(Here, in the photo you can see that the leather cut line in the center of the frame is marked with a leather pencil. I usually just cut through, but I drew it here so that it would be clear to those who are good at sewing). After drying, cut the allowances inside the frame, glue them to the sides, and smash them with a mallet or hammer. We do the same with the outer allowances of the frame.

Perhaps someone will say that it can be simpler - just cut out the frame and stitch it without covering the edges. Maybe. But, this method is good for thick leather, where the edges can be polished or covered with paint for edges. For thin soft skins, in my opinion, it is not very suitable. The pocket will subsequently be well used and this is the place where strength is needed, and open sections are quickly torn or chopped. That's why I usually roll up all the seam allowances. This is the resulting leather frame.

If you put the frame in place, you can see that the upper and lower frame are related to each other. And the lower frame, lined, will later be covered with a leather frame.

Now about the lightning. If it is rolled, then you need to put a slider on it approximately to the middle. Then you need to singe the edges of the zipper with a lighter. It is necessary to melt not only the braid, but also the teeth themselves at the ends, so that the zipper does not open later. I often sacrifice my fingers and, having properly melted the plastic of the teeth almost to the point of a drop, I press this drop firmly with my fingers. Seems. what's scary? - Actually, no - it’s a second operation, I don’t have time to get burned. (I was joking about the victims and the fingers). The slider slider looks weird in my photos. Don’t be surprised - it’s wrapped in paper so that it doesn’t get scratched or stained with glue during the sewing process. I remove the paper from the slider slider after the pocket is completely ready.
Then we mark the middle of the zipper with a marker, also the middle of the leather frame, and the middle of the glued frame on the lining. These are control signs by which all the details will then be combined so that nothing is distorted.
Next step. We glue the zipper to the lining from the inside with glue, align the middle according to the control marks, glue the leather frame on top, also combining all the middles.
this is from the face:

and this is what it looks like from the inside out:

We check: the upper frame of their skin and the lower frame of the lining must match and the frame of the lining should not stick out from under the skin anywhere. If you need to fix it before the glue has set, we tear it off a little and fix it. Let it dry, you can tap it a little with a hammer or mallet.

Now we carefully turn this “sandwich” over to the wrong side and glue the lining allowance to the bottom side of the zipper, slightly overlapping the zipper so that the edge of the burlap protrudes and falls under both seams of the frame from below. Set aside, let dry and set.
This is what it looks like from the inside out:

And this is how it looks from the face (note that the burlap will be all turned up during work).

Next, we adjust the frame along the inner contour from below from corner to corner, leaving the tails of the threads, stretching them to the wrong side. We also make a second line from corner to corner from the bottom, along the outside of the leather frame, and also pull the tails of the threads inward. In this case, the bag is made of gray leather, but I have a black pattern on it, I also use black cedar, black zippers, and dark metal fittings, so all the seams and finishing stitches are also black, to match.

this is from the inside out:

We drag the tails of the threads to the wrong side, tie them, and singe them. We turn the lining down, fold it in half, and glue the second allowance of burlap to the zipper, already on top of the frame. We also combine all the middles and cuts so that there are no distortions. The lining should slightly overlap the zipper with the frame glued underneath, so that the allowance hits both seams of the frame.


Now, you need to stitch the rest of the frame along the inner contour from the face. We start from the corner, make a fastener - these will be the ends and at the same time the zipper stops, so here it is necessary to secure the frame well. Also, we pull the tails of the threads to the wrong side, tie knots and singe the ends of the threads.
There is very little left. Turn the piece inside out, match the side seams of the pocket burlap and stitch them on both sides. The lower part of the burlap ends slightly below the upper cut of the pocket burlap part, in fact, up to this point you need to make a stitch. You can see in the photo that the stitching of the side seams of the pocket does not reach the top. This is not scary - in the future you will see that there will be no unsewn holes in the pocket.

If you don't like a rectangular pocket, you can make rounded pockets. Although, in fairness, it is worth saying that even if there is garbage, it will still begin to accumulate regardless of whether the corners of the pocket are rounded or straight. Believe me! You can leave the corners alone and make them straight, especially since such an internal pocket assumes that documents are placed in it, and rounded corners may simply be inconvenient. As an example, I’ll give men’s suits - there are a whole series of pockets, for example, a pocket for an airline ticket, a pocket for documents, a purse, a phone, they are always made straight - dictated by the shape of what is put in this pocket.
And the last step. We adjust the frame along the outer contour from the side and from the top, from the end of the line to the end of the line. We drag the ends of the threads inside, fasten them and set fire to the cut tails. This is what happened from the inside out.

Final: We turn the part over, look at the pocket, and if you really want to, we admire what we’ve done. If we did it the first time exactly as I described, and everything turned out as it should, and even better, we again admire and praise ourselves. And then, we put this detail aside, perhaps take a tea or coffee break, and continue to sew the bag.
In the end it should look like this:

or another photo, the pocket from the inside:

Not everyone knows that sewing a bag with your own hands from a piece of some fabric found at home or not too thick leather is not as difficult as it seems at first glance. Difficulties can arise if the material is too thick, such as leather or denim, or the pattern is not simple.
How to sew a bag? Which one? A small women's room or a large roomy utility room, a fashionable, stylish one for yourself or a children's room...
A homemade summer bag can be made from almost any material you like. A model and pattern diagram with dimensions can also be made based on your own ideas about shape and spaciousness. It is advisable to start with simple patterns. Otherwise (in professional language) a pattern is called a pattern. Keep this in mind when searching too.
From felt you can build a very cute flat handbag in the shape of an owl or a wolf with huge eyes (photo below towards the end of the article) for an electronic device.
I was surprised that for some reason a lot of visitors come to this page for the query “ DIY fabric bags patterns for the very stupid". You can't talk about yourself like that. If you are planning to sew such a thing, then I think you can figure it out without difficulty. As a last resort, if something is not clear, then you can ask!
DIY bags - patterns
For example, if I carry an umbrella in my purse, then it should fit there - horizontally, vertically, or diagonally.
Think over the situation in advance - if your umbrella breaks, you will buy a new one, which may be slightly longer than its predecessor.
It is better to make sure that a standard size umbrella fits inside.
Three patterns of GUCCI leather handbags
To begin with, I will give patterns for several GUCI bags; they were originally given for making paper models, but they can just as well be used for sewing normal ones from fabric or other material with your own hands. The next three photos, if you are interested in the patterns, can be enlarged a little, they are clickable.
The photo shows mostly only patterns of bags without sizes. A little advice for those who have found a suitable model for themselves and want to sew a similar one. Take a picture with a pattern, open it on a large screen in any graphic editor, enlarge the diagram to the desired size. It’s even easier for me - my screen is a large TV. :)
Place loose paper or tracing paper on the screen, fix it and trace with a soft pencil. If you are planning to sew a small bag, then a regular screen may be enough for you. Otherwise, enlarge the image to the “life size” of the bag (even if it doesn’t fit into the entire screen) and trace the pattern piece by piece, moving the photo on the monitor.
When cutting your bag, don't forget the seam allowances!
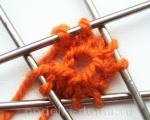
By the way, the leather pattern of a pendant tassel for decorating a bag is similar to a paint brush; it is made exactly as shown. It is not cut completely into strips, then the area of skin is moistened with glue and rolled into a tube.

Details such as size and shape, the presence of external and internal pockets must be thought out in advance, based on your needs and preferences.

Focus on the size of your wallet when thinking about pockets. They say that it is safest to store your wallet vertically in the middle of the bag in a specially made compartment, this way it is much less likely that a pickpocket will get to it. They usually cut the outside side surface or end with a sharpened coin and steal what they fumble inside. The second time cutting - inside - is already inconvenient.

Some people sew a special pocket for an umbrella with a zipper at the bottom of the bag or underneath it. This is also very convenient; the umbrella can be taken out separately from its compartment without opening anything from above.

If it is difficult for someone to understand the patterns presented above, they will in any case understand how to sew a bag (for example, from an old jacket), a “T-shirt”, a bag using noble materials - suede, leather. However, jeans and leatherette will also work, it all depends on what choices you have.

DIY backpack bag with pattern
You better know what shape of the bag you prefer, what you wear (or are going to wear) inside, what handles you prefer - short, long, wide, narrow, or maybe it’s generally more convenient for you to wear a backpack - this way your hands will be free. I personally love backpacks, but not too small - you can’t fit a lot in there, and the women’s backpacks on sale are mostly very modest in size, so sometimes you have to sew it yourself if you want to do fine sewing.


A cute bright owl will be a great gift for a girl or girl. The main thing in this backpack is the external decor, but you can take almost any pattern, it still won’t be visible. Looks great with casual youth fashion, T-shirts and jeans. By following the link, you can see several slightly different color options.
Bag made from an old leather jacket
You can sew a new leather bag from the leather of an old jacket (or leather trousers) - there are probably some good unworn areas left on it. You might end up with something as handy as the one in the photo below.

It's a good idea to make some handles, which you can always make shorter or longer, or attach one long strap.
Think about the fastener in advance, if it is a zipper, then find a suitable color at home, if it is slightly larger than the hole, then it’s not a big deal - one end can be hidden inside the product. Think about what kind of buckles and magnetic clasps your future bag will have.

Selection of accessories
Usually, when I throw away an item (clothes or a backpack, it doesn’t matter), I evaporate any accessories from it that may still be useful, and that’s why I keep a lot of these little things at home. This is very convenient - you don’t have to immediately run to the store; if you come up with the idea of using accessories, you can immediately apply them and figure out whether something from your “home supplies” will be suitable. It is necessary to take into account the color of the fittings; the finished product will not look very good if silver and gold colored fittings are used at the same time. It's better to keep the style.

The clasp can be made with a magnet - there are some on sale and they are quite inexpensive. Or even on a cord that tightens the top. This looks good on beautiful evening bags made of silk or other fine fabrics with a slight sheen, embroidery or beading.
I usually draw the bag pattern myself - the shapes are very simple. I sometimes collected ideas for models and patterns from the Internet; I never used them directly, but you can take them as a basis, and little things (both proportions, or separate height and width) can always be changed or added as you wish.

A product sewn on a lining looks neater, so prepare a lining fabric that matches the color - matching or vice versa in a contrasting color. The main details of the bag pattern will need to be duplicated on the fabric for the inside. On the lining, it may not be amiss to have one or more pockets, with a zipper or open, for small items, cosmetics, and a phone. Pockets are always very convenient when you know what should go in which pocket.
Knitted and felt bags with felt
If you don't know how or don't want to knit, you can still create a knitted accessory yourself. Do you know what? From unnecessary knitwear - pullovers, large or fine knit sweaters. Or use an old bag to transform it into a new one using knitwear.
A handbag can be sewn from felt in the shape of a wolf, owl or other animal. No pattern is required here, the main thing is a beautiful design on the outside.

There are a lot of large pictures here with examples of felt handbags. Animals and birds are different - fox, eagle, pig, elephant, dog, rhinoceros and even a bat. The basis of the pattern is a rectangle the size of a phone or other device, and the rest is decoration - it’s a matter of your imagination and possibilities in terms of choosing the color of felt, thread or fabric.
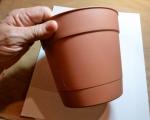
Idea to repurpose an old leather bag with knitting
A very interesting idea is to remake an existing old bag made of thick leather - cut off the bottom and knit it from dense threads or yarn, for example, in a contrasting color. First make holes along the bottom, and tie the knitted parts to them. I’ve been planning to implement this idea for a long time, I even have a bag for experiments, but I haven’t found the right yarn yet.

In my opinion, this is a “Spanish” idea for original bags made of thick leather with a knitted addition; it seemed interesting to me, naturally, for repeating with your own hands. So I took it into account.
The bottom can be tied very quickly using a thick cord. I would still knit the bottom part of a darker shape, otherwise it will be a washing problem very soon.
The shape of the pattern will largely depend on the rest of the piece. There is no need to worry about whether the sewing machine will sew through the leather part - we will make small holes with a special tool-punch and that’s it, you can fasten it. I think it’s still worth making a lining for such a handbag, especially if the knit is large.
That’s probably all this time about patterns that can be used when sewing such a necessary accessory with your own hands. I hope someone finds these ideas useful.
You may be interested in:
A women's tweed travel bag is a necessary item when traveling. It is very roomy and practical to wear. Therefore, it is also good for everyday use in cool, windy seasons. A very interesting antique pattern with a sewing pattern, let's try to sew it with our own hands, the leather trim will look good.

These are the interesting multi-colored woolen knapsacks with embroidery, made by a craftswoman with her own hands, that I spied at an exhibition of handmade craftsmen. There were also cases for mobile phones, and even just roomy, but very light baskets and baskets made of felt for shopping trips to the store. Oddly enough, the hostess advised me to even wear potatoes in them! :) Personally, I wouldn’t do this - it’s a shame! And how light they turned out to be! Just unbelieveble.

It’s even easier to sew a spacious bag for the beach with your own hands, the patterns are very simple, and the sewing process is simple. The materials can be anything - from mesh to canvas, the shape and pattern can vary, but in any case the volume should be large. And you can decorate it in any way you like, even with seashells or painted with acrylic paints. Here you will find a bag-bag pattern, which you can use to sew a product made of fabric or even leather!

Another simple pattern for sewing a large, comfortable beach bag from a material (plain or patterned) that will fit all the necessary things. I don’t recommend making such a bag out of leather; bow folds along the top won’t look very good. The bag consists of an outer part and a lining, which can be the same or different, for example, a thinner fabric.

Examples of ready-made shopping bags, as well as handmade products with appliques from my good friend, a needlewoman, a jack of all trades, who lives in the city of Regensburg. This way you can decorate an existing item with your own hands, as well as sew a new one, inventing a decoration in the process.
For shopping
Four rectangles: two for the front and back sides of the bag, two for the handles (see diagram below, for a bag-package). This is how the simplest shopping bag is cut out, which is usually used for shopping. Most people prefer to replace it with plastic bags, but if you are concerned about the environment or want to look more elegant, then it is better to use this simple pattern to sew a nice shopping bag from a more noble material: leather and fabric, for example, as in. Or from fabric with individual decor, for example, with weaving from ribbons - as described in, so in addition you can creatively use the remains of various ribbons and ribbons. You can also come up with your own version: from embroidery to patchwork appliques, as users of our portal Katerina-777 and Leukocyte did.
Super simple for every day
Using the same simple pattern, you can sew many different bags, not only for shopping, but also for walking and even for the office, by sewing a zipper to the top edges and, if desired, sewing instead of two, one long handle on belt loops to the side seams. An example of such an easy to sew bag of the most basic cut is a magnificent model in the ethnic style from. The choice of material and fancy finishing in a certain style will give the bag a representative look.
To make the bag more spacious and look like a package, stitch the bottom corners diagonally, as described in. Then your bag will have a rectangular bottom, and things will not pile up.
Bag-package
Instead of stitching the edges, you can sew a real bag bag by stitching 3 more parts between the sides of the bag: side inserts and the bottom.
The size of the side inserts is calculated by the height of the side sections of the bag part, plus the required width is added, usually 6-8 cm. Folds can be sewn along the top of the side inserts for convenient flat folding. For the bottom, two parts are cut out; their width should be equal to the width of the side inserts, and at least one part of the bottom is duplicated with a gasket, preferably a rigid one (gasket materials can be used). If you don’t have a rigid pad at hand, strengthen both parts with a regular adhesive pad, and between the two parts insert a piece of cardboard cut exactly to the size of the bottom. The top of the bag can be fastened with a zipper. To do this, you need to cut out 2 more strips for facings along the top side of the bag and, on one side, stitch them to the top edge of the bag after hemming along the top edge, and on the other, stitch the zipper tape to them from below.
By the way, there is a simpler pattern for a bag-package - it is given in. Or by .

Bag with flap
Using approximately the same pattern: front and back sides plus a handle, a standard bag with a one-piece flap is sewn. For the flap, you just need to increase the size of the back side of the bag and, accordingly, if desired, round the edges of the flap or draw them in the shape of a triangle. You can find a super simple pattern for a flap bag in.
Please note that if desired, the details of the bag can also be rounded, drawn in the shape of a trapezoid, or given any fancy shape, for example, the shape of a butterfly, flower or fruit. You will find the pattern for the curly side part, for example, in.
Bucket bag
A very convenient and popular pattern of a soft and comfortable bucket bag with a long, wide, one-piece handle is cut out of just two parts. For it, you can combine different fabrics, as in the master class on sewing a bag with turquoise decor, sew pockets, side linings, insert zippers, decorate with tassels, pendants, decorative stitches, etc. - see also the options below.
Lined bags
A bag with a flap (like many other models) must be lined with lining. The lining fabric pieces are cut out from the existing top pieces, with the exception of the handles, with the same seam allowances. When joining the bag itself with its lining, a hole is left in one of the seams of the lining (the usual side seam) for turning inside out, which is then sewn up by hand using blind stitches.You can see a detailed description of sewing a bag with linings in.


Sewing your own bag for cycling is also not a problem, see the description. For active recreation and sports, a pocket bag on the belt is also useful - a small and roomy model, just like a backpack, leaves your hands free, it is better to familiarize yourself with the pattern and sewing in detail, and then choose the right model for yourself.
For relaxing on the beach
The beach bag-mat is sewn according to one of the very simple patterns described above. Its pattern consists of one large rectangle, folded 4 times, and a strip for two handles. A large rectangle will need to be cut out 3 times: 2 parts from fabric and 1 part from a thick pad or sheet of foam rubber. Ours offers an option to sew a beach bag from a terry towel. Another option for a beach holiday is: an original solution for two problems at once: you simply sew a valve for beach accessories and a carrying handle to the pillow.
And for those who like to relax on the beach doing their favorite handicraft, you just need to sew a model in which you can put everything you need: from scraps of fabric and patterns to scissors, needles, threads and a thimble.

City backpacks
Lately, women's city backpacks have been very popular; they are small, but roomy and comfortable. Details for fashionable backpacks or transformable bags (those that can be carried both in the hand and over the shoulders - see) can also be drawn yourself. Using a similar pattern, you can sew a variety of models: to sew a glamorous accessory, to where you can combine a tapestry with leather - a stylish addition to an image in an ethnic style.
Clutches and evening bags
And finally, evening handbags - primarily clutches, as well as handbags with a clasp clasp (see pattern and description of sewing in) - all their variety is based, as a rule, on the original finish. Handbags on a chain or a long handle that hang around the neck and hold nothing more than a powder compact and lipstick are a hit this season; they are super easy to sew according to the description in
To sew a couple of dozen different clutches, you can use just a few patterns: from the simplest one to the original clutch or the original soft clutches presented in the master class on sewing three models at once. When sewing such clutches, it is very important to carefully sew on the zipper or make another fastener.
Decor
So, we already realized that sewing a bag is not so difficult. However, to make your model different from others - it’s not for nothing that it is handmade, focus on the choice of memorable fabrics and materials and on the decor.
Fabric appliqués with embroidery, cut-out leather motifs (including logos), contrasting or tone-on-tone piping, tassels, patchwork techniques, voluminous patchwork (trapunto technique), huge rhinestones imitating precious stones and exquisite floral motifs lined with rhinestones, braid with pom-poms combined with mirror sequins, fringe, a patch pocket made of leather in a contrasting color with a beautiful clasp, a handle in a contrasting color, decorative belts with blocks or a row of blocks in the form of beads.
In youth fashion, a variety of inscriptions, funny bright applications are relevant; clutches in the form of boxes of sweets, books and other items have not gone out of fashion.
You can find it on our website.
Accessories made with imagination and taste will make your look unique!
Topic 4. TECHNOLOGY FOR MANUFACTURING BAGS
The production of women's, shopping and travel bags at leather goods enterprises is carried out in accordance with the approved Standard Technology for the Manufacturing of Women's Bags (1987) and the Standard Technology for the Manufacturing of Travel and Shopping Bags (1988).
Bags are classified:
By manufacturing method - stitched, glued, welded, riveted, molded, injection molded, knitted, braided, combined;
According to the manufacturing method - reversible and non-reversible;
According to the type of edge processing - folded, trimmed;
According to the degree of rigidity - rigid (all main parts with rigid gaskets); semi-rigid (bottom with walls, bottom with wedges, bottom with valves, bottom with yokes; walls, folds, yokes, valves with rigid gaskets); soft (parts without a rigid gasket or a bottom with a rigid gasket);
According to the method of finishing trimmed edges - painting, edging, braiding, using HDTV welding;
According to the closing method - frame lock, flap, zipper, open, with a cord.
Bags differ in design-technological and design-decorative characteristics.
Structural and technological features characterize the design and technological methods of manufacturing products - type of closure, manufacturing method, method of processing the outer edges of parts, etc.
Structural and decorative features characterize the appearance of the product - silhouette, finishing details, color scheme, number of handles, pockets. These signs are subject to fashion changes.
The requirements for products are divided into aesthetic, mechanical, technical, economic and consumer.
Aesthetic requirements for bags are informational expressiveness, rationality of form, integrity of composition, perfection of production execution and appearance.
Mechanical requirements - product strength, color fastness to repeated bending, shape retention, etc.
Technical requirements must be met during the production of bags in full accordance with the requirements of the industry standard, standard technology, recommendations and techniques.
Economic requirements provide for a reduction in cost, material consumption and labor intensity of product manufacturing, typification and unification of components and parts, etc.
To make bags, a wide range of materials are used, differing in physical and mechanical properties, structure and production methods.
Natural and artificial leather, polyvinyl chloride films, fabrics, plastics, and synthetic materials are used as upper materials. Auxiliary materials include lining fabrics, PVC films, cardboard, adhesives, fittings, etc.
When making bags, the thread method of joining parts is the main one.
The parts of the bags are connected with stitches, the execution of which must comply with the requirements of regulatory documentation. The maximum stitch frequency is set when performing the most critical stitches that are subject to stretching during wear (connecting parts of the product body, attaching valves, handles, etc.). The stitch frequency depends on the materials used. The color of the threads is matched to the color of the top material. Finishing stitches are performed with silk or other threads. The stitching of the thread seam should be smooth, tight, without missing stitches, looping or thread breaks. The beginning and end of the stitch must be secured.
Adhesives in the bag industry are most widely used for pre-attaching parts, as well as for attaching rigid pads to parts. Synthetic adhesives based on latexes, synthetic rubbers and aqueous dispersions are mainly used.
Adhesives based on animal raw materials (bone and flesh) are used as additives in the preparation of synthetic adhesives