Photos are small arms of the baby's legs. Draw with palms and hands
Good afternoon, today I am unloading the full a selection article with ideas for hand drawings. Hand painting can be a fun way to create images quickly and easily. Children really like this technique, because it does not require serious artistic skills from them. We will draw in non-traditional technique- using the print of children's hands on paper. Ordinary gouache paints and the palms of your kids will help create paintings depicting a variety of characters. Even the smallest children will be able to draw a fish, a bunny, a chicken with their palms. These ideas are suitable for choosing crafts for a lesson in kindergarten - for drawing or appliqué.
Pictures-drawings with palms
For the little ones.
Birds and birds.
A package of hand drawings with birds will begin our article, with a variety of drawings, from chickens to peacocks with chic tails. A beautiful unconventional print technique can turn a child's hand into any bird. This idea is suitable for an abstract with a lesson on non-traditional drawing techniques
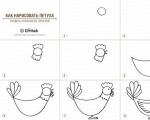
To make a chicken out of the palm, you need to draw a comb, a beard and a beak along the edge of the thumb print. Add the outlines of the wing - and the picture from the palm is ready.

And for the rooster, with gouache and a brush (or colored markers), we will draw multi-colored feather arcs, we get a bright rooster tail. Drawing a tail is a fun activity that can be done with your fingers (children draw with their hands for fun).

And you can pre-paint the palm in one neutral color, and each finger in a new bright gouache color. And then it turns out that the arched multi-colored fingers are the tail of the rooster in the figure.
Hand painting - gives a lot of creative options for children's drawings. You just need to look at the print and understand what your bright palms look like.
In the same way, you can draw a duck. Here you need to close your fingers together with palm prints, because duck tails are neat, gathered in a pile. And at the end of the thumb draw an oval shape, this will be the head. We finish drawing the eye, duck beak and paws.

In the same way, a drawing of a peacock bird can be made from a palm print. Each finger needs to be supplemented with elements already completed on the dried paint. The outlines of the feather hairs and the peacock eye at the end of the finger (as done in the figure below). A black marker or felt-tip pen draws perfectly on dried paint.

You can paint your hand in different colors - the body of the bird is green, the first phalanx of the finger is covered with blue, and the second phalanx is blue, the third is purple. And we immediately get a colorful beautiful bird using the “drawing with palms” technique.

You can apply your palm several times to a sheet of paper and get a drawing with a magnificent peacock tail. With your fingers, you can add bright yellow spots to the peacock feathers. Next, when the paint dries, cut out the silhouette of the body of the bird, and glue it to the center of our handprint. We will complete the craft-drawing by gluing the eyes, beak and paws.


An adult palm with closed fingers can be the source for the peacock craft drawing below. The base of the palm continues with the outlines of the breast and neck of the bird. Around the fingerprint add swirls of feathers and a pattern of "peacock eye".

Drawing with DOVE paints can also be created using the handprint technique. Here you need to spread your fingers to the sides as much as possible and smear the paint thicker. The center of the palm has a recess that will not be printed on paper - we simply paint over this unpainted place on the print with a brush. To the thumb we add a beak, an eye and a green branch of the world. A simple topic for an abstract of an open lesson on the topic CHILD AND SOCIETY.

And here's another great idea - in drawing with palms combine together PRINTS OF HANDS AND FOOT. As we see in the photo below, this drawing involves a footprint (the body of a cockatoo) and handprints (the bright plumage of a Brazilian bird). The curved beak can be drawn on or cut out of colored paper.

A bright red handprint can be easily drawn into a flamingo with a long, curving neck. The bend of the neck can be drawn with fingers, since we do not use a brush.

Red bullfinch birds are also a great craft for children. On winter branches, red winter birds look like a DIY New Year's card. We tint the background of the paper in advance in blue (using a thick blush brush and water painted over with gouache).

Bullfinches are obtained if the palm (with closed fingers) is placed horizontally on a branch. And if the handprint is made vertically - across the branch, then we will get the outlines of an owl. We are waiting for the paint to dry, then we glue two round pieces of paper eyes. We finish the green leaves on the branch with our fingers, on the bud there is a yellow beak and paws. We get an excellent drawing with palms in the form of an OWL.

Drawing with two hands
Bird with spread wings.
If you print two palms at once (left and right), then you can make more interesting drawings. For example, such a swallow can decorate a spring craft. The palm drawing needs to be supplemented only with a circle-head and three strokes of the tail. The idea is suitable for the summary of the drawing class for SPRING.

An eagle bird is also obtained if the hands are printed in turn (right, then left) - placing them opposite each other (stroking the base of the palm on each other). We draw the white neck of the eagle with our fingers, dipping them in white gouache.

As you can see, palm painting can display absolutely any bird. Try to make yourself a STORK, a HERON (the frogs will be lower), a TITMOUSE with a yellow breast, a flock of cheerful SPARROWS.
Hand drawing.
For application in kindergarten.
Also, a handprint can be prepared and dried in advance to participate inside the craft-applique. In kindergarten classes, you can prepare the handprints of children in advance (by signing the name on the back so as not to confuse). In preparation for the application, we cut out the outlines of the palm, prepare other details of the future craft, and the task of the children is simply to collect all the elements of the picture together. Make a ROOK bird or chickens with a wing-palm. This hand-drawing craft is suitable for the younger group of kindergarten. Do not forget to make dots of snowfall with blue or white paint, and dots of grains in the feeder with yellow paint - for this you do not need a brush, you have FINGERS.

And here is a cute chicken with a wing-palm. Such an application in kindergarten is suitable for children of the younger group.

Two prints of black palms - and we have the wings of a crow. Now we need 2 circles of black paper (smaller - head, larger - body), beak and legs of red paper. A great fun craft for children in the middle group of kindergarten.

And here is a craft for the smallest children. Glue the body of an owl onto a sheet of paper, then two eyes and a beak. And it remains to add wings to her - typos of palms with bright gouache. Great idea for kids.

The same can be done with a chicken craft made from yellow palms. Drawing after the completed application. First we work with glue, then we paint our hands with gouache, print them and wash them under a tap with soap. In kindergarten, this work on the craft can be divided into 2 parts - in the first half of the day we do the application itself, and after sleeping, individually, in turn, the children approach the teacher, who applies paint to the palm of his hand and helps the child to print correctly. After applying, the teacher wipes off the main layer of paint with a cloth and sends the child to wash his hands with soap ... and calls the next child for the same procedure.

Hand drawing
Crafts for girls.
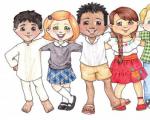
Separately, I want to lay out the topics of hand drawings - topics that GIRLS will like ... and then those that will interest BOYS.
A good theme for girls is drawing a bunny. Delicate white craft on a black cardboard background.
IMPORTANT NOTE!!! .If you plan to leave an ink print on glossy cardboard, you will not succeed. The gouache will curl into droplets without sticking to smooth, slippery cardboard. TO AVOID THIS, you can use one trick - add a little liquid soap to gouache - and then the print will calmly fall on glossy cardboard.

Drawing with palms can be decorated and decorated with a variety of materials - feathers, colored paper appliqué, beads, rhinestones.
You can draw a delicate pink flamingo. Paint the palm in a bright pink color, make a juicy palm print on a piece of paper. And immediately, until the paint has dried, sprinkle the wet surface with sparkles. The craft is perfect for kids.

Girls will also enjoy the hand painting of the MAGIC UNICORN PONY. A beautiful delicate unicorn craft can be decorated with sparkles and rhinestones. To fix the sparkles, use PVA glue - draw the elements of the mane and tail with glue and immediately, until the glue has dried, sprinkle everything with sparkles. We wait a minute and shake off the extra glitter on the newspaper.

Here is such an interesting frog-girlfriend if you cover your palm with thick green paint. We are waiting for everything to dry, add the outlines of the legs with a black marker. We finish the fly. Even before the imprint on a paper blue background, you need to stick a green oval of a water lily sheet - and then make an imprint over this sheet. Frog is a theme that everyone likes.

Girls will also like drawings of flowers from the palms. If a bright palm is supplemented with a long green stalk and a leaf, we will get a flower that has blossomed petals. It remains to place the sun, butterflies and bees nearby. Bees are fingerprints.

But drawing with the palms of a flowering cactus in a pot. An excellent idea for drawing in kindergarten is the middle and older group. A simple child-friendly theme for non-traditional drawing.

And here is an idea for a butterfly craft. It can be a simple print directly onto paper. Or you can separately prepare handprints, dry them and cut them out as in the master class below. The craft is also suitable for kids.


And girls like angels. Craft an angel for Christmas can please a grandmother or mother. Beautiful angels in the technique of drawing with palms.


Hand drawings.
Crafts for girls.
And now let's see what handicrafts the boys in kindergarten and at school can do with their hands.
Here is an idea for a fire breathing dragon. Here we paint over the gaps between the fingers with yellow paint. Add a long tail and neck of the dragon.

For younger children, crafts for kids are suitable - in the form of a large dinosaur. Here, an adult makes a silhouette application in advance, and the child only leaves a few handprints on the back of the beast. Easy to understand theme for kids.

Older children can paint the body and tail of the dragon themselves.

Pirates and their ships will also please the boys. Offer such an interesting weekend craft to your home robber - he will be delighted.

Try to come up with imprints of those characters whose adventures you read before bed. These can be good kings, wild Indians, ninja turtles, alien robots, etc.

The boys like to draw scary spiders - two palms will make an excellent spider. Glue the eyes on white paper.

Hand drawing
Cats and dogs.
Cute cats can also be depicted with the palm of your hand. We finish the tail and head with ears. It will look great if the head is cut out of a piece of fur or velvet paper - you get a great craft for the older group of kindergarten. And for kids, it will be pleasant - stroking the kitten's delicate fur coat is a great pleasure for small children.

And here is a beautiful spotted dog. We make a white hand drawing and add the outlines of the head and then with our fingers we make dots from black gouache.

For a child of 3-4 years old, such a craft in the form of a dog is suitable. We make a palm print with white gouache on black paper. Cut out. Add an oval white head, black ears, nose and eyes. A good topic for a summary of the drawing class in the Pets themed week

And if you make a dog print with a protruding little finger and thumb, you get such a cute portrait of a dog. Dogs are a popular children's theme.

Drawing with palms and paints.
Cheerful zoo.
And here is an interesting way to create drawings of animals using the hand painting technique for children. If the palm is placed on paper SIDELY - spread fingers to the left or right - then we get a blank for an animal that clings to a tree trunk or creepers in the jungle. And of course these animals will be MONKEY or BEAR KOALA.


And if the slightly spread fingers of the palm are lowered down, then we will get four legs for animals with four paws or hooves. In this technique, crafts-drawings BEAR, GIRAFFE are made. We make the spots of the giraffe with our fingers. These animals are often used in kindergarten as non-traditional drawing.

But beautiful crafts with the addition of colored paper - BULL and RACCOON. Simple palm drawing for the older group of kindergarten, for children 5 - 7 years old.

From two palms MOTHER'S and CHILDREN'S you can make beautiful pictures in the form of animals and their cubs. Horse with foal. Elephant with baby elephant. Beautiful family crafts with their own hands from the palms.


For the smallest, the Hedgehog craft is suitable, where you just need to print your palms in a chaotic manner. It will turn out well if each finger is smeared with a DIFFERENT shade of brown - so we get not a common porridge-mass, but needle-shaped outlines of different colors. An excellent craft for classes in kindergarten - here you can give the children the outlines of a hedgehog, paints, a brush and let them get their hands dirty themselves - put them with their fingers up on the hedgehog, get dirty again and apply again. Delight and pant for an hour at least.

Hand drawing
Unconventional technique
WITH A SEA THEME.
The inhabitants of the seas (crabs, fish, turtles and other aquatic animals) are also excellent when drawing with their palms. We take a sheet of blue paper - we paste a strip of yellow paper on it (this is sand), a piece of cotton wool (this is a cloud). And it remains only to make two handprints with red paint and we get a drawing of a CRAB. A simple craft for an unconventional drawing lesson in kindergarten.

The marine theme can continue in any characters, whales, sharks, crayfish, snails, turtles. Let's see…
A blue handprint can be turned into a wonderful Yudo fish KIT.


AND HERE IS A SIMPLE CRAFTS for non-traditional drawing FOR KIDS IN KINDERGARTEN. Suitable for a nursery group, the teacher distributes paper aquariums to children and it remains to add a palm print to it - it will be a fish. Glue eyes, draw a mouth. We glue bubbles, algae from colored paper, sprinkle sand (sifted from the sandbox) on the bottom on a puddle of PVA glue.

If the palm is painted with stripes, then we will get such a picture of a STRIPED fish from a cartoon. An affordable craft for beginners in an art circle.

In the same way, you can get TURTLE drawings - here you need to add strokes to outline the lower edge of the shell, a round head and expressive eyes.

Black marker, dots along the marker prints and we have an adorable OCTOPUS. Remember that the marker writes only on dry paint.

You can take a large sheet of paper and place on it a whole composition of different characters drawn using the hand drawing technique for children in kindergarten.

And also the collective work of the entire kindergarten group looks great - AQUARIUM in the form of a large panel on the wall. For group activities during the summer season.

Drawing with PALM
For NEW YEAR.
And of course, the New Year holiday also boasts ideas for handicrafts using the palm painting technique. Here we can make Santa Claus with a white beard from the palm of his hand. Or bright candles on a Christmas wreath of spruce paws. Choose your themes and decide how they can be displayed in the technique of hand drawings.


These are such bright and beautiful ideas for a kindergarten for drawing with palms on animations.
Now you can make crafts with your own hands using children's handprints.
Good luck with your creativity. Let everything work out.
Olga Klishevskaya, specially for the site
There are many ways to capture memorable moments of your child's childhood: photographs, first drawings, growth chart, joint crafts, etc. One of the most popular ways to keep warm memories in memory is to make casts of the baby's arms and legs. And the basis for them can be made by hand.
Believe me, your child will be pleased to look at his hands and feet in the future. Yes, and you will experience warm feelings, looking at this beauty. Many now make prints to order and keep them for years. But if you make the material for the impressions yourself, the result will not change at all.
And making stuff is easy. Roughly speaking, we need a cool salty dough.

What will we need?
- flour (1 cup)
- salt (1 cup)
- warm water (1/2 cup)
- paints
- coating varnish
How to make casts of children's hands and feet?
Mix flour and salt and carefully add water. The dough should not stick to your hands. If it still sticks, add a little more flour.

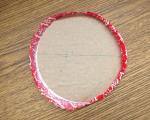
We roll out the base and give it the desired shape (circle, square, star, etc.). If you have something to cut out, you can make the base of an unusual shape.

Now we leave an imprint of a hand or foot in the center. With a toothpick, you can write the name and year.

We send the product to the oven, heated to 100 degrees, and leave to bake for 3 hours. If the layer is very thin, you can lower the temperature to 80 degrees. When the time is up, we take out the craft and leave it to “rest” for the night.
The next day we paint the cast with any paints. When the paints dry, we fix them with varnish (preferably in 2-3 layers) so that the product will never deteriorate.

A template for furniture handles is a piece needed when assembling furniture. Despite the fact that it would seem that the matter is not difficult, a lot of time is spent on installation. By making a template for marking holes for furniture handles once, you will save a lot of time. It remains only to hit the punch a few times and drill.
The first time when I decided to install handles not on chipboard, but on an MDF facade in a film, I was surprised that the marking took more than the actual installation. A light wave of the sleeve and everything that was noted was erased. Perhaps if I worked in a workshop on a machine or if I had more experience, everything turned out to be done much faster.
If you make furniture like me, not all the time, but from time to time, I advise you to make a furniture template for marking. Doing it yourself will save you money. The template can also be purchased, there are now many variations of these handle installation assistants. Actually the situation is the same as with .
Types of furniture handles and markings for installation
There are many types of furniture handles. We make a template for pens with a bracket or fungus. For their fastening, it is necessary to drill the facade for one or two holes. There are options for handles for mounting which require milling, or handles in the form of a profile, but now it’s not about them.
If everything is more or less clear with the handle with a fungus, we retreat from the edges of the facade the required distance and drill a hole. Then when installing the handle with a bracket, you must clearly observe the distance between the filler holes. Installation distances are standard - 96,128,160, 192 mm. A self-made template will help us to make these distances evenly and without error without spoiling the facade.
DIY furniture handle template

The template has a centimeter overhang in order to make a right angle to the facade. The template can be made from cardboard or paper, suitable for one-time use. Cut out the middle part to make the markup. We look at the installation distance of the handles we have chosen. We mark the level along the edge of the facade where the handle should be, apply the template and mark the holes for the pricks with an awl or center punch. Next, we drill and install the handle.
Something like this. I hope I was able to help you with the installation.
updated: February 4, 2018 by: admin
Julia Osadchaya
For young children drawing with fingers and palms is the most accessible. After all, it is still quite difficult for them to cope with a brush, pencil or felt-tip pen. And here - a slap - and the print is ready! And then parents or a teacher will help turn a simple print into a hedgehog, tree, flower, elephant, fish, bird. Children are very fond of observing or doing their best to participate in such transformations of prints into familiar objects.
In addition to pleasure in hand drawing and with fingers there is also a developmental benefit. This is both an enrichment of tactile experience and an acquaintance with colors and the properties of paints.
Undoubtedly, the transformations of prints also influence the development of fantasy and imagination in children.
Now in sale There are special colors for finger painting. For our inquisitive parents, we found with the help of Internet resources and homemade color recipe hand and finger painting :
0.5 kg flour
5 st. spoons of salt
2 tbsp. tablespoons of vegetable oil
water - to the consistency of thick sour cream. We mix all this with a mixer, then pour the resulting mass into separate jars, add food coloring (beetroot or carrot juice, as an option - Easter sets, mix until smooth.
With the children of our group (1 junior group) We painted in joint activities. In the hall of the kindergarten, an exhibition of works by our pupils "Multi-colored palms".
Here's what we got:


Parents of newborns are delighted with the tiny hands and heels of their baby. Of course, I want to capture this touching cuteness. Some moms take hundreds of photos of tiny heels emerging from under the covers. Others make hand and foot casts in plaster or salt dough. We have found a very elegant way to decorate the prints of children's feet and hands in an unusual way.
Look at these panels. In fact, the elements of these paintings are tiny prints of children's hands and feet. True, they fit very well into the overall picture?

Such pictures can be done independently, on thick paper. And you can separately make prints, and make a collage in Photoshop.


This method of making prints of children's feet and hands has a definite plus: the panels look stylish and will be able to decorate the child's room, even when he grows up and starts a rebellion against everything "malyshovsky".

Drawings with handprints can be done by children themselves. Offer them a plot, and let them dream up in what way footprints or handprints can appear here.

And such pictures can be made as a gift to grandparents. Collect the handprints of all family members in the drawing, choose a beautiful font and sign the names and the date when the collage was made.