Making bouquets of sweets with your own hands. DIY paper flowers with sweets - there is nothing easier! Master class on making bouquets of flowers and sweets (photo)
Sweets and flowers are a nice gift, which, however, can cost a lot of money.
If you want to surprise a loved one and save the budget, you can make beautiful flowers with sweets with your own hands.
Before starting work, you need to decide on the type of bouquet, the choice of flowers, materials and treats.
Raffaello - a simple and sophisticated do-it-yourself paper bouquet with sweets for beginner "florists"
To make such a bouquet, you must have with you:
1. packaging of Raffaello sweets;
2. corrugated paper;
4. scissors;
6. Styrofoam (or other similar material for the frame of the bouquet);
7. thick paper / cardboard;
9. transparent film;
10. satin ribbon;
To begin with, we create a frame - the basis of our bouquet. We cut out a dome-shaped figure from foam plastic - our delicious flowers will be attached to it.


We attach the frame to the handle of the bouquet. You can do two options:
Straight handle (as pictured). To do this, we make a tube out of cardboard, decorate it with ribbons, corrugated paper, rhinestones - to your taste;
Triangular handle - in this case, we fold the "bag" out of cardboard and attach it to the base of the bouquet.
The next step is to make a ring out of cardboard - cut a circle with a hole in the middle. We decorate with improvised materials - corrugated paper (or wrapping paper), satin ribbons, rhinestones and beads look the most spectacular. An unusual option is to make the base in the shape of a heart.

We put the resulting material on top of the frame, fasten it with adhesive tape / glue.
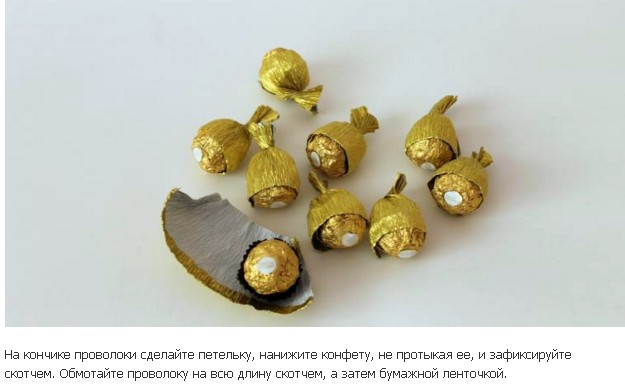
We pack each candy (in addition to the factory wrapper) separately in a transparent film, tie it with a satin ribbon, and decorate (to taste). Next, we “plant” on a toothpick or pike.
If you have the desire and time, you can make a corrugated paper base and attach it to the base of the flower.
We attach the resulting "sweets" to the frame, decorate, correct the shortcomings (if any). An exquisite and delicious handmade gift is ready!


Pineapple - an unusual version of "delicious" paper flowers with do-it-yourself sweets
Another original way to present a handmade gift is to make a paper flower bouquet with pineapple-shaped candies!
The principle of its manufacture resembles the previous version, the main difference is only in the shape of the frame.
Materials for work:
1. 1-2 packages of sweets (for example, "Raffaello");
2. corrugated or wrapping paper;
3. double-sided tape;
4. scissors;
6. foam;
7. drawing paper / cardboard;
8. toothpicks (or "spike" for canapes);
9. transparent film;
10. satin ribbon;
The basis for the frame will be an egg-shaped figure cut out of foam.


Want to make a "surprise within a surprise"? Instead of a base, use not foam, but a small vase of a similar shape, which can also be filled with sweets inside. The gift will be much more significant, more interesting and tastier!
The second most popular way of presenting this bouquet is based on a bottle of champagne (or wine). An important condition in the manufacture of such a gift is the curved ("pot-bellied") shape of the vessel.
After you have finished with the frame, you need to attach sweets to it. We use double sided tape for this. We stick several sweets on one row, given that they should be located along - glue them along the "red line". We wrap our base with the resulting “tape”.
It remains only to decorate (optionally) the resulting “fruit” and give a loved one a great mood!


Sweet roses - a bouquet of the most noble color with sweets with your own hands
For those who already have experience in making handmade bouquets of flowers and sweets, the option with roses will seem the most interesting.
In order to make such a gift, you must use the following materials:
1. round candies;
2. corrugated paper in green and pink (or another, of your choice) colors;
3. double-sided tape;
4. scissors;
6. toothpicks (or “spike” for canapés);
7. satin ribbon;
8. small basket;
We cut out the base for the rosebud from corrugated paper - two rectangles measuring 8 x 7 cm. We round off one end to get the shape of a “marigold”. Using your thumbs, stretch it from the center to the bases to give a natural look.


We turn to the manufacture of rose petals. Depending on your preferences, you can make the flower lush or slightly ajar. When creating a classic rose, you need to prepare 8 pieces of corrugated paper for the petals. Their dimensions should be 1.5-2 cm smaller than that of the bud.
We wrap each petal with a toothpick from one edge, stretch it in the center to shape it and, using glue, attach it to the base of the bud. To make the rose look neat, we apply glues in a thin layer on the unrounded edges of the petals. They should be attached to the bud in two rows. The first row - 3 pieces, the second - 5 pieces.
The result should be such a pretty rose.


The next step is the manufacture of leaves on roses. To make it as natural as possible, we recommend using green corrugated paper. We cut out small rectangles from paper - 2-2.5 cm, make veins to make it look like a “crown” or “fence”. We attach the resulting figures to the base of the roses with the help of threads. Do not use tape at this stage - it will be visible to the naked eye and will greatly increase the base of the flower.
It remains only to beautifully put the resulting roses in a basket, decorating it with decor. You can lay corrugated paper in the base of the basket, leaving the edges free.
The bouquet is waiting for its lucky owner!
Bouquets of sweets are today a fashionable trend in the technique of sweet design. Today it is difficult to surprise anyone with a box of chocolates. Now it is possible to create an unfading delicious bouquet from improvised materials, sweets and corrugated paper that will delight both an adult and a child.
For beginners, this article is a must-see and read. The following articles will be easier to complete (after studying this article) - then you will learn the beauty of creating different bouquets of sweets with your own hands:
Necessary materials for creating a bouquet of sweets with your own hands

Candies
The main material used to make bouquets is candy. Only candies in individual packaging are suitable for creativity. Assorted candies are not suitable, but if only they are wrapped in foil or paper wrapper, then they are suitable.

In the process of work, the integrity of the wrapper is not allowed to be violated, except for those cases when it is necessary to cut off the tail.
Advice: Before starting work, sweets, even with a solid filling, are recommended to be kept in the refrigerator.
Confectionery with fondant or liqueur filling is easily deformed, so it is easier to work with sweets with praline or raglage filling.
Advice: When buying sweets in a store, do not forget to be interested in the date of manufacture and expiration date. After all, your gift for some time will become an interior decoration and a reminder of the event for which it was made.
Corrugated paper (crepe paper)
Bouquets of sweets is a work in the technique of sweet design. Corrugated paper "Cartotecnica Rossi" of Italian production is most suitable for work. It is thick and holds its shape well. It practically does not tear and at the same time stretches well.
Crepe paper made in China or Germany is cheaper, but much inferior in quality.

Bouquets for sweets cannot be made from corrugated paper for children's creativity. It is thin, soft and quickly loses its shape in finished products.
You can buy high-quality corrugated paper in stores selling art supplies or packaging materials.
Tip: Please note that the sheets of corrugated paper are divided by longitudinal lines into strips 5 cm wide. These lines help to make even cuts and avoid unnecessary measurements.
Tape tape
Tape is a waxed paper tape that has a light adhesive effect when pulled lightly. It can be replaced with a narrow (1 cm) strip of corrugated paper cut along the side edge of the roll.
Tape tape is necessary for decorating (taping) wire or barbecue sticks when depicting flower stems, twigs, as well as when making other details and elements.

This is done as follows: fasten a ribbon to the end of the wire or stick, grab this with your left hand and begin to rotate the base in a convenient direction, wrapping it in a spiral. Help the process with your right hand. In this case, you need to ensure that the tape is located at an angle of 45 degrees to the base.
Wire
First of all, you will need gerbera floral wire with a diameter of 0.7 to 1.2 mm, which can be found on sale in packages by weight and by the piece.
Also, decorative aluminum wire of different colors with a diameter of 1.5 - 2 mm is used for work, sold in coils or on coils.

For fastening sweets and other manipulations, in some cases, a thin wire (bouillon) with a diameter of 0.3 mm or strong threads is required.
You can buy all these types of wire in stores selling goods for creativity or floristry.
bamboo sticks
Bamboo barbecue sticks can be used to make flower stems. They are cheap compared to wire, but are not suitable for the image of ampelous (hanging) compositions.

In some cases (for example, when the flower needs to be fixed close to the base), barbecue sticks can be replaced with toothpicks.
Foundation materials
Styrofoam, styrofoam, floral foam for dried flowers, or even old newspapers can be used for these purposes. The advantage of foam plastic over foam plastic is that it does not crumble when cutting, has a denser structure and is easier to give the necessary shape.

Floristic foam "Oasis" for dried flowers is also well cut with a knife and is convenient for filling baskets, vases and pots, but is relatively expensive, therefore it is used less frequently.
Adhesive tapes
Candy bouquets just need duct tape. You will need: double-sided floral tape, stationery transparent tape, masking tape, insulating and other types of adhesive tape.

Make your choice based on your goal.
Decorative canvases
Floral organza, mesh, felt, sisal and jute fabric are used to finish the work.

These materials can be purchased by the meter or in rolls from stores that sell packaging materials or flowers.
Polysilk
Polysilk is a thin but strong packaging film made from polyethylene. During the production process, the film is metallized and dyed in various colors.

Thanks to this, the polysilk looks festive and is perfect for this type of creativity, where it is used to decorate the base or additional wrapping of sweets to cover the colorful colors of the candy wrapper.
Paper filler, sisal fiber or packaging shavings
Some bouquets of flowers are made using baskets, pots and vases. And to cover the base they need: paper filler, sisal fiber and packing shavings.

You can buy them in the same place as decorative canvases.
Advice: Wood shavings are used to package glass, ceramics and porcelain. You can negotiate with an employee of a store that sells such goods and get it for free.
Cardboard
Sometimes flower bouquets are made using corrugated cardboard packaging. Postal boxes are made of such cardboard. You can also use cardboard from sets for children's creativity.

You will also need laminated cardboard substrates for cakes or cuts - this is a durable and aesthetic material. Round shapes will go for a stand when packing ready-made bouquets.
Often the question of how to please a loved one is very acute, so interesting and original handmade gifts have recently become very popular. The recipient of the gift will certainly be delighted with a bouquet of sweets, complemented by various details and elements.
Unlike flowers that can stand in a vase for a week, such a bouquet can please for a very long time, and evoke pleasant memories of a memorable day.

A bouquet of sweets with your own hands will help you surprise the recipient of the gift, touch him, cause sincere tenderness. With all this, the preparation of such a surprise will not require large material costs from you, and in just a few evenings, by investing a minimum of money and a maximum of warmth, you can create an exclusive gift for a person close to you.

What materials are needed
If you decide to make a bouquet for the first time, but in the end you expect to get a real masterpiece, resembling the product of experienced craftsmen in appearance, carefully study the step-by-step guide that we will give in this article.


It will not be superfluous to watch master classes on how to make a bouquet of sweets. Video tutorials will allow you to more fully immerse yourself in this process, understand the basic tricks, peep the creation technique, look at successful ways to complement compositions, types of flower arrangements, successful combinations of shades, etc.

The first item in the instructions for beginners will be the selection of the tools and materials necessary for the creative process. Of course, sweets will become the most important elements of the composition. To create a chic bouquet, you need to pick up sweets that are not only very tasty, but also brightly and beautifully packaged.


It is also necessary to prepare corrugated or colored paper, lace, foil, satin ribbon, beads, beautiful laces, ready-made figures and similar materials that will serve for an interesting design of the “flower” itself, or rather its petals and composition as a whole.

You can not do without the material that will be used to create the packaging of the bouquet. For this, a special mesh, suitable fabric or flower packaging sold in stores is suitable.

In the case when the flowers are planned to be made on long stems, stock up on thin sticks, toothpicks, wire, etc.

Foam rubber, polystyrene foam are used to fasten the "inflorescences", it is possible to use a hardened polyurethane foam. To facilitate the work, you will need a glue gun.

An adhesive tape is required to fix the composite elements. It is advisable to purchase several of its varieties: transparent, colored and paper.

If you plan to make a bouquet of paper and sweets in a vase, wicker basket, flower pot, then be sure to prepare the desired container.


The list of the above materials is approximate, at your own discretion, having studied a variety of photos of candy bouquets, you can select the desired design elements for yourself and use them to build an exclusive composition. Bows, butterflies, birds, berries, fruits, etc. can be used for decoration.

The main tool that you will need when creating a bouquet: regular scissors, paper glue, and pliers if you plan to use wire.


creative process
Having prepared all the necessary materials and tools, you can begin to be creative. To begin with, we advise you to experiment: practice creating simple elements, individual inflorescences.

So, at the first stage, the candy is attached to the “stalk”. After that, it is necessary to prepare and cut out the petals of the required quantity and the required shape from paper or fabric.

The method of attaching the petals and the design of the “flowers” themselves depends on your desires and preferences: let your imagination fly or peep good ideas in numerous photographs of candy bouquets.

After the sweet flowers are made, proceed to form the basis of the composition - arrange the flowers in a vase, basket, pot or wrapping paper using the material chosen for fastening (foam rubber, foam, polystyrene).

To make the bouquet truly original and chic, decorate it additionally by decorating the finished composition with interesting elements: beads, ribbons, butterflies, tulle, figurines of berries and animals, perhaps even small soft toys.


A bouquet of sweets will be a great gift for any occasion. Having decided to make a composition with your own hands, choose the design you like as a sample, prepare all the necessary materials, be patient, put your soul into the creation process and you will definitely succeed!


Photo of candy bouquets


The female half of humanity, young and old, loves flowers and sweets. When going on a holiday for the birthday girl, a tasty or fragrant gift is being prepared.
Why not double the joy of a surprise and present flowers and sweets at the same time in one bouquet.
This is a great idea!
Such an original gift is easy to make with your own hands.
It turns out saving money and time looking for a gift.

Working out the idea of a bouquet of sweets
Firstly, you need to decide on the type of flowers in the bouquet. What does the birthday girl prefer? Is she allergic to roses, tulips, crocuses, snowdrops? What age is she?
Secondly, the issue of the design of the bouquet is being resolved. Will it be a standard bouquet? Or flowers in a box, on a stand, in a basket?
Thirdly, bought in a candy store. Each type of flower has its own candies, based on the shape of the candy and its wrapper;
Fourth, a selection of decorative ornaments for a bouquet of sweets with their own hands. It can be butterflies, thin satin ribbons, artificial or fresh flowers. Of course, these decorations are easy to purchase at a sewing accessories store, but making them yourself is a simple and enjoyable experience;
Fifth, preparation of tools and materials for the creative process: corrugated paper, scissors, glue, basket or box.
With this approach, success is guaranteed!

Do-it-yourself bouquet of sweets No. 1 (step by step) for beginners
The gift consists of chocolates of the famous Raffaello brand. In addition, you will need: skewers, toothpicks, cardboard, foam plastic, paper (corrugated white), silicone gun, adhesive tape, decorative ornaments in the form of beads, ribbons, mesh, organza to match.

Do-it-yourself frame for a bouquet of sweets is made. Cardboard is taken and glued into a tube. Styrofoam is put on it and cut off in the shape indicated in the figure. Styrofoam is pasted over with corrugated paper. Then skewers, pre-lubricated with glue, are stuck from it. However, they can be inserted later, when the buds are strung on them.

A circle with a diameter of 25-30 cm is cut out of cardboard, and a hole is made in it. The resulting part is wrapped with decorative tape. The cardboard tube-holder is wrapped with corrugated paper. After that, you can glue the circle with the hole to the plastic. It is recommended to fasten it as strongly as possible, since it is this part of the structure that will hold the bouquet of sweets with your own hands.
Fastening "sweet flowers". Raffaello brand candies are put on transparent small bags. They can be crafted from a transparent flower wrapper from a flower shop. Squares are cut out of it. A toothpick is inserted into the Raffaello candy. Now the cut out squares wrap each candy, which at the base, at the location of the toothpick, is tied to a satin bow.

Collecting flower design. All sweets are stuck in foam. It is recommended to start assembly from the edge to the center. It is advisable to insert the first time in order to less deform such a fragile material.

A bouquet of sweets with their own hands is decorated with artificial flowers, beads and ribbons. The picture shows flowers cut out of satin ribbons in the form of circles. The edges of the fabric are processed on candle fire. An artificial pearl is sewn into the center.
The highlight of the bouquet will be a drop of the birthday girl's favorite aromatic oil.
Do-it-yourself bouquet of sweets No. 2 with tulips (step by step)
It doesn't take much to make such a wonderful bouquet. All you need is chintz fabric of different colors, dark green felt, wire with a cross section of 1-2 mm, pyramid-shaped or rectangular sweets (not square at the base), skewers, teip tape (decorative adhesive-based paper tape).

The chintz is cut into pieces of square fabric measuring 10/10 cm. It is recommended to do this along the direction of the threads, not diagonally. Such actions will help to avoid unnecessary processing of the fabric along the edges, since with a diagonal cut the textile base will crumble.
Wrapped sweets are wrapped in fabric squares, as shown in the picture.

A skewer is inserted under the candy, but it does not pierce the sweetness. The skewer is wrapped in the corners of a square fabric and wrapped very tightly with teip tape.

At the base, a wire is inserted into the resulting flower, which is also wrapped in teip tape.
Shapes resembling tulip leaves are cut out of felt. It is attached to the already known tape to the base of the flower.

All "sweet flowers" are collected in a bouquet, which is tied with a satin ribbon. Everything, a delicate spring bouquet of sweets with your own hands is ready! It is appropriate to present such a gift to both a little girl and a young lady.
Bouquet of sweets No. 3 - step by step (with roses): do it yourself
A bouquet of roses is a chic gift. Any female representative will appreciate it. Making flowers for a sweet bouquet is hard work, but not difficult. The assembly scheme is simple and clear.

Improvised material and tools: pyramid-shaped sweets, decorative basket, soft pink and green corrugated paper, artificial rose leaves, wire with a cross section of 2 mm, teip tape (adhesive-based decorative paper tape), glue gun, scissors, thin rubber bands for white money.
First, the first rose is made, as an example for all subsequent ones.
A rectangle is cut out of soft pink corrugated paper. It bends in half. One corner is slightly rounded.

Candy is inserted into the resulting form. It is recommended to stretch the paper in the center. This will ensure an even fit. The paper will not bulge.
One edge of the future flower (near the sharp base) is wrapped with an elastic band. Thus, the flat side of the candy became the top of the flower, where the side of the corrugated paper with the rounded corner should be.
A wire is inserted into the base of the flower. Its length depends on the size of the basket used and can be from 15 cm or more.
The base of the flower is tightly wrapped with teip tape.
Rose petals are being made. They are also cut out of corrugated paper. The desired shape is a rectangle with rounded corners on top. And then comes the time for magic: the center of the rectangle is stretched, the edges of the future petal are bent with a pen, pencils or toothpicks. The work is delicate and elegant.

The resulting petals are glued to the base of the "sweet flower".

Narrow leaves (sepals) are cut out of green corrugated paper for the base of the bud. They are glued to the designated place. The process ends with the creation of a receptacle at the flower. The bottom of the bud is wrapped with teip tape so that a cup is obtained, as in the picture. The teip tape does not break and continues to wind down the wire - the stem.
It turned out to be a beautiful rose. Now the leaves in the bud can be given a variety of shapes.

According to the described scheme, the rest of the "sweet roses" are made for a bouquet of sweets with their own hands. For a small basket, as in the picture, it is enough to collect 30-35 roses. All of them are of different shapes and ripening times: from unopened buds to those that have bloomed magnificently.
Do-it-yourself candy bouquet No. 4 for the bride from Raffaello and Ferrero Rocher
Bouquets of Raffaello and Ferrero Rocher sweets are extremely popular. On the one hand, these are the most delicious confectionery products. On the other hand, there is a beautiful package, ideal for a sweet bouquet. Weddings played in some style have come into fashion: retro, American-gangster, sweet-lowe, and so on. Brides love to stand out not only with the color of the dress, but also with unusual accessories. A bouquet of sweets can not only be given to the newlyweds, but also made a personal bouquet of the bride.

To create such a bouquet you need to work hard. But if you made the previous flowers from sweets with your own hands, then this one will definitely work too!
Materials at hand: Raffaello and Ferrero Rocher sweets, long skewers, 2 mm wire, corrugated paper or foil, gold-colored ribbons, organza, adhesive tape or teip tape (decorative adhesive-based paper tape), scissors.
Each Raffaello or Ferrero Rocher candy is wrapped in a layer of foil in such a way that a flower with a stem is obtained. You can use only Raffaello sweets, wrapping them in delicate pink organza, as in the picture above.

A skewer and wire are inserted into each resulting flower from below, which are tightly wrapped with another layer of foil.
If pink organza is used, then the receptacle (the base of the bud) is wrapped with a green teip tape.

Pieces of square-shaped fabric are cut out of organza. If you are afraid that the edges of the fabric will begin to crumble at the wrong time, which is unlikely, burn the edges by a candle fire.
These resulting square elements wrap each flower. They are fixed at the base of the bud on a thin ribbon.
All flowers are collected in a bouquet, in which the stems are wrapped with tape. If desired, you can tightly tie it with a ribbon, as described above in the master class for making a bouquet of sweets with tulips with your own hands.

A bouquet of sweets is decorated with corrugated paper. Its upper edge is bent with a pencil or manually. The thin folded edge stretches.
Flowers are tied with a ribbon on a knot with a bow.
In the event that you decorate a bouquet with organza, then the fabric is wrapped in a circle several times. The width of the fabric is equal to the height of the bouquet. The stems are tied with elegant satin ribbons of different colors. It is not recommended to use a stapler to give the top a bouquet of waviness. It will only look beautiful from a distance. In the case of portrait shooting, it will create unnecessary glare and reduce attractiveness. It is enough to bend the layers of organza outward in different places, lower them somewhere. To top it off, use a glue gun and half pearls to decorate the bouquet.
Friends, welcome!
Once again, today I sat and puzzled over what to give my beloved aunt for her birthday. And then I realized that more is needed. There are a lot of them in a year. Do you agree? This is March 8 and the New Year, anniversaries, oh, and weddings. Yes, it’s pointless to enumerate, you yourself know). Traditionally, everyone always buys flowers for any solemn event, plus some other present. I also wanted something unusual. So I decided to get involved in the creative process. In general, I wanted to make a bouquet of sweets.
I just didn't know how to approach him. I often met such cool souvenirs on the net, but I thought that it was not really difficult to make them on my own. There would be a desire, I thought, and began to hang out on the Internet on different sites. I found a bunch, oh, probably even a big bunch of everything, everything that I already gasped.
And then I put everything together, and today I publish to you with great pleasure all the materials I have collected. I think and hope that they will definitely come in handy in this life for you as well as for me).
If you are new to this business, like me, then all ideas will be shown with detailed instructions and, of course, with step-by-step recommendations. Well, to make it easier to master.
Wow, yes, such beauty in the end turns out, well, you can’t take your eyes off. Thanks to the person who invented such a cool thing. Well, these are just gorgeous, they are beautiful and also edible. And you can decorate them with soft toys, fruits or chocolates. And for children's holidays it is better to use lollipops or kinders.
Such a surprise will appeal to any person, especially girls or women. You can even just come to visit with such beauty. And the one to whom such a little thing was intended will only be happy. I propose at the very beginning to disassemble the craft in the form of a bouquet of flowers in its simplest execution.
As is probably traditional, most of us love to give roses, but I want to suggest that you first learn how to make snowdrops. They look very cute and gentle, and if suddenly you don’t know how to please your loved ones, then here’s an idea for you. It will fit perfectly if spring is in the yard and you really want warmth and the first flowers. And it will also be a nice gift for the day of the Teacher or Educator, as well as on September 1st.

Moreover, you can take absolutely any box of chocolates, or a bag of sweets, etc., and put your creation on top. In general, look below and you will understand everything.
We will need:
- chocolate sweets, preferably nuts (almonds or hazelnuts) in chocolate
- a box of any sweets, such as Raffaello or cookies
- floral crepe paper: green, light green and white
- green teip tape
- flexible wire
- threads
- scotch
- scissors
- yardstick
- hot glue gun

1. In order to build 5 flowers, you will need strips: from white crepe paper 5 strips, width - 2 cm, length - 50 cm, from light green - 5 rectangles 5cmx4cm, from green - 2 strips 50 cm long, and wide - 2 cm.

2. Now load the gun with the rod and wait until it is ready to go. Glue each candy, or rather the tip of the candy wrapper, onto the wire, as shown in the figure below.
Advice! If there is no glue gun, then you can stick the candy wrapper on double-sided tape, but do not touch the candy.

3. From the rectangles that you made in the amount of 5 pieces, carefully frame with your hands and make a wavy edge. Squeeze a little, as if making an accordion.

4. Now you need to deepen.

5. The leaves for the flowers will be white, so grab some white stripes and get going. Divide with a ruler into three segments, that is, through a distance of 16.5 cm. Cut. Now twist each strip obtained in this way, as shown in the photo, around its axis by 360 degrees.

6. After twisting, fold each blank in half to make a petal. Make a small indentation.

7. Thus, we have come to the final stage of work. Take the wire with the candy and hide it in light green crepe paper. To prevent the paper from sleeping, fix it with threads. Then apply white petals and also tie with a thread.

8. The result should be something like this. Everything worked out? You, well done! Move on.

9. And here is a top view, so that you can better understand what I'm talking about.

10. Carefully cut off all excess with scissors at 45 degrees.

11. Now we decorate the wire and add leaves. To do this, divide the green strips (you have two of them) into four pieces each. In the end, 8 blanks will come out. Trim each piece so that it reminds you of a leaf. Take a look below and see how to get the job done. After that, also bend the leaves a little, then you will see why.

12. Now, to hide all the threads and wire, wrap the sepals and stalk with sticky tape.

13. A little lower after the sepals, take a previously prepared green leaf and fix it. Just below is another one.

14. Well, here's what a delightful result you will expect at the exit. You can decorate with beads and tie a bow. Lay the bouquet on the box, dripping in one place with a glue gun so that the flowers do not fall and give to the one you love so much.

Or you can arrange it differently, add more toys and put such a miracle in a vase or basket.

If you are going on a romantic date or wedding. Then it will be possible to make a more expensive and rich bouquet.

We will need:
- candy Ferrero Rocher or other round shape
- mesh fabric or other light and airy fabric, such as organza
The entire manufacturing process is shown below in the pictures.
Stages:


Beautiful bouquet of sweets and corrugated paper in a basket
To make it more interesting, you can arrange the flowers in a basket and it will turn out to be a real composition, as in those florist shops. From such a gift, the birthday boy will be happy to the point of madness. I propose, in order not to repeat ourselves, to perform the following work in the form of a sunflower.
We will need:
- any sweets so that the wrappers are black or dark blue, so they will act as seeds
- double sided tape
- thermal gun
- scissors
- two-color corrugated paper
- styrofoam for base
- green mesh or organza
- toothpicks
Stages:
1. Prepare all the necessary materials for the upcoming work.

2. From orange-yellow paper, cut a strip 5 cm wide or a little more, depending on your idea and imagination. Decide on the length yourself, depending on what the base will be in diameter, but it should be enough for three turns around its axis.
The base should be round in shape, the height is also arbitrary, but not lower than 5 cm. Paste the top of the base with a glue gun with black or dark green paper.

3. Then wrap around the diameter with yellow corrugation. Also fix it on the glue from the gun.

4. After scissors, make cuts on yellow paper to make petals. And take another green ribbon and also make leaves on it, as shown below:

Glue the green corrugation to the workpiece. And with your fingers, slightly squeeze out a semi-circular shape, like a recess, so that the craft looks more voluminous.
5. Attach sweets to double-sided tape so that they can then be easily torn off and eaten.

6. Now, along the edge, make another frame in the form of green petals. To do this, glue shreds of green mesh material on a toothpick. They look like blanks like darts. Cut the organza into small squares and then fold each square in half and glue it to a stick.
On a note! Such amusing products are called funtikami.

7. So, insert the pounds along the edge of the work. They will embellish your sunflower. And also add a satin ribbon and add any decorations, rhinestones or puff pastry souvenirs in the form of a butterfly or ladybug at your discretion.

And here is another wonderful idea for you, though the author is well done, I really like it!

Master class of flowers from candies in a box
If you like everything unusual and attractive, then the next option will be just that. You can give such a souvenir to your mom. By the way, when Mother's Day, then such a masterpiece is simply necessary to express all your feelings and say how.

This is a fairly easy craft, even a child can handle it, so if you are just a beginner craftsman, take note and create. After all, such a candy box will surprise anyone and even you when you build it.
I think that you can give such a charm to a work colleague or surprise the team at work when you have a corporate party, for example, New Year's. Or maybe you're celebrating Christmas. In general, such a present would also be appropriate here. Moreover, sweets will alternate with lollipops. And most importantly, such a souvenir will not hit your budget.
We will need:
- any small box
- wrapping paper
- styrofoam or floral foam
- crepe paper in red, gold and silver colors
- red cellophane (ask at the florist's shop)
- decorative ribbon for a bow
- scotch
- Ferrero Rochers lollipops and round candies
Stages:
1. Take crepe paper of different colors and cut out 5 cm x 5 cm squares from it, you need as many of them as you have treats. Place blanks on each skewer, piercing them first with a needle or toothpick.
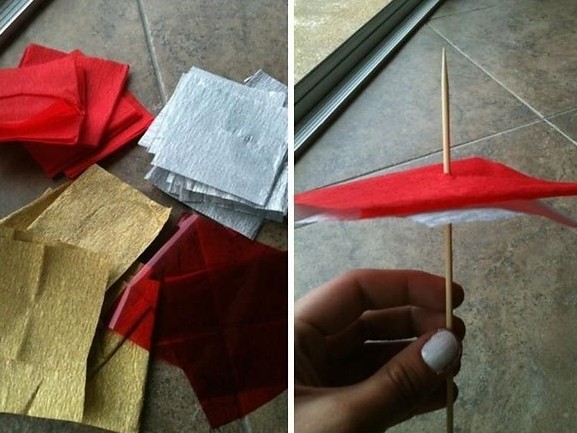
2. After that, put a lollipop stick on the tip of the toothpick, wrap it with tape. But wrap the sweets in red cellophane and attach it to a toothpick and secure with tape.

3. Decorate the box on the outside with wrapping paper. Stuff the inside with foam. Lay a sheet of crepe paper on it and start assembling. Carefully stick sticks with souvenirs in a chaotic manner.

4. Also glue a bow on the box to make the craft look even more spectacular.

Gift from Raffaello in the form of a bouquet
Probably the most common sweets are white sweets in coconut flakes. It is from them that the next composition will be. You can hide Raffaella flowers, or you can go the other way. Buy a box of such sweets and attach bright inflorescences of roses, etc. on top. Which way do you like best? Hope you make your choice soon.
We look at the first option, it will be tulips, you will see all the steps of work a little lower in this note, and I show the second super masterpiece right now in the form of opened roses.

We will need:
- box of Raffaello chocolates
- red satin ribbon
- glue gun
- scissors
- ruler
- decorative berries
- corrugated paper
- foil 17 cm x 13 cm
- artificial flowers
- artificial leaves
Stages:
1. Crumple the ball from the foil with your hands. From green corrugated paper, cut a strip 10.5 cm long and 3 cm wide. Then twist it in half.

2. And then fold and make a recess, as was done in the first master class with snowdrops. Put a ball in the petal.

3. Now give the shape of a bud, crumple. Glue the connection with a gun.

4. Round each blank and also make a recess with your fingers and stretch.

5. Glue the red petals to the green bud.

6. Now you need nine rectangular blanks 3 cm x 5 cm. Cut an oval from each rectangle. And then make these two cuts, as shown below. Deepen again.

7. And glue the cuts with overlap glue from the gun. You should get 9 beautiful petals.

8. Glue all 9 petals along the diameter of the bud, each petal should overlap the previous one by half. Cut off the excess green paper.
Now cut green rectangles 3 cm x 5 cm. And round with scissors on one side to get the shape of a leaf.


10. And that's what happened. Build 7-9 such flowers. And then glue them on artificial leaves. And then all this composition on a box of chocolates.

11. But, first, for brightness, tie the box with a satin red ribbon.

12. The result is such a fun charm from.
Corrugated roses with sweets
One more masterpiece caught my eye, if in the previous version they took a foil ball as a basis and made a flower out of it, then this one will be almost the same, only there will be a round candy together with the ball. And the buds will not be as open.

Get to work, and these pictures will help you. Nothing difficult, do everything by analogy with previous work. Well, if something is not clear, then I described this master class in more detail.


3 videos on how to make a simple candy bouquet
To all those who do not understand something from this note, then look through these stories, and then everything will work out for sure. So, the first masterpiece is a basket of roses from Anna.
If you are going to a wedding or today is February 14 - Valentine's Day, then here you are, take this idea and put it into action.
Flowers from sweets (step by step instructions)
Well, now another grandiose souvenir, which is very unusual and not primitive. Take a look? Just charm.

We will need:
- sweets in the form of hats or lollipops
- wooden skewers
- tissue paper
- green colored paper
- sleeve
Stages:
1. Papyrus paper (cut out a large rectangle and fold it in half). Screw on the sleeve, and then wrinkle on both sides in the form of an accordion.

2. Remove the sleeve and twist the resulting workpiece into a ball. Cut off all excess.

3. In the middle, in the hole, insert a candy on a stick or a chupik. To do this, tie up the candy with transparent wrapping paper, and then glue the paper to a wooden skewer.


4. Fix the craft on a stick with adhesive tape, and to hide it, glue a piece of green corrugated paper with a glue gun.

5. These funny freaks came out. Looks awesome and unusual. Nobody has ever given you something like this.

Candy bouquet "Tulip"
And again, another video, which is very detailed, so you can definitely handle it. In addition, you will also learn how to make a bag for decorating such crafts.
And for those who do not want to watch or maybe the Internet speed is bad, read this step-by-step instruction and descriptions.


MK sweet bouquet of caramel on a stick and chocolate
To be honest, for some reason this composition reminds me of an autumn bouquet, probably because it is in different colors of the rainbow. You just need to buy caramels or M&M's (M&M's) and arrange them by color. And then make bags and fill with these sweets.
It is better to take wrapping paper and put delicious balls into it and bandage it, glue it with tape, and then attach the stick, as we did in the previous descriptions.
You can also use other types of candies that you like the most.


You can go an even simpler way, make a souvenir out of paper, but not like everyone else, but with a twist. You can give one flower separately, to someone who is so dear to you, a great idea for March 8th. And as they say, cheap and cheerful.
By the way, you can make such an “application” at a school or kindergarten with children, so that they then hand it over to their mothers or grandmothers.

We will need:
- cardboard template (download below and print)
- sweets in bright wrappers
- double-sided colored cardboard
- skewers
- gouache or acrylic paint

Stages:
1. So, circle around the template (you can also use a mold, as shown below) and cut out blanks from cardboard.

2. After each skewer, glue to the flower. Paint them green in advance and dry.

3. And on the other hand, stick sweets, it is advisable to take the middle of a different color so that it differs from the petals.

4. Cheerful and so, well, just a creative gift made in a couple of minutes. Good luck.

5. For completeness, you can glue more leaves of green colored paper or use corrugated paper.

One more idea:

The original composition "Poppies" from sweets
We will need:
- Candy Truffles
- sticks
- corrugated paper
- scissors
- teip tape
- bow
- organza
Stages:


Many asked me to find another job in which candy or sweetness is easily removed from the bud. Because all the same, I don’t want to say goodbye so quickly with a gift. And so I searched for a long time and still found it, I am happy to share.


You can also make a pen yourself, or a bag, maybe someone will need:


How to make a bouquet of lollipops and kinders
To be honest, making such a present is also quite simple, even a child can handle it. Because if the craft is only made of chupiks, then you only need an empty pot and floral foam. In which you just need to insert tightly all the sweet blanks.

Here's another idea:

You can arrange it like this.


Decide on a color scheme based on this hint.

You can also make a hedgehog if you are a creative person. Here is such a handsome man who was exhibited in the Country of Mothers.

But if you want to choose a job more difficult, then I recommend that you turn to this film. The author combined both kinders and chupiks in one bouquet.
In conclusion, I also want to show a couple of ideas, it turns out that bouquets can be made from tea bags.

Or combine candy flowers with fruits.


Or soft toys.


I hope you liked my note very much and you learned how to collect such wonderful and beautiful bouquets of sweets with your own hands. After all, there are a lot of holidays throughout the year. Be unique and impress everyone.
Bye everyone! Have a wonderful day and great mood!


