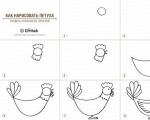
The scheme of knitting a skirt with Solomon loops. Openwork tunic crochet mesh pattern "Solomon's knots"
The author of the master class is Guzelka Fattakhova, who lives in Chekmagush, Bashkiria. Please love and favor.)) She presents a master class on an air bolero for a girl or woman. Amazing reviews are welcome. They are always pleasant to any craftswoman, I know from myself.))
Even I wanted to have such a wardrobe decoration, and if I knit this for my daughter, I think it will be quite charming!
For creating crochet bolero we will need:
Yarn (any, the model in the photo is knitted from mohair Nako)$
The pattern is very simple - ordinary "Solomon" loops.
Crocheted bolero master class
1. Make the first loop. Then pull a long loop out of it.

 2. Grab the working thread and pull it out. Now insert your hook into the loop coming from the first loop. (See photo)

 3. Having captured the working thread, we knit both loops on the hook.
 4. Next, we again pull the loop from the base and knit the next one, repeat such loops to the length of the bolero you need. I measure by the circumference of my forearm.
 5. Having tied the required number of loops, we proceed to the second row. To do this, we knit three more Solomon loops. And in the fourth loop from the hook, we make a single crochet, grabbing both loops in the knot and pulling out a long loop for the next "Solomon" loop.
 6. We make two more loops and again fasten with a single crochet through one knot. So repeat until the end of the row.
 7. We knit the third row, starting with two Solomon lifting loops.
 8. Next, we knit stbn into loose knots and again 2 Solomon loops. We continue to the end of the row.
 9. This is what the end of the row looks like:
 10. We knit the fourth row in the same way.
 11. When all the rows are connected, we sew according to the scheme.
 12. Around the entire perimeter, we tie the edges of the bolero with double crochets.
  Let's not forget about the sleeves.
13. The next three rows are arches of 5 air loops.
 14. The last row is the fans.
Do you also think that solomon knot crochet- is it about the last century and grandmother's needlework? There is an opinion that this knitting has gone out of fashion and is completely irrelevant among modern craftswomen, however, a simple Google search proves: crochet solomon loop- it is fashionable, it fits, it is actively used in creativity and played up in a variety of works. By the way, did you know that the second name of the Solomon loop is a crocheted love knot? Maybe it was born because, having tried it once, you will forever love this pattern and start using it in your work as often as it works out? In any case, it is worth learning and experimenting a little - who knows where the paths of your imagination will lead you?
Solomon knot crochet - 5 varieties:

1. Volumetric Solomon knot
Not the easiest pattern for beginners, but if you are one of those who are inspired by complex and time-consuming ideas, this option is just right for you. However, thanks to a competent lesson, you will quickly figure out how to crochet a Solomon knot, and having figured it out, you can create the most incredible things.

2. Solomon crochet loop "Burgundy Touch"
Perhaps the most difficult thing in a Solomon crochet knot is to stuff your hand and maintain the same length of loops during the entire knitting. Someone resorts to certain tricks, someone tries to work by eye, but one thing is clear: finding your personal way to maintain the same length of the loop, you will get a very, very beautiful basis for further creative experiments.

3. Solomon knot of flowers
Having mastered the basic principles of the Solomon knot pattern, you can quickly create the required things. However, the pattern with flowers will still require a little time to implement the plan - knitting each individual flower is associated with a certain time cost. But the result ... what a wonderful result!

4. Solomon knot "Blusters"
If the Solomon's knot crochet pattern seems too light and openwork, too lacy and transparent, you can always supplement it with more "weighty" elements - for example, "clusters", as in the proposed master class. The idea is simple, but the execution is beyond praise. Things connected with such a pattern will carry a slight touch of vintage, which in itself is already great.
Sometimes, in order to quickly update your wardrobe, it is easier to knit a beautiful lace bolero for a dress than to buy a new dress. I began to be attracted to models that require a minimum of time, but look spectacular. What bolero models can be crocheted even for beginners?
1. We knit a square, for example, 51 * 51, as in my case, 44 sizes.
2. Fold the square in half.

3. We connect it along the dotted lines, leaving room for the armhole.

4. We knit the sleeves in a circle of the desired length in the places of the armhole.

5. We tie the bolero along the contour and along the bottoms of the sleeves.

Such a bolero can be made with any pattern, even with squares.
I suggest crocheting this simple bolero with an openwork pattern - the Solomon knot. This pattern requires minimal time, a small amount of yarn and, in my opinion, it is very beautiful.
Knitted from yarn Madame Trico Paris "Merino Gold" (60% merino wool 40% acrylic), 100 g / 400m.
I will not dwell on knitting the pattern itself, because. many good master classes can be found on the Internet. http://mizrah.ru/post168463743/?upd
We knit a square with a Solomon knot pattern. I knitted a square measuring 19 * 19 pairs of Solomon loops

We fold the square in half and connect the seams from the outside to the armhole in approximately this way (the red line is the Solomon loop). If there is a second skein of yarn, then the second seam is better to start
A very simple, but at the same time incredibly stylish crocheted tunic, knitted with a textured Solomon's knots mesh pattern, will appeal to both young girls and older ladies. The description of the tunic is presented for mohair yarn, and for combined cotton threads. The Solomon Knots pattern is easier to knit from a video than from pictures, so I found it for you and posted it on the site.
Finished Size: Waist circumference: 84(92)100(108)124cm
When working with “Paola” pruse, the length of the tunic is 55 (57) 59 (61) 63 * 65) cm, the sleeve length from below is 42 (43C4 (45) 46 (47) cm
When working with the Rose Mohair style, tunic length: 70(72)74(76)78(80) cm
Bottom sleeve length: 45(46)4647(48)49(59) cm You will need: yarn "Novita "Paola" (49% polyamide, 46% cotton. 5% metallic polyester. 112 m / 100g 450(500)550( 600) 650 (700) g silver (442) or mohair "Rose Mohair" (65% acrylic. 35% mohair, 198 m / 50 g) - 20 (200) 200 (200Y50 | .250) 300 g blue, hook: for "Novrta Paola" No. 5. for "Rose Mohair" No. 4
Pattern: knit according to the instructions and following the pattern of "Solomon's" knots. Knitting density: when knitting, the loop is pulled out by 1.5 cm. Attention, the knitting density changes when the length of the loop changes.
With 4 patterns) (=8 knots) and with 6 rows of patterns = 10 cm

Back: knit for the initial chain 34 (36> 40<44)48(52) узелка
1st row (see figure No. 1). Skip one loop on the hook and the next 3 knots, then knit 1 air. n. in the next knot. Create *2 knots, skip one knot on the previous row and knit 1 air loop in the next knot *—* repeat to the end of the row.
2nd row; turn the work over, create 3 knots. 1 air p. In the knot of the previous row. Create * 2 knots, skip one knot on the previous row and knit 1 air. n. in the next knot *, repeat * - * to the end of the row.
Repeat 2nd row.
After knitted 33 (34) 35 (36) 37 (38) rows, including the first row, and knitted with yarn -Paola-, or after knitted 42 (43) 44 (45) 46 (48) rows, including the first row, knitted with mohair "Rose Mohair", cut off the thread and finish the job.
Front end: work with Paola 26(27)28(29)30(31) rows for Row 1 or with Rose Mohair 35(36)37(38)39(41) Rows for Row 1, in the same way. how to knit the back. Start knitting the neckline from the right shoulder. Continue in right edge with 8(10)12(14)16 knots (= 4-5-6-6-7-8 stitch patterns). When working with Raola yarn after 33 (34) 35 (36) 37 (38) rows, taking into account the first row or after 42 (43) 44 (45) 46 (48) rows, taking into account the first row when working with Rose Mohair mohair » Tear off the thread and finish the job. Knit the left shoulder in the same way.
Sleeves: connect the shoulder seams as shown in picture #2. Knit the sleeve from the shoulder down (see the direction of knitting on the diagram). Try on the width of the sleeve at the front of the work on both sides of the shoulder, in total 26 (26) 28 (30) 32 (34) rows \u003d 26 (26) 28 (30) 32 (34) knots Attention: start narrowing the sleeve from the end of the first row, following figure No. 4. On the next row, start tapering the sleeve at the beginning of the row. Knit the next two rows, then proceed to narrowing in the same way.
Continue taper every 4th row as before 2(2)3<3)4(5)раз = 18(18)18(20)20(20) узелков. После 25(26)26(27)28(28) связанных рядов пряжей «Paola» или после 27(27)28(29)30 рядов, связанных мохером «Rose Mohair», оторвите нитку и закончите работу. Второй рукав вяжется также.
Assembly: connect the side seams by knitting. According to figure No. 2. Knit to the neck and fasten the edge to the sleeve 1 air. n. in a free knot. Create 1 knot. 1 air. n. in a free knot * repeat * - *, at the end 1 more knot and finish the row with the first air. loop.
Openwork tunic crochet mesh pattern "Solomon's knots"
More knitting patterns:
Beach tunic crochet "Queen of the Beach"
Simple openwork tunic crochet arched pattern
Summer tunic crochet "Charm of July"