How to make snowflakes from ribbons on a headband. Japanese New Year decorations: master class on creating kanzashi snowflakes
The Japanese kanzashi technique allows you to create unique jewelry from fabric. A kanzashi snowflake is non-standard, beautiful and quite easy to implement.
Products made from satin ribbons look gentle and noble. They are great for Christmas tree decorations.
Such snowflakes are so elegant that they are quite suitable as hair accessories. Delicate blue jewelry can become elegant elastic bands or hair clips, a detail for decorating a headband or headband.
You can attach a pin to the back of the snowflake, then it will become an excellent New Year's brooch, which can easily be attached to a fluffy dress.
If you set yourself the goal of making New Year's paraphernalia with your own hands, then the given master class will help you.
Snowflake using the kanzashi technique - the result of the work
For convenience, here is a calculation of fittings for 1 product.
Prepare the following for one kanzashi snowflake:
- square-shaped satin blanks in soft blue and white colors. The side of all squares is 5 cm. The number of parts is 12 and 6 pieces of the first and second colors, respectively;
- square-shaped brocade blanks - silver with the inclusion of blue lurex thread. The side of the squares is 4 cm. The number of parts is 6 pieces;
- square-shaped satin blanks in soft blue and white. The side of the squares in this series is 2.5 cm. The number of parts is 7 and 37 pieces, respectively;
- round bead hugger with a diameter of 1.5 cm;
- blue half bead with a diameter of 0.8 cm;
- a felt circle of white or blue color, the diameter of which is 3.5 cm;
- needle and thread, glue - for collecting flowers and attaching parts.
To make a New Year's product, you need to model several parts:
- main flower of 6 four-layer sharp kanzashi petals;
- small flower of 7 double sharp petals;
- 6 branches, consisting of one central blue petal and four lateral white petals.
MK "Snowflake of Kanzashi"
1. Prepare blue and white squares with a side of 5 cm and a shiny square of 4 cm for one sharp petal.

2. Bend all three parts in the same way - diagonally.


4. Fold two corners and fasten. The right corner of the former triangular piece will become the sharp end of the triple petal of the kanzashi. The side and bottom of the part should be cut off.

5. To turn the resulting petal into a more elegant one, make it four-layered. For this you will need small white petals. They are made according to the same scenario, but from a white satin ribbon measuring 2.5 cm.

6. You also need to prepare 6 small elements. The same parts in the amount of 24 pieces will be used in the future for branches. Insert sharp petals into the center of large blanks.

7. Cut baby blue and white 2.5cm satin ribbon into 7 squares each. Make double pointed petals so that the white part is inside the blue one. Assemble the flower using thread and needle.

8. Prepare narrow, sharp petals for the branches. Blue squares with a side of 5 cm will be used to make them.

9. Such details will be one color. The squares are folded twice.

10. Also, after forming the petal, the cut should be soldered, pressing it on the sides with your fingers.

11. Prepare 6 identical petals.

12. Gather the main flower onto a thread. Also decorate the small flower with a bright blue half bead and a hugger.

13. Stick one layer on top of the other in the form of a pyramid. Cut out a 3.5cm felt circle.

14. Make designs from long blue petals and small white petals, combining them into snowflake rays.

15. Glue rays into the spaces between the petals of the main flower to turn it into a snowflake.

16. All that remains is to glue the product onto a felt base to use as an accessory or decoration.

Using the amazing kanzashi technique, you can create not only flowers, but also snowflakes that will be just as beautiful, but also fabulous. Such New Year's products can be made in white colors, additionally using sparkling brocade elements, rhinestones, half beads and other decorations. In addition, blue, blue or golden colors are suitable for creating New Year's paraphernalia.
Beautiful snowflakes will sparkle on the New Year tree, if you attach them to the branches, they will decorate the interior before the holiday. Elegant and expressive products can also become the basis for hairpins for girls. Young fashionistas will look like real Snow Maidens if they decorate their hair with such snowy accessories. A master class on making kanzashi snowflakes is given below.
For one snowflake you need to prepare:
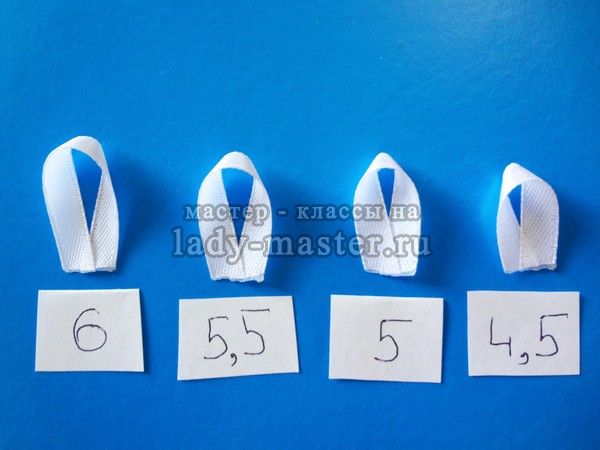
- - 24 petals from a white ribbon 0.5 cm wide (one petal consists of four lengths of 6 cm; 5.5 cm; 5 cm and 4.5 cm);
- — 8 petals made of silver brocade 0.5 cm wide (the length of the silver pieces is 7 cm);
- - 11 sharp kanzashi petals from white ribbon 2.5 cm wide (cut squares with a side of 2.5 cm);
- - 8 diamond-shaped leaves of white tape 2.5 cm wide (they will require 8 pieces of tape 10 cm each and a wood burner);
- - round felt base 4 cm;
- — 1 wide hug and half-bead-stone 0.6 cm;
- — 8 small mother-of-pearl half-beads, 0.4 cm each;
- - glue (transparent and strong).
Snowflakes from ribbons, master class
1. Cut strips of thin white satin ribbon 0.5 cm to create multi-layered droplets. The snowflake will consist of three layers of four-layer petals; in total, the specified parts will require 24 portions of pieces of each length listed in the list of materials - you need to prepare 24 pieces of 6 cm; 5.5 cm; 5 cm and 4.5 cm stripes.

2. Make droplets from the segments, gluing the ends together. This can be done with glue or a lighter flame. The size of the droplet loops will decrease proportionally for segments of different lengths.
3. Glue the droplets in size together to make petals. Connect the parts, overlapping each other, and fix them to the glued base.
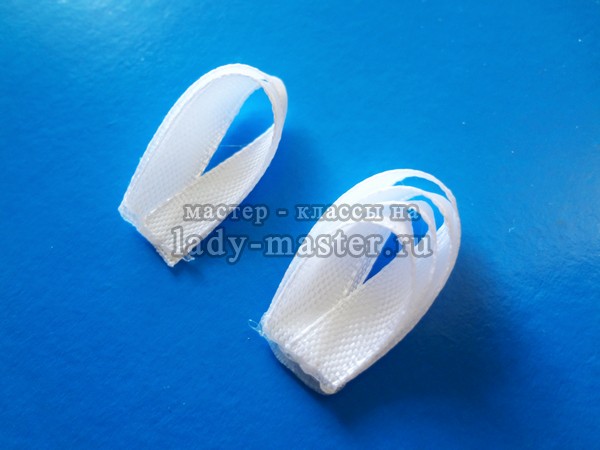
4. You need to turn all 24 portions of droplets into layered petals.
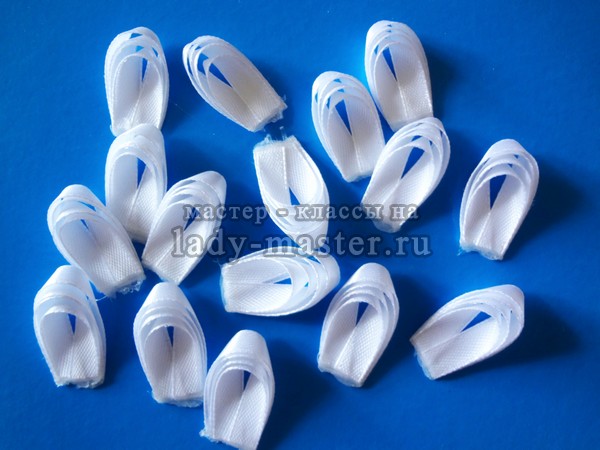
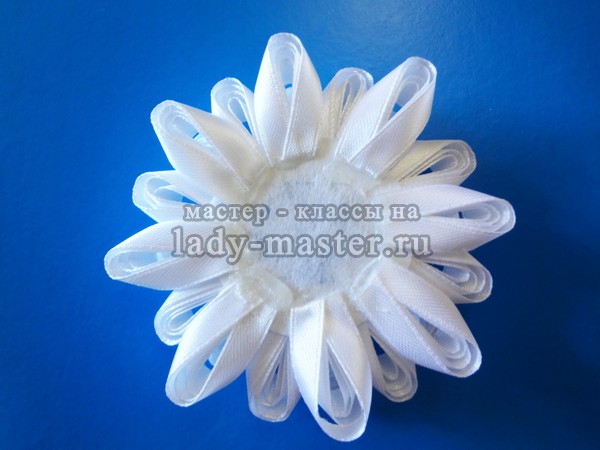
5. Divide all the blanks into 3 parts of 8 pieces each. Cut out the felt base 4 cm. Glue onto it the first layer of daisy-shaped petals, consisting of 8 parts. When gluing the droplets, retreat evenly from the edge of the circle - 05-0.6 cm.

6. Glue the second part of the petals on top in a checkerboard pattern.

7. Add the last row from below for fluffiness (but the loops should be directed upward).
8. Cut 2.5 cm squares from a white piece of satin or ribbon. From these you need to make classic sharp kanzashi petals for the inner flower. And this flower will require 11 parts. Bend the squares diagonally (one).

9. Bend the resulting two-layer triangles in height. Close the resulting four-layer triangular blanks at the base and glue them together.

10. Trim along the bottom line to make the petal flatter.
11. Glue 11 petals into a daisy. Prepare a hugger, a duplicate flower and a half bead.

12. Also make droplets from 8 pieces of silver brocade 0.5 cm by 7 cm.

13. Glue the silver layer to the center of the snowflake.

14. Apply glue and insert a daisy inside, then a hug with a pebble to make the snowflake sparkle.

15. To create the bottom layer of white leaves that will resemble the spiky rays of a snowflake, use the last portion of tape: 8 pieces measuring 2.5 cm by 10 cm. Fold each strip in half. Then divide the resulting rectangle in half diagonally with a burner. Unfold the bags. Each rectangle will be divided into 2 portions, then use only those that look like sepals. Glue small mother-of-pearl half-beads to the ends.

16. Glue the leaves on the bottom as the last layer. Place them evenly overlapping around the circumference.

The New Year is not only a Christmas tree, Santa Claus, sweet gifts... For the New Year, all mothers prepare especially carefully, choosing outfits and accessories for their children for matinees and Christmas trees. If you have already chosen an elegant dress, but don’t have accessories for it yet, then I suggest you see how easy it is to make a snowflake from ribbons using the kanzashi technique. , headband or brooch. And what is most important, such decoration can be made in any color that will harmonize with the chosen outfit. And also, making your own decoration will be much cheaper than buying it in a store. And you can’t buy such accessories in a regular store.
Carved snowflake from satin ribbons
To create a snowflake you will need the following supplies:
- Rhinestones,
- Center stud/cabochon earring,
- Tools: tweezers, torch/lighter, heat gun.
Let's start creating thin, sharp kanzashi petals, which we will turn into curls. We use a 5x5 cm piece of satin ribbon, fold it into a triangle and bend it again into a triangle. We roll it into a sharp petal and pinch it with tweezers at the very edge.
Cut off the excess. We melt the cut area over the fire and while it is still hot, roll the tape into a tube with tweezers. We hold it a little so that the petal has time to curl. If it doesn’t work out the first time, you can heat the cut area on the tape again and wrap it again.
One branch will require curls turned left and right. We will also make one and two slightly tilted to the left and right. Such details can be made by heating the edge of the petal and slightly bending it with your fingers in the desired direction. Let's start assembling the branch. Glue together two parts tilted to the left and to the right.
We will glue a straight petal between them, and to the left and right of it we will place glued curls. You will need 5 such branches. Let's prepare some more details. From pieces of satin ribbon 2.5x2.5 cm we will make sharp petals and glue them together in three pieces. You will need 10 such petals.
Let's start creating a kanzashi flower, which will become the basis of our snowflake. We will make a triangle from a solid satin ribbon 5 cm wide and fold the remaining ribbon back.
We insert a 5x5 cm piece of brocade and fold both ribbons so that the top of the triangle is above the fold.
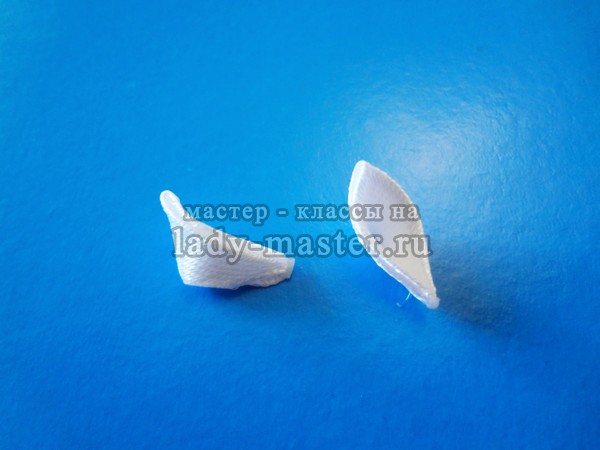
We bend the corners inward on both sides. Fold the petal, cut the tape and melt the edges. We make 5 petals.
Glue a blank of triple sharp petals into the resulting petal. We glue all the parts into a flower, and glue triple branches between the petals. Under them we will glue branches of sharp thin petals.
Glue another blue decorative element and glue them between the white branches. I note that the blue parts should be located slightly higher than the white ones.
Glue rhinestones and the center onto the snowflake. As a base, I used a felt snowflake purchased at the store. Before gluing the base, we will make two cuts on it so that the decoration can be put on a headband or hairpin.
Snowflake kanzashi on a universal basis
This snowflake is also in the kanzashi style, but different from the previous one. It is easier to assemble and takes less time to create.
- Consumables:
- Ribbons: brocade (silver), satin (white, blue, gray) 5 cm wide and brocade (silver) 10 mm,
- Middle: rhinestone, cabochon or stud earring,
- headband,
- Tools: soldering iron (optional), tweezers, heat gun...
Let's assemble a multi-layer kanzashi petal. Let's put a gray one on the white triangle and move it to the right, put a blue one on it and move it to the left, and place a brocade triangle in the center. Let's fold a sharp petal.
Glue a flower from 6 petals. Let's prepare sharp petals of white, gray and blue colors.
Let's glue the twig, glue the blue one onto the white part so that it is a little higher, and glue the gray one onto the blue one, also slightly higher than the previous one. Cut off the base and process it over fire. We glue these blanks between the petals of the main flower. From brocade we will make thin, sharp, straight petals, as well as curved ones: some to the left, others to the right. For 1 branch you will need 4 curved parts and 1 straight one. There are only 6 branches.
We will make twigs from thin blanks. Glue them between the white and blue sharp petals.
Let's work on the base to cover the unsightly areas of our snowflake; we'll make leaves from blue satin and narrow brocade ribbon. Take a piece of blue color 5x10 cm, put a brocade ribbon on the front side, fold it in half and cut it with a soldering iron or burner. You can do without them: hold the tape with tweezers, cut it and melt the cut with fire.
We glue the leaves to the base of the snowflake in two rows of 5 or 6 petals. I note that the leaves serve as decor on the back side of the decoration, so they should not be very visible from the front. Cut out a circle of felt and cut holes in it for a headband or hairpin. My snowflake, made of satin and brocade ribbons, is ready.
A simple snowflake for the New Year's outfit
A very simple, but no less beautiful snowflake that you can make with your own hands. To create it, we will need the same materials as in previous master classes. It is based on sharp kanzashi petals.
Fold the four-layer petal in the following order: silver-white-silver-white. Glue the petals into a flower.
From brocade 5 cm wide, we fold the sharp petals and melt the base so that they are not through. For the ray of the snowflake, we will glue together 5 of these parts.
In total, you will need 6 rays of 5 petals each, which means you need to make 30 blanks. We glue each ray into the space between the petals of the flower.
All that remains is to glue the middle and the felt base.
New Year's snowflakes of Kanzashi. Photo
Continuing the series of New Year's craft lessons, we present you with another master class on making frame snowflakes from satin ribbons using the kanzashi technique.
To make a snowflake from satin ribbons you will need:
Satin ribbons of contrasting colors with a width of 0.5 cm, 2.5 cm and 5 cm;
Napkin/corrugated paper;
Wire;
Scissors, thread, needle;
Decor: beads, rhinestones, seed beads;
PVA glue, hot-melt gun/glue “Moment-Gel”
Tweezers, candle/lighter.
Snowflakes from satin ribbons step by step:
Make the basis for the snowflake branches - cut the wire into small pieces: 3 pieces of 8 centimeters each and 3 pieces of 4 centimeters each (photo 1). Wrap the snowflake blanks with corrugated paper/napkin, generously coat them with PVA glue and leave to dry (photo 2).

Make narrow kanzashi petals from a satin ribbon 5 centimeters wide. Fold the ribbon squares twice, then overlap the triangles (Image 3). Fold the triangles one more time and secure (photo 4).
By analogy, collect petals from a 2.5 cm wide ribbon (photo 5). Next, glue the small part into the large petal (photo 6). Make sharp petals in 3 shades from 2.5 cm wide ribbons (photo 7). Then, from the sharp petals, form modules consisting of 3 and 5 leaves (photo 8).

The resulting modules need to be glued to the base wire: to long parts - modules of five leaves, to short parts - three leaves each (photo 9). Cut strips as long as the wire from a narrow ribbon 0.5 cm wide. Burn the edges at an acute angle (photo 10). Glue the strips to the wire and cut the “branches” in half (photo 11). Gather large leaves into a flower using thread (photo 12).

Hide the underside of the flower under a circle of ribbon (photo 13). At this stage, you should get blanks, as in photo 14. Glue the wire with modules to the flower: glue the long ones onto the leaves, and glue the short ones between the leaves (photo 15). Cover the middle with a circle of ribbon (photo 16).
The New Year holidays are already approaching, and if you have come to this page, it means that you want to come up with something new and original to decorate your interior and you are looking for some special idea for holiday decor.
As a rule, homemade New Year's decorations mean Christmas tree balls, garlands or unusual toys made from scrap materials. But snowflakes are also a traditional element of New Year’s interior decoration, but we would like some special snowflake...
If you decide to make decorative snowflakes with your own hands, you probably want such decorations not to look too simple and banal. An excellent option in this case would be to create snowflakes using the kanzashi technique.
The peculiarity of such snowflakes is that satin ribbons are used to make them, due to which you do not have to redo such decorations every year, and you can easily make snowflakes from ribbons with your own hands using the Japanese kanzashi technique.
Source materials
How to make a kanzashi snowflake and what materials do you need to stock up on? In order to create New Year's kanzashi snowflakes, you will need light-colored fabric that is as durable and light as possible. As a rule, such snowflakes are made from satin ribbons.
In the process of making such snowflakes you will need the following materials:
- ribbons made of satin (or other similar fabric, for example, satin, silk, organza);
- cardboard or thick paper;
- scissors (it is advisable to use small scissors, as they are more convenient for cutting out small parts);
- thread and needle;
- glue (note that it must be waterproof and transparent);
- pencil;
- ruler;
- tweezers or clamp;
- lighter (if you don’t have a lighter, you can use regular matches, but a lighter is more convenient);
- beads or seed beads to decorate snowflakes.

It is advisable to prepare all the necessary materials in advance, since the process of creating a snowflake from satin ribbons requires perseverance and accuracy, so you will not be able to constantly be distracted by searching for the necessary items.
You can decorate the Christmas tree not only with ready-made toys: - figurines, stars, balls, men made of felt will look original and cute and will serve well when decorating the Christmas tree with your own hands.
How to make a Christmas tree toy with your own hands? Find out at. From scrap materials you will create toys of different sizes - both large and small, with which you can decorate your house or hang them on the Christmas tree.
Let's start creating
The process of creating kanzashi snowflakes with your own hands at first glance does not seem so simple. But in fact, there is nothing complicated about it: you just have to follow the instructions - and you will get an excellent result, no different from snowflakes made by experienced craftsmen. We present to you a master class of kanzashi snowflakes, consisting of several stages.

At the first stage, you need to take the prepared fabric and cut out several small squares from it. The size of these squares will depend on how large the snowflake you want to get. Standard parameters are 3 by 3 cm. In this instruction we will talk about the process of creating snowflakes of a standard shape, but this does not mean that you cannot experiment. The number of cut squares should be determined based on the shape of your future snowflake; in our case, you need to cut 42 such blanks.
 Photo of Kanzashi snowflakes
 Using cut out squares we will make small petals. Small squares are folded diagonally: this procedure is repeated three times, and in the end you should get a triangle consisting of several layers. The two outer corners of such a triangle must be folded towards the center so that your triangle has a rounded shape.
To make folding such figures more convenient, hold the fabric with tweezers or a clamp.
After the triangle is complex, the corners need to be secured. To do this, the edges of the future petal must be melted and squeezed together until the fabric cools. As a result, you will have a finished petal.
 These are the petals that make up the basis of a snowflake
 This procedure must be repeated with 11 squares. The resulting petals will be placed on the inside of your future snowflake.
As for external elements, they are created in a similar way. After carrying out the procedures we have described, you should still have 30 squares left, which must be folded in the same way, but skip the step of giving the triangles a rounded shape. That is, you will melt triangles with sharp corners.

The next stage is creation of the Kanzashi Snowflake Center. Take a needle and thread and thread it through the six rounded petals. At the end, fasten the thread so that these petals form a round flower.
 Using the kanzashi technique you can make not only snowflakes, but also twigs and flowers
 To form the rays of the future snowflake emanating from its central part, you will need glue. Take two sharp triangles and glue them together. If you don't have glue or are worried about it leaving marks on the fabric, this procedure can be done with a needle and thread. Connect 12 more triangular petals in the same way.
The petals do not need to be completely glued together; you only need to connect one of the corners.
When the double petals are ready, glue (or sew) the third petal between the two adjacent ones. As a result, you will receive an element consisting of three interconnected petals. In the same way, attach the petals to 12 more finished elements.
As a result, you have 12 parts consisting of three petals. Now you need to connect them in pairs: sew one element over the other and repeat this procedure for the remaining ten figures. You can make the rays longer or give them a non-standard shape: it all depends on your imagination.

The next stage is creating the basis for a snowflake. To do this, you need to take thick cardboard (or paper) and cut out a small circle from it. The size of this circle should be slightly smaller than the size of the central flower for your snowflake. Then take the fabric and cut out a circle from it, the diameter of which coincides with the central flower.
It is not necessary to use these exact materials: you can choose any fabric and any dense material for fastening, since these elements will be located on the back side of the snowflake.
Also, consider how big it should be. lace, on which your snowflake will hang. Measure the required length, sufficient to hang the snowflake. As a rule, this is done in the form of a loop.
 New Year's Kanzashi snowflakes will make your Christmas tree irresistible
 Place the cardboard circle inside the fabric circle, and then gather it with thread so that after tightening you have a small bag with a solid base. You need to sew two edges of the lace to it to make it snowflake pendant.
Then proceed to assembling kanzashi snowflakes: to do this, you need to glue its central part and the prepared rays.
You need to glue the rays on the wrong side of the snowflake, so first turn it over to the other side.
After the glue has dried, glue or sew the prepared part with a loop on the same side. As you can see, the process of making such snowflakes is not at all difficult, and even small children will enjoy this procedure, so do not forget to invite them to participate in this process. The resulting snowflake can be decorate using beads, seed beads or sequins.
By the way, Anastasia Kulikova’s video about creating kanzashi snowflakes will allow you to more clearly study the technology of manufacturing parts and their assembly:
Methods and applications
Now let's tell you a little secret: in fact, with the help of these snowflakes You don't have to decorate the Christmas tree. There are a large number of options for using these original jewelry.

The most standard way is room decoration. In addition to the Christmas tree, the ideal place for snowflakes using the kanzashi technique would be windows, walls, and ceilings. Attach them to threads or laces - and hang several snowflakes close to each other. You will get a great winter composition.
 Such a snowflake made from ribbons will be a worthy decoration even for a bride
 In addition, you can make snowflakes a beautiful garland. And if you attach a magnet to the back wall of the snowflakes, you can stick them on the refrigerator or give them to your guests as a souvenir.
Look: you can make these wreaths with your children on the eve of the holiday and decorate your apartment with them.
Read about New Year's apartment decor - all the secrets and decorative techniques for adding the greatest solemnity and mystery to the interior of your home.
Snowflakes made from kanzashi style ribbons will be wonderful hair decoration: just attach them to a hoop, elastic band or hairpin. Your children will love these decorations if you are collecting them for the New Year holiday.
 For compositions using the kanzashi technique, use contrasting colors of ribbons
 By the way, in order for your snowflakes to harmonize with the interior or clothing, you can use fabric of different colors. For example, combine fabric with white and blue, white and purple, or white with blue. Elements of snowflakes can be made multi-layered: due to layers of different colors, your snowflake will look even more original.
We hope these snowflakes will be a great addition to your New Year's decorations. And so that you don’t miss the important details of their creation, we offer you a MK (master class) on the kanzashi technique and creating unusual and original snowflakes with your own hands from Anastasia Kulikova: