DIY bow - we sew for dogs - catalog of articles - kennel club "Daina". DIY bow - sew for dogs - catalog of articles - kennel club "Daina" How to make bows for small dogs
What do we need
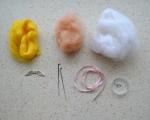
To make bows you will need:
- Multi-colored ribbons. They can be of different widths, but usually no more than 3 cm, because larger bows will not look very nice on the dog’s head.
- Finishing tapes. They are used as decoration for the main ribbons to make the bow even more beautiful.
- Seam finishing glue or just silicone glue.
- Threads to match the ribbons.
- Scissors.
- Needles.
- Matches or lighter.
- Fishing line. Used for sewing main and finishing tapes.
- Any round objects, for example, pencils, markers, syringes. They are used to give the shape of a bow.
- Various bow holders. This can be hairspray, nail polish or gelatin, dissolved to a thick consistency.
- Decor: rhinestones, beads, sequins, beads, etc.
- Rubber bands or hairpins to attach the bow to.
- Fantasy and perseverance.
A little about the quality of the bow
The bow can be made either by gluing or by sewing. But the first method is not very reliable - over time it will crumble. If you make bows for your dogs, then you can use this option. But if you work for sale, then you need to care about quality, so here you only need to use stitching. Also pay attention to the quality of the elastic band to which the bow is sewn. It should be of excellent quality, not slip and not pull hairs. Reliable fastening of ribbons and decor is the key to not only high quality, but also profit.
Let's get started
- Cut off the main ribbon that determines the color of the bow. If you plan to make a double or triple bow, then cut 2 or 3 strips accordingly. The length of the first tape is usually about 9 cm, the rest are 1-1.5 cm less than the previous one. At this stage, if desired, you can add braid to decorate the bow, but it is sewn on with a thin fishing line so that the latter is practically invisible. We burn the edges of the ribbons with matches to prevent fraying.
- Then the ends of the ribbon are connected, slightly overlapping one another, and stitched on the wrong side with matching threads. We get rings from ribbons. Then we fold the ring, notice the middle and connect it to the seam, make several stitches, connecting the two halves of the ribbon. We do not cut the thread, but tighten it, giving the ribbon the shape of a bandage. We do the same with the second one, etc. layers of bow.
- Now we place the bows one on top of the other and sew them tightly together. At this stage, a hairpin is immediately glued well or an elastic band is sewn on.
- Round objects of suitable size are inserted into the petals of the bow.
- Now we prepare the fixative. Dissolve it until thick and apply to the bow. You can also use hairspray with a very strong hold or nail polish and leave until completely dry, remove the “frame”.
- We decorate. We take everything that your imagination suggests and start creating. It is very popular to make designs with special decorative glue with sparkles or to make beautiful patterns with rhinestones or Swarovski stones. Whatever you come up with, remember that you need to decorate a ready-made bow. If you produce bows in large quantities, then you should buy a special pen for rhinestones, although it is not cheap. But in principle, you can get by with an ordinary soldering iron, only after some practice. To do this, we lay out a pattern of rhinestones on the bow and start gluing them. Press the rhinestone with a soldering iron for a few seconds and release. Nothing will happen to the stone itself. But the glue on the rhinestone will melt and stick it to the bow. It is important not to move the soldering iron while gluing.
We clearly explained how to make jewelry for dogs. All that remains is to put a bow on the dog’s head and go out into the street to be fashionable.
You will need
- - wide ribbon of any color;
- - a wide and narrow ribbon of a different color (preferably contrasting);
- -decoration (rhinestones, beads);
- - fastening for a bow. You can use the base of a regular children's hair clip.
Instructions
To begin, cut a piece of the main wide ribbon. The length of the piece should be approximately 22 cm. At the same time, cut the second piece of tape (now use additional fabric). It should be slightly shorter in length than the base one. Since it is best to use a satin ribbon to make a bow, use a lighter to trim its edges. This is necessary so that they do not fluff up.
Next, make a ring from the main tape. The size depends on how big you want the bow to be. You can adjust its diameter by positioning the overlap inside as needed (more or less). Now wind the second (additional) tape into a similar ring. But to create a beautiful bow, it should also be slightly smaller than the main one. After adjusting the second ring, place it on top of the first. To do this, pinch both rings with your finger in the middle.

Fasten the ribbons together. To do this you need to sew them together. Select the thread to match the color of the additional ribbon. After all, it is the one that is located on the front side. You need to stitch it so that you can pull the tip of the thread to make a bow.

Thanks to this simple manipulation, the bow is ready. Now you need to decorate it and attach it to the base of the hairpin. Cut a small strip of tape from the extra one. Only this strip should be thin. After all, it will only serve as the middle of the bow, while simultaneously covering the place where the parts are sewn together. Sew it at the back so that the seams are not visible.

Let's try to make a bow from a satin ribbon with lurex. Sewing stores have a wide selection of these ribbons in different colors and shades. We will need ribbons of the same color, but of different widths, as well as a candle, latex rubber bands, hairspray and two gel pens. Cut 8.5 cm of wide tape and 3 cm of narrow tape. This is the optimal length for creating a bow on the head of a Yorkie of any size. With a quick movement, draw the edge of the ribbon several times through the candle flame. The edge will melt slightly and prevent the tape from crumbling.
Fold the wide ribbon in half to mark the middle. Place the edges of the ribbon overlapping the folded middle. The edges should overlap each other no more than 2 mm, otherwise you will get a thick seam. Tie a knot in the thread and sew the folded edges with a “forward needle” seam.

We tighten the thread so that folds appear on the workpiece. We wrap the thread around the workpiece, stick the needle into the center of the workpiece and pull the thread through, securing the folds. We repeat this step several times so that the bow is firmly sewn. Cut the thread and secure it. The blank took the form of a “classic” bow.

Take a narrow ribbon. We process its ends in a candle flame. We apply one tip to the “wrong” side of our workpiece, wrap it with a narrow ribbon, forming a soft, beautiful middle of the bow.

We bend the second edge and from the “wrong” side, using small, neat stitches, sew the edges of the narrow ribbon. You can sew it to the bow itself so that the middle does not move along the bow.

We sew on the latex rubber bands with a separate thread. If the elastic bands break, the bow itself will remain intact.