How to do a manicure for short nails at home? Photo of manicure ideas for short nails How to make a manicure for short nails.
Beautiful manicure for short nails at home? Is quite real. To do this, you only need to make the correct suitable shape of the nails, and then carefully perform a manicure.
Owners of short nails in 2018 need to pay attention not only to the color of the varnish, but also to other parameters of the perfect manicure:
- Nail shape. The fashionable square shape takes second place this year. The first place is occupied by an oval shape. For lovers of a square shape, it is advisable to choose a more rounded shape that will visually lengthen the nail. Short nails are contraindicated in the almond shape.
- Lacquer color. On short nails, dark shades of varnish will look beautiful, which will go well with contrasting bright shades.
- Design. It is advisable for girls to abandon the “mirror rub”, and you should also pay attention to the usual glossy and matte finish. A variant of a moon manicure and a gentle jacket is possible. If you choose between patterns on the nails, then you need to give preference to a small pattern or vertical geometric lines. It is not recommended to get carried away with rhinestones, because too many stones on the nails look vulgar.


How to make French at home?
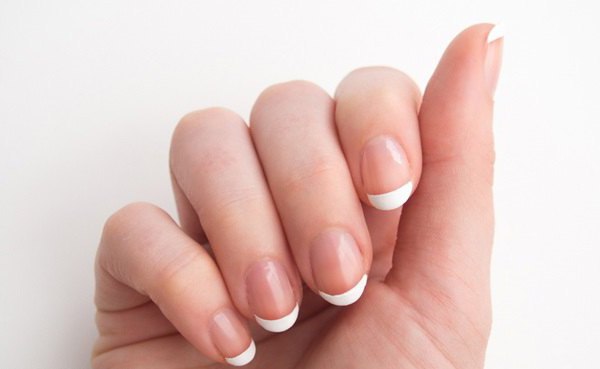
French (French manicure) is more suitable for owners of long nails, but an option for short nails is also possible. Before coloring nails, you need to do a quality manicure. To perform a jacket at home, you can buy ready-made stencils that make it much easier to draw a white line (smile). Instead of a stencil, you can take strips of adhesive tape or stationery gum.
It should be noted that each shape of the nail is suitable for a different degree of roundness of the smile.
The ideal option is a mirror repetition of the shape of the cuticle. For this type of manicure you will need: white varnish, base and top coat. In order for the manicure to be neat and beautiful, you must adhere to the following recommendations:

- Be sure to remove the keratinized cuticle. It's great if there is a machine for hardware manicure, and if not, use nail scissors or tongs. European manicure does not look very nice on short nails. Before working with the cuticle, it is advisable to steam the skin with a sea salt bath.
- It is necessary to wait for the complete drying of each layer of varnish, regardless of whether conventional or gel polishes are used.
- After applying the white line (smile), it is necessary to fix the manicure with a top coat.
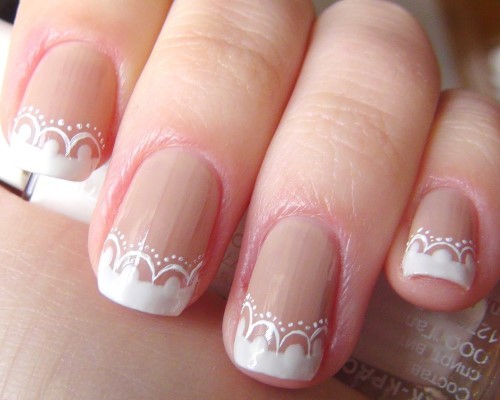
- Among the decoration methods, it is desirable to choose rhinestones or lace. At the same time, if the jacket is made in classic colors, the decor must be minimized.
Fans of experimenting can do a jacket in bright colors of the palette.


We use rhinestones, powders
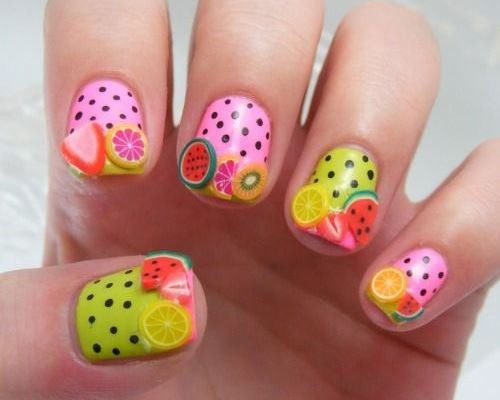
To create a beautiful manicure on short nails, you can use rhinestones of various shapes and colors. Rhinestones immediately add the effect of luxury and high cost to the nails. On short nails, rhinestones can be placed in different ways:
- In the form of a line, which can be vertical or follow the contour of the hole.
- Covering part or all of the nail plate in the form of a honeycomb or mesh.
- In the form of a picture, using rhinestones of various shapes and colors.
The main advice when attaching rhinestones is to use high-quality expensive glue, which will protect against premature deformation of the nail.
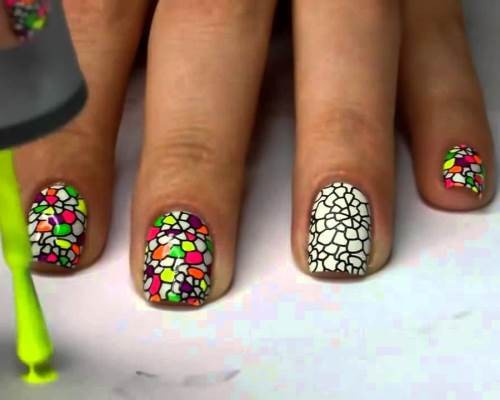
Together with rhinestones, acrylic powder is often used in decorating nails, which can be of different colors. Thanks to the velvet effect, the powder looks aesthetically pleasing on the nails. It is applied to the nails at the last moment, when the sticky layer has already been removed. To fix the powder, it is necessary to draw a contour of the desired pattern with a white gel polish, using a thin brush. Then sprinkle the pattern with powder of a suitable color. Next, you need to dry your nails in a lamp, and then brush off excess material with a brush. Patterns can be different: from clear geometric lines to delicate flowers and snowflakes.

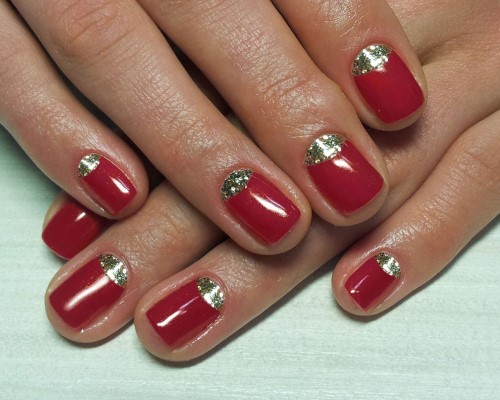
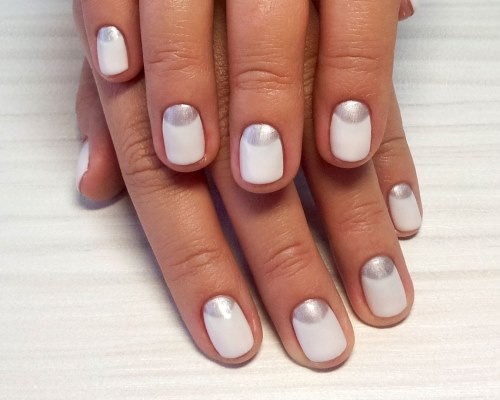
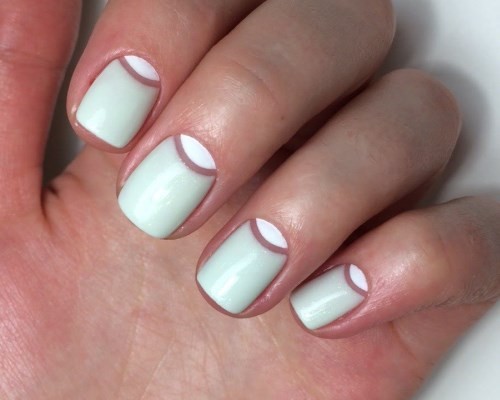
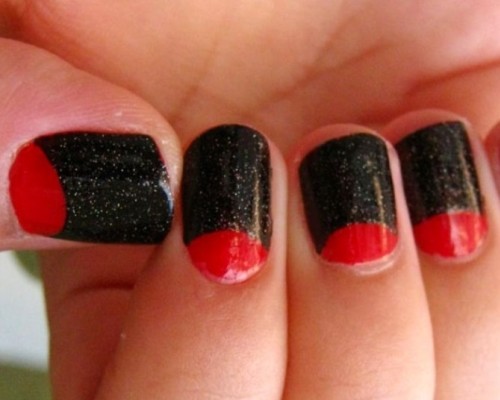
Lunar manicure for very short nails
For very short nails, a variant of the moon manicure is suitable. But it should be understood that the holes visually shorten the nails. The combination of jacket and holes on short nails does not look aesthetically pleasing. In this case, the holes may not be painted over with varnish. A more common option involves highlighting the hole in a contrasting color. To form a neat, clear contour of the hole at home, you can purchase a special stencil, and the hole itself can be not only in the form of a crescent, but also in the form of an inverted triangle. They can be distinguished by rhinestones, beads and a thin colored line. The color range of this manicure technique is very extensive, and the nail itself can be painted in two or more colors. An important point when choosing this type of manicure is that the cuticle area must be processed flawlessly, as the holes attract attention.


Gradient at home
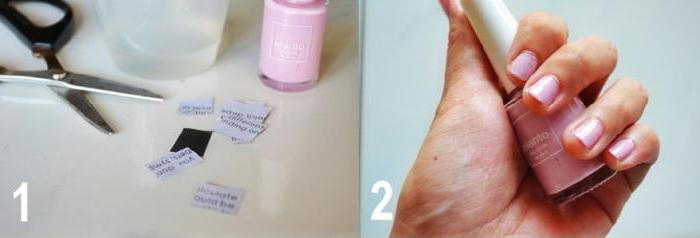
The gradient is a fairly popular design for short nails. It is a smooth transition from one color to another. In this case, the color transition itself can be both vertical and horizontal. To make a gradient at home you need:
- Prepare varnishes of several shades of the same color, sponge (if not, you can take ordinary foam rubber), a fixative, an orange stick and cotton pads with nail polish remover.
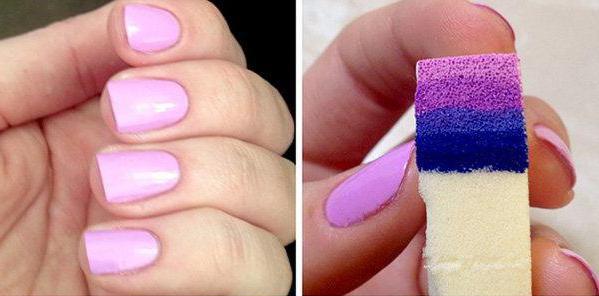
- Apply varnish on the sponge in strips, starting from the lightest shade and ending with the darkest and most saturated.
- With light movements, bring the sponge to the nails. Immediately after painting the nail, the manicure must be dried, and then the second layer of varnish should be applied.
- With a cotton pad moistened with nail polish remover, lightly walk around the nail plate, and then apply a fixative to the nails.

Wedding Manicure Ideas
Wedding manicure is often performed in light colors. Most women prefer a delicate French manicure, decorated with rhinestones coated with northern lights. Also among the decoration of a wedding manicure is a very popular pearl, which harmoniously stands out against a light background. For more impulsive girls, a strict manicure is suitable, made in white with square rhinestones. For bright and energetic brides, colored confetti and sparkles are suitable for decorating a manicure. For romantic girls, a more suitable option is a manicure with acrylic or gel modeling. Do not forget about the classic version of a plain light pink coating. Different shades of light varnishes go well with white patterns (flowers, snowflakes, lace), as well as with acrylic powder drawings.
Well-groomed female hands and nails are not only a sign of beauty, but also an important canon of modern fashion, which all girls really like. Every year, image makers and stylists of international stature introduce us to interesting manicure novelties. And if earlier it was fashionable to wear long nails, then in 2017, as never before, short nails will be very relevant. In this article we will tell you about the variety of nail art for such nails.
Long nails are certainly beautiful, but not always by the way. They will be perfectly combined with an evening dress, a wedding dress. But, being at work or doing household chores, long nails cause a lot of inconvenience. And here beautiful manicure for short nails and looks great, and does not require painstaking care, and always looks great, because nails of small length do not tend to exfoliate or break. The owner of such a manicure will not have to strengthen the nail plate with special means every day. It will only be necessary to cut their length in a timely manner and file.
Features of care for short nails?
Before choosing any manicure design for short nails, you need to know the main features of caring for them:
- For nails of small length, you can choose any method of care:
- European "dry" - when the cuticle is not steamed or trimmed;
- Classic - with the processing of each nail and trimming the cuticle;
- Japanese - involving 5 stages of working with nails: cleansing, moisturizing, nourishing and restoring, processing the nail plate and cuticles, hand massage;
- Hot (SPA manicure). To create it, a bath filled with a creamy lotion or oil is used, which does not cool down. It contains vitamin complexes that nourish the skin of the hands, cuticles and strengthen the structure of the nails.
- Before covering short nails with gel polish, they must be trimmed in the evening or two hours before the procedure.
- Short nails look best when they are square or oval. In accordance with the shape of the nail, the pattern should also be selected - floral patterns will look good on an oval nail, and geometric patterns on square ones. The choice of the shape of the nail will depend on whether your fingers are thin or plump, long or short.
- Despite the fact that the nails are short, you need to make sure that their length does not differ on different fingers. If at least one nail is a little longer, then the manicure will already have an untidy look.
- With a wide nail plate, it is important to visually make it narrower. To do this, the varnish must be applied so that the ridges of the nail plate remain unpainted.
- Decorating short nails should be small, so any modeling that involves the creation of three-dimensional patterns on the nails will look ridiculous.

Fashion trends manicure 2017 for short nails
In the new season, the trend will be naturalness and naturalness in everything, including manicure. Therefore, the nails must have an appropriate appearance. Those whom nature has awarded with beautiful strong nails are very lucky, because they will not need to do additional procedures with nails in order to be stylish and fashionable. But, girls whose nails are weak and not smooth will be forced to give them naturalness with the help of gel polishes.
The length of short nails cannot exceed 5 mm, the best option is 2-3 mm from the free edge of the nail. Lovers of the “Square” shape of nails will have to slightly round off their ends to make it look softer.
As for nail art, many stylish manicure trends of the outgoing year will remain relevant in 2017. However french manicure for short nails with a thin "geometric smile" of an unusual color and "Assorted" manicure will be a priority.

Your manicure will look very fashionable next year of the Fire Rooster if your nails are painted with pink, blue, green, peach, light yellow, white, milky and sand varnish. To create a pattern but nails painted in such delicate pastel colors, you can use brighter varnishes, for example, orange, canary, red, purple and hot pink.
Manicure ideas for short nails with a photo
Next year will not tolerate acrylic flowers on nails and sculptural decorations. It has no place for vulgar nail art and defiant very long nails. Your entire look, from hair to manicure, should be discreet and elegant. Based on this, we offer you some interesting ideas that are relevant in 2017 for creating a manicure on short nails.
Manicure with plain varnish on short nails

There is an erroneous opinion that short nails painted with plain varnish are a boring and uninteresting version of a manicure. However, we hasten to assure you that this is not the case. The most successful stylists and nail artists claim that such a manicure is universal and always winning in any situation. In view of the wide variety of color palettes of varnishes that are relevant next year, you can use the following design options on your nails:
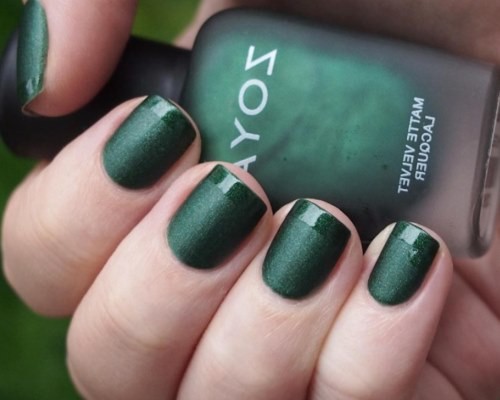
- Black manicure for short nails will look very noble and beautiful:
 If you want your nails to be pure black, you need to use a matte varnish, and if you want a result in which the black color shimmers in different shades, then use a regular varnish. Only during its application to the nails, you should pre-treat the nail plates perfectly and be very careful, since black varnish does not tolerate mistakes and slips.
If you polish the nail poorly or file it poorly, the black color will focus on these shortcomings, so the whole look of the manicure will be ruined.
French black manicure looks great, in which the entire plate is painted with black matte varnish, and the “smile” is made with ordinary black varnish:

If desired, one nail on one hand can be shaded - make a drawing on it or stick some decorative elements, for example, beads or small rhinestones:

- Dark manicure on short nails. The technique of its execution is in many ways similar to the creation of nail art with black varnish, because rich dark colors are also used here, such as burgundy, coffee, dark blue, dark gray, purple and dark green.


- Red manicure for short nails looks elegant, while on long nails it looks a little defiant. At all times, red was very fashionable, and to this day it is. You can choose any shade of red for yourself and you will never be disappointed in your choice, because your manicure will look perfect.

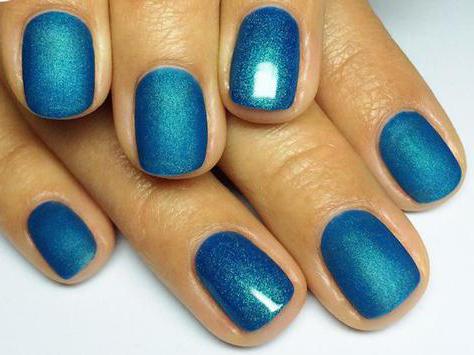
- Blue manicure on short nails looks good on oval shaped nails. Of course, as an everyday wear, you are unlikely to be able to walk with it for a long time, unless it is winter outside, for which the blue color and all its shades are very relevant.

- Beige manicure for short nails is the epitome of sophistication and sophistication. Nails painted with beige varnish always look natural and well-groomed.

- Pink manicure on short nails This is a versatile and at the same time romantic nail design. It has been popular for many years, and 2017 will be no exception. Due to the huge variety of shades, not only a young lady, but also a respectable woman can afford a pink manicure.

Shellac manicure for short nails
Shellac is by far the most common nail polish option. This tool has gained great popularity due to the fact that it can be applied to nails without pre-treatment, Shellac is stable and practical. Within two weeks after applying shellac to the nails, the girl may not worry that the manicure has deteriorated, it will have a beautiful and neat appearance.
Of course, in order to make shellac nail art for yourself, you must either contact the master, who has a special ultraviolet lamp under which this coating should dry, or purchase it personally. It is certainly expensive, but the quality is guaranteed. Varieties manicure 2017 for short nails with gel polish so many. Here are some options for nail design using Shellac coating:


Manicure for short nails with a pattern
In the year of the Fire Rooster, a manicure with an original pattern will be very fashionable. It can be done on any basis, both on ordinary varnish and on shellac. The only thing is that additional funds will be required for the gel polish coating. They need to process the nail plates before creating nail art.
When choosing a pattern for your nails, follow some simple guidelines:
- If you have short fingers, then drawings made vertically will help to visually lengthen them.
- On a short nail, you can not allow both a large pattern and too small
- To make the nail design look harmonious, do not use more than 2-3 varnishes to create a pattern.


Manicure with rhinestones for short nails
Rhinestones on short nails can look very catchy and vulgar, therefore, when decorating your nails with such decorative elements, you need to be extremely careful and not overdo it with their number. Remember that the main task of any manicure is to emphasize the well-groomed and attractive hands. Therefore, when choosing rhinestones, it is preferable to use transparent elements or with a chameleon effect.
Rhinestones can visually expand the nail plate or shorten it. To avoid these mistakes:
- Do not lay out transverse lines from rhinestones.
- Do not completely cover the entire nail plate with rhinestones. It is allowed in this way to decorate only one of any nail. As a rule, masters make such a design on the ring finger.
- Do not glue rhinestones around the moon or French manicure if your nails are square.


Lunar manicure for short nails
In 2017 this easy manicure for short nails will not lose its relevance. With the help of two pastel or contrasting varnishes, you can make an original moon nail art. Some new techniques for its implementation will not appear next year, unless you yourself come up with them. The following types of moon manicure will be popular:
- Classical

- Color

- Without cover

- Triangular
- With gold or silver
- Matte

- With an image

- Lunar

- Floral

- White
- Black

- Red
Summer manicure for short nails
In summer, short nails are not only beautiful, but also comfortable. Packing suitcases on vacation, on the road, wherever you are, they will look very feminine and at the same time will not cause you any inconvenience. For summer nail art 2017, you can use any of the above techniques, just choose bright varnishes that match the season. Of these, you can perform an Ombre or Assorted manicure, which will also be popular next year.


Wedding manicure for short nails
For a long time the tendency to a triumph to build up nails has become obsolete. Now it has been replaced by shellac, which makes the nails neat and beautiful. It is perfect for wedding nail art. Given the fact that 2017 is the year of femininity and tenderness, we have selected several options easy manicure for a wedding on short nails.


Children's manicure on short nails
Today, girls start painting their nails at an early age, from the age of 7. And this is a completely normal trend that fully meets the requirements of the time. After all, it was previously believed that the painted nails of a little girl are a sign of spoilage, but now it is a common hygienic procedure. The main thing is that the manicure is age-appropriate, not vulgar and catchy.


Video: Children's manicure
Manicure to school for short nails
Any teenage girl wants to look attractive, and a beautiful manicure is a great way to make your look stylish and well-groomed at the same time. Of course, a manicure for school should be special - no bright colors, patterns or rhinestone decorations. Monochromatic light or transparent varnish and jacket are allowed. The girl should look modest and neat.


Home manicure on short nails
Not every girl can boast of the ability to draw beautifully on her nails, and often there is no time or money to go to a beauty salon to make fashionable nail art. How to make a manicure at home for short nails on your own:
- Steam the skin around the fingers in warm water;
- Dry your hands with a towel and treat the cuticle: first lift it with a manicure spatula, and then tear it off with tweezers just so that the skin is not injured;
- Cleanse skin that has already become keratinized;
- File your nails, giving them the desired shape;
- Lubricate your hands with oil or a special lotion rich in vitamins;
- With the help of nail polish remover, it is necessary to degrease the nails;
- Apply varnish.
You can make a light drawing if you like. This is done very simply: with a brush, drip on the nail, and then draw a pattern using a regular needle. Below are pictures of manicure that any girl can do for short nails at home.


As you can see, it is very easy to make a beautiful and fashionable manicure on short nails. You will not have to constantly worry about the appearance of your nails, and at the same time they will look stylish and fashionable.
Video: Manicure for short nails
In the video below, you can watch one of the master classes on how to create a manicure on short nails, the design of which will be very fashionable in 2017.
A detailed description of each step by a professional will help you complete the original drawing and put your nails in order.
When doing a manicure, special attention should be paid to the shape of the nails.
To understand how to make a beautiful manicure step by step at home, you should listen to the advice of professionals.
When choosing the shape of the future manicure, you should pay attention to:
- cuticle shape;
- the shape of the nails, the length of the fingers;
- the shape of the nail bed.
The most common is the oval shape of the nails, it is suitable for any type of hand and finger shape. Oval nails visually lengthen the fingers, especially if the hands are full and the fingers are short.
For owners of graceful hands with thin fingers that have nails with a convex nail plate and a rectangular cuticle hole, a rectangular nail shape is suitable. The length doesn't really matter, rectangular shape looks good on both short and long nails.

For those women who have wide hands and large fingers, the rounded shape of the nails is ideal. In this case, the length of the nail receding from the edge must be at least 3 mm. So the manicure will lengthen the fingers and give the hands grace.
The pointed form of manicure, it is also called almond-shaped for those whom nature has endowed with a thin shape of hands and long fingers. On full hands, such a manicure will look awkward, breaking the proportions.
Manicurists believe that the shape of the nails should follow the shape of the cuticle. But everything is purely individual.
There is another important rule of manicure. All nails must be the same length. If one nail is broken, then all the others will have to be shortened to the same length.
Choice of nail file. Which one and what is it for?
For a manicure step by step at home, you will need nail files. When choosing a nail file, you should pay attention to the material, from which it is made and on its rigidity - abrasiveness.
Abrasiveness is the hardness of the nail file.
It depends on how large or small the nail file has a coating and how many units of abrasive per unit area. This value is measured in grits. The higher the number of grits, the softer the file, respectively, a nail file with a lower number of grits will be harder.

For polishing natural and artificial nails, buffs with an abrasive index of 400 to 1000 grit are used.
The materials from which nail files are made, advantages and disadvantages:
- metal. They are durable and strong, these are all their advantages. The main disadvantages include the fact that such a nail file severely damages the nail plate with its spraying, which subsequently leads to delamination and brittleness. Metal nail files can be used for artificial nails.
- glass. A nail file that spares the nail plate. With proper care, this nail file will last a long time. Its only drawback is fragility.
- Plastic. The perfect choice of material. These nail files are easy to use, easy to clean and disinfect. A large assortment from different manufacturers will allow you to choose a nail file of suitable quality and reasonable prices.
- Paper. A budget version of a nail file based on thick coated cardboard. This nail file is not very durable, suitable for one-time use.
- Ceramic. For careful processing of the tips of the nails, a glass nail file is used, and a ceramic file will allow you to seal the edge of the nail so that it does not exfoliate. Just like glass, this nail file is quite fragile and requires careful handling.
Steaming the nail plate
There are 2 types of manicure:
- classic, edged manicure;
- European, not cut manicure.
For manicure step by step at home, it is better to choose a safe way to process the cuticle. This is considered a European manicure. With this method, the cuticle is not cut off, but steamed and shifted to the edge of the nail. Oils and special gels are used to slow down the growth of the cuticle.

Classic manicure - steaming and removing the cuticle. Suitable for those who have some nail processing skill.
In both cases, you will need to steam your hands in a hot bath for 5-7 minutes.
Previously, before steaming, give the desired shape to the nails with a nail file. Steaming can be replaced with a cuticle treatment with a special gel that will soften it and facilitate its removal.
Additives to the bath for steaming herbal decoctions, essential oils, sea salt, table salt will strengthen the nails, make the skin of the hands softer and silkier.
Polishing
Polishing gives a neater look to the nails. When no topcoat is applied, polishing the nails adds shine. When applying a coating, the coating fits better on the polished surface of the nail.

Some rules should be followed when applying polishing:
- Doing a manicure at home do not get too carried away polishing the nail plates. Once a month will be enough. Step-by-step use of nail files with spraying of different hardness will allow you to achieve an excellent result.
- It is not recommended to polish weakened nails. this may worsen their condition.
- Nails must be buffed before polishing.. This procedure will improve the condition of the nail plate, eliminate irregularities and minor flaws. After polishing, the nails are polished with a nail file with a soft coating. If you plan to cover your nails with gel polish or shellac, you should only lightly sand your nails. Excessive grinding will thin the nail plate.
Coating
Any varnish, gel or shellac, when applied to the base coat, has a brighter color and lasts longer. When using a coating of soft, pale tones, a white matte varnish can be used as a base. Using the base will avoid layering.
In order for the coating to hold well, the nails must be well degreased immediately before coating.
This advice is especially relevant if fat-containing preparations were used for preparation to remove the cuticle.

Coating starts from the base of the nail and continues to the edge of the nail. The movement of the brush should be with light pressure in order to paint the maximum surface of the nail in one stroke. Next, you will need 2 more light strokes with a brush to paint the remaining edges of the nail.
Coating with gel or shellac requires additional funds - a base and a top coat. On fat-free nails, the base is first applied, after the gel. After drying the coating, a top coat is applied to strengthen it. In the case of using a regular varnish, the base is not needed, but the use of a top coat will extend the life of the manicure.
Materials and tools
Step-by-step manicure at home implies the availability of tools for such work.
You will need:
- nippers or tweezers to remove the cuticle, manicure masters call them nail cuticles;
- nail scissors with rounded ends for those who are not used to using wire cutters;
- several nail files, with different hardness. For grinding and polishing buff;
- sticks with a special end for cuticles / pusher (metal tool for working with cuticles).

Additionally:
- nail polish remover/acrylic remover;
- cotton pads;
- foil is needed to remove the acrylic coating;
- cuticle remover (for dry manicure);
- capacity;
- additives such as essential oils, sea/table salt, soap/gel;
- paper napkins;
- cuticle moisturizing oil, hand cream - all this is used to complete the manicure.
Sterilization of instruments at home
The health of the nails depends on how clean the instrument with which the manicure is performed is. A minor wound can cause big trouble. At home, manicure tools should also be disinfected.
The number of home tool users is limited, but this does not negate disinfection.
To sterilize manicure instruments at home, you do not need to buy a special apparatus that is used in salons.
Home remedies for sterilization:
- hydrogen peroxide;
- pure alcohol;
- vinegar.
Depending on which agent is used, the sterilization time also differs. Pure alcohol implies instant sterilization, and using hydrogen peroxide will take several hours. You can sterilize the instrument with vinegar if the liquid does not damage the coating of the instrument.

Methods for sterilizing metal instruments:
- boiling;
- heating on an open flame;
- heating in the oven.
Metal instruments are pre-washed under running water, then sterilized. Sterilization on an open flame is carried out for 5 minutes, boiling or sterilization in the oven - for 15-20 minutes.
To sterilize nail files, use a spray filled with a disinfectant solution.
If someone at home has a fungal skin infection and uses the same tools, disinfection should be carried out especially carefully.
Ready-made disinfectants that can be purchased on the Internet, a pharmacy or specialized stores:
- sterillium;
- cutasept f;
- octenisept;
- estilodez antiseptic;
- bansolar;
- alaminol.
The manufacturer offers such products in the form of sprays, concentrates, wipes.
What pharmaceutical products can be useful
For sterilization of home manicure tools, products can be purchased at pharmacies.
These include:
- hydrogen peroxide;
- alcohol;
- octenisept;
- sterillium.
Cuticle removers
For quick and effective cuticle removal in salons, special tools are used - removers. They allow you to soften the cuticle in a short time and contribute to its high-quality removal. Some removers contain substances that subsequently slow down the growth of the cuticle.
These products contain acids or alkalis. Therefore, removers are not recommended for fungal diseases and people prone to allergic reactions.
Remuver are of several types:
- acid;
- alkaline;
- oil;
- mineral.
The safest are oil and mineral-based removers. They are recommended for home use.

Remover is applied to dry cuticles with a brush or directly from a tube with a special spout. After 3-5 minutes, the product is wiped off with a napkin, the cuticle is pushed back with a stick or a pusher. The product is not washed off with water. When using an acid remover, it is recommended to cover the skin around the nail with oil.
Doing a manicure at home, you can use olive oil and lemon juice step by step. This combination will allow you to quickly and efficiently process the periungual space.
Step-by-step instructions for performing a classic edged manicure
Performing a trim manicure step by step has the following steps:
- removal of the old coating, if any;
- shaping the nails, this should be done before steaming;
- steam your hands, remove the cuticle / in case of dry manicure, use a remover to remove the cuticle;
- use a stick to clean the space under the nails;
- grinding, polishing;
- application of strengthening agents for nails;
- Finish off by applying cuticle oil to and around nails, followed by hand cream.

Unedged manicure at home
European manicure is done in 3 ways:
- Dry way using a remover, hands do not steam out. It should be remembered that some types of removers can cause allergic reactions.
- wet way using a warm bath for steaming hands.
- hot method Designed for steaming heavily roughened cuticles and hand skin.

Manicure should be performed in the following sequence:
- First you need to shape the nails.
- Steam your hands. With a dry method, treat the cuticle with a remover. After 5-7 minutes, you can work with the cuticle.
- Wipe your hands dry/Remove the remover with a napkin or cotton swab.
- Move the softened cuticle to the root of the nail with a wooden stick or pusher.
- Apply an oil that slows down the growth of the cuticle, rub it well into the nail plate at the base of the nail. The use of such oil will allow you to do manicure less often in the future.
- Thoroughly degrease nails before coating.
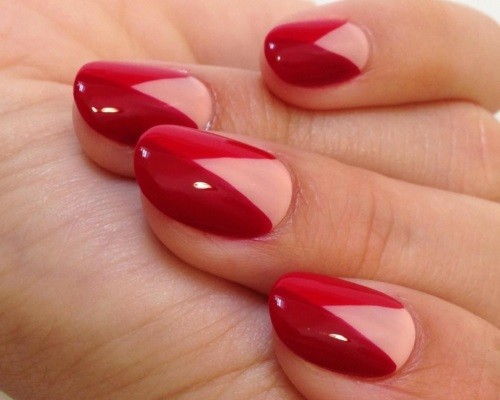
How to do French (French manicure) step by step
The most popular manicure is French, that is, French manicure. The jacket is suitable for all occasions: for an evening dress and for an office suit.

The classic version of a French manicure is a bodily base and a white smile at the tip of the nail.
Modern nail design offers different variations of such a manicure.
To make a French manicure at home, you need a little skill:
- Give the desired shape to the nails. It is better if it is a rectangular or oval shape.
- Steam your hands.
- Process the cuticle. For a jacket, a classic edged manicure is suitable.
- Further sand and polish nails. These simple procedures will extend the life of the coating.
- Apply base coat, nude or beige lacquer.
- After drying draw a smile with a thin brush or stencil. The width of the smile should be the same on all nails. A wide smile will visually shorten the nails, so it is not recommended to get too carried away. The width of the contrast strip should be no more than 2 - 3 mm, depending on the length of the free tip of the nail.
- After coat your nails with clear polish fixing a smile. You should also cover the end of the nail, this will seal all the layers and strengthen the coating.
- The procedure ends applying cuticle oil. Apply a little cream on the skin of the hands, rub with massage movements.
Gradient on nails
The technique of applying in the style of a gradient or ombre has been very popular for more than a year. This is the use of several colors, the transition from one color to another. Such a coating looks original and spectacular.
Required:
- varnish 2-4 colors;
- sponge;
- nail polish remover;
- cotton buds;
- toothpick;
- foil.

Coating gradient, step by step:
- Prepare nails.
- Before applying the coating, generously lubricate the skin around the nail with cuticle oil. The oil will make it easier to remove the varnish that has got on the skin.
- Further actions will require some speed in the work. Draw stripes of varnish on the foil close to each other and blend their borders together. Wet the sponge into the created palette and transfer it to the nails.
- Cover the nails with a top coat, without waiting for the layer to dry.
- Remove excess varnish with cotton swabs and nail polish remover.
multicolored nails
A popular technique is varnishing in different colors. You can choose a palette of colors that are close or opposite to each other along the color wheel. You will need varnishes of 2-5 colors, manicure tools.

Step by step:
- Nail preparation.
- Before you begin to cover the nails, the bottles of varnishes should be opened and prepared in the order in which they will be used. If 2 colors are applied, determine which nails will be covered with which color.
- Alternately cover the nails, dry, fix with a top.
Lunar manicure with gel polish or shellac
A moon manicure is the opposite of a French manicure. The hole is covered with white varnish, the main coating is made in a different, contrasting color. You can use brighter combinations of foundation and smile.

Step-by-step instructions for performing a moon manicure with gel polish or shellac:
- Nail preparation for coating
- Covering the nails with the main color, drying the coating in the lamp. Depending on the lamp power, this will take 1 to 2 minutes.
- Drawing a moon smile with a thin brush. Drying.
- Top coat and dry again.
The boundary line between the main layer and the base can be decorated with rhinestones. Rhinestones are applied to the smile before drying. The surface is reinforced with a top.
Matte and mirror manicure for short nails
A fashion trend is a combination of matte and mirror manicure of the same color. A matte surface is obtained by applying a special coating on a regular gel polish.
This cover is great for short nails.
Instructions for the step-by-step implementation of a matte-glossy manicure:
- Preparation of nails for coating.
- Apply base, then foundation. Drying in a lamp.
- Apply a matte top coat to selected nails. For a combination of matte finish and gloss on one nail, use a stencil. This technique will create an interesting design.

For a glossy manicure at home, foil or rub, polyester powder is used. You can buy all this in specialized stores.
Step-by-step instructions for creating a mirror manicure using powder:
- Apply the main layer of gel, dry.
- Immediately after drying, sprinkle the main layer with powder. The powder is applied with a spatula. Rub the powder with the applicator. Remove excess powder with a brush.
- Apply top, dry in the lamp.
The secret of overflowing mirror nails
For a mirror manicure, a special powder is used. It is made of polyester, a material that consists of small particles. It is these particles, reflecting the light, that give the manicure a mirror shine.

Using powder with different colors and particle sizes makes it possible to create an original manicure.
Newspaper manicure
Simple newspaper manicure. 
Required:
- base color;
- newspaper, 10 fragments of newspaper with small dough for each nail;
- acetone;
- transparent top.
Execution sequence:
- Prepare nails for coating.
- Apply base color.
- Immediately after applying the base color with a drop of acetone, attach a newspaper fragment to the nail.
- Wait for the paper to dry completely. Do not move the newspaper until it is completely dry so that there are no streaks.
- Remove the newspaper, cover the nails with a transparent top.
Applying such a manicure will take time, but the result is worth it.
Hollywood mirror minx with foil
Mirror manicure with foil. The choice of foil color depends on what color of varnish will be used.

Step by step:
- Gel polish is applied to the prepared nails, dried.
- After that, a colorless foil glue is applied to the gel. You must wait until the glue dries.
- The foil is applied to the glue with a matte side and carefully smoothed out with a wooden stick.
- After that, the foil is removed and the mirror layer remains on the nail.
- Completion - coating with a fixing top.
Design - cat's eye
Spectacular cat eye manicure. A special magnetic gel is a varnish containing particles that, under the influence of a magnet, create an iridescent pattern on the nail.

To work, you need a gel polish with magnetic particles and a magnet.
Step by step:
- Gel polish is applied to the prepared nails.
- A magnet is brought to the surface of the nail, which orients the particles in a certain direction, creating a reflective effect. Depending on how to act with a magnet, the particles will be arranged. Straight, diagonal or wavy stripes.
- Then dry the layer.
- Apply top, dry.
Beautiful manicure with a stencil
A very popular manicure using a stencil. The stencil makes it possible to make an original and neat manicure at home without much difficulty. In a specialized store you can buy stencils for French and moon manicure.

Also for sale is a special adhesive tape for geometric patterns and a variety of adhesive plates with elegant patterns. For such a manicure, you will need a varnish of 2 colors, a stencil.
A stencil manicure is performed as follows:
- first prepare the nails for coating;
- the base is applied, then the base, the layer must be dried;
- a stencil or adhesive tape is glued and the nails are varnished in a different color;
- the stencil is removed from the nails at the moment when the layer is dry, but not completely dry;
- protective coating is applied and dried.
Stamping - stamp design
Another quick way to make an original manicure, now with the help of stamps. This method differs from the previous method in that the stencil is a one-time sticker, and the stamp can be reused.
To perform a manicure using stamping, you will need plates with patterns and a stamp - a device with a silicone base for transferring the pattern to the nail plate.
Pre-nails should be prepared and covered with a base, then with a base on which the pattern will be applied.
Dry the main layer properly so that there are no blots when applying the stamp. Apply a protective coating to the skin around the nail, which after applying the stamp will be removed and the skin will remain clean.

Lacquer is applied to the stencil with a pattern, the excess is carefully removed with a scraper. After the drawing from the plate is transferred to the stamp, then to the nail, and so on. Then the finished manicure must be covered with a top.
A drawing made using a stencil is quite fragile and requires protection. The top should be applied without strong pressure so as not to smear the stamp. The top coat will prolong the durability of the manicure.
Water manicure: how to make a manicure yourself
A simple technology of water manicure, it will require:
- a water container, not very wide, but enough to put a finger in it;
- varnishes 2 - 3 colors;
- toothpick for drawing patterns;
- adhesive tape / cuticle oil / greasy cream to protect near the nail space from excess varnish;
- cotton buds and discs;
- remover for varnish;
- base, top

Execution step by step:
- Cover the nails with a base, then dry with varnish, which will be the main one.
- Fill the container with water at room temperature.
- Drop a few drops of varnish alternately on the surface of the water. Make the next drop in the center of the previous one. Wait for them to spread.
- Create a pattern on the water. Make 2-3 movements with a toothpick on the varnish film.
- Lubricate the periungual roller with cream / cuticle oil / paste with adhesive tape around the nail. Nails must be dry.
- Dip your finger in water, the film will be transferred to the nail. Take out your finger.
- Next, remove the adhesive tape, if a cream was used, wipe off excess varnish. What could not be removed immediately, clean with cotton swabs and wash.
- This procedure can be carried out with each nail. The combination of monophonic and water coating of nails on the fingers of one hand looks original.
- Secure the resulting pattern with a top.
Simple varnishes with special effects
Nail polishes with special effects are a quick and effortless way to create an original manicure.

Manufacturers offer:
- Glitter polishes. These can be rare small inclusions of glitter in a color base or distinguishable sparkles of medium and large geometric shapes in a transparent and color base.
- Glitter polishes made entirely of glitter glitters.
- Glitters with splashes resembling sugar crystals. The coating has a dense texture, when dried, they have a rough surface.
- Metallic effect polishes, silver and gold.
- Varnishes with craquelure effect, cracking effect. The varnish is applied on a contrast base with a shimmer (reflective particles). After that, a special color coating is applied to the base and dried in the air. In this case, cracks appear on the top layer of varnish.
- Matte finishes with and without sparkles.
Brands of varnishes and acrylic coatings for nails and estimated price:
- Laque RuNail - 270-300 rubles;
- Essie - 300-350 rubles;
- Vinylux CND - 550 rubles;
- P.I. - 550 rubles;
- Kodi Professional - 500 rubles;
- Shellac CND - 1000 rubles;
- Gelish Harmony - 1000 rubles.
The most common brands that they prefer to use in nail salons are Kodi, Shellac CND and Vinylux CND.
Baths and oils to strengthen nails after manicure
For nails that exfoliate, baths with sea or table salt will be useful.
To enhance the effect of such a bath, add a drop of iodine.
For weakened nails - warm oil baths with the addition of vitamins A and E, herbal decoctions of chamomile, calendula and mint.

The use of natural nail oils will strengthen the nail plate, prevent delamination and brittleness of nails, improve the general condition of nails and the skin around them. Oils can be used both in baths and on their own.
Baths with the addition of essential oils:
- lemon
- grapefruit
- rosemary;
- jojoba;
- avocado.
To strengthen the nails, rub in ylang-ylang oils, lavender, tea tree oil. Also used are nail masks made from a mixture of natural oils. As the basis of such a mask, olive, castor, linseed oil is used. To be effective, the oil mixture must be heated before use.
Performing a manicure yourself at home, you need to follow the advice from professionals.
Then step-by-step execution will become not just work, but an exciting creative activity that you will want to return to more and more often.
Well-groomed hands and a beautiful manicure are the visiting card of every woman.
Useful videos on how to do a manicure at home
How to make a manicure "Gradient" yourself at home? Watch in the video clip:
How to perform a trimmed manicure yourself, find out in the video:
Short nails remain the trend of this season - it is not only fashionable, but convenient and practical. Even a slight length of the nail allows you to perform various nail art. From our article you will learn how to make a beautiful manicure at home (with step-by-step photos) for short nails.
Preparatory stage
First you need to take care of the form. For these purposes, it is desirable to select nail files on a cardboard or plastic basis. Be sure to stock up on a polishing tool to process the nails before applying the coating.
Each girl chooses the shape and length, based on her preferences. The square shape is very popular, but for short fingers it is advised to choose an oval one, as it will help to visually lengthen them. Get rid of the cuticle and degrease the surface of the nail. Only after the preparatory stage, you can start creating a design.
Necessary materials and tools
Consider what tools will be required to create a unique design. Usually the following already familiar attributes are required:
- dots,
- art brush for painting,
- stencils.
Study the ideas of manicure for short nails in the photo, choose the method you like and repeat it yourself.


Treatment
Properly processed nails look very beautiful and well-groomed. Circumcision is important to do not only for the sake of aesthetics, but also for the sake of the hygienic component, because dirt accumulates under the nails. Some prefer a trimmed manicure, which is done with pliers to remove excess skin, while others prefer an unedged manicure, which is performed with emollients and pushing back the cuticle. Then you can start designing. You can consider various ideas for gel polish manicure in the photo for short nails. This will help you make your choice faster.


Step by step procedure
The first step in creating beautiful nails begins with choosing a shape. If they are too long, then cut them to the desired size. If you just need to shape it, then it is enough to correct the nail plate with a file. You also need to cut your nails correctly, moving from the tip to the “moon”.


Now that the shape of the marigolds is prepared, the hands should be dipped in the prepared bath with sea salt, olive oil and essential oils. And a small amount of lemon oil will help your nails get a whitening effect. After 10 minutes, you can start cutting the skin around the nail.

Using a spatula, it is necessary to move the skin to the root of the nail. If there are burrs, they should be removed with tweezers. Do this very carefully, otherwise you will get a lot of cuts and bruises.


Then proceed to the next step. The nails are degreased with a special tool, then the base is applied under the varnish. Cover the entire nail plate with any varnish. If necessary, several layers can be applied. After that, it is recommended to apply a colorless fixative, which will help the varnish to last longer. Lubricate your hands with moisturizer.
How to make "French" yourself?
It is very popular every year. You can master this manicure technique yourself.
What is needed for work:
- pastel varnish of your favorite shade;
- white varnish for drawing a dividing line;
- transparent base.


Usually, stencils are used to work in this technique, which allow you to draw a smile line evenly on all nails.
How to make a lunar design yourself?
Not so long ago, a new design began to gain momentum - a moon manicure. This technique is simple in its execution, and the nails look very unusual. You can choose any color of varnish. The holes are drawn in the same way as a French manicure. When creating a design using the moon manicure technique, you can include your own imagination. After all, you can make holes in different colors or not paint the base at all. To draw the moon, as in the jacket, use stencils.


How is gel polish applied?
- We cover the nail plate with gel polish. Try to make thin layers, each time ridding the brush of excess gel, otherwise ugly bubbles form on the surface.
- We apply varnish alternately on each hand and dry it in a lamp. This will help all nails dry evenly.
- We take it out and apply a layer of varnish again on each dried finger, and send it to dry.
- Using alcohol, remove the sticky layer from the nail plate, and apply oil to the skin around the nail. At the end, the hands are smeared with cream.


Mirror finish
If you need to make a festive manicure, then the mirror design is just for you. To create an unusual coating, you will need special glue and foil of your favorite color. Before proceeding with the decor, it is necessary to carefully treat the surface of each nail so that there are no rough edges.


The following actions:
- the base is applied;
- painting is carried out to match the foil;
- each nail is covered with glue;
- foil is applied, it needs to be smoothed out well;
- the remnants of shiny paper are removed;
- nails are covered with a finishing varnish.

Fashionable matte finish
Matte colors stay in fashion for at least another year. They look advantageous when combined with rich and deep tones. Matte manicure on short nails looks very bewitching:
- sexuality gives red color;
- chocolate shades look very luxurious;
- burgundy lacquer is associated with elegance, charm;
- peach and lavender tones will add romance to your look;
- shades of yellow and orange have brightness and mischief.

You can make beautiful nails yourself. Moreover, even the simplest design can be uniquely designed with the help of decor. For decorating nails use:
- artistic brush for painting abstract and geometric patterns;
- glitter, loose powder and special sand;
- stickers and stencils;
- rhinestones, shells, beads, bulbs.


Rhinestones and lace are the trend of this season. Nail art is a thing of the past. It is with the help of sparkling pebbles that girls strive to stand out from the crowd. It takes a little practice, and you yourself will be able to apply various patterns on your nails and make unusual designs.

Various design: the best ideas
If you have absolutely no imagination, then you can use ready-made ideas to create your own design.


French and moon manicure
- Glue the stripes on the top smile and bottom moon. On a free surface, apply black and coral varnish, alternating each finger.
- Then peel off the strips and apply contrast polish to the moon and edge of the nail.


Turquoise and gold
- Paint your nails with turquoise polish.
- Take an ordinary plastic bag, crumple it and apply gold varnish to the surface.
- Apply the pack to each nail.
- Finally, apply clear polish on top.


gradient technique
A manicure made at home in pink colors looks very beautiful and gentle.
- Dark pink or fuchsia varnish is applied to the thumbs of both hands.
- Now we drip varnish on the palette and add one drop of white varnish, mix well. The result is a shade one tone lighter than the previous one. The resulting color is applied to the index fingers of both hands. And so we move to the very end, each time adding one more drop of white varnish.
Nature rewarded every girl with her own shape of the nail plate, sometimes imperfect. The female gender strives to create an impeccable image, one of the components of which are well-groomed hands. Lucky women with long fingers with square nails do not have to rack their brains over the question of what manicure to do today. But for those with a small plate size, it will be more difficult. How to make a manicure on small nails so that it looks no less worthy than nail art on an elongated plate?
Advantages of a small nail plate
It is believed that long nails are a sign of femininity and sexuality. But it is not always possible to grow them and not for everyone. It would seem that modern technologies in the form of acrylic or gel extensions can come to the rescue. However, the result of their use is able to please the owner of long claws for a short time. After a week or two, to maintain an ideal appearance, regrown nails should be corrected, and this is an additional cost of money and time. In addition, the extension procedure does not affect the condition of the plates in the best way. Native nails are more practical, and with proper care, they always look good. But the extensions can break at any time and spoil the whole appearance.
Now very popular for small nails. Many fashionistas are happy to accept this trend due to its main advantage - practicality. In addition, the design of small nails looks just as impressive as nail art on long claws. But there are several conditions for this: a healthy appearance of the nail plates, well-groomed hands, regular cutting of the cuticle and varnishing without flaws and chips.
The basics of creating a flawless manicure on small nails
A spectacular manicure for small nails at home is possible subject to the following rules:
- Choosing the right one Rectangular nails are suitable for owners of long fingers, in other cases, a classic oval plate should be preferred. Properly selected shape visually lengthens the nail and finger as a whole.
- Removal of cuticles, burrs and rough skin. Trim manicure should be done weekly, because they must have a neat appearance. Removing the cuticle contributes to the visual lengthening of the small plate.
- Giving the nails the same length. This procedure requires special care, because on a short plate a deviation from the average by at least one millimeter becomes noticeable.
- Using a nourishing hand cream. Daily use of this tool is necessary, and a single application is not enough. It is necessary to use the cream after each washing of the hands, massaging them at the same time to improve blood circulation.
Hygienic component of manicure
A manicure for small nails will be spectacular and fashionable only if the periungual zone is well treated. This procedure at home is carried out as follows:
- Remove the remnants of the old coating.
- Shape your nails to the desired shape using a glass nail file.
- Make a warm bath for the fingers.
- Remove the softened cuticle by pushing it back with a manicure stick and trimming with tweezers or scissors. Get rid of burrs and rough skin.
After this procedure, the fingers will look gentle and neat. And it doesn’t take long to apply the coating on the nails.
Basics of the decorative component of manicure
In order to make small nails beautiful and elegant, you need to choose dark or bright shades of varnish. Mother-of-pearl varnish is categorically not recommended for use, because it contributes to a visual reduction in length.
When choosing the color of the coating, it is necessary to pay attention to the skin tone. If it is pale or yellowish, you need to use dark varnishes. And if the skin has a dark shade, it is recommended to use a coating of pastel or pink tones.
The choice of colors for nail art should be limited to two or three colors.

If the nail plate is too small and deeply recessed into the nail roller, it is recommended to use gel polish. To avoid sticking to one color for two to three weeks, it's best to choose a clear coat and use your favorite shades over it as often as you like. This must be remembered when doing such a manicure on small nails. Gel polish, unlike building, does not need to cut off the top layer of the nail. So, after this procedure, the plate will remain healthier.
The possible design options for small nails are described in detail below.
French manicure
Everyday French coverage involves the use of a transparent tone for the nail plate and white for a “smile”. If you need to look solemn, then you should choose other shades for the components of this manicure.

It looks stylish on small nails. And when applying dark varnish to the edge of the nail, you can visually increase the length of the plate.

How to do a French manicure on small nails? Photos will help to cope with this seemingly difficult task.

It serves to give a natural shine to the French manicure and helps keep the appearance of the nail neat for a long time.
Monochromatic coating
To date, there are many varnishes, various in color and texture, so it is not difficult to choose a coating to make on small nails. Photos of a possible design are presented here, but you should not be limited to the proposed options.

For a more stylish manicure, you can give each nail its own shade, and the colors used can be either from the same color range or contrastingly different from each other.

Look good on small nail plates as matte varnishes and glossy. You can use a variety of shades - from pastel to dark.
The highlight of the manicure can be highlighting the nail of the ring finger with a varnish of a different texture or even a different color.
Newspaper manicure
To make a manicure on small nails using a newspaper font, you need to proceed as follows:
ombre effect
The ombre effect is a smooth transition from one shade of varnish to another, while the border of the color change should not be noticeable.

Using this technology, you can make a manicure on very small nails.
Indeed, with the correct arrangement of shades, you can achieve the effect of a visual lengthening of the plate. The lightest shade should be placed at the base of the nail, and the darkest shade should be placed at the edge.
The lacquering process is as follows:
- Coat your nails with a base shade.
- Apply the selected shades to the foam rubber sponge in the required sequence.

Coating with a pattern
To get a beautiful manicure on small nails using a pattern, you should try these options:
- Contrasting design. The use of white at the base of the nail and black at the edge visually increases its length.

- Small horizontal stripes. This manicure looks bright and stylish. It is made using special stickers for nails.

- Pastel rhombuses with sequins. This design gives the nails a delicate and original look.

- Multicolored horizontal lines. To achieve the maximum effect, their width should not be the same, the colors of the coating should also be different.

If you have small nails, they must be well-groomed, without burrs, regrown cuticles and rough skin. In this case, design is not the problem. Manicure for small nails has a number of features, given which, you can achieve a stylish and spectacular look for your hands. Feel free to use the technologies of French manicure, monochrome coating, ombre effect, newspaper nail art and various patterns.