How to make a braided headband. Headband braid with loose hair: how to create a fashionable hairstyle? DIY French braid headband

Beautifully braided hair has always looked very elegant and romantic. They are able to show all the beauty of a woman’s face and emphasize her special individuality. If a beautiful lady has medium or long hair, then braiding any braid, including a headband braid, is not difficult.
But don't worry if you're not a braider. After reading this article carefully, you will understand how to braid a headband from hair of any length, but we will focus on short ones, since braiding is easier on long and medium ones.

Classic French braid headband
This type of weaving has long been one of the most popular and beautiful. Braiding a braided headband in the French style is not at all difficult. Follow these steps step by step:
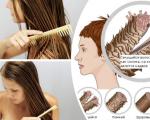
- Comb the strands with a small comb and divide the hair mass horizontally. The front should be slightly narrower than the back. For convenience, the front part can be moistened with water or foam (mousse). Start braiding the headband on the side that feels comfortable to you. It is more comfortable for left-handed people to start weaving from right to left, for right-handed people - vice versa.
- Divide the front part of your hair on the left or right into three parts and you can start weaving, you need to do this the same way you would start.
- It is necessary to place the left strand in the center of the braid, separate a thin strand from the loose hair and add it to the main part. The strands need to be draped over the top.
- The same manipulation must be done with the right side. Again, the strands need to be woven over the main braid.
- In this way, braid the braid to the very end. When you get to it, secure it with an elastic band.
Advice! The end of the braid can be discreetly secured with a bobby pin under the back of your loose hair.

A beautiful classic braid headband, created independently, in the French style is ready. The back of the hair can be curled for extra volume. You will certainly be irresistible!
“Waterfall” created on short hair
Hairdressers call this hairstyle “not quite an ordinary headband braid.” In order to create such a chic hairstyle, you need to prepare only two things in advance - a thin comb and an elastic band that matches the color of your hair. So let's get started:
- Comb your hair thoroughly.
- We take a straightener, curling iron or hair dryer with a diffuser (as convenient for you) and curl your curls. This should be done so that in the future the finished hairstyle will look more impressive.
- From the side that is comfortable for you, at the temporal part we separate the strand. Distribute it into three equal parts. Recommendation! Keep in mind that the wider you separate the initial strand, the thicker the hoop braid will be later on.
- You can start braiding in the standard way. After you have sung a few centimeters, move on to. To do this, leave the strand located on top at the bottom. Replace it with new, woven strands located below.
- Weaving a braid with a headband should continue according to the same principle - let go of one strand and weave in another.
- If desired, a “waterfall” is braided from one ear to the other, creating a “waterfall-rim”. If there is no desire or your hands are tired (braiding your own hair is quite a tedious task), you can finish the braid in the middle. Secure the braid with an elastic band that matches the color of your curls or using a beautiful “crab” or hairpin.
Advice! You can create a headband from a braid by braiding two braids, from one ear to the middle of the head and from the second ear, also to the middle. The braids will “meet” at the top of the head and secure them there, combining two beautiful “waterfalls” into one common one.

Combination of a bun and a braided headband
A woman's short hair requires a variety of braiding options. The next hairstyle combines the most popular elements - a braid and a “bun”, as it is also called. As a result, you will end up with not only a bun, but also a hoop with an unusual braid weave.
- Comb your hair thoroughly using a fine comb.
- Armed with a curling iron or iron, we make curls. This will give your hair a special texture and volume.
- Now divide all your hair vertically into three parts equal in width.
- From the part located in the middle, you need to form a “bun”; you can do this in any way that is convenient for you.
- Braid the strands located on the sides into two braids, using the French method. Weaving must be done from the forehead, towards the place where the bun is located. Advice! can be braided either in the standard way or.
- Secure the end of the braids with a thin elastic band and secure at the base of the bun using bobby pins.

Your friends will probably ask you to braid them when they see you with this hairstyle!
Classic hair headband
Such a braid, braided at home, will turn even the most ordinary girl into a real beauty. By following the following weaving pattern, you will create “beauty” on your head in a matter of minutes. Where to begin? The scheme is simple:
- As always, we comb our hair carefully.
- It is necessary to separate the hair horizontally from one temple to the other. The rest of the hair, so that it does not interfere, is secured at the back of the head using a hairpin.
- Divide the strands at one temple into three parts, of course, equal in volume.
- Start braiding your hair inside out, in the French style. Curls must be added under the bottom of the “main” braid, gradually adding thin strands to the right and left.
- The braid should continue until it “reaches” the opposite temple. When the braid reaches the ear, continue braiding like a regular braid.
- Fix the end using an elastic band, preferably matching the color of your curls. Advice! If some hairs get out of the main weave, they need to be lightly sprayed with varnish and carefully hidden inside. To do this, use invisible ones.
- To make the braided headband look more, gently pull the loops of the braid, as if stretching them.
- The remaining unbraided hair can be curled with a curling iron.

Take into account! Such braided headbands can be braided not only on short hair. Having made them long or medium, you will certainly be irresistible to the envy of other girls!

So, you have learned how to braid a headband using the most popular braiding techniques. Develop your skills and be irresistible!
Video: Hairstyle “One-sided French braid headband”
A variety of weaving options allow you to create new styles and experiment with shape and style. Spikelets add femininity, elegance, and lightness to the look. An evening event, daily chores, a long-awaited date - hairstyles will be appropriate for any occasion. The braid headband has several weaving options. Depending on the structure and length of the hair, you may not be limited to one model.
general description
In Ancient Rome, styling fashions changed quite often. The empresses were the legislators, who gave new shapes to their curls several times a day. Braids and headbands were first mentioned in the Ancient Roman Empire, which were part of a frame hairstyle. They were woven in several tiers around the head, and the first hairdressers at that time were slaves. , you will find on our website.
Braids on the forehead received a new round of popularity in the last century. Revolutions and wars also left their mark on trends in hairdressing. Women's short, practical haircuts have appeared that make daily care easier. Those who did not want to say goodbye to long locks braided them into neat braids with headbands.
The hairstyle has several names - a braid on the forehead, a headband, a hoop. The weaving is located in the parietal region; hair can be collected on the crown and back of the head. You can braid short, medium and below shoulder level strands. A braid is created on a straight, curly structure. It goes well with bangs; for young ladies with a neat forehead, a model without locks on the face will suit.

Braid with loose hair
- Comb your hair using a flat comb, backcombing in the area of the crown and crown.
- Select a strand symmetrically at the left and right temple.
- Braid three-point braids one by one from the selected curls, tying the ends with elastic bands.
- Throw the right braid around the head to the left side, secure it under the bouffant with bobby pins.
- Lay out the left braid in the same way.
- Loose hair can be twisted into playful curls.
Various options for weaving and styling braids
A mid-length headband is suitable for those with flawless facial features. Emphasizes the correct oval, corrects an elongated, triangular, diamond shape. Suitable for everyday styling, the hairstyle is also appropriate for exceptional, special events. It is important to pay attention to the skin tone, maximum emphasis on the face, so the covers must be flawless.
A gathered spikelet around the head suits slender girls. It is not recommended for chubby young ladies; the shape of the hairstyle will only highlight flaws. Stylish hairstyle should be emphasized with bright makeup, as well as choosing jewelry that matches the event. You can weave not only a standard spikelet. By experimenting with fishtail and reverse braid techniques, it is easy to achieve perfection.
goes well with braided hair. Suitable for elongated and triangular shapes, careless, graduated - ideally hides imperfections in appearance, corrects oval shapes. The hairstyle opens the neck line and emphasizes the graceful silhouette.
The combination of bangs and locks on the face has the properties of contouring an oval shape and will hide skin imperfections. Universal styling is suitable for different age categories and is also appropriate for a business dress code. Careless execution creates a light, romantic image, emphasizing femininity and soft lines.
Smooth spikelets that duplicate the shape of the head are suitable for young girls with model parameters. The hairstyle looks stylish, modern, the classic model emphasizes the freshness and beauty of youth. Original jewelry turns practical, everyday styling into a formal hairstyle.
You can create a headband braid on short and medium-length curls. Stacked strands give a neat shape to the hair; the hairstyle suits different types of appearance. You can do without accessories; the spikelet will decorate the whole image.
A spike around the head on long, flowing locks is suitable for special occasions. Excellent styling to highlight luxurious flowing locks. The hairstyle visually makes you taller, slimmer; half-tied hair with a braid creates the image of a goddess.
Advantages and disadvantages
Traditional styling continues to be popular today. Features of implementation, advantages and disadvantages will allow you to determine the optimal model.
Pros:
- simplicity, ease of execution, you can braid your own hair;
- practical hairstyle maintains a neat shape throughout the day;
- suitable for different styles and trends;
- various variations of execution allow you to choose a styling for each type of appearance;
- has a rejuvenating, corrective effect;
- it is performed for short, medium length, looks luxurious on long curls, you can create weaving on straight, curly, curly hair;
- corresponds to the latest trends in hairdressing;
- Can be used as a hairstyle for every day; even without accessories, the elegant model is suitable for a social evening.
Minuses:
- requires the use of styling products;
- models with collected curls do not suit round and square ovals.
Stellar examples
Selena Gomez chooses a braid model around the head with loose strands.
Jessica Alba They use classic hairstyles, captivating with their external perfection at social events.
Taylor Swift I chose a thin braided headband and long bangs for one of the ceremonies. The mysterious and gentle image did not go unnoticed by the paparazzi.
Drew Barrymore also went out with a neatly collected braid.


Hairstyle is one of the main elements of any person’s style. Beautifully styled hair can give a unique look. And one of the most popular hairstyles now is the headband braid, suitable for any type of appearance and event.
Fashion detail
Using only your own hair, it is considered fashionable and suitable for any age, but looks especially good on a young girl. Make it for a person with any curls - straight or wavy, dark or light, and even short or long. An additional advantage is that it can be worn with any style of clothing - from business to sports.
The headband is a fashion trend and is suitable for any wearing options:
on a date (an excellent option in this case is a braided headband with loose hair);
to a gala party;
to visit a cafe or restaurant.
Options for weaving a hair headband with your own hands
There are several known ways to weave a headband. These include using a braid (single or double) or a French braid as a base. In addition, you can not complete the braiding to the end, but secure the braided hair at the second temple and hide it under the rest of the hairstyle.
French braid headband
In order to get a headband from a French braid, you will need a hair dryer, a comb with a ponytail and an elastic band. It usually takes no more than a quarter of an hour to make a hairstyle.
The work includes 5 simple steps:
- Completing the work at the required level and securing the hair with an elastic band.
Washing and drying hair. Just before you start weaving, you also need to comb them. Heavily fluffy curls should be straightened out with a straightener, and thin ones should be combed at the roots to give them volume;
Selecting three strands of equal thickness at the temple and lubricating them with styling foam, which will ensure the safety of the weave for at least the next day;
By grabbing and weaving new strands, which are taken from only one side - from the bangs. The first is placed on top of the second and, spreading them apart with your fingers, a new curl is placed inside from the side. Weaving is required until the braid reaches the second temple;
Continuation of weaving downwards, with the weaving of new strands, which allows you to collect all the strands in one braid;
Quick option with loose hair
In the absence of time for weaving and experience in how to make a headband from hair, a simplified option is possible - of two.
Separate two curls on each side, choosing the thickness depending on your own preferences. Loose strands are secured with hairpins. Each curl becomes the basis for a regular braid, the end of which is left equal to approximately 2–4 cm. They are fixed with elastic bands. Now you should wrap one braid over your head and secure it slightly below your ear. The second is placed in parallel, retreating by 1–2 cm. And the remaining strands are either left free or placed in a hairstyle.
Twisted hairstyle for short hair
There is an option in which the headband is not weaved, but twisted. Although it will require some dexterity and the presence of a comb, hairspray and the same “invisibility” devices. The curls are separated at each turn, secured with varnish and twisted with flagella. Now comes the turn of the head and securing the hairstyle on both sides.
They require some modification of the process - here, first dividing the hairstyle (the 2 parts should be unequal), twisting the strands moving from either ear to the temple on the opposite side will do. As you work, short strands of hair should be inserted into the braid and secured with varnish and bobby pins. Look good for everyday wear or at a party. Several hairpins arranged in a circle, reminiscent of a crown, have approximately the same effect.
An image that complements becomes more elegant and feminine. At the same time, it will not take much time to create it. And the result will be worthy and memorable.
Hairstyle is an integral part of every girl’s image, as it helps highlight facial features and create her own unique style. There are tons of hairstyles for different lengths of hair, so there is no shortage of ideas. But most of the fair half of humanity are simply lazy, because in order to make a beautiful and neat hairstyle, you need to spend a lot of time. We present to your attention a great idea on how to style your locks: a headband braid! Let's look at how to create this hairstyle yourself.
This weaving technique was invented by French women, who, as you know, are distinguished by their remarkable taste and desire to always look beautiful. Soon after its invention, this hairstyle spread among women of a wide variety of nationalities. Russian women also adopted the method of weaving a “French” braid, because to make it, you don’t need to have long hair: it is suitable even for short strands. Moreover, creating a headband from hair will not take much time. Of course, in the initial stages, when you are just learning how to make a braid yourself, you will need to spend 10-20 minutes, but in the future you will be able to do this hairstyle in no time!
A braid around the head is a universal way to look unusual and attractive. This hairstyle is suitable for almost all occasions:
- For everyday wear. To keep your hair out of the way, just braid it at the front into a headband braid, and at the back it will fall beautifully onto your back;
- For special occasions. This weaving technique makes an impression on others. The headband braid looks impressive in any case, so you can safely do it for going out. If you want to add charm to your look, it is recommended to curl your strands in light waves;
- For Wedding. To look feminine and romantic, you can make a braid headband for the bride for her wedding. But to prevent the hairstyle from looking too simple, stylists advise not to neglect hair jewelry, which will add solemnity to the appearance.
There are four types of headband braids: “French braid”, “Dutch braid”, “Dutch half braid”, “Drawstring braid”. To find out how to make them yourself, read on!
"French braid": weaving technique
- First, you need to separate the hair growing closer to the forehead into one section. We will weave a headband directly from this hair. Remove the remaining hair so that it does not bother you;
- Take a section of hair that starts from your left ear. To weave the headband, divide this strand into three parts;
- Next, start braiding. Gradually weave in loose strands. Continue this step until you reach the tip of the right ear;
- Carefully secure the braid with bobby pins.
- Unravel the hair that was previously tied up and comb it.
Done, now you have learned how to make a fashionable hairstyle! As we can see, weaving a headband braid using the French braid technique is not at all difficult. This hairstyle is suitable for hair of any length.
“Braid-lace”: how to weave?
 Braid-lace: hairstyle photo
 A lace braid, or, as it is also called, a French half-braid, is woven in almost the same way as a French braid, the weaving technique of which we discussed above. This hairstyle weaves even faster and easier. Let's look at the step-by-step technique for creating such a hairstyle:
- As in the first case, separate the top section of hair from the bottom of the head. Collect any hair you don't need while working with an elastic band;
- Start braiding from the right or left side, but do not weave other strands into it. That is, your head will be decorated with a kind of “lace” of hair;
- Secure your hair with bobby pins.
This weaving technique is suitable for those with fairly long hair.
"Dutch braid": weaving technique

- Separate the front section of hair from the parting towards the left ear. Tie the part of the hair that you will not be working with into a ponytail so that it does not bother you;
- Separate a bunch of hair, starting from the parting, divide it into three strands;
- Place the back strand over the middle one;
- Pry the front strand under the middle one;
- Throw the back strand over the middle one again;
- Repeat steps 3, 4, 5, weaving other strands into the headband. You need to make sure that the hair does not fall out of the braid - then the hairstyle will turn out neat;
- The last step is to secure the braid with bobby pins as tightly as possible.
The “Dutch braid” differs slightly in its weaving technique from the classic French headband, but its appearance is not very different.
"Dutch half braid"

The only difference between a Dutch half-braid and a Dutch braid is that at the stage of weaving the headband, you do not need to weave the hair into the resulting braid, but simply create a hairstyle using the braiding technique given above.
Above are four techniques for weaving the popular French headband braid. At first glance, it may seem that making such a hairstyle is very difficult, but, in fact, a few hours of practice will solve everything.
The French braid headband has aesthetic and practical significance. The first is the visual originality and beauty of the hairstyle using such a braid. The second is one of the ways to remove hair from your face so as not to interfere, and also to hide your bangs.
How to french braid headband
- Prepare a suitable elastic band or hair clip.
- Wash and dry your hair.
- Comb your hair thoroughly.
- Leave a row of hair loose from the face to weave into the headband.
- Select three identical strands from the side of the temple.
- Place the outermost strand from the face onto the central one, then place the side strand opposite the face onto the central one (braid like a regular three-strand braid).
- Next, place the outermost strand from the face onto the central one, grabbing a strand of loose hair from step No. 4. Then place the outer strand opposite to the face on the central one without grabbing any loose hair.
- So weave to the opposite temple.
- Continue weaving the braid downwards, grabbing strands from both sides so that all the hair is woven into the braid.
- Braid the braid to the desired length.
- Secure the braid with an elastic band or hair clip.
Features of weaving a French braid with a headband
- Hair for braiding must be clean and dry.
- If your hair is curly and unruly, before braiding, apply hair styling foam to it to make the braid neat and tidy.
- The braided strands should be approximately the same thickness so that the braid has the appearance of a rim.
- For a neater look, you can straighten your hair with an iron before braiding.
- It is necessary to tighten the strands tightly to make the braid moderately tight.
- When the braid is ready, to make it more festive and airy, you can use your fingers to pull the strands a little to the side.
- For elegance, you can weave decorative ribbons of different colors into your braid.
- French braiding inward (dragon method).
- French braid outward.
- You can braid it to the opposite temple, and fasten the remaining hair with a thin elastic band and curl it with curling irons or roll it into a bun, securing it with hairpins.
- Braiding on both sides of the forehead - with two braids.
- Braiding with the release of part of the hair from the braid-rim.
- Braiding - French braid with hair bows.
Options for weaving a French braid with a headband
French braid headband A French braid headband can serve as an excellent option for an everyday hairstyle, as well as a hairstyle for a special occasion.
It weaves quite easily and quickly, suitable for both girls and women of different ages. It all depends on the selected accessories (hair bands, hair clips, decorative pins, etc.) and the style of braiding the headband.
A French braid headband can look good both in a neat, strict weave, and in a slightly careless look. At the same time, the hair should be well-groomed and clean. With the help of different options for weaving a French braid with a headband, you can always look different and delight others and yourself.