Acrylic nail extensions. Features of acrylic nail extensions Acrylic nail extensions technique
The requirements for the appearance of a modern woman who wants to play a leading role in life are quite high. Manicure today has become one of the most important components of a fashionable image. To make nails look perfect, they are modeled using special synthetic products. Now it is possible to purchase the necessary substances and tools, and then do acrylic nail extensions at home.
The history of nail modeling technology
Even in medieval China, they corrected the shape of nails with silk and varnish. In Europe, nails were modeled using similar methods in the nineteenth century. Even then we were thinking about how to grow our nails and make them more beautiful. 
Acrylic was first used to correct the nail plate in the middle of the last century. Then, for the first time, dental material was used to repair a nail. This composition was very toxic. The shape of the nails that could be obtained with its help was far from ideal.
Modern compositions for nail modeling no longer cause such harm to the health of the artist and the client. And nails that have been extended with acrylic are durable and elastic. 

Preparing for the nail extension procedure

What do you need to have on hand for nail extensions?
List of materials and tools:

How to behave so that nails that have been extended with acrylic last longer?
What do those who decide to get acrylic nail extensions need to know?


Types of nail modeling
On tips
This extension option is suitable for those who would like to do without gel and acrylic. Tips are plastic overlays in the shape of nails. They are glued with a special compound to the natural nail. Then the tips are given the desired shape. A suitable material is used to cover a natural nail with a tip. This is followed by polymerization. Finally, the artificial nail is filed and polished. 
This option is the easiest to implement and does not have the disadvantage of an unpleasant odor. Therefore, even children over 12 years old can grow their nails this way.
On forms
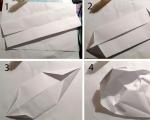
Here, paper or plastic templates are used for extensions. They are called forms. The template is applied to the nail or under its free edge. A composition is laid out on it that builds up the nail. The mold is removed after polymerization. Then the artificial nail is polished. 
On the upper forms
This is the most popular way to do it at home. It is simple and does not require special skills or extensive experience. The whole process will not take much time. 
Step-by-step instructions for modeling nails on the upper forms:

If you want to study the rules of nail extensions in even more detail, you can watch the video that is presented at the end of this article.
How to remove artificial acrylic nails?
You can remove acrylic from nails not only in a salon, but also on your own.

After removing artificial nails, you need to pay attention to caring for your natural ones. There are special vitamin pastes that are rubbed into the nails. You can make salt baths for them. 
Svetlana Markova
Beauty is like a precious stone: the simpler it is, the more precious it is!
Content
Recently, this procedure has become popular among many women. Just 1-2 hours of time - and you have beautiful, well-groomed, durable and strong nails. Any girl can become a master of creating artificial manicure by studying the technology of this process.
Acrylic nail extension technology
When learning the technique of nail extensions, it is important to follow the sequence of the procedure step by step. First you need to decide how to build it up: with forms or tips. When choosing the latter option, select them according to the shape and width of the nail plate, and glue them with special glue. The lower forms already have an adhesive backing, so it is only important to attach it evenly.
The technique of acrylic nail extension involves the interaction of acrylic powder (monomer) and the liquid in which it dissolves, forming a ball. It is applied to the prepared surface, stretched from the middle to the edges. You will need several of these balls until completely covered. Then a hard nail file is used to give the desired shape and length. The last stages are grinding and polishing.

Removing acrylic powder coating is easier than gel coating, which can only be filed off with a nail file. The powder dissolves well with the help of a monomer (liquid) - a liquid for removing artificial turf. Sometimes acetone or nail polish remover is used for this purpose. You need to keep your nails in the solution and remove the remains with an orange tree stick, after which you can strengthen them.
For tips
Beginners are better off choosing acrylic nail extensions using tips: modeling the shape is easier and the process takes less time. The tips are made of plastic and have a contact zone on the inside, which is attached to the nail plate with glue. Next, the desired length is selected, and the excess part needs to be trimmed. Tips come in different colors, you can make a transparent manicure, white, colored French.
Covering your nails with acrylic helps strengthen the plate - you can safely do any housework. When acrylic extensions are performed on tips that vary in size (from 1 to 10), the shape and size are selected strictly individually for each client, depending on the size of the nail plate. There are tips with a ready-made design, which allows you to make any manicure original.
On forms
It is a little more difficult to apply acrylic nail extensions to forms that are made from two types of material: paper and Teflon. Paper forms are made from disposable materials and can be thrown away after use. There are a number of advantages to using them: they are easy to work with, give any shape to a manicure, and they have an attractive price. Teflon molds are reusable and have a wire frame, with which they are attached to the plate.

Acrylic nail extensions at home
After studying step-by-step video and photo lessons, instructions, and completing training, any woman can master acrylic nail extensions at home. Before increasing them for a client, ask about his health. This system of creating an artificial manicure can harm girls with herpes, diabetes, and fungal diseases. People with allergies to harmful bulk substances and components of materials should also avoid manicure.
Start by preparing the plate: push back the cuticle, remove the top layer with a nail file. Attach the form or glue the tip, give it the desired length, and go through it with a file. Degrease the surface, apply primer. Dip the brush into the monomer and then into the nail extension acrylic. When a ball is formed, place it in the middle of the plate and spread it towards the edges using pressing movements.
Repeat this process until completely covered. The layer should be thicker in the middle and taper off towards the edges. To complete the procedure, dip the brush into the monomer and smooth the surface with patting movements. When the coating is dry, remove the molds (if any). Proceed to filing, giving an even shape to the plate. The final stage is grinding and polishing.
An important point is the process of removing such coating. To do this, you will need a cleaning agent: soak a cotton swab in it, apply it to the plate, and wrap everything on top with foil. After 15-20 minutes, all materials are removed along with the coating. If necessary, use a manicure spatula. After removal, you need to properly care for the nail surface. Good means to strengthen it are glycerin, aloe, and lemon oil.
What you need for acrylic nail extensions
If you have carefully studied the technology, video and photo lessons, make a list and buy the necessary equipment, materials for acrylic nail extensions: liquid, primer, brush, files, tips (forms), grinder, orange sticks, glue, acrylic for nails. You can also purchase a ready-made set in online stores, where you can see photos of the products offered.
Beautiful and well-groomed nails always make a good impression, so every woman takes care of this. In almost every woman's cosmetic bag you can find nail care products - nail files, nail polish removers, varnishes, etc. But this is not enough to always keep your nails in perfect condition. Often they break, peel, and then their appearance leaves much to be desired, despite all efforts.
In this case, extensions will help, giving your hands an ideal look, despite all their problems. You won’t have to worry about the imperfection of your manicure; your nails will be of sufficient length and with a beautiful design.
What is acrylic extensions?
Acrylic extensions are considered the most acceptable method. Many beauty salons offer artificial nails, but you can actually do a great job at home if you learn how to do acrylic nails. Try to make your hands the height of perfection!
The substance acrylic is a polymer material that contains derivatives of two acids - acrylic and methacrylic. There are many types of acrylic, it depends on the reagents used. As a result of the interaction of various substances, a durable transparent material is obtained, which makes nails beautiful and strong. A new nail is formed from this material, and it does not have a negative effect on the nail plate. Acrylic nails last quite a long time.

This substance began to be used in manicure quite by accident. One dentist wanted to strengthen his nail with a substance he used to treat his teeth. And he succeeded. When you visited the dentist's office, you probably remember that specific smell.
Since then, acrylic extensions have been available in many salons. Now every girl can learn how to extend nails with acrylic at home. The polymer and monomer in its composition give this substance special plasticity and rapid drying, just like a tooth filling. But still, do not forget about safety precautions and prevent the substances used from getting into the respiratory or visual organs. This may damage them.
For extensions, recently they prefer to use monomer, since their smell is not so persistent. A type of acrylic called ethyl methacryate is the safest material, but its price is higher than other materials used for extensions.

Any woman can do acrylic extensions if she has all the necessary tools. In fact, the technology of nail extensions is quite simple. There are special frames or tips that serve as the base and are attached to the plate itself.
For acrylic extensions, paper blanks – forms for extensions – can be used. They are removed when the acrylic dries. Such forms are more often used in salons, since they are easier to correct there. At home, you will need an assistant who will make the correction. It is quite difficult to perform such a procedure with one hand. Therefore, it is better to take ready-made tips that can simply be easily glued.

Necessary materials for extensions
To make acrylic extensions yourself, you will need to visit a specialized store and purchase the following materials there:
- acrylic powder is a quick-hardening substance that can be either transparent or multi-colored. This makes the manicure especially attractive;
- the liquid serves to polymerize the acrylic coating;
- The primer promotes better adhesion of acrylic to the nail. If the extension takes place using tips, then this tool is not necessary;
- solvent - a liquid that removes the previous coating;
- the disinfectant helps to effectively clean the surface;
- brushes are one of the main tools, their shape depends on the preferences of the master;
- monomer;
- types and forms;
- tip cutter - a tool that allows you to reduce tips;
- files (one of them should be made from orange wood);
- polishing block for correcting nail plates.
There are entire kits that contain all the necessary tools for extensions.

Acrylic nail extension step by step
Nail extension with acrylic on tips
There must be enough free space to carry out the procedure, otherwise it will be difficult to carry out. All necessary items must be prepared in advance. The light should be bright enough, so make sure you have a bright lamp to illuminate your work.

- The skin of your hands should be clean, so you need to wash them thoroughly and wipe them with a degreaser or lotion containing alcohol. This will degrease the surface of the skin, which is quite important for further work.
- Take care to remove the cuticle. Orange tree sticks perfectly remove it without a trace.
- The surface of the nail should not remain shiny, so it must be polished with nail files. In order for the tips to adhere well, the nail plate must be rough. But do not overdo it, too intense treatment can damage the nail. Use nail files only in one direction to prevent this.
- Tips come in different shapes, so you can choose any shape you like. Even if the tips are a little wide, this is not critical, since the file will help correct all the inconveniences.
- Tips must be glued to the nail plate tightly, leaving no empty spaces.
- Long tips are cut with a tip cutter. If you are doing extensions for the first time, then do not make your nails too long. Let them be half a centimeter longer.
- A nail file can be used to give any shape to your nail.
- Prime your nails with primer and let them dry.
- Take brushes and acrylic powder. The brushes need to be kept in monomer; lumps are made from the powder. The lump needs to be crushed on the nail plate. It is necessary to make small strokes, pressing lightly, on the edge of the nail you should get a thicker layer than in the cuticle area. The tips must be well glued to the nail so that they do not peel off during the process.
- A brush and monomer will help make the plate absolutely smooth, so that in the future it will be easy to apply any design to it.
- Treat the surface with files and polishers when it is 100 percent dry.
- Before you create your design, paint your nails with clear polish. Avoid putting your hands in too much sun to prevent the acrylic from yellowing.
- After all this, you can create any nail design.

Form nail extensions
Let's look at how to extend nails with acrylic onto forms; step-by-step instructions will help you figure it out.
- Wash and disinfect the skin of your hands. Roughen the nail plate with a file.
- Remove cuticles with a fine-grain file.
- Prime your nails with primer until they have a beautiful shine.
- Take the form and place it on your finger so that it is at the corners of the nail. This way they will hold on tighter. In the middle of the nail, the form must be pressed harder.
- Treat the plate with the mold again with primer. Then apply acrylic to the brush and spread it.
- Two balls are applied to the plate itself, and one of them is applied to the cuticle.
- When the acrylic dries, the mold is removed and the plate is leveled. Use a coarse file to file the sides of your nails and then the end. Then the surface must be properly sanded with a fine file.
- To avoid scratches, take the oil and treat the nail plate. See how the work done looks in bright light.
- Apply clear varnish.

Positive and negative sides of extensions
Positive aspects
Many girls doubt and think about how to extend their nails, because they can be done with acrylic or gel. Let's look at the positive aspects of acrylic coating:
- There is no need to paint your nails all the time.
- Acrylic holds tightly even when applied in a thin layer, making it look more natural.
- Removing the acrylic coating is quite easy and the nail remains intact and unharmed. A special liquid dissolves the composition.
- All cracks and irregularities are quickly eliminated without the need to replace them.
- You can apply any pattern or design to acrylic nails.
- Acrylic extensions are also done on the legs. As a result, much less money is spent on manicures and pedicures, since there is no need to do them too often.
- Such material gives scope for fantasy and imagination. To carry out acrylic extensions, you should look at photos of various drawings, and you can implement one of them.

Undesirable consequences of extension
- If cheap materials are used for acrylic extensions, then the nails will have an unpleasant odor.
- After some time, the acrylic still comes off. The gel in this case is more durable.
- Some components cause allergies.
- Too much housework can cause the nail plate to become dull, which will force you to use additional glitter polishes.
Contraindications:
- Damage to the nail plate,
- fungus,
- intense sweating,
- treatment with hormonal pills,
- bronchial asthma.
Nail care after extensions
You not only need to know how to add acrylic nails at home, but also how to care for them afterwards. They require adjustments every two weeks to maintain a beautiful appearance. You should carefully care for the cuticle, get rid of excess skin in a timely manner so that it does not spoil the entire effect of a beautiful manicure. Nails grow in two weeks, so they need to be filed.

When you decide it's time to remove your nail extensions, you should treat them with nail polish remover to get rid of them. Next, you need to trim it short with scissors. To remove the acrylic coating, you will need a special liquid for this. It is necessary to maintain the nails for several minutes in this liquid. Orange tree sticks are easily removed by liquid acrylic.
After this, your nails will require a little work. Use special restorative substances that will care for them and promote their health to restore the outer layer. Glycerin, oils, aloe, vitamin are great for this. Chamomile baths soothe the skin and promote rapid recovery. It is better to let your nails rest for a while and do not use varnishes or any other substances with acetone, and do not file them.
Successful nail extension with acrylic powder is determined by the strength of this porous material. It’s not surprising, because acrylic came to the world of female beauty from dentistry, where it worked for the benefit of damaged tooth enamel.
The nail service technicians only had to slightly modify the specific material so that it could be used for an excellent women's manicure. And now the fruits of design improvement are demonstrated in our hands, or rather, in our hands.

How does acrylic powder work?

Acrylic powder is a porous polymer powder, which, in turn, means that when it is on our nails, it gives them full access to oxygen. We emphasized the last point specifically for opponents of such technologies. But the point here is that nails do not need to breathe, they are “dead”, that is, keratinized tissue. The living part of the nail is hidden under the cuticle, from where it actually grows and breathes through microcapillaries. But let's not argue, but let's continue about acrylic.

This plastic, quickly and firmly hardening material is intended and used not only for nail extensions, but also for strengthening them, creating voluminous decorative elements and shapes. And with the advent of a varied color palette in acrylic, it is possible to create the most delightful nail designs that can last on the nails for a long time without losing their brightness.

Agree, in our age of enormous speeds this is an important bonus. Plus, among the types of acrylic powders there are camouflage ones - they will help hide defects and imperfections of the nail plate; shiny and neon.

The same option for working with gel polish and acrylic powder has long been tested and approved by millions of grateful users. But today we are interested in acrylic for nail extensions, and we’ll talk about it.

Contraindications and restrictions
Before moving directly to the extension technique, you need to know in which cases you should abandon it.

- In case of any fungal disease or even suspicion of it. The greenhouse effect that occurs between the natural nail and the extended one will aggravate the disease. It won’t be long before you completely give up your dream of beautiful nails.
- Those with diabetes and hormonal disorders should not take risks.
- In case of intestinal diseases and acute stages of herpes, you should also refrain from the procedure.
- In addition, it is better to avoid extensions while taking antibiotics, a course of chemotherapy, and postpone until PMS stops.

Necessary products for acrylic extensions
Despite the fact that even a beginner can use this technique at home, you will have to spend money on purchasing starting materials. What you need:
- Nail degreasing agent.
- 180 grit file and coarse file.
- Tweezers for shaping the nail or special tubes.
- Soft sanding. They are buffs.

- Primer (also called acrylic base).
- Tips or paper forms (cones attached to nails for lengthening).

- Acrylic powder, of course. Its transparent appearance or camouflage.
- Monomer, also known as liquid, is used to dilute acrylic.
- Brushes.
- Brush cleaning products (brushliners), if you don’t want to throw them away after the first use.
Step by step instructions
So, you decided to do it yourself, and now it’s time to learn how to extend your nails with acrylic at home. At the very end of our article there will be videos posted for the most curious, but for now it’s time to take on practical lessons.
Every representative of the fairer sex dreams of having strong and strong nails. Unfortunately, this “luxury” is not granted to everyone. Therefore, girls are forced to look for ways to solve this issue. You can resort to traditional methods or use the achievements of modern cosmetology, but most often the result is expected in the future. A For the blitzkrieg in the manicure “battle” there is nail extension. It comes in acrylic and gel. In this material we will tell you about the technology of acrylic nail extensions and describe all the stages of acrylic nail extensions step by step.

Specifics of acrylic nail extensions
Girls with brittle, peeling and very flexible nails often resort to acrylic extensions, as this allows them to strengthen the nail and give it aesthetics. Also acrylic coating forms the correct direction of nail growth, which completely eliminates the process of its ingrowth. Compared to gel nails, acrylic nails have several advantages:
- Acrylic nails more durable than gel. The turnaround period for gel nails is 1-2 weeks, while for acrylic nails it is 2-3 weeks.
- The condition of the nail after removing the acrylic is much better than after gel coating. This is due to the fact that the mixture of acrylic with monomer is very active, and it is easily dissolved with acetone. Therefore, if you correctly carry out the procedure for removing extended nails, the damage caused to your nail plate will be minimal. To avoid damaging your natural nail, never tear the acrylic nail away from the natural one.
- Time spent on acrylic extensions is less time spent on gel, since the mixture of acrylic polymer and monomer dries very quickly in air and does not require drying in special UV lamps.
- Nails extended with acrylic, look more natural compared to gel ones.

But despite the visible advantages of the acrylic nail extension method, it It also has some negative points:
- During the extension procedure, acrylic has very strong and unpleasant smell. But it goes away immediately after it ends and does not appear while wearing nails. Craftsmen who are in constant contact with him are recommended to wear a protective mask.
- Acrylic is a dense and airtight material, so if you wear such nails for a long time, unpleasant consequences may occur, since the nail does not receive oxygen and the necessary substances for its growth.
- May cause mild allergic reactions and skin irritation.
- Acrylic nail extension not recommended during pregnancy, breastfeeding and taking hormonal medications. Since during these periods the natural nail can reject the artificial material.
- When used as topcoats acrylic varnish may change color and lose its shine.
- To remove old varnish it is better to use acetone-free liquid, because it dissolves acrylic.
- Nail extensions not recommended for psoriasis nails and other fungal diseases.
What is needed for the acrylic polymer nail extension procedure?
Acrylic nail extensions are carried out in two ways:
Nail extension with acrylic on tips
One third of the surface of the natural nail special flexible tips are glued. Next, the joints between the tips and the nail are leveled using a nail file. After this, the nail plate is covered with acrylic. When the material has completely dried, the extended nail is sanded and covered with a special protective coating.

Acrylic nail extensions on forms
Forms for extensions attached to the edge of the nail with a special hole. Then the shape and length of the nail itself is modeled with acrylic. After the material has completely hardened, the finished nail is sanded, given its final shape using a coarse file and covered with a protective layer.

Acrylic nail extensions can be done either at home or in a salon. So, what do you need to do acrylic nail extensions?, if you decide to make it yourself at home?
- Files for natural nails. These can be sandpaper with an abrasiveness of at least 150-180 grit, ceramic, glass or metal files.
- Buffs.
- Antistatic brush made from natural pile.
- Degreasers, dehydrators, preprimers, etc.
- Acrylic powder.
- Liquid (monomer).
- Tips or forms.
- Acrylic brushes.
- Disinfector.
- Set for dry manicure.
- Sanding files for artificial nails having an abrasiveness of either 80/80 or 100/100 and 120/180 grit.

To make it easier for you to imagine the whole essence of the process of creating an artificial nail, we will provide step-by-step instructions for acrylic nail extensions.
- Disinfection. Nail extensions, like any other cosmetic procedure, require preliminary disinfection using special disinfectants.

- Correction and polishing of the nail surface. Using files designed for natural nails, their length is adjusted and the top smooth layer of the nail plate is removed.

- Then The nail plate is polished using a buff to remove natural shine, varnish residues and household alkalis from the surface of nails. When working with a buff, you need to be extremely careful and careful, as you can damage the nail. Starting from the cuticle, move towards the free edge of the nail.


- Clean your nail from excess dust using an antistatic brush.

- After treating your nails with files, you need to degrease with special liquids.

- The construction material for nail extensions is acrylic powder, which in its structure resembles fine powder. Wet the tip of an acrylic brush in monomer and dip it in acrylic powder.
- Formed Apply the ball immediately to the nail or a workpiece.
- If you use tips, then the ball is applied at a distance of 2-3 mm from the cuticle, and if you use forms, then first the tip of the future nail is formed, and then the uncovered part of the nail plate. Align the nail with a brush so that so that the middle is thicker, and the layers at the edges are a little thinner.


- When using the mold, it is removed after the polymer has dried.. Next, use files for artificial nails with an abrasiveness of 80/80 or 100/100 grit to give the nail the desired length and shape. If there is a need to remove excessive thickness and unevenness of the extended nail, then use a file with an abrasiveness of 120/180 grit.
- As a final step treat the artificial nail with a buff.
Fashionable ideas for acrylic nail extensions with photos
The most important and interesting stage in nail extensions is creating a manicure design. We have made a selection of current options for decorating acrylic nails.
It is a classic of the manicure genre. It looks perfect on both natural and artificial nails. French can be done both during nail extensions with acrylic, and after extensions using varnishes.


Recently, it has become very fashionable to create flower-themed manicures. This design looks quite interesting and unusual.


With your help, you can create an unusual, fun and beautiful manicure at the same time, without spending a lot of time on it.


As an interesting option for manicure on acrylic nails, you can consider bright summer colors and designs.


The combination of black and white colors will probably never go out of fashion and will not lose its relevance.

n can understand the extension technique itself, clearly find out what tools and materials are needed.
Acrylic nails will help you look beautiful and feel more confident. The main thing is not to forget about proper care of artificial material, then your nails will last a very long time. A properly chosen manicure is already half of a beautiful look. If you have your own opinion on this topic or have your own interesting cases, then we are waiting for your comments.