Christmas decoration paper ball. To make a New Year's paper ball you will need
To make a ball out of paper, you can use one of the ready-made patterns or turn to the papier-mâché technique. First, let's analyze the method using ready-made templates.
Ball glued according to the finished scheme
For this project you will need the following:
- Paper
- Scissors
- Scheme of the ball (it can be)
Print and cut out the diagram along the contour lines, including labels for gluing its fragments. Glue all the strips one by one, moving clockwise. When the body of the ball is ready, let it dry, then apply glue to the round "cap" and gently press it to the ball.


As you can see, here gluing occurs in parallel on both sides. Each template from this file must be printed 6 times, cut out and glued together.
Ball of paper strips
Necessary tools and materials:
- Ruler and pencil
- Scissors
- Heavy paper
- Glue or double sided tape
Procedure:
1. Draw and cut the paper into equal strips. Remember that the width of the stripes determines the density of the figure, and the length determines its diameter.

For each ball you will need 6 strips of paper.
2. Roll one of the strips into a ring and glue the ends together. Set the ring aside, you'll need it later.

3. Bind the remaining 5 strips like this:

4. Next, place the ring in the center of the weave and tuck every second strip inside it, starting with any of those that were under the adjacent one when unfolded. For example, in our picture, this is the top green stripe.

Hold the ring in the middle of the workpiece so that the ball is even.
5. Then crosswise, alternating the top and bottom, weave the strips of paper over the ring, and glue the ends of the same color.

If you do everything right, the finished ball will consist of rings intertwined in the form of triangles and pentagons flowing into each other.
And once again this video lesson:
Papier-mâché paper ball
When making a papier-mâché figure, you cannot do without a special adhesive solution, which is made from white flour and cold water in a ratio of 1:5. In addition, to avoid the appearance of mold on finished products, a little salt can be added to the solution.
Mix a glass of flour and a glass of water in a small bowl, stir thoroughly and place over medium heat. Add 4 more glasses of water. Whisking constantly, bring the mixture to a jelly-like consistency (this process will take approximately 3-5 minutes). Then remove the bowl from the stove and let the contents cool to room temperature.
While the glue is cooling, prepare the following materials and tools:
- Balloon
- Paper cut into strips (newspaper, paper towels, or thick napkins work best)
- Brush for applying glue
- Gloves
Operating procedure:
1. First of all, you need to make the basis for the ball. Inflate the balloon so that it becomes round, but still soft enough. Pasting it with strips of paper, you can give it the correct spherical shape later.
2. Completely immerse the strip of paper in the cooled glue, remove excess solution with your fingers, and stick the paper on the ball. Repeat this procedure, evenly distributing the strips over the surface of the base, until you cover it entirely in 1 or 2 layers.

When the glue begins to thicken, adjust the shape of the figure by slightly squeezing it from all sides.
3. Put the figure on a plastic cup and leave it overnight to dry.
4. When the workpiece is dry, cover it with another 1-2 layers of paper and leave to dry for some more time.

Factory Christmas decorations are in almost every home. They are certainly very beautiful and, when well combined with other decorations in the house, can cause a worthy aesthetic effect. But just buying Christmas balls is boring. Uniqueness can be achieved only by making the decor of Christmas balls with your own hands.
Christmas balls from threads
The method of making balls from threads has long been used. Products are spectacular, amenable to additional decor. It is possible to vary the size.
For manufacturing, you will need: threads (with a large percentage of natural fibers in the composition for good impregnation with glue), PVA glue, a disposable cup, round balloons.
Manufacturing steps:
- Prepare glue for work. Strongly thick dilute to a state of sour cream density.
- Inflate the balloon to the extent that the size of the toy is planned.
- Soak 1 m lengths of thread in glue.
- Wrap in a "cobweb" way so that free holes do not exceed a diameter of 1 cm.
- Allow the glue to dry (12 to 24 hours).
- Remove the ball from the product, carefully bursting it and taking it out through the hole in the ball.
- Decorate the product. To do this, use: glitter, paper cuttings of various shapes, sequins, beads, semi-beads, etc. Thread products can also be dyed with balloon paint or acrylic. Watercolor and gouache are not suitable, as they can soak the product and lead to its damaged appearance.
Having made Christmas balls of different diameters, they can decorate any corner of the house: a Christmas tree, candlesticks, compositions in a vase, on a windowsill, etc. The decor of the balls can be done as follows: put a light garland on a tray, put on top products of different sizes, but of the same color. When the garland is on, they will be highlighted and create an interesting effect.
From beads
Balls made of beads will look very beautiful and impressive on the Christmas tree. In this case, the foam spheres of the blanks will be decorated. In addition to the foam blank, you will need beads, pins (sewing needles with hats, like on carnations), ribbon.
The manufacturing method is very simple:
- String one bead onto one pin.
- Attach the pin to the foam base.
- Repeat the steps until there is no free space left on the basis.
- At the end, attach a ribbon loop for hanging the decoration.
It is advisable to take beads of the same size in order to avoid empty spaces on the base. The color scheme is chosen both in one tone and in different ones. It all depends on individual preferences and the general style of decorating the room.
Instead of a foam base, you can use factory-made plastic balls. Only here the beads will be fastened in this case not on pins, but on hot glue.
From buttons
Button balls will look no less original and unique on the Christmas tree. Old unnecessary buttons do not have to be selected in the same color scheme. After all, they can always be repainted and achieve the desired shade. They look spectacular in gold, bronze, silver shades, as well as all colors with a metallic coating.
To make such a decor for Christmas balls, you will need: buttons (it is possible with through fastening and hidden), hot melt adhesive, foam or plastic blank, tape.
- Apply a small amount of hot glue to the inside of the button.
- Attach a button to the base.
- Repeat step 2 until the entire surface is covered with buttons.
- Attach a ribbon so that the ball can be hung.
When placing on a Christmas tree, you need to make sure that there are not too many of them concentrated in one place. It is better to dilute such decorations with others.
From paper
Original Christmas balls can be made simply from paper, without using any base.
colored paper ball
To do this, you need thick (about 120 g / m2) paper, scissors, clips, tape. Making your own is very easy.
- Cut paper into 12 strips 15 mm x 100 mm
- Fasten all the strips on one and the other side with pins, stepping back from the edge by 5-10 mm.
- Spread the strips in a circle, forming a sphere.
- Attach the ribbon to the base of the ball.
Strips can be cut not straight, but with other uneven lines. You can use curly scissors.
Corrugated paper
Corrugated paper will also come in handy. It is made from pom-pom balls. For this you will need: corrugated paper, glue, scissors, tape.
- If the paper is new and packaged, then 5 cm must be measured from the edge and cut off. Then again measure 5 cm and cut off.
- Cut two blanks with a “comb” with an interval of 1 cm strips without cutting to the base of 1.5 cm.
- Dissolve one blank and start twisting the “flower” in a circle, gradually gluing. Get a fluffy pom-pom. Repeat the same steps with the second piece.
- Connect two pom-pom blanks with glue at the place of gluing. Get a fluffy ball. Attach the tape-loop to the place of gluing. Fluff the resulting pompom.
Double sided colored paper
You can also make a ball out of double-sided colored paper. To do this, you need: colored paper, scissors, glue, a round object (a cup, for example), tape.
- Circle the cup on paper 8 times. You will get 8 equal circles. Cut them out.
- Fold each circle in quarters.
- Cut an additional circle with a smaller diameter.
- Glue the blanks to it with the corners to the center on one side (4 pieces will fit), and on the other side it’s the same.
- Open each fold and glue at the junction with each other. Get a ball with "petals".
- Attach tape.
Paper balls usually do not last long and are used for one season. It is not worth placing them in large numbers on the Christmas tree; it is better to “dilute” them with other decorations.
From fabric
If there was an old blouse in the closet that it is a pity to throw away, then refusing to dispose of it was the right decision. You can make a cute Christmas toy out of it. For manufacturing you need: knitted fabric, scissors, a sewing needle with thread, cardboard, ribbon.
- Cut as long as possible strips of fabric 1 cm wide. Stretch each strip so that it twists the edges.
- Cut a 10 cm x 20 cm piece of cardboard.
- Wrap the resulting strips on the cardboard in width.
- In the center on one side and the other, connect the strips with a needle and thread. Pull out the cardboard.
- Cut the formed loops along the edges.
- Fluff up and attach the ribbon.
There is another way, which involves decorating a foam or plastic blank with a cloth. You need any fabric (can be of different colors), hot glue, scissors.
- Cut the fabric into rectangular pieces, 3 cm x 4 cm in size.
- Fold them like this: turn the two upper corners to the center of the bottom.
- Glue to the workpiece in rows, bending inward starting from the bottom.
- Cover the entire ball. Attach tape.
Fabric applications can be made in a variety of ways, using additional improvised means - beads, braid, rhinestones, ribbon.
With embroidery
Decorating Christmas balls with your own hands is also possible in this way. A new trend has become the design of decorations for the Christmas tree with embroidery. To do this, use a pre-embroidered image. You also need a fabric, a blank made of foam or plastic, hot melt adhesive.
- Attach the embroidered image with glue.
- Decorate the rest of the ball with a fabric appliqué.
Instead of appliques, you can use the same fabric on which the embroidery was made. Alternatively, you can make a pattern out of fabric, where one of the parts will be embroidery. You can also decorate each part of the pattern with separate embroidered images and secure. After these steps, you can additionally add beads, rhinestones, sparkles, sequins as decor.
with filling
Such specimens will look spectacular both on the Christmas tree and as part of compositions from balls. To make unusual balls, you need to stock up on plastic transparent blanks.
By opening the hat-holder, you can create various compositions inside:
- Pour inside acrylic paint of different colors, shake the ball so that all the inner walls are painted, let dry. The pigment will color the workpiece inside and it will acquire a unique color.
- Fill the inside with small colored feathers and beads.
- You can also fill the inside with confetti of different colors.
- Pieces of old tinsel are used for filling.
- Favorite photos are also placed inside. To do this, you need to twist a small photo into a tube (look at the diameter of the ball) and straighten it inside. Top with confetti or sequins.
- The inside is filled with colored cotton wool and complemented with beads. You can choose different colors. It is better to paint in acrylic paint. Fill after complete drying of the cotton wool.
- Multi-colored sisal can be placed inside and enjoy the color and originality of the decoration.
Fantasies about filling a transparent ball can be different. All of them relate to personal preferences and mood during needlework.

Pleasant New Year's chores are one of the most wonderful components of the winter holiday. Among these chores, there is always a decoration of the house and the New Year tree.
Toys, garlands and other decorations can be bought at the store. Well, if there is a desire and a small amount of time, then you can take on the independent production of original and amazing jewelry. For example, make a Christmas ball out of colored paper.
DIY Christmas balls made of colored paper
A multi-colored volumetric ball will decorate not only the Christmas tree, but also walls, doors and windows.
To make crafts you will need:
- scissors;
- glue (pencil or ordinary stationery);
- ordinary glass or glass;
- a coil of thin wire or a stapler;
- colored paper (one-sided).
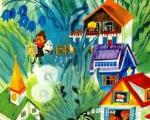
The paper ball in the photo above is made from several colors of paper (blue, cyan and orange). You can make a two-color ball or a solid color.
Operating procedure
For the ball, we need to cut out circles from paper. Well, to cut them out, we first draw them.
Step one - draw

You can use a compass to draw a circle. But it is not always available. Therefore, we take an ordinary glass or a glass of a suitable size, turn it over, put it on paper and circle it with a pencil. We draw as many circles as they fit on the sheet. For each ball you need 12 circles. If you decide to make a 2-color ball, then take 6 circles of each color equally. If 3-color - 4 circles.
Step two - cut out
After you have drawn the circles on paper, they need to be cut out. If you want to make not one, but several balls, you can fold a few more under the first sheet and cut out a stack of circles at once. This will save time on making crafts.
Step three - bend
Take a circle and bend it in half. We do this with all twelve circles, then stack them in a pile in a certain order. If 3 colors of paper are used (1,2 and 3), then the sequence will be: 122331122331. The sequence when using paper of 2 shades (1 and 2): 122112211221.

Step four - fasten
Perhaps the most difficult stage. If you are making a ball for the first time, you will have to tinker. It is necessary to carefully wrap a thin wire along the fold line, trying not to wrinkle the structure. Thus, we will fasten the circles. A more modern way is to fasten the mug at the fold with a stapler.

Step five - glue
You need to carefully straighten the halves of the circles of the resulting design, and then start gluing them together. Each half is glued to one adjacent half from below, and to the other adjacent half at the top.


Do not forget to glue a rope loop to one of the halves of the circle, for which you can hang our ball on the Christmas tree or in any other place of your choice.
There are many ways to make beautiful volumetric balls for the new year. In this material, we will consider several understandable and accessible for everyone to create unique jewelry. There is still time to make beautiful crafts with your own hands to decorate the Christmas tree, at home and just for gifts in honor of the New Year and Christmas to relatives and friends.
The ball is still the most popular Christmas tree toy. If a few years ago it was customary in many families to buy a new ball for the holiday, today a hand-made Christmas ball is especially appreciated. Christmas paper balls are beautiful and stylish, but you should also pay attention to other options for decorating this craft. For example, it can be old disks, fabric. Consider how to make Christmas balls in stages using different materials, and not just paper.


DIY Christmas balls: diagrams and explanations
From paper No. 1
The first toy is made from colored paper (choose three colors that go well together), you also need wire and glue, a stapler, a glass. It is necessary at the initial stage of work to take a glass and draw a circle on each sheet. Then cut out four circles and fold in half in a pile, alternating colors. First, it is better to take one color, then two others, then the one that was at the beginning. That is, the point is to stack the stack in such a way as to avoid repeating the colors one by one. Fasten the circles together, for this, wrap them with wire along the fold line. Connect the ends of the wire together.


Advice! If there is no wire at hand, then it is recommended to use a stapler to fasten the ends. In general, it is recommended to work with those materials with which it is more convenient, it is not necessary to strictly follow what the instructions say step by step. How to do it yourself.
After that, straighten the circles and glue the joints between them, glue is already used here. You need to glue the circles in such a way that the top of the circle of one color coincides with the bottom of the circle of another color. After the end of the gluing process, attach a satin ribbon to the wire and a paper ball will be ready, which is perfect not only for decorating a Christmas tree. Such crafts will perfectly decorate the interior of any room, they can be hung on windows, on a chandelier, on the ceiling: such balls raise a festive mood anywhere.


From paper number 2
Another interesting option is how to make your own unique paper ball with your own hands. This version of the craft is voluminous, the master class is perfect for the process of needlework with a child. The product is as simple as possible to make, but in appearance it turns out to be stylish.
What you need for work: paper of different colors (you can also take wrapping paper with various New Year's drawings), glue and scissors, a glass and a satin ribbon. Again, you will need to cut out eight circles from different paper using a glass. But the size of the circles should be different - from small to large enough.


Bend each circle in half, while focusing on the front side inside, glue everything. Be sure to glue additionally on the bend and after each such process, allow the crafts to dry at least a little. Pass a satin ribbon inside, and then glue the final voluminous paper ball. By themselves, these balls look stylish and pretty, they are also suitable for creating a beautiful and stylish garland, decorating a child's room or living room.
From pieces of discs
Two options for how paper balls are made were considered. In conclusion of this material, I would like to talk about another and original way to create beautiful spectacular balls for the Christmas tree. They will look especially stylish at night.
To work, you will need an old Christmas ball or just a foam blank, an old CD, satin ribbon and scissors, silver spray paint, glue. Carefully cut the disk into small pieces (this is the most difficult process, it is better to ask a man for help).


Now take the ball and paint it with spray cans, leave it to dry completely (in principle, the spray can be with paint of any color at your own discretion). After the workpiece dries, you can begin to glue pieces of the disk to the ball. Glue the entire ball, but there will still be gaps between the pieces. After that, attach a satin ribbon and you can already hang the ball on a Christmas tree or in another place where a unique New Year's decor is required.


This is how beautiful do-it-yourself paper balls are made step by step. Following simple and understandable schemes, as well as carefully viewing thematic photos and videos, there will definitely not be any problems with how to make a New Year's paper ball unique, neat and original. Happy holidays and pleasant preparations for the New Year and Christmas.
1. DIY Christmas ball (option 1)
To make this Christmas decoration, you will need colored paper, thin wire, a stapler, and glue. The balloon you see in the photo above was made from three different colors of paper (pink, blue and light blue).
Work plan:
1. Take a small glass or glass (glass) and circle it on paper with a simple pencil 12 times. You should have 12 circles (4 circles of each color). Cut out the circles with scissors.
2. Fold each circle in half and stack them together as shown in the picture below. We use paper in three colors (A, B and C) to make this Christmas ball. Stack the circles in the following sequence - ABBCCAABBCCA. If, when making a New Year's ball, you used paper of two colors (A and B), then in this case the circles had to be folded in the following sequence - ABBAABBAABBA.
3. Fasten the circles of paper together with a thin wire, wrapping it around them along the fold line. Twist the ends of the wire together. If you do not have wire, then you can fasten the circles with a regular stapler.
4. Spread the circles and glue the adjacent halves of the circles to each other. Each half must be connected to one adjacent at the top, and with the other - at the bottom.
2. DIY Christmas balls (option 2)
Cut out three circles of the same size but different colors from colored cardboard or thick paper. In the first of them cut a cross (fig. a), in the second circle make a horizontal cut in the middle and perpendicular to it two cuts in the direction from the circle to the center of the circle (fig. b), and in the third - four cuts in the form of a cross, also along direction from the circle to the center (Fig. c). Pass the circle "c" into the circle "b". In circle "a", bend the corners formed as a result of its incision; you get a square hole. Pass circles “b” and “c” into it, having previously folded them. Then straighten the corners again (fig. d). Attach a thread to the resulting ball.
3. Christmas paper balls (option 3)
From old postcards or colored paper, you can make such cute Christmas toys - Christmas balls. Detailed instructions for making this Christmas decoration can be found on our website at the link.
It is not necessary to make a large, complex ball; you can make a small Christmas ball with fewer parts.
And you can print ready-made colored circles for making a colorful Christmas ball using this technique.
4. Making a Christmas ball (option 4)
Very easy to make Christmas paper ball. To make it, you will need colored paper and glue.
Work plan:
1. Cut out eight identical circles from paper of different colors. Although, in fact, the number of circles can be any, but not less than three.
2. Fold each circle in half, right side inward.
3. Glue the halves of the circles together as shown in the photo below. Glue is applied to the wrong side of the halves of the circle.
4. Before finally sealing the New Year's ball, thread a thick thread or ribbon through it. You can also make a wonderful Christmas tree garland from a large number of paper balls.
Note: such a Christmas decoration can be made not only in the form of a ball, but also in any other shape. To do this, use, for example, the following stencils
5. DIY Christmas ball (option 5)
When making Christmas balls, you can use strips of paper of different colors and beads to decorate Christmas toys with your own hands. see link
If the strips of paper are bent in the middle, then you get such a New Year's decoration. Link to the New Year's master class
6. How to make a Christmas ball (option 6)
We suggest you make such a cute and easy-to-make New Year's craft from old postcards with your child.
1. Using a small glass or wine glass, draw and cut out eight identical circles.
2. Using another object with a round base but smaller in diameter, draw and cut out two small circles.
3. Fold each large circle in half, and then in half again. See photo below.
4. Glue four folded large circles on one small circle, the remaining four on the other. As a result, you will get two halves of your future Christmas ball.
It is very IMPORTANT to correctly place the quarters of the large circles on the small circle. Try to carefully straighten the "pockets" of the folded circles and in advance, before gluing, estimate the correctness of their location. At the same time, focus on the very first photo, which shows a finished ball.
5. Now you just have to glue the two finished halves together and, when the glue dries, straighten all the pockets. Christmas ball is ready!
7. DIY paper balls (option 7)
Making balls from thread:
1. You will need: scissors, balloons, fat cream (Vaseline), any yarn, PVA glue, a bowl.
2. Dilute PVA glue with water, approximately 3:1.
3. Inflate the balloon to the desired size, give it a round shape, tie it with a thread.
4. After unwinding the required amount of yarn, put it in a bowl and leave for 5 minutes.
5. We smear the ball with a fat cream and wrap it with yarn, first leaving a large distance between the thread.
6. Gradually reduce the distance between the threads until the whole ball is wrapped in yarn and resembles a cocoon.
7. Cut the thread and glue it to the ball. Leave it to dry (at least a day).
8. Gradually untying the balloon, gently blow it off, and then remove it from the thread cocoon; tie a rope to the thread ball on top for fastening.
9. The balloon is ready!
When making a ball, you can use yarn (threads) of any color or paint with any paint or sparkles (spray). Especially for the New Year, you can decorate this thread ball with tinsel and stars. Hang small balls on the Christmas tree, decorate the room with large ones. Fantasize more!
If you are unable to wind the glue-soaked thread around the ball, you can wind the dry thread, and then carefully soak it with glue with a brush or sponge.
Instead of glue, you can use sugar syrup or starch paste. To prepare the paste, take 3 teaspoons of starch in a glass of cold water, mix thoroughly and bring to a boil. Instead of a thread, you can take a thin copper wire and wind it around the ball in the same way.
9. New Year's do-it-yourself. New Year decoration
Old Christmas balls can be updated by wrapping each of them in a piece of beautiful fabric and tying it with a ribbon.