What can be done from white modules. Origami from modules for beginners: step by step instructions with photos and video tutorials
In this article we will tell you how to make the simplest origami from modules - a daisy flower.
The video at the end of the article shows the assembly of this wonderful craft. Such a chamomile can be given as a gift, because the best gift is a handmade one. Or you can do this origami with children, this is an interesting pastime that develops memory, accuracy and perseverance.
Assembly diagram
Assembling this product is quite simple, even a child or a person who does not have experience in making origami, a novice origami artist, can do it. Following the scheme, you, and possibly your children, will learn how to assemble crafts in the form of a chamomile flower from pieces of paper.
Step-by-step instructions for creating a simple modular origami flowers for beginners
- At the first stage, we must prepare the modules - the constituent parts of our origami.
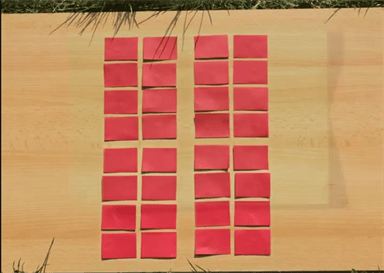
- Take a sheet of A4 paper and divide it into 16 equal rectangular pieces.
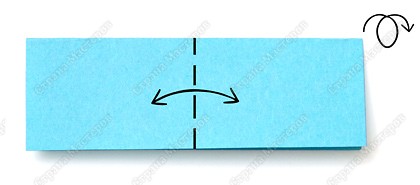
- Take one of the resulting rectangles and fold it in two, in half.
- We fold it again in the same way and unfold it back.
- We bend the edges of the rectangle down to get a semblance of a house.
- Then, in accordance with the diagram, we bend the lower part to make a triangle and fold it in half so that it can stand on the table.
The module is ready! It remains to prepare the rest. In total, we need 90 such particles: 20 pink, 20 yellow, 50 white. You can watch a detailed video tutorial at the end of the article on making such modules.
So, now we can start assembling our paper product.
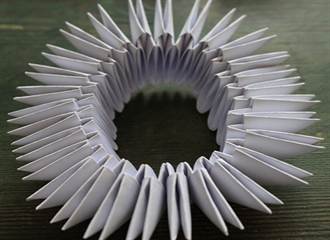
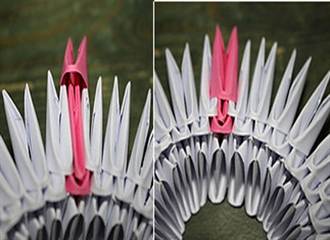
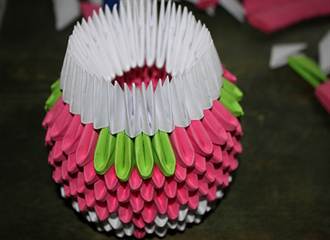
Let's take the modules from pink (or red) paper and fold the center of the chamomile out of them, threading the edges of some modules into others (see diagram). Before this, you need to prepare 20 pink or red modules. To make them hold on tight, you can apply a little colorless clerical glue.
- We cover the outer circumference of the resulting pink circle with ten yellow modules.
- Once again, we cover the resulting circle with ten yellow modules, after turning it over.
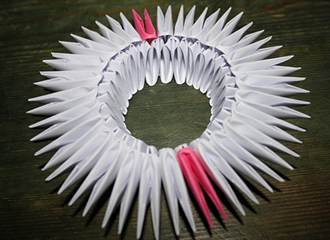
- Next, let's start creating the petals. To do this, take 20 white paper triangles and overlay them with a circle, putting 2 pieces on each yellow element.
- Then we put on 30 more white triangles in the same manner, but already three pieces for two elements from the outer ring.
- Thus, we have prepared a flower with a core and petals.
Now let's start creating a stem with leaves.
We need green electrical tape, which needs to be covered with a wire, or a stick, or a thin paper or plastic tube. Instead, you can also simply roll the paper into a thin, long cylinder.
We attach leaves to the stem, which we first cut out from a green paper sheet. Next, insert the end of the stem into the middle of the flower and admire our craft!

Video the simplest modular origami - flowers
The first video below shows the process of assembling a triangular module. The second video tutorial shows an example of assembling a similar flower, with the difference that it is made from smaller modules, the petals are longer, and more triangular elements were involved in the manufacture. But the principle is the same as in our instructions.
Article genre - Origami
Modular origami is a very exciting activity that gives a lot of room for creativity to everyone who has mastered the simple technique of making paper modules.
Before you make origami modules, you need to prepare a dense and cutting tool.
You can use special paper sheets designed for making origami, but their cost is usually quite high, so at least at the training stage it is better to use plain paper for a high-density printer - from 80 g / m 3 and above (for example, Spectra Color).
Before you make the modules, you will need to cut many identical rectangles out of paper. As a cutting tool, you can use ordinary scissors. But it is tedious to cut a large number of blanks with them, so it is more convenient to use an office cutter with a self-leveling mat.
We take a sheet of A4 format. Depending on the size of the modules, the paper sheet will need to be divided into 16 or 32 fragments. If we need 16 parts, fold the sheet horizontally two times, if 32 - three times. In the figure below, we folded the workpiece three times, if you need 16 workpieces, then do not do the last bend.

Now unfold the sheet and fold it in half vertically (the fold should remain on the left side). Then fold it in half horizontally 2 times. Expand the sheet. On it we will see the fold lines along which we have to cut blanks for the modules.

The sheet to be divided into 16 parts looks like this.

And this is how the sheet looks like, which will be divided into 32 parts.

Cut the sheet along the fold lines. From each small rectangle, we have to make an origami module, the assembly diagram of which is presented below. For beginners, it is better to start assembling modules from a 1/16 paper sheet. Modules from 1/32 turn out to be more miniature and elegant, but the process of assembling them requires some skill.
Module assembly scheme:

1- take a small rectangle;
2- fold it horizontally in half;
3- now fold in half vertically;
4- expand;
5- bend the "wings" on both sides;
6- turn over (curved ends are longer);
7- bend the corners;
8- we turn the protruding part together with the corners;
9- bend the module, it takes the form of a triangle.
10-expand the triangle and get a finished module with pockets, reminiscent of an airplane.
11, 12 - fastening modules with each other using pockets.
We collect chains of ready-made modules of 10 pieces. If there are more of them, then the chain will not be strong - this will affect the quality of the craft.
Using the modules as parts of the designer, you can create the most bizarre voluminous ones from them, which your imagination only tells you.
Volumetric origami is already a more complex type of this wonderful art. When the principle of simple assembly is mastered, it becomes interesting to try to do something more difficult. This will help schemes for beginners to assemble origami from triangular modules. To begin with, it is worth learning how to assemble the module itself.
Module Assembly
Origami modules can be not only triangular, but also square and rectangular. Here we consider the assembly diagram of a triangular module.
For the manufacture of modules, you will need many small rectangles. They can be made from A4 paper.
To get 53×74 mm rectangles, you need to cut the paper like this.

To make the rectangles 37x53, cut like this.

Fold the rectangle in half lengthwise.

Now bend across and unbend back.
Bend the corners to the fold in the middle.

Flip over to the other side.

Raise the bottom edge up.

Bend the corners through a large triangle and unbend.


Fold the corners inward along the already marked lines and lift the bottom edge up again.

Fold in half into a small triangle.

The finished modules have 2 corners and 2 pockets, with their help they are connected to each other. Having learned how to make modules, you can move on to making paper figures.
Hello Kitty cat

You can make any animal in this technique, an owl or a hare, for example, but now we will consider a scheme for the triangular modules for making a Hello Kitty cat.
You will need:
- White modules - 588 pieces;
- Pink modules - 132 pieces;
- Green modules - 14 pieces;
- Felt.
The first row is made of 28 white modules.
In the second row, you need to put 2 pink modules. 28 white modules and 2 pink ones are used.

Turn the workpiece over and make a row of only pink modules.

The next two rows are also pink, and the third with green modules.

The next row has even more green details.

Then the head - it has 35 modules.


Bend the rows with your hands and form the head.

Make hands and eyes, ears and a bow out of thick paper and felt. Ready! This kitty can be a great stationery holder.

rainbow vase
Now you can learn how to make a rainbow vase.
To do this, take A4 paper of different colors: red, orange, green, yellow, blue and purple. 10 sheets per color.
Cut them into 32 pieces each and fold the modules.
Take 6 modules of each color. Put in front of you. Connect two modules of the first color with a third of the same color.

Attach a module of the second color in the bottom row, connecting the module of the first. Connect the modules of the second row with the first color.

Attach the module of the second color to the bottom row and fix it with the same color. From above, connect the module of the first color and so on, alternating. You will get 3 multi-colored rows.
Make 6 such colored blanks and connect them into a ring.


How to make a triangular module (diagram)
How to make a paper module (video)
What can be done from modules
Modular origami is a special manufacturing technique various volumetric figures from paper triangular modules. It was invented in China.
To make, for example, a swan, a snake or a Christmas tree using this technique, you need to prepare many paper triangular modules and then connect them to get the desired shape.

Origami modules are triangular in shape and they are made from rectangular pieces of paper. These rectangles can be of different sizes, such as 53x74mm or 37x53mm. To get the right size, you need an A4 sheet.
Prepare A4 size paper (standard paper from a sketchbook, or paper for printing or copying).

1. Fold the paper in half, then again and again - if you unfold the paper, you will get 16 divisions.
* You can fold the paper one more time, then there will be 32 divisions, and they will be smaller.
2. Cut the paper into 16 or 32 rectangles.
* You can use both scissors and a clerical knife for this, the latter will be faster.
3. Fold one of the resulting rectangles in half in width.

4. Now fold in half lengthwise and return to the starting position (return to step 3). In the middle you now have a line with which you can fold the module evenly.

5. Fold first one side of the rectangle to the middle, then the other (similar to folding an airplane).

6. Now bend the edges of the segments that protrude.

7. You need to bend the protruding segments up.

8. Bend your design in half (connect 2 sides of the module).


Such modules need to be made as much as necessary to assemble the desired design.
How to make a triangular module (diagram)

How to make a paper module (video)
Modular origami. How to make a module
The main thing you need to have for modular origami is paper and great patience. Due to the fact that the figures in modular origami are not quite small, they need to prepare a lot of modules, several hundred to several thousand.
Each module has 2 pockets. With their help, you can connect modules.
Usually, when folding the modules, no glue is used, since the friction force does not allow them to disintegrate. But it happens that in some places the paper structure is not stable, then it is strengthened by gluing several modules with PVA glue.
Can be used both pure white and colored paper. Office paper will do, but pages from magazines and even candy wrappers can also be used. Plain colored paper is quite thin and rips at the folds. It can be used to create small modules (if you divide A4 paper into 32 parts).
To connect modules, simply insert them into each other. This can be done in several ways.
For example, like this:

What can be done from modules
And if you enthusiastically engage in this type of art, you will very soon be able to make, for example, such models:


triangular module
This module is used in most crafts modular origami
A4 sheet is divided into equal rectangles, and choose the size yourself. The more rectangles, the smaller the modulus. I make modules based on this ratio.


1. Bend the rectangle in half lengthwise.
2. Bend across, find the middle, and unbend. Lay at a bent corner
3.Fold the edges towards the middle.
4. Turn the product over
5. Fold up the raised edges.
6. Lay the corners behind the triangle.
7. Unfold the bottom
8. Lay the corners along the resulting lines and lift
bottom up
9.bend the module in half
10. triangular module ready
assembly video
——————————————————————————————————————- Here is another paper origami module, although running first. Sheet flattening process

The rectangles are narrower, they fit almost the same, but there are slight differences in module assembly.
—————————————————————————————————— for tangram models.
Tangram models are assembled, as a rule, from modules folded in a triangle, the so-called basic modules. The second type of modules - additional - due to its narrow long shape is used to create leaves, heads and necks. The basis of both types of modules is a square. Folding modules is a fairly simple process.
Origami modular assembly scheme:

Basic module from a square.
We begin to arrange origami from paper -
module.
1. First, lay a sheet of paper on the table with one corner towards you. Then bend it diagonally up so that you get a triangle. The long side is at the bottom.
2. In the second step, attach the right corner to the upper, middle corner and make a crease.
3.Now the left corner is next in line. It also needs to be attached to the top corner. Now you have a square.
4. Turn the square upside down, all corners should remain at the top.
5. Bend the top sheet of the square down, make a crease.
6. Then fold down the right square.
7. Do the same with the left corner: bend it from top to bottom. If you did everything right, you will get another triangle.
8.Finally, fold the right half of the triangle to the left.
9.Basic module is ready for assembly modular origami from paper.
10. This is how the base module looks from the side. Two slots for nesting other modules are clearly visible. In this perspective module stands on its long side, double end (goal) pointing back.
——————————————————————————————
Additional module.

- First, lay the square facing you. Then fold it diagonally and open it again. Now you see a vertical crease.
- Fold the right side to the center fold so that the narrow corner is at the top.
- Then fold the left side in the direction as shown in the picture. A narrow corner is formed from below.
- 5. Bend the right and left sides again towards the middle - you will get a rhombus.
6. Fold both sides of the diamond together along the middle crease
7.Finally, fold the triangle again - up - and the additional module is ready.
This is how the modules are assembled.
There are no related articles.
Decor, DIY
Regina Lipnyagova

Photo © Regina Lipnyagova
Modular origami is incredibly popular today. Beautiful three-dimensional figures from triangular origami paper modules look luxurious. Also, this type of needlework is called 3D origami, it is believed that this art originated in China. Another name for it is Chinese modular origami. You can make almost anything from small triangular modules. Having figured out the intricacies, you can make origami vases from modules, an origami swan from modules, an origami Easter egg from modules, origami flowers from modules, an origami peacock from modules, a modular origami dragon and much more.
In this instruction, we will show the basics of the basics - how to properly make an origami module. The scheme is quite simple, the main thing is to strive to make all pieces of paper as identical as possible.
We will need:
- scissors
Materials:
- paper
Step by step instructions How to make an origami module:

To make an origami module, we need paper and scissors.

We cut the sheet into 16 identical parts. You need to try to do this as carefully as possible, all parts should be the same. Someone prefers to fold a sheet of paper in half and cut it until a piece of paper of the required size is obtained, while someone draws a sheet with a ruler and cuts several sheets together at once.

Fold the paper in half lengthwise.

Bend across in half.

Having made a fold, unfold the rectangle back.

We bend the right side to the fold line at a right angle.

Fold the left side in the same way.

Flip the module.

We wrap the base of the triangle up.

We turn over the workpiece.

Trim the remaining ends with scissors.

We bend the workpiece in half. It turns out that making an origami module is very simple. He's ready!

To connect the modules to each other, you need to put the module on the tips of the two elements.
Leave your opinion about the article:
Modular origami is a very exciting activity that gives a lot of room for creativity to everyone who has mastered the simple technique of making paper modules.

You can use special paper sheets designed for making origami, but their cost is usually quite high, so at least at the training stage it is better to use plain paper for a high-density printer - from 80 g / m 3 and above (for example, Spectra Color).
We take a sheet of A4 format. Depending on the size of the modules, the paper sheet will need to be divided into 16 or 32 fragments. If we need 16 parts, fold the sheet horizontally two times, if 32 - three times. In the figure below, we folded the workpiece three times, if you need 16 workpieces, then do not do the last bend.
Now unfold the sheet and fold it in half vertically (the fold should remain on the left side). Then fold it in half horizontally 2 times. Expand the sheet. On it we will see the fold lines along which we have to cut blanks for the modules.
The sheet to be divided into 16 parts looks like this.
And this is how the sheet looks like, which will be divided into 32 parts.
Cut the sheet along the fold lines. From each small rectangle, we have to make an origami module, the assembly diagram of which is presented below. For beginners, it is better to start assembling modules from a 1/16 paper sheet. Modules from 1/32 turn out to be more miniature and elegant, but the process of assembling them requires some skill.

1- take a small rectangle;
3- now fold in half vertically;
5- bend the "wings" on both sides;
7- bend the corners;
9- bend the module, it takes the form of a triangle.
11, 12 - fastening modules with each other using pockets.
Using the modules as details of the designer, you can create the most bizarre three-dimensional figures from them, which your imagination only tells you.

Necessary materials:
Modules for origami - step by step instructions


By threading the corners of some modules into the pockets of others, we will be able to create voluminous paper crafts of any shape and size.
Looking at the amazing figures, made up of many elements, it is difficult to imagine that even a child can cope with them. Modular origami does not require special skills, but it allows you to perfectly develop fine motor skills, perseverance and creative thinking. For beginners, origami from modules is extremely diverse: everyone will find a figurine to their liking. And if you can’t find a suitable scheme, with a little experience, you can try to come up with it yourself.
To make a modular origami "Little Peacock" you will need
- white elements (108 pieces)
- yellow elements (64 pieces)
- pink and blue elements (8 pieces each)
- scissors (to cut out elements from sheets of A4 paper at the beginning)
We collect the basis of the figure "Little peacock"
1) We begin to collect the base of the figure. To do this, take 36 elements. Then you need to create 12 bundles of 3 elements each as shown in the photo.
2) Take the 1st bundle, insert the 1st and 2nd protruding corners of the 2nd bundle into the 2nd and 3rd pockets.

3) Continue to connect the rest of the bundles in the same way.
We make a body for the figure "Little peacock"
1) We begin to make a body of triangular modules. For this we need 13 white and eight yellow elements. The levels are stacked on the base and on each subsequent number of elements should be reduced by 1.

2) For the 1st level, connect 2 white elements, 2 yellow and 2 white, respectively (that is, a total of 6 elements).
3) At the 2nd level there should be 1 white, 3 yellow and 1 white element (that is, a total of 5 elements).
4) The 3rd level includes 1 white, 2 yellow and 1 white elements (total 4 pieces).
5) Then we insert 1 white, 1 yellow, 1 white elements (three pieces).
6) At the penultimate level - 2 white elements, and at the last - 1 white.

Making the neck for the "Little Peacock" figurine
1) In order to make a neck, you need to take eight white and two yellow pieces. Put all the modules on top of each other (yellow at the top).
2) Gently bend the resulting "column" so that you get a neck.
3) Now attach the neck to the topmost element of the body.
We make the tail for the figure "Little peacock"
1) In order to make a tail, you will need 11 white and six yellow elements.
2) Place four white elements on the back half of the calf.
3) Lay three white elements on them.

4) Then four yellow colored elements on top.
5) Install three white elements on top of the yellow ones.
6) Then two yellow elements.
7) At the top there should be 1 white element.
8) Now the peacock tail needs to be made fluffy. To do this, you need 30 white elements, 16 yellow elements and nine elements of some bright color, such as orange.
9) Make five basic white ligaments, consisting of 3 elements. Make four bundles, consisting of 2 white and the last bright element.
11) Attach the fluffy part of the tail to the finished figure.
12) The little peacock is ready! For reliability, the constituent elements can be glued.
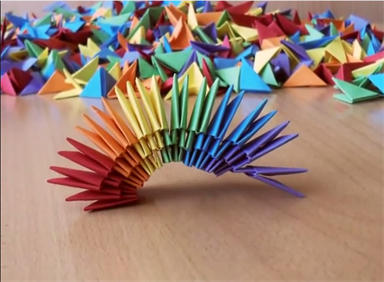
Modular origami "Scorpion"
To make such a figurine, you will need 95 red and 76 black elements. If necessary, the finished figure can be glued with PVA glue. How to make origami from modules for beginners so that you get an excellent souvenir or interior decoration, we will describe below.
1) We begin to make a body. The first level consists of two black and two red modules. The second level consists of three red elements (put on so that the extreme corners of the red modules of the first level remain free. Such levels must be alternated 12 times.

2) In the 13th row we put two red elements and in the center 1 black is simply nested between the elements of the previous row, as shown in the photo.
3) The 14th row consists of one black element.
4) We begin to make the tail of the scorpion. To do this, connect the black and red elements in a chain as shown in the photo.
5) We begin to make scorpion claws. The elements must be assembled in a chain in the following sequence: seven red, one black, one red, two black.

7) And finally, two black elements, put on each element three corners from the previous level. In the same way, make the second claw.
8) Now we will make paws (only eight pieces). Each consists of nine elements, arranged in the order indicated in the photo.
9) We begin to collect the figure. We attach the claws to the body and bend them as shown in the photo.
10) Attach the paws to the tail, also arching them.
11) Our scorpion is ready!

Related videos
In this article we will tell you how to make the simplest origami from modules - a daisy flower.
The video at the end of the article shows the assembly of this wonderful craft. Such a chamomile can be given as a gift, because the best gift is a handmade one. Or you can do this origami with children, this is an interesting pastime that develops memory, accuracy and perseverance.
Assembly diagram
Assembling this product is quite simple, even a child or a person who does not have experience in making origami, a novice origami artist, can do it. Following the scheme, you, and possibly your children, will learn how to assemble crafts in the form of a chamomile flower from pieces of paper.

Step-by-step instructions for creating a simple modular origami flowers for beginners
- At the first stage, we must prepare the modules - the constituent parts of our origami.
- Take a sheet of A4 paper and divide it into 16 equal rectangular pieces.
- Take one of the resulting rectangles and fold it in two, in half.
- We fold it again in the same way and unfold it back.
- We bend the edges of the rectangle down to get a semblance of a house.
- Then, in accordance with the diagram, we bend the lower part to make a triangle and fold it in half so that it can stand on the table.
The module is ready! It remains to prepare the rest. In total, we need 90 such particles: 20 pink, 20 yellow, 50 white. You can watch a detailed video tutorial at the end of the article on making such modules.
So, now we can start assembling our paper product.
Let's take the modules from pink (or red) paper and fold the center of the chamomile out of them, threading the edges of some modules into others (see diagram). Before this, you need to prepare 20 pink or red modules. To make them hold on tight, you can apply a little colorless clerical glue.
- We cover the outer circumference of the resulting pink circle with ten yellow modules.
- Once again, we cover the resulting circle with ten yellow modules, after turning it over.
- Next, let's start creating the petals. To do this, take 20 white paper triangles and overlay them with a circle, putting 2 pieces on each yellow element.
- Then we put on 30 more white triangles in the same manner, but already three pieces for two elements from the outer ring.
- Thus, we have prepared a flower with a core and petals.
Now let's start creating a stem with leaves.
We need green electrical tape, which needs to be covered with a wire, or a stick, or a thin paper or plastic tube. Instead, you can also simply roll the paper into a thin, long cylinder.
We attach leaves to the stem, which we first cut out from a green paper sheet. Next, insert the end of the stem into the middle of the flower and admire our craft!

Video the simplest modular origami - flowers
The first video below shows the process of assembling a triangular module. The second video tutorial shows an example of assembling a similar flower, with the difference that it is made from smaller modules, the petals are longer, and more triangular elements were involved in the manufacture. But the principle is the same as in our instructions.
Genre of the article - Origami