How and from what to make eyes for a doll. How to make eyes for nylon dolls from ordinary buttons

Many people are faced with the fact that it is not so easy to find eyes that are suitable in size, color and type for their craft. Therefore, we will learn how to make eyes with our own hands!
1:824So let's get started.
1:856 1:861To create the eyes we will need:
1:9291. Glasses (in any pet store you can find them in the aquarium section).
1:10672. Brushes (you can get by with one, but you can take thinner or thicker ones).
1:11943. Acrylic paints.
1:12324. Palette and some water.
1:1280 1:1285
I deliberately take several different shades of the same color to make the eye look more natural and beautiful. It is necessary to remember that when working with glass you will have to apply the paint in the reverse order, and if usually a dark color is applied first, and then the highlights and veins are lighter, then here we start with the light veins and the pupil.
2:24172:4
The first coat of paint always turns out translucent. In the iris of the eye this is good, but the pupil must be deep.
2:215To draw the pupil, you need to place a dot approximately in the middle, and then gradually expand it with a brush.
2:416 2:421
After the first layer of paint has dried and we are convinced that both pupils are the same size, we can apply the second layer without sparing the acrylic.
3:1195 3:1200
Since I plan to make two toys in the near future, I’m making two pairs of eyes: a cat’s and a regular one.
4:1895After the pupil is dry, I begin to apply the iris.
4:132The most important thing is to move the brush from the center to the edges and not be afraid to leave thick strokes of paint.
4:299 4:304
I have this paint with a mother-of-pearl effect and it gives a very interesting shine to the look. It's optional and you can just use any light base paint.
5:1122 5:1127

After the base paint dries, I squeeze out a little acrylic onto the paper, in accordance with my ideas. The cat's eye will be green-yellow. The second pair is blue.
7:2458For cat eyes I use green and two shades of yellow:
7:102 7:107
The green in a cat's eyes is usually only around the pupil. Therefore, with bold strokes I paint over the area around the black.
8:841 8:846
I wait for the paint to dry and apply lemon paint:
9:1453 9:1458
I wait again and after that I finish with a darker base coat, which I don’t regret.
10:2116The main thing is to make sure that your previous layers are dry.
10:100 10:105
At this point, I put the cat’s eyes aside and squeeze out shades of blue, blue paint and silver onto the palette:
11:823 11:828
I make veins from blue. Also - from the center to the edges, with a thin brush, but not transparently, but so that the paint is visible:
12:154912:4

Adding silver:
13:548 13:553
And, after these three layers of paint have dried, I finish.
Making toys with your own hands is becoming an increasingly popular creative activity. Moreover, all the necessary materials for sewing or knitting are easy to find in regular stores. But with such a seemingly trifle as eyes, difficulties often arise. After all, finding something similar to them in the store is not easy. In this case, it is useful to learn how to make eyes for toys with your own hands. This will solve the problem perfectly and won't take much time.
We sew beautiful eyes for toys from plastic spoons
Plastic spoon eyes are perfect for large soft toys and dolls. They can be made very simply and quickly.
To work you will need two plastic spoons, acrylic paints, double-sided tape and sandpaper.
You will only need oval spoon scoops, so these need to be carefully cut from the handles. You need to lightly sand the convex surfaces so that the paint sticks to them well.
We attach the future eyes to the cardboard with double-sided tape and apply white paint. On top we draw the contours of the irises - green (blue or brown) ovals.
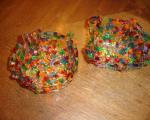
Draw black pupils and a black outline of the iris. Apply small highlights with white paint. We draw the eyelids with flesh color. The eyes are ready!
How can you crochet eyes correctly?
Knitted eyes are perfect for knitted toys, but they can also be used for other soft toys.

- Yarn in three colors - white, green and black.
- Hook
- Sewing needle
Our master class begins with knitting with black yarn: you need to cast on 3 air loops, close them in a ring and knit 9 half stitches with nikadas from them. Then we attach the green thread and knit in the next row 2 half double crochets in each of the previous rows.

Then we knit with white thread according to the following pattern: chain loop, 2 single crochets, half double crochet, half double crochet and double crochet, double crochet, double crochet and half double crochet, half double crochet, 2 single crochets, connecting post, fasten and cut the thread long enough to form a highlight on the pupil.
Using small lines we embroider highlights on the pupils. The eyes are ready!
How to quickly and easily make eyes for felt toys with your own hands
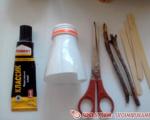
These eyes are perfect for handmade dolls. To work you will need sheet felt, artificial eyelashes, moment glue, scissors, a sheet of cardboard, and a pencil.
First you need to draw the eyes. Their shape can be different, depending on the type of toy.
The drawn eyes need to be cut out and tried on the toy, and if necessary, adjust the size or shape. We cut out the pupil of one of the eyes so that the cardboard patterns become templates. We cut out blanks from white felt along the outer contour. According to a small template - the internal parts are made of blue or green.
Glue the pieces together. Cut and glue highlights from white felt. The outlines should be outlined with a thin black felt-tip pen. Glue the eyelashes. The eyes for the dolls are ready!
Made of plastic and epoxy resin.Black blanks of pupils with white dots-highlights need to be molded from plastic and baked.

We dilute the epoxy resin according to the instructions in the package. To give your eyes a beautiful shade, add a little ink from a gel rod to the solution; you can take any suitable color.
Then we take empty blisters from tablets. We place the pupils in the recesses and fill them with epoxy resin. It is very convenient to do this with a syringe. A toothpick will help move the pupil slightly. It is necessary that there are no bubbles in the resin.
Leave the eyes to dry for about a day. We cut out the cells from under the tablets so as not to capture anything unnecessary.

If desired, you can make eyelashes. Ready-made ones can be found in stores, or you can make them yourself using fishing line, thread, yarn, etc.
Create black eyes from yarn and glue for dolls
This is another simple and straightforward way to make eyes for a toy from scrap materials. Yarn is needed in two colors - black and a color suitable for the iris (green, blue, brown, etc.). It only takes a little. Therefore, you can take any leftover thread from knitting or ask someone who knits.
You need to choose transparent “moment” glue. We lay out the main yarn in the form of a circle, with a small black circle on top. Squeeze the glue onto the yarn in a drop of a suitable size and let it dry. Excess yarn must be cut off with scissors.

In addition, eyes can be made from round or oval buttons of suitable size. You can paint the buttons with acrylic paints. Instead of buttons, you can also use beads.
On some toys, eyes made of fabric or leather will look good, which can be made like eyes made of felt in the master class given above.
Video on the topic of the article
For those who want to examine the topic in more detail and gain new interesting ideas, we have prepared a selection of video master classes:
Homemade dolls have become increasingly popular lately. Many people try to master this craft on their own. Of course, the desire to make a beautiful, memorable thing is quite natural. Having learned how to make expressive eyes for toys, a novice craftsman will be close to having his work remembered. After all, it is the eyes that are primarily the determining factor in the uniqueness of a homemade creation.
Human imagination knows no bounds, so there are many incredible ways to make eyes for toys with your own hands. To do this, they use not only different materials, but also a large number of different technologies. Here are just a few of them:

Any of the options requires good preparation and diligence from beginning masters. You can't succeed without this
Knitted eyes
A lot of dolls are made from soft materials, including knitted ones. For such a toy, crocheting the eyes is the best option. The knitting pattern may vary slightly, but most often they do it like this:

Having mastered the pattern of how to crochet eyes for a toy, you can easily revive any doll made of soft material. To do this, tied eyes are sewn onto the doll's face and the contours and eyelashes are tied. They can be embroidered with black floss.
In addition to woolen thread, felt or leather eyes are often used for soft toys. They use material of three colors, where black and white are mandatory. Three mugs of different sizes are made using the templates. One big one is the color of the eyes. The second smaller one is for the pupil and a very small one, white, for the glare. For greater reality, artificial eyelashes are glued on.
Buttons are a popular material
 One of the most popular options for making eyes for dolls is ordinary buttons. People have been using them for a long time to bring toys to life. If the problem needs to be solved as quickly as possible, then it is enough to sew two buttons of the same color and the product will become “sighted”.
By using additional processing of this material, many achieve excellent results. Eyes made from false flat and spherical buttons transform a toy face into an almost lifelike one. The technology for making such eyes is not very complicated, but it requires perseverance and accuracy. A description of how to make eyes for dolls with your own hands and a master class will help you achieve the best result.
I came up with two options for making eyes, and settled on the second.
I want to say right away that this is not the truth, and there is no limit to perfection, but the eyes turn out cool (as long as the master’s imagination is enough).
They can be fired together with the doll, kept at 120 degrees, or used for work where firing is not required, after covering them with transparent varnish.
Puppen Fimo, Epoxy "Metal" No. 1 or Epoxy "Titan" No. 6 or Epoxy "Gleam", the latter has not been used, it is necessary to look at the t° of property preservation. When purchasing, make sure that the hardener is transparent; slight yellowness is acceptable. The resin is only transparent. Acrylic paint (variations with mother-of-pearl, sparkles, etc. are possible) Alcohol, Toothpicks (wooden), beads of different sizes (smooth, not deformed, without scratches), foil.
Go…

1. I wrap a metal plate in foil (I use a round one more convenient). I'm making a sausage out of plastic. I cut equal slices. I form a ball and form a pie-type eye on the plate. 

2. Using a bead, I form a depression in the iris, about 1/4 of the bead, in the center of a D1-2 mm depression for the pupil, depth 1 mm. It is better to moisten the bead with saliva. 
2.1 The pupil is not formed, and after painting the iris, it is applied with a brush (0) - a point, as it is more convenient for you. I settled on a black plastic ball with a recess to stabilize the ball.
3. I put the plate in the oven and fire it. Balls (pupils) too.
4. I paint the iris: I prime it with white acrylic, first degreasing it with alcohol. Brush - Column No. 0, from the center to the edge, do not touch the pupil. The order of painting: local dark, around the pupil there is a light animation and radial animations, only after that the pupil is black.
After painting the iris, I glue the ball (pupil). 

5. Prepare Epoxy, keep the bottles in warm water to reduce viscosity and the appearance of bubbles. Everything is according to the instructions on the pack, I mix,
carefully, I use a toothpick. It is necessary to avoid bubbles. Therefore, mixing the components with a stick occurs very slowly. 

6. Using a stick, apply the component into the pupil from the edge so that it squeezes out the air, and then add it to the iris until a bulge forms. I don’t recommend getting a toothpick in your eye! But if you really want to, i.e. A bubble has appeared; use a new toothpick to twist the component onto a stick to remove the bubble, but it is better not to allow them to occur.
7. That's it. After a few hours the lens will harden. If the components are mixed and introduced into the eye correctly, the lens will be transparent without bubbles and will not stick to the finger. After hardening, streaks and overuse of hardener are possible on the surface of the lens. You can once again, but in exact proportions, combine the components and add them to the iris. To check the transparency of the lens, you can completely cover the eye with varnish (PF-283 Alkyd "Empils" transparent or extra transparent alkyd from the Yaroslavl plant "Premiya"),
After firing, the doll's eyes lose some of their attractiveness (they become cloudy), but after covering them with varnish they will shine again. 


In the latter eyes, the pupil is made in the form of a ball of black plastic.
Note: The iris can be painted with whatever suits your fancy, so that only the colors and inclusions maintain the temperature, and the eye itself can be sculpted in any way you like, round, square……. You can insert a small black ball into the pupil, etc. — I settled on the last option!
Making toys with your own hands is becoming an increasingly popular creative activity. Moreover, all the necessary materials for sewing or knitting are easy to find in regular stores. But with such a seemingly trifle as eyes, difficulties often arise. After all, finding something similar to them in the store is not easy. In this case, it is useful to learn how to make eyes for toys with your own hands. This will solve the problem perfectly and won't take much time.
We sew beautiful eyes for toys from plastic spoons
Plastic spoon eyes are perfect for large soft toys and dolls. They can be made very simply and quickly.
To work you will need two plastic spoons, acrylic paints, double-sided tape and sandpaper.
You will only need oval spoon scoops, so these need to be carefully cut from the handles. You need to lightly sand the convex surfaces so that the paint sticks to them well.
We attach the future eyes to the cardboard with double-sided tape and apply white paint. On top we draw the contours of the irises - green (blue or brown) ovals.
Draw black pupils and a black outline of the iris. Apply small highlights with white paint. We draw the eyelids with flesh color. The eyes are ready!
How can you crochet eyes correctly?
Knitted eyes are perfect for knitted toys, but they can also be used for other soft toys.
- Yarn in three colors - white, green and black.
- Hook
- Sewing needle
Our master class begins with knitting with black yarn: you need to cast on 3 air loops, close them in a ring and knit 9 half stitches with nikadas from them. Then we attach the green thread and knit in the next row 2 half double crochets in each of the previous rows.

Then we knit with white thread according to the following pattern: chain loop, 2 single crochets, half double crochet, half double crochet and double crochet, double crochet, double crochet and half double crochet, half double crochet, 2 single crochets, connecting post, fasten and cut the thread long enough to form a highlight on the pupil.
Using small lines we embroider highlights on the pupils. The eyes are ready!
How to quickly and easily make eyes for felt toys with your own hands
These eyes are perfect for handmade dolls. To work you will need sheet felt, artificial eyelashes, moment glue, scissors, a sheet of cardboard, and a pencil.
First you need to draw the eyes. Their shape can be different, depending on the type of toy.
The drawn eyes need to be cut out and tried on the toy, and if necessary, adjust the size or shape. We cut out the pupil of one of the eyes so that the cardboard patterns become templates. We cut out blanks from white felt along the outer contour. According to a small template - the internal parts are made of blue or green.
Glue the pieces together. Cut and glue highlights from white felt. The outlines should be outlined with a thin black felt-tip pen. Glue the eyelashes. The eyes for the dolls are ready!
Made of plastic and epoxy resin.Black blanks of pupils with white dots-highlights need to be molded from plastic and baked.

We dilute the epoxy resin according to the instructions in the package. To give your eyes a beautiful shade, add a little ink from a gel rod to the solution; you can take any suitable color.
Then we take empty blisters from tablets. We place the pupils in the recesses and fill them with epoxy resin. It is very convenient to do this with a syringe. A toothpick will help move the pupil slightly. It is necessary that there are no bubbles in the resin.
Leave the eyes to dry for about a day. We cut out the cells from under the tablets so as not to capture anything unnecessary.

If desired, you can make eyelashes. Ready-made ones can be found in stores, or you can make them yourself using fishing line, thread, yarn, etc.
Create black eyes from yarn and glue for dolls
This is another simple and straightforward way to make eyes for a toy from scrap materials. Yarn is needed in two colors - black and a color suitable for the iris (green, blue, brown, etc.). It only takes a little. Therefore, you can take any leftover thread from knitting or ask someone who knits.
You need to choose transparent “moment” glue. We lay out the main yarn in the form of a circle, with a small black circle on top. Squeeze the glue onto the yarn in a drop of a suitable size and let it dry. Excess yarn must be cut off with scissors.
In addition, eyes can be made from round or oval buttons of suitable size. You can paint the buttons with acrylic paints. Instead of buttons, you can also use beads.
On some toys, eyes made of fabric or leather will look good, which can be made like eyes made of felt in the master class given above.
Video on the topic of the article
For those who want to examine the topic in more detail and gain new interesting ideas, we have prepared a selection of video master classes: