How to knit according to a pattern. Knitting a fabric of a certain shape according to a pattern
Very simple and clear. I have always had a problem making a pattern for knitted things. So I was very happy when I found this lesson.
Author's master class from Astrea
I know many people have questions,
when you need to quickly and easily create a pattern.
I want to offer you my very easy way.
To build a pattern we need
1. ruler
scale 1:4 (I had one like this somewhere).
If there is no such line,
take a regular one and apply new divisions with a marker - 1 cm = 4 cm,
i.e. each cm scaled will be equal to 2.5 mm.
If someone wants to create a life-size pattern, we take a regular ruler.
2. 3 landscape sheets
3. calculator
4. simple pencil, eraser
5. centimeter
It is necessary to take 4 measurements (for the front and back, we will deal with the sleeves a little later):
1. Chest circumference (I’ll use my own as an example) - 88 cm
2. Neck circumference = 34 cm
3. Product length = 56 cm
4. Back width (measured from armhole to armhole at a level just above the shoulder blades) =32.
1. Draw a rectangle on 1 sheet - this will be the back -
rectangle height = Product length = 56
width rectangle = Bust circumference: 44

2. Mark the center with a vertical line,
To make it more convenient to measure later, we calculate the depth of the armhole
(Chest circumference: 2) - Back width = 44 -32 = 12, well, since we have 2 armholes,
divide it all by 2. In my case 12: 2 = 6 cm

3. Armhole height:
Breast enlargement: 6 + 5. In my case - 88: 6 + 5 = 19.5 (I usually do 19)

draw smooth lines, remove additional lines

4. Now the neck:
We calculate the width of the collar on the back of the neck: 3. 33:3 = 11
And raise the shoulder line by 2 cm (we don’t remove the old shoulder line yet)

We connect with a smooth curve, draw a new shoulder line.

Well, the back is ready.
Don’t forget to draw a new line for the neck, stepping back down by the width of the binding -
if you are going to do the binding
(with an elastic band or some kind of pattern - the Japanese always have very beautiful bindings)


Shelf.
You can draw the shelf directly on the finished back pattern.
If you want a separate pattern for the shelf, repeat steps 1-4 on a new sheet,
just don’t draw a smooth line on the neckline. The shelf has a tighter neck.
Shelf neck depth = Neck circumference: 6 + 2. 33: 6 + 2 = 7.5 cm

Connecting with a smooth curve

and again, if you are doing a binding, lower the line of the neck of the shelf to the width of the binding
(in the case of a regular elastic band - about 2 cm)

SLEEVE.
Need 2 measurements
1. Wrist circumference (mine is 18 cm)
2. sleeve length (55 cm)
Drawing a rectangle
1. height = sleeve length = 55 cm
2. calculate the width of the Chest circumference: 3 + 2 (88: 3 + 2 = 31.3 (usually rounded to 32 cm)

Mark the middle of the sleeve
and from the top we set aside the height of the sleeve head = Chest circumference:
8 + 3 - 88: 8 + 3 = 14 cm

Draw additional lines from the center of the top of the sleeve to the edges of the sleeve head
and mark the midpoints of these lines

Measure the distance along the bottom line of the sleeve in the center
(wrist line) = Wrist circumference + 2 cm = 18 + 2 = 20 cm
and connect to the bottom line of the sleeve head

We connect with smooth curves - up to the middle of the head - concave, after the middle - convex

Well, here the sleeve is ready

Handmade knitwear is very elastic: it fits easily, is perfectly ironed, acquiring the desired shape, and can be stretched if necessary. Therefore, patterns for knitwear are much simpler than those used for sewing. We offer pattern drawings for children's, men's and... The first is accompanied by a detailed description of the construction. Pattern drawings for men's and children's clothing are given without explanatory text, as they are constructed in a similar way.
The base pattern is like a shell of the specific figure (from the base of the neck to the hip line) for which it is made. On such a pattern there is no cut in the front or back, there are no lines creating a style, the neckline runs along the base of the neck. If you knit the model according to the base pattern, it will fit the figure without folds or creases.
When making clothes of a certain style, they first build a base pattern (it is made for half of the figure), then the style lines are drawn on it, the fastener, pockets, cuffs are outlined, and then it is called a working pattern - a specific model is made from it. For a working pattern, you need to draw out the entire back and sleeve. If the item will be worn over the head, then the front also needs to be drawn completely.
When constructing a base pattern, the allowance required for a loose fit is taken into account. Its size varies and depends on the cut of the clothing, the thickness and structure of the knitted fabric, as well as the quality of the yarn. For example, a product knitted from mohair thread stretches too much in width, so you need to give it an allowance of 1-2 cm less than required, by the way, the same as for clothes made with loose or openwork patterns.
Loose fit allowance for women's, men's and children's knitwear (the allowance is given for half the figure):
Summer thin blouses, T-shirts: 2 cm
Dresses, jackets, pullovers with set-in sleeves: 4 cm
Jackets, jackets with set-in sleeves: 4 cm
Clothes with raglan sleeves: 4 cm
Sportswear, coat: 5 cm
Construction of a drawing of a base pattern with set-in sleeves for a female figure of size 48.
We use the following measurements for construction (you can fill in your own - measurements are taken in the same way as when sewing):
1. Neck circumference – Osh – 18 cm (half measurement)
2. Chest circumference – Og – 48 cm (half measurement)
3. Hip circumference – About – 50 cm (half measurement)
4. Back length to waist – Ds – 40 cm
5. Product length – Di – 60 cm
6. Shoulder length – L – 13 cm
7. Arm length – Dr – 53 cm
8. Wrist circumference – Oz – 8 cm (half measurement)
The size of the chest dart opening is 4 cm (in knitted clothes this value corresponds approximately to the bra number).
Before you start drawing the pattern, familiarize yourself with the table. It will help you quickly make the calculations necessary for construction.

The first column of the table gives the dimensions of the model (that is, the measurement of chest circumference - Og), starting from the 28th to the 62nd size. For each, the following columns give the results of the calculations that may appear in the drawing. Let's say your size is 48. Find the number 48, followed by the numbers 24, 16, 12 and 6. If, when constructing a drawing, you have to use, for example, the calculation Og:3, then you will see the finished result in the column under this calculation - this is 16 cm.
Grid (Fig. 1).

Mark point A in the upper left corner, from it to the right horizontally set aside 51 cm = 0 + 3 cm and place point B. 3 cm is an allowance for loose fitting. Segment AB – neck line. From point A down vertically, set aside Dc = 40 cm (by measurement) and, as a continuation, the distance from the waist line to the hip line equal to 20 cm (by measurement), a total of 60 cm. This vertical is the line of the middle of the back. Now complete the rectangle with sides 51 and 60 cm. The vertical line located opposite the middle of the back is the line of the middle of the front, the bottom line of the rectangle is the line of the hips.
Connect the 40 cm point in the middle of the back with a horizontal straight line to the middle of the front - this is the waist line. Along the line of the middle of the back down from point A, measure 21 cm - the depth of the armhole. This value is found by the following calculation: (Og: 3) + 5 cm = 21 cm. Connect the 21 cm point with a horizontal line to the middle of the front - the chest line. Along it, from the middle of the back, set aside 25 cm = (Og: 2) + 1 cm or from the middle of the front 26 cm (Og: 2) + 2 cm and down from this point lower the perpendicular to the hip line - the side seam line.
Note.
For figures larger than size 54, it is impossible to determine the depth of the armhole by calculation (Og: 3) + 5 cm, since the armhole will be too deep. In such cases, make it no more than 22-23 cm (if your arms are too full, up to 24 cm).
Back (Fig. 2)
Along the neck line from point A, measure the width of the back neck, equal to Osh:3 = 6 cm. Up from the point 6 cm, set aside 2 cm - the height of the neck. Connect the new point with a concave line to point A (head line).
Note.
For figures with fatty deposits on the neck from the back, make the width and height of the back neckline 1 cm larger than required.
Along the neck line to the right from the point 6 cm, set aside the length of the shoulder + 1 cm (1 cm – fit on the shoulder) = 13 cm + 1 cm = 14 cm From this point down, measure 2 cm and connect the new point with a straight line to the height of the neckline – the shoulder seam line . From the end of the shoulder, lower the perpendicular down to the intersection with the chest line, divide it in half (in Fig. 2 this point is marked with a cross) and draw a line for the back armhole.
At the hip line from the middle of the back, set aside 25 cm = About:2. In this example, the found point fell on the side seam line, and therefore the side seam of the straight silhouette model coincided with the side seam of the mesh. But this may not work out if the hip volume measurement is smaller or, conversely, larger than the standard one, then the point obtained as a result of the calculation will be close to the side seam line. Connect it to the end of the back armhole, and the new line will be the side seam line (Fig. 3) - dotted for figures with narrow hips, a thick line for wide hips.

For a fitted model, measure along the waistline from the side seam to the left 2 cm (no more than 3 cm), connect the new point with a straight line to the end of the back armhole and a slightly convex one to a point 25 cm on the hip line. The construction of the side seam line of a fitted model for figures with narrow and wide hips is shown in Fig. 4 and 5.
For a figure with wide hips, it is more convenient to draw the front pattern separately from the back; for a normal figure, it can be done on the same drawing. To do this, from point B down the middle of the front, measure the neck depth 7 cm (Osh: 3) + 1 cm. To the left along the neck line, set aside a neck width of 6 cm = Osh: 3. From a point of 6 cm, measure the length of the shoulder 13 cm (by measurement) and from this point down - 4 cm - the bevel of the shoulder. Draw a shoulder seam line. From the end of the shoulder down, lower the perpendicular to the chest line and divide it in half. Draw a front armhole line as shown in Fig. 2.
Front side seam.
Draw new lines for the waist and hips: they should be located below the previous ones by the amount of the tuck opening, in this example, 4 cm. From the middle of the front along the new hip line, set aside 26 cm (About: 2) + 1 cm. Connect the resulting point with a straight line to the end of the armhole The front is the side seam line of a straight silhouette model; for a standard figure, it coincides with the side seam line of the mesh. The construction of the side seam line of a straight silhouette model for figures with narrow and wide hips is shown in Fig. 6.
If the clothes have a fitted silhouette, then measure 2-3 cm along the new waist line from the side seam (as on the back) and connect this point with a straight line to the end of the armhole and a slightly convex line with a point 26 cm on the new hip line. The construction of the side seam line of a fitted model for figures with narrow and wide hips is shown in Fig. 7 and 8.
Bust dart.
Measure 3-5 cm from the end of the armhole along the side seam (this value depends on whether the bust is low or high) and through the found point draw a horizontal line 12-14 cm long - the upper side of the dart. Along the side seam from a point of 3-5 cm, set aside the depth of the dart (4 cm) and connect the new point with a point of 12-14 cm - the lower side of the dart with a point of 2 cm on the new waist line.
Long sleeve (Fig. 9)
Draw a vertical line AB equal to the arm length measurement (53 cm) - the middle of the sleeve. From point A down vertically, set aside 15 cm = (Og:4) + 3 cm – the height of the sleeve cap (for sizes larger than 54, determine this value without calculation, it is equal to 16 – 16.5 cm). From a point 15 cm to the right, measure 18 cm = (Og: 3) + 2 cm (or half the arm circumference at the shoulder Or + 3 cm = 15 cm + 3 cm = 18 cm) - the width of the sleeve. Connect the found point with a straight line to point A, divide the segment into 4 equal parts and draw a line for the hem of the sleeve, as shown in the drawing. From point B to the right, measure horizontally 10 cm = Oz + 2 cm and connect this point with a straight line to the width of the sleeve (with a point of 18 cm) - the sleeve seam line.
Short sleeve (Fig. 10)

It should be narrower. Its widest part is determined by the formula (Og: 3) + 1 cm = 17 cm (or Or + 2 cm = 17 cm), the height of the collar is (Og: 4) + 2 cm = 14 cm. Taking the sleeve length measurement (for example , 23 cm), measure your arm circumference at this level (for example, 14 cm is half the measurement). The principle of constructing a drawing is the same as a long one.
Base pattern with set-in sleeves for a size 50 male figure (Fig. 11)

Built to measure, see below
(circumference measurements are given in half size in cm):
1.Neck circumference = 21
2.Chest circumference = 50
3.Hip circumference = 48
4.Shoulder length = 16
5.Arm length = 57
6. Wrist circumference = 10
7.Product length = 70
Base pattern with set-in sleeves for children's figure size 30.
The pattern (Fig. 12 at the beginning of the article) is constructed according to the following measurements (circumference measurements are given in half size in cm):
1.Neck circumference = 14
2.Chest circumference = 30
3.Arm length = 34
4. Wrist circumference – 7
5.Product length – 39
Discussion of the article
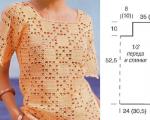
(Size 50)
A blouse with short set-in sleeves and a round neckline (Fig. 9) is knitted on a machine from 150 g of pale pink melan. There is a zipper on the back. The knitting density horizontally is 3 loops per 1 cm, vertically - 4 rows per 1 cm.
The blouse consists of four parts (Fig. 10): a back, two sleeves and a front. The back and sleeves are knitted in stocking stitch, the front is crocheted with an openwork pattern.

For knitting backrests cast on 146 loops and knit 12 rows of hems at a higher density than the working one. Then the rib is knitted by hand and another 12 rows are knitted at the same density. Hang the loops of the initial row on the needles and knit the connecting row at working density. After the connecting row, knit with straight fabric to the chest line - 136 rows (34 cm). The armhole is knitted with partial knitting on 12 needles, pushing 2 needles into the PNP 4 times and 4 times one at a time. 12 armhole loops are closed in one step. From the chest line, knit 40 rows (10 cm) to the beginning of the cut. Then divide the loops in half, swap the 2 central loops and knit each part separately to the neckline, knitting braids on the outer needles of the cut. The shoulder and neck loops begin to be closed simultaneously from the 81st row. 40 shoulder loops are closed 8 times, and the neck loops are closed in the following sequence: 7 loops, 4 loops and 5 times 2 loops.
For knitting sleeves cast on 98 loops and knit 12 rows at a higher density than the working one. Then a rib is knitted by hand and knitted at a working density of 40 rows (10 cm), adding 1 loop on both sides 4 times after 4 rows and 5 times after 3 rows. Having tied it to the armhole line, knit the okat, closing the loops according to calculation. The second sleeve is knitted in a mirror image.
For knitting front cast on 171 loops and knit the bottom, as on the back, and then proceed to knitting the pattern. To perform this, 1-, 2- and 3-needle deckers are required.
To knit a sample pattern (Fig. 11), cast on 48 loops (KP/21 + 4 + 2 outer ones).

I row- (11 needles are passed, the loop from the 12th needle is transferred to the 11th, 1 needle is passed, the loop from the 14th needle is transferred to the 15th, 6 needles are passed). The released needles are left in the RP. They knit.
Subsequently, in all rows in which the openwork is knitted, the freed needles are left in the RP.
All even rows- knit in stocking stitch.
3rd row- (10 needles are passed, with a 2-needle decker the loops from the 11th and 12th needles are transferred to the 10th and 11th, 1 needle is passed, the loops from the 14th and 15th needles are transferred to the 15th and 16th, skip 5 needles). They knit.
5 row- (9 needles are skipped, with a 3-needle decker the loops from the 10, 11 and 12th needles are transferred to the 9, 10 and 11th, 1 needle is skipped, the loops from the 14, 15 and 16th needles are transferred to the 15, 16 and 17th, skip 4 needles). They knit.
7 row- (8 needles are skipped, with a 3-needle decker the loops from the 9, 10 and 11th needles are transferred to the 8, 9 and 10th, 3 needles are skipped, the loops from the 15, 16 and 17th needles are transferred to the 16, 17 and 18th, skip 3 needles). They knit.
9 row- (7 needles are skipped, with a 3-needle decker the loops from the 8, 9 and 10th needles are transferred to the 7, 8 and 9th, 5 needles are skipped, the loops from the 16, 17 and 18th needles are transferred to the 17, 18 and 19th, skip 2 needles). They knit.
11 row- (6 needles are skipped, with a 3-needle decker the loops from the 7, 8 and 9th needles are transferred to the 6, 7 and 8th, 7 needles are skipped, the loops from the 17, 18 and 19th needles are transferred to the 18, 19 and 20th, skip 1 needle). They knit.
13 row- (3 needles are skipped, with a 3-needle decker the loops from the 6th, 7th and 8th needles are transferred to the 5th, 6th and 7th, 9 needles are skipped, the loops from the 18th, 19th and 20th needles are transferred to the 19th, 20th and 21st). They knit.
15 row- (4 needles are passed, with a 3-needle decker the loops from the 5, 6, 7th needles are transferred to the 6, 7 and 8th needles, 10 needles are passed, the loops from the 19, 20 and 21st needles are transferred to the 18, 19 and 20th). They knit.
17 row- (5 needles are skipped, with a 3-needle decker the loops from the 6th, 7th and 8th needles are transferred to the 7th, 8th and 9th, 8 needles are skipped, the loops from the 18th, 19th and 20th needles are transferred to the 17th, 18th and 19th, skip 1 needle). They knit.
Row 19- (6 needles are skipped, with a 3-needle decker the loops from the 7, 8 and 9th needles are transferred to the 8, 9 and 10th, 6 needles are skipped, the loops from the 17, 18 and 19th needles are transferred to the 16, 17 and 18th, skip 2 needles). They knit.
21 row- (pass 7 needles, with a 3-needle decker the loops from the 8th, 9th and 10th needles are transferred to the 9th, 10th and 11th, skip 4 needles, the loops from the 16th, 17th and 18th needles are transferred to the 15th, 16th and 17th, skip 3 needles). They knit.
23 row- (8 needles are skipped, with a 3-needle decker the loops from the 9, 10 and 11th needles are transferred to the 10, 11 and 12th, 2 needles are skipped, the loops from the 15, 16 and 17th needles are transferred to the 14, 15 and 16th, skip 4 needles). They knit.
25 row- (9 needles are skipped, with a 3-needle decker the loops from the 10, 11 and 12th needles are transferred to the 11, 12 and 13th, the loops from the 14, 15 and 16th needles are transferred to the 13, 14 and 15th, skip 5 needles). They knit.
27 row- (10 needles are skipped, with a 2-needle decker the loops from the 11th and 12th needles are transferred to the 12th and 13th, the loops from the 14th and 15th needles are transferred to the 13th and 14th, skip 6 needles). They knit.
Row 29- (pass 7 needles, with a 3-needle decker the loops from the 8th, 9th and 10th needles are transferred to the 7th, 8th and 9th, skip 1 needle, with a 1-needle decker the loops from the 12th and 14th needles are transferred to 13th, skip 1 needle, with a 3-needle decker the loops from the 16th, 17th and 18th needles are transferred to 17th, 18th and 19th, skip 2 needles). They knit.
31 row- (pass 6 needles, with a 3-needle decker the loops from the 7, 8 and 9th needles are transferred to the 6th, 7 and 8th, skip 3 needles, with a 1-needle decker the loop from the 13th needle is transferred to the 14th, skip 2 needles, with a 3-needle decker the loops from the 17th, 18th and 19th needles are transferred to the 18th, 19th and 20th, skip 1 needle). They knit.
33 row- the pattern is repeated from the 13th row.
Distribute the pattern so that an openwork strip runs through the center. Knit 120 rows (30 cm) from the connecting row with straight fabric. The dart is knitted with partial knitting, pushing it out from the side seam into the PNP 6 times with 4 needles each. Having finished knitting the dart, knit another 16 rows (4 cm) to the chest line and begin knitting the armhole with partial knitting. 24 armhole needles are pushed into the PNP as follows: 15 needles, then 2 times with 2 needles and 5 times with one. Close all the armhole loops in one step. From the chest line to the beginning of the neckline, knit 44 rows (11 cm), and then divide the loops in half and from that moment on, knit each part separately. The neckline is knitted with partial knitting. The needles are pushed into the PNP in the following order: 9 needles (10 needles on the other side), then 5, 4, 3, 2 and 2 times 1 needle each. Close off 25 loops at a time. 36 shoulder loops are closed 8 times, starting from the 73rd row. When knitting openwork stripes, they finish them with a whole figure (31st row), without starting the figures in the 29th row. First, finish the central strip, then the next two, and lastly the outer ones.
The finished parts are sewn together. Sew in a zipper. The neckline is treated with a double strip of stocking stitch, which is sewn with a quilt stitch on the back and front sides of the product.
Today we'll talk about where and what kind of knitting patterns are obtained?.
I recently met a very interesting craftswoman who has been knitting to order all her life. knitting needles. She does not use pattern making at all in her business. The customer only asks for a few measurements, and only if the figure is not standard. She has her own system, developed with experience, which consists of seeing the figure as if step by step: “I cast on so many loops, gradually decrease the number of knitting needles towards the waist, and at the armhole I decrease so many times by so many loops..”.
Probably, such mastery in knitting sooner or later comes to everyone for whom hand knitting is a profession, especially if they often knit models of a certain silhouette from a certain yarn. The master knows just by looking at the figure how many loops need to be knitted and in what places.
But in order to grow to such a serious level, you first need to learn how to successfully work with patterns. From start to finish, knit a certain number of products using them.
In crochet, especially in irregular knitting techniques, patterns are an essential part of the creation process.
In general, I lead to the fact that it is impossible without patterns. The main thing is not only pleasure while knitting, but also that the suit “fits” later and does not lie in a bag to be unraveled. Although there is always a way out:
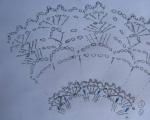
By the way, I read on one of the knitting forums that such a technique as in the picture above is sometimes used in knitting magazines so that the product looks like the model’s figure.
If we knit a product for a specific person, and we want it to fit his figure as it should, then we need not just a pattern, but individual pattern.
Where can I get the pattern?
There are several options:
3. Develop it yourself from scratch.
4. Create patterns using electronic programs.
5. Re-shoot from finished products that fit well on the figure.
Today we will discuss the first two options in more detail.
1. Order from a professional designer.
Some craftsmen do this, especially those specializing in Irish lace, because products of this type of knitting require a well-designed sewing pattern with all the darts and smooth lines. Products using such techniques consist of many motifs connected in different ways, so it’s not so easy to unravel the product while sitting on the sofa in the evening. The fit must be perfect the first time, which is why ordering a pattern is worth it. In addition, such products are expensive, completely paying for the order of the pattern.

2. Take a ready-made one from a magazine or pattern store.
Now there are a huge number of online stores of ready-made patterns at an average price of 25-65 rubles per pattern. These stores are divided into two types: the first sell ready-made patterns with predetermined sizes; the latter specialize in creating a pattern (of course, using special programs) according to your specific measurements. I advise you to choose stores where the pattern requires more measurements than bust size, waist size and hip size. More measurements - more precise pattern.
The finished pattern will be sent to you by email. The entire process usually happens automatically and quickly. All that remains is to print it on a printer on paper in A4 format, glue the sheets together in the numerical order indicated on them, cut along the contours and use. It's very easy and takes minimal time!
And of course, store shelves are replete with magazines of ready-made patterns such as “Burda”, “Sewing and Cutting”, etc.


For a large number of craftsmen, this is the main source of obtaining patterns for future knitted models. There are even such magazines in city and village libraries. For example, at the library near my house, I can take magazines home for a couple of days to study them and copy patterns. There would be a desire.
What is the advantage of patterns from magazines?
We do not need to first develop a base pattern and then model it in order to obtain the desired style - the shape of the product. You just need to transfer the completely finished modeled pattern from the magazine to the desired size, knit the sample, calculate the loops and knit calmly.
What are the challenges of cutting from magazines?
The first difficulty. When beginners pick up a magazine for the first time and, flipping through the pages, reach the insert with patterns,

which, when expanded, looks like this:

Many are terrified by the multitude of lines that intersect, it seems unclear where they begin and where they lead. But this is only the first impression. Each issue of the magazine contains general instructions on how to copy patterns onto paper, and an explanation is given for the symbols of the pattern sheet:

For each model:
1. Its number is indicated, as, for example, in the photo below: Blouse 134.
2. A technical drawing is attached, giving an idea of what the product parts look like:

3. For each specific model the following is indicated:
— designation (alphabetic or digital) of the insert sheet where the details of the model pattern are located;
- color of the outlines of the pattern parts;
- pattern part numbers;
- type of dotted line according to size, and other necessary information:

Let's find patterns for parts blouse No. 134 on the pattern sheet.
The description states: “ Pattern with blue outlines on pattern sheet D”.
We unfold the insert so that sheet D is in front of us.
We need to look for parts with blue outlines. Let's find a sleeve. For clarity, I outlined its contours with a blue line at the smallest size:

Each size has its own type of dotted line (see photo with description). This photo shows the pattern better:

In addition, each part is indicated with its number of the corresponding color, both along the edges of the sheet and inside the part pattern. Sleeve detail – No. 3. We check the picture and number in the description given above (I put a large blue circle in the picture of the sleeve). The pattern of the part also indicates the model number:

Often on one part there are numbers of two (sometimes more) models. For example, as in our example: just above on the thin blue line there is the inscription Mod.135, and along the bottom line - Mod.134. What does this mean? This means that the sleeve patterns of models 134 and 135 are the same with the only difference being that the sleeve pattern of model 135 is a little shorter. Of course, it is more rational not to draw a separate pattern of almost the same sleeve on a sheet of paper, but to combine it. Let's look at the description for blouse 135:

Let's find a pattern for part No. 1 - Front with a fold, which is also the same for models 134 and 135:


Well, and also a pattern for part No. 4 of the front neck trim strip:

Although we will be using a knitting pattern, Be sure to read the entire instruction manual for the model. For example, for models 134 and 135 the description states: “ Extend part 2 by the specified amount" We look at the drawing of part 2 and see that we need to lengthen the part by 6 cm when we redraw the pattern on paper. This is also rational, since the specified length does not take up extra space on the pattern sheet.
That's it. Nothing complicated. A first grader can handle it!
A sheet of paper is placed under the sheet of patterns, on which we will transfer the patterns, and between them is a sheet of copy paper. We take a copying wheel or a knitting needle that does not have a sharp end, so as not to tear the paper, and carefully resize it along a line corresponding to its size. Then we cut out the resulting pattern along the contours and begin to work with it.
The second difficulty when working with patterns from magazines – mismatch in size.
Each magazine contains a table of sizes according to which the patterns are developed:

But often not all measurements match in size. The sizes given are standard, but most of us have non-standard figures. But this is not a reason to refuse a magazine pattern! You can always adjust it. This is what many tailors and knitters do. By the way, there are now many courses on adjusting magazine patterns to individual sizes. The question is: if there are such masters, then why don’t they develop a pattern from scratch?
The answer is simple: because the use of ready-made patterns is convenient and rational from the point of view of the finished style. That is, there is no need to waste time on development and modeling. Everything is already there. And adjusting a pattern, increasing or decreasing its size is not such a big problem. And in magazines provide visual instructions in the form of drawings and explanations on how to do this. In the case of knitting patterns, it is much easier for us due to the plastic structure of the fabric. There is no need to adjust the pattern down to the millimeter.
There are a lot of models of knitwear in such magazines, for example, we can use a turtleneck pattern from the magazine “Sewing and Cutting” for a model that we will knit with knitting needles:


There is no need to draw out the neckline, armhole, or shoulder slope. Everything is already there. Transfer the pattern onto paper and cut it out. We knit a sample, make calculations based on it and knit the product. If our size is not available, then we increase or decrease the pattern. How to do this is shown in the magazine on a separate page.
You can take any patterns you like. Skirts, for example:

For knitted products, it is more advisable to take patterns without unnecessary dart reliefs (such models are circled in red). Models with vertical darts (circled in green circles) or with horizontal darts are more suitable for us. .


I’ll tell you how to work with vertical darts in. Don't miss it.
In stores you often find separate patterns of one or two models for both adults and children:


They cost on average 60-100 rubles per piece. I really like them! In addition to the patterns and size table, there is a detailed description of how to sew the product.


One pattern can be used for a long time and often. Model it by changing the style. Lengthen, shorten, adjust the size, etc. For example, our child’s shoulder length is size 104, and the rest of the measurements are size 110. We customize the pattern. To do this, draw a new line (blue in the photo) from the end of the shoulder along size 104, and at the bottom point we finish along the line of size 110:

Useful recommendation!
To be sure of the pattern, before knitting the product, do not be too lazy to cut out a sample on an old knitted T-shirt and either sew it by hand or machine stitch the sample parts into the product with an allowance of 2–2.5 cm in the seams. After trying it on, a lot will become clear: whether something needs to be removed or added. Or you can start knitting.
In this case, you can completely do without the help of another person. If adjustment is required, carefully use tailor's pins or running stitches to remove excess in the right places, or release the missing from the seams. Try it on. If after adjustment you are satisfied with everything, make the appropriate changes to the pattern. For example, we lengthened the darts on the back by 2 centimeters, which means we make the same changes to the pattern.
That's all for today. Let's continue the conversation about patterns next time.
Dear friends, today my article is for all knitting lovers. When I talked about mine, I promised to tell you what program I use to calculate loops, so as not to do it manually and not waste a lot of time.
It is impossible to calculate the number of loops without drawing patterns according to size, even to scale. And if different patterns and silhouettes are knitted, then the work can turn into a nightmare, which discouraged me from knitting. But a few years ago, quite by accident, I came across a program that turned my knitting world upside down. Now this business brings me pleasure - 10-15 minutes to sample and calculate the knitting density, the same amount to take measurements and enter them into the program, and, without a headache, we start knitting.
Program for calculating loops for knitting and crochet
I want to say right away that you don’t need to install this program on your computer, it works online and is also free. Basically, it makes calculations for knitting on a knitting machine and with knitting needles, but once I conducted an experiment for a crocheted product. As a result, I got a wonderful vest without any problems.
Of course, the service is not perfect, but it seems to me that this is the best thing that can be found on the Internet today to help knitters. So, let's get to know her. First, I will tell you what it is, and then, for those who want to visit it, I will leave a link below.
This is not an easy program to calculate loops. By clicking on the link, you can find a whole catalog of a wide variety of models for women, men, and children. Choose any model you like and go with it. On her page you will see the product itself, links to a master class (all the nuances of knitting), a pattern with a diagram, and a version of the model for which the loops are calculated. Women's, children's and men's catalogs are supplied separately.

On the site that I am introducing you to today there are many interesting lessons and master classes, although they are designed for machine knitting, but I think that some of them will be interesting for those who knit. So stop by if you have a chance.
Calculation of loops. Online knitting program
But we have gathered here not for the sake of lessons and master classes, but in order to quickly and without any problems learn how to count loops for knitting any product you like. To do this, you need to go to the “Patterns” page on the website. There you will see a variety of patterns for which you can calculate knitting.

What awaits you there?
- Patterns for women - 24 models. These are products with set-in sleeves, with raglan sleeves, with one-piece sleeves and with low shoulders. The silhouettes are fitted and straight, with or without elastic at the bottom. Jackets, pullovers, dresses, skirts - knit whatever your heart desires.
- Patterns for men - 10 models. The products are similar to women's in silhouette and types of sleeves.
- Patterns for the little ones - here you can calculate the knitting of blouses and rompers for newborns and older babies.
- Patterns for children - 12 models. Dresses, pants, blouses, pullovers with any sleeve option.
- Hat patterns - 5 models for every taste. Choose and knit.
- Patterns for the whole family - 4 models of different hoods, socks, knee socks, mittens, gloves. These patterns are designed for machine knitting, but even using them, you will receive a calculation based on your measurements and knitting density, which can easily be used when working with knitting needles. I tried it, it worked.
Program for calculating loops when knitting. Work for free
To work in this program you need to know several nuances.
Nuance No. 1. Measurements
Be sure to learn how to take measurements. Even if you know how to do this, still take a look at this page. Measurements such as Armhole Depth (Gpr) or Back Length to Waist (Dst) can be determined differently and you do not know which option is used specifically for this program.

Nuance No. 2. Once again about measurements and additional
information for calculation
As for me, the finished product, knitted according to the calculations of this program, according to exact measurements, turns out to be somewhat loose, even if you specified a semi-adjacent silhouette. By the way, pay attention to the additional information at the top for correct calculation, it is very important. Don't lose sight of her.

So, in order to make my model more tightly fitting, I reduced all the girths by 1-2 cm and also recorded the shoulder length by one centimeter less. But you can experiment and try to knit a product exactly according to your measurements. I have determined this nuance for myself, you may not agree with it.
Nuance No. 3. Prescribing measurements
This is a small thing, but it frayed my nerves until I found information on the website about how to correctly enter the decimal fraction in measurements and knitting density. They need to be marked with a period, not a comma. Otherwise, you won’t be able to create a fraction; be sure to take this into account.
Nuance No. 4. Calculation, recalculation, printing
When you have written down all the measurements necessary to calculate the loops, selected the additional information that is at the top (don’t forget about it, otherwise the calculations will be inaccurate), click the “Calculation” button and the program displays the ready-made information.
If you are not satisfied with something in the calculations received, or you made a mistake in the measurements somewhere, perhaps you forgot to mark additional information, I sometimes forget about it, correct it and click the “Recalculate” button.
When you like everything, click “Print” and this page, with the pattern and calculations, will be printed on the printer. Everything is very convenient. You don’t need to knit and sit near the computer, especially since this calculation will not be saved after you close the program.
Nuance No. 5. How not to get lost in numbers
I’m sure when you see such a picture your eyes will sparkle. But don't be alarmed, everything is simple there. You just need to figure it out.

Each area where the decrease occurs is labeled: armhole, neckline, shoulder. For each of them, all types of reduction are indicated. If you have chosen a fitted model, then under the back and shelf there will be rows in which you need to increase and decrease one loop at a time.
The same goes for the sleeves. First, the rows where the decrease or increase is made are indicated, and a little lower, diagonally, the number of loops that need to be closed. If there is no such number, then the action is performed with only one loop.
More detailed information can be found on the program website.

First, click on “Program Description”. After the page reloads, the “Program in details” button will appear in the same menu. Click and read. But keep in mind that the page will not open in a new window, which means that by going to it, you will lose all the recorded measurements and calculations. Therefore, you need to open the description page in a new window or first make a printout with the loop calculations.
Dear friends, if you are interested in this program that facilitates the knitting process, then here is the link where you can go to the site http://www.mnemosina.ru/all-vikroiki. Study, calculate and knit. I wish you good luck!
I wish everyone happiness, Natalia Murga
22 comments from readers of the article "Calculation of loops for knitting and crocheting. Wonderful program"
Wow, it turns out there is such a thing, it’s great. I used to knit for children and I remember that it was not always possible to calculate everything correctly, I had to bandage it. Maybe that’s why it didn’t become my hobby. So the program is an excellent assistant for knitters.