Cool paper boats. Paper boat
We all folded as children paper boats, but time passes, and we forget what we did in childhood with our eyes closed. But children grow up, and you can entertain them not only with toys, but also with all sorts of improvised means. You can distract your child while you are sitting in line or on your way somewhere using plain paper. It is enough to make a boat out of paper and your child will be distracted for a long time, because he will want to make such a boat himself.
When I started preparing for a trip to the Black Sea, I had a question about how to entertain a child on the train. And this is where paper crafts are simply a great option. After all, you can not only make a paper boat, you can paint it, decorate it, etc. It turned out that there is not one, but six options for making a paper boat.
A paper boat is an easy option.
Everyone made this boat in childhood. This option turned out to be the simplest, and the boat turned out right away. Try making such a boat with your children, they will be delighted. Such a boat will not sink in the water, and it can be safely launched into a stream. Immerse yourself in childhood with your children.

paper boat - standard
To make a boat, it is better to use thicker paper than regular paper. Then your boat will serve you longer and will sail longer in the seas and oceans of your child.
A paper boat is a steamship.
This version of the ship is more complex, but still, a child can make it even on his own. You just need to show him a couple of times how to assemble this option.

paper boat - steamship
Your child will really like this option, especially since it’s a pleasure to decorate this ship.
A paper boat is a boat.
Making a paper boat is quite simple. The child was delighted after I started making version 3 of the paper ship for him. Therefore, you can show a real master class to your child. By the way, the boat is very stable on the water, and launching it into the water brings a lot of positive emotions.

Paper boat - boat
The only small problem is that at the last step you need to turn the boat inside out, and this must be done very carefully, the child may not be able to cope.
A paper boat - a catamaran.
This boat looks like a catamaran, but to be honest, I don’t really like it. And I didn’t succeed in assembling it the first time and it doesn’t look exactly like a boat, but I will, of course, publish a diagram for assembling it. Maybe someone will like it.

Paper boat - catamaran
A paper boat is universal.
This boat is very beautiful, strong and stable. I liked her the most. It took a little longer to make than the first one, but it turned out right the first time.

Universal paper boat
The end result was a very beautiful boat; by the way, you can put soldiers or small toys in it.
The paper boat is military.
The most difficult option, not even all adults can do it, but after a couple of attempts you will still succeed. This warship will help your child develop fine motor skills, which is very important for the child’s psychophysical development.

Paper ship - military
If you take A4 paper and use it to make a square, etc., the boat will turn out small.
P.S. Don't forget to subscribe to new articles. Join the “Katya’s Blog” group in contact: http://vk.com/blogkaty
More interesting articles.
Useful tips
Many of us have loved making paper boats since childhood and let them flow in streams. This fun is still popular among those who love to craft.
You can make a boat using plain paper or cardboard. But you can also try materials like tree branches, polystyrene foam, walnut shells and plastic bottles.
You can build several boats and launch them race. Whose boat floats the longest will win.
Let's look at several ship options, starting with two types paper boats.
How to make a boat (diagram)

You can prepare both a sheet for printing, and a landscape or notebook sheet.
Here's how to make a regular paper boat.

This is how you can make a sailboat/frigate

And this is another type of paper boat

How to make a paper boat
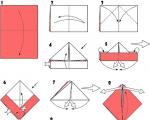
The diagram below shows how to make origami boat.
How to make a boat (photo)
Prepare a sheet of A4 paper.
1. Fold the sheet in half lengthwise.
2. Bend and straighten the sheet again to mark the fold locations in advance.
3. Fold the top corners towards the line.

4. Fold the bottom edges up halfway (this must be done on both the front and back sides).

5. Now bend the bottom corners 90 degrees to the top. Do this on both sides.

6. Also on both sides you need to bend the bottom edges to the end.

7. Taking the folded piece by the center, begin to stretch it.

8. The bottom edge of the square needs to be folded up.

9. Again, grab the workpiece by the center and begin to stretch it.

10. The bottom edge needs to be folded.

11. Holding the workpiece by the tips of the corners, begin to stretch it.

That's it!
This is another type of boat, or rather a steamship with two pipes. This steamer is very easy to make - follow the photo instructions.

Prepare a sheet of A4 paper (or a simple landscape sheet) and scissors.
1. First you need to make a square from a rectangular sheet.

Fold the top corner of the sheet so that the top side is on the left side.
Fold and cut off the excess bottom of the sheet and unfold it.
Since one fold line is already there, it remains to make a second one. To do this, fold the sheet as shown in the image, i.e. connect opposite corners diagonally. Next, unfold the sheet.

2. Fold the corners towards the middle.


3. Turn the workpiece over and repeat the same thing, i.e. bend the corners again towards the center.

4. Turn the workpiece over again and repeat the same action a third time.

5. Turn the workpiece over one last time and straighten the two opposite corners as shown in the picture. These corners should turn into rectangles, which will act as the pipes of your steamer.

6. All that remains is to take the product by the tips of the opposite corners and simply unfold it. The steamer's pipes must close together.
How to make a boat with your own hands

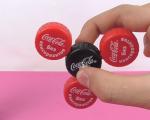
As was already said at the beginning of the article, boats can be made not only from paper. Here's what you can do if you use, for example, bottle caps.
Such a craft is not at all difficult to make. Simply glue three or more bottle caps together using superglue, add a toothpick mast and a sail.

If you wish, you can tie a string with a reel to your boat so that you do not lose it and can return it.
But what a cute boat you can make using walnut shells.

To make such a boat, you first need to carefully split the walnut into two even halves and clean it of the insides.
Light a candle and then drip paraffin into the shell.

While the wax is in liquid form in the shell, insert a toothpick to serve as the ship's mast.
Once the paraffin has hardened, you can decorate the ship. For example, add a paper flag or sail.
Here's how to make a boat from tree branches.


DIY paper boat made from candies
1. First you need to trim off the excess from a piece of foam to give the shape of the future ship.

2. For a good poop, glue on a few flat pieces.

3. For now the ship is not very level, which means we will correct the situation with the help of papier-mâché.
Outside the window, cheerful drops have been sounding for a long time, our brisk river is babbling nearby... spring has not yet begun, but outside the window it is shining brightly and the spring mood is gradually penetrating into our house! The other day my little son asked me to tell and show him. Remembering your school years and reminiscing different patterns for making paper ships, boats and steamboats, laid out colored paper on a large desk and, together with my son, began to make paper boat...
Preschoolers and elementary school students love to practice origami - folding paper figures. The process becomes especially entertaining when parents participate in it. But such activities have a beneficial effect on the development of the child. About how to make a paper boat with your own hands or paper steamer We will tell you in detail below and with the help of master classes with photos you can easily make beautiful paper boats to launch in the nearest body of water.
Creating jewelry, decorative elements and various toys can captivate any restless person when he sees how paper comes to life in his hands. Don't forget to allocate a shelf for finished products so that they can be shown to friends and all guests.
We were all once children and loved to make paper boats with our own hands. Years have passed, now it’s time to teach this art to the next generation, and at the same time return to childhood for a while and remember the happiest and most carefree period of life. Some made snow-white paper ships that looked like large steamships, others preferred red or blue motor boats, some girls painted the top of a white paper boat pink, and scarlet sails appeared on it.
The first time the baby needs to be shown how to fold a paper boat correctly(or it’s better to immediately teach him how to work with a paper craft making scheme). If you cannot remember the sequence of necessary actions, use the proposed paper boat diagram (below). When the watercraft is ready, you can play with your child.
Origami allows you to spend time fun and usefully. The baby develops imagination, he realizes that for a good mood it is not necessary to run and jump, you can sit quietly and do something very exciting. Folding paper with small fingers is painstaking work that improves fine motor skills.
Paper crafts can reveal the creative personality in a child and give rise to new achievements in this area. Even if the subsequent hobby is not related to origami, the first impetus may be given by simple boats.
The process does not end once the boat is ready. You can fold several boats, a steamboat, ships and go for a walk with your child to put them on the water. Taking into account the parameters of our watercraft, we conclude that a puddle, a ditch and other similar bodies of water will serve as an excellent sea for them. It will be great if the weather pleases with sunshine and a light breeze that will push the boat to set off on a long voyage. Forget about your worries for a moment, go back to childhood and play with your child. Sending paper boats on a voyage, even if not very far, is very funny and fun. Children are delighted with such entertainment.
Next you will find step-by-step diagrams with photos, as well as explanations about how to make a paper boat with your own hands fast and simple. But paper can be used to make not only classic boat, but also a paper steamer or boat. When you look at the diagrams with photos of the stages of work, pay attention to the fold lines so that our paper boat turns out smooth and without unnecessary dents. On the pages of our website you will find many lessons and master classes on making paper crafts using the origami technique , as well as other materials on how to quickly make beautiful paper boat together with your children.
How to make a paper boat
How to make a paper boat
How to make a paper steamer
We hope that now you can easily make both a boat and paper steamer or boat together with your child. Even a small child can make a simple paper boat with his own hands. , so teach him the basics of the art of origami, give him a square-shaped sheet of paper and invite your child to try to make a paper boat on his own.
NEXT ARTICLE:
Paper crafts are a fun activity. A simple white or colored sheet can make an interesting creation.
At first glance, folding figures looks like a child's game. But this is a real art with its own techniques and methods of work, which, nevertheless, every person can master.
Every child has folded paper figures at least once. The most familiar and beloved are paper airplanes and boats.
As a child, paper boats were set sail and simply used for games. This simple toy gives room for the child's imagination.
Some were fond of making complex and large models with many small elements.
Anyone can create such a figurine from paper. It is enough to know simple instructions.
Instructions for folding a durable boat
In order to fold the craft, you need a sheet of paper. Nothing more is required. And the scheme itself is quite simple. It is enough to understand it carefully and fold the product several times.
 In the future, you can do without the hint.
- You need to prepare a rectangular sheet of paper. The final size of the boat will depend on its size.
The sheet can be white or colored, depending on your wishes. If you are using paper that has color on only one side, it is advisable to fold it with the color on the inside. The finished figurine will look more beautiful.
- You need to fold it in half crosswise.
- Place it in front of you with the fold up and find the middle of the sheet. To do this, you need to fold it again, but not completely. As soon as the middle is identified, you can make a light crease.
- At this stage there is a sheet folded in half, with the middle marked. Next, you need to fold both corners towards the center, focusing on the mark.
- Holding the corners, you need to run your finger along all the fold lines. They should become fixed and thin.
- Next, you need to tuck in the free edges of the sheet that remain under the formed triangle. One edge is on one side, and the other on the other.
- Now the corners of the folded edges need to be folded, repeating the shape of the triangle and again fix the fold with your finger. Do this on both sides.
- Now you have a blank in the form of a triangle. If you move the edges of its base apart, a pocket will form inside.
- Next, you need to bring the corners of the base of the triangle together and fold its opposite sides. Now the workpiece has become square in shape.
- It is necessary to grab the upper corners of the square and stretch them in different directions.
- The product is ready.
How to make a paper boat with a child
The folding process may seem long and complicated. But in practice everything is much simpler and more interesting. In order to interest a child in such an activity, it is necessary to take part in the process. At least at the initial stage.
Folding figures will not only captivate your baby, but will benefit his development:
- the process helps develop fine motor skills;
- perseverance and patience are formed;
- imagination develops.
There are a huge variety of diagrams and figures. They vary in degree of difficulty, and you can choose the right option for a child of any age.
 In order to assemble a craft with your child, you must:
- Think in advance about which model you plan to fold. Prepare its diagram and understand it before starting the process.
- Prepare a suitable work surface and several sheets of paper (in case something doesn’t work out the first time).
- You can also prepare colored pencils, markers or paints. When the ship is ready, you can decorate it: come up with a name, draw holds, or simply paint it.
- When everything is ready, you can start working. It is necessary to fold the paper, showing the child the sequence of actions and technique. At the same time, the child must do his own crafts on his own.
- The finished figurine can be decorated to suit the child’s taste. Then put the “ship” on the water (even at home).
- It is necessary to be patient and not rush the child so that he can calmly figure out a new activity for himself.
Paper origami in the shape of a boat
Origami is the art of folding various paper figures. The classic version involves using only one sheet of paper, without using scissors.
Origami in the form of a boat with a sail can be assembled as follows:
- Fold a sheet of paper along both diagonals alternately, straighten it and turn it over.
- Now make folds in all corners and turn over again. The resulting folds make folding the figure easier.
- A piece of paper must be folded in half and then unfolded back.
- Now you need to fold the edges of the sheet to the central fold and press them.
- The result is a rectangular blank. The top and bottom edges need to be folded towards the center. Now it turns out to be a square.
- Next, the top and bottom need to be bent back.
- The lower corners need to be raised up and their corners turned outward to form a trapezoid.
- Do the same with the top part.
- Next, you need to grab the upper trapezoid by the central part and pull it up.
- Turn the workpiece over. It turns out to be a square in the center. The entire figure needs to be folded in half along the diagonal of this square.
- All that remains is to raise the bottom corner and the craft is ready.
 Another model in the form of a boat:
- The sheet must be folded in half horizontally.
- Then make one horizontal bend in the center of the sheet.
- Next, you need to bend the top corners outward on both sides towards the center line.
- Also bend the bottom corners towards the center.
- Now you need to bend the top layer forward and the bottom layer back.
- Next, fold the workpiece inward and straighten it.
- Bend the corners back and level the boat.
Ship made from A4 sheet
Most often, A4 (or landscape) sheet is used to make figurines. Its parameters allow you to create a ship of medium size and good shape.
It is preferable to use A4 with a density of 80 to 160 g.
Often the product requires a rectangular sheet (like for a classic boat). In this case, even scissors are not required.
If you need a square sheet, then it can be easily made from A4 using scissors (for example, as for a two-pipe boat).
Making a big boat out of cardboard
To make a large ship, you can use the same patterns as for ordinary crafts.


 But ordinary paper will no longer work here, since such a blank will not hold well.
- Sometimes large figures are made from newspaper sheets in two or three layers. But even such tricks don’t really help. As a result, the craft does not hold its shape and has no appearance.
- For such a product, very thick paper or cardboard is suitable. This material will give rigidity and keep its shape.
- It should be noted that working with cardboard is more difficult than working with paper.
- First you need to take measurements, and then make bends in the right places.
- Fixing the bends will require some physical strength. Therefore, the child will need adult help.
- Sometimes a model of a large ship is made from thinner paper, and then reinforced with cardboard figures of the desired shape. They are glued to the ship and it becomes stable. But it is not recommended to place such a product on water, since the folds will quickly become saturated with water.
- Large ships often perform a decorative function and are a decoration or addition to the interior.
Beautiful sail for a paper boat
A sail is one way to decorate paper crafts. With such a detail, the product takes on a finished look.
In this case, the sail does not functionally help you swim faster. Therefore, you only need to take care of its beauty and originality. It doesn't matter in which part of the ship it will be attached.
- First you need to prepare the base for the sail. If the figure is small, then a toothpick will do. For a large model, you can use any wooden stick. Or another material is not too heavy for the product.
- The base is attached with glue or mechanically (for example, with threads).
- The sail itself is attached to the top of the base. It can be of any shape and color, from any material: colored paper, material, shiny foil.
- For convenience, it is better to first attach the sail to the base, and then this structure to the craft.
- It is necessary to ensure that the sail does not overweight and the boat does not fall on its side.


Double-pipe boat for interior decoration
A two-pipe boat (or steamship) is just as easy to make as the classic version. It can become not only a toy, but also a worthy addition and decoration in the interior.
 To make the boat look presentable, you can make it from beautiful, unusual paper. Or decorate the already prepared figurine so that it fits harmoniously into the interior.
The manufacturing process of a two-pipe boat:
- For this model you will need a square sheet of paper. If the shape is rectangular, then you also need scissors.
- The rectangular sheet must be folded, bending one corner diagonally to the opposite edge. Thus, you get a square folded in half and the remaining strip of paper that needs to be cut.
- The resulting square must be folded first along one diagonal, and then along the second. Thanks to this, the center of the sheet will stand out.
- Next, you need to bend all four corners to the center. You also get a square figure, but smaller in size.
- The workpiece must be turned over with its bent corners onto the table. And on the resulting surface, repeat the operation again - bend the corners to the center.
- We turn the workpiece over again and bend the corners to the center for the third time.
- Now you need to turn the figure over again. The top and bottom corners need to be straightened. They will serve as pipes for the boat.
- The other two corners (left and right) need to be pulled to the sides and the craft is ready.
 Another simple instruction and the result is a new boat model with two pipes in the center.
How to properly launch ordinary boats on the water
To launch a finished paper boat on the water, you must first prepare.


 Of course, you can do this without preparation. But such a figurine will quickly become saturated with water, lose its shape and drown.
To prevent the product from becoming disposable, you need to follow these recommendations:
- use thick paper for production, which does not absorb water well;
- You can melt paraffin or wax and dip the figurine in it. When everything dries, a layer forms on the paper that will serve as protection against water;
- do not overload the ship with additional cargo. Sometimes during the game you can place a figure (captain) or cargo on the boat that needs to be transported. If all these items are too heavy, then some of them must be put aside for the duration of the voyage.
Any of the boat creation schemes is feasible for both adults and children. This is a fun and interesting activity for everyone.
You can make such a craft in any conditions. This does not require any special skills or special materials.
Today I’ll tell you how to make a paper boat with your own hands. Making paper boats is fun for both children and adults. With the arrival of spring, children quickly run outside to launch their ships, made with small hands from materials found at home, along streams or puddles. The simplest and most affordable option is a paper boat. Every child has a question about this: how to make a paper boat yourself. There are several best ways to model paper ships. All paper crafts can be made from. To make the boat float on the water longer, it is better to make them from coated magazine paper.
Method 1. A simple paper boat. Step-by-step production.
To solve the problem of how to make a paper boat according to step-by-step instructions, you need to follow these steps:
Step 1. Take a landscape sheet, most often it is in A4 format. This material is denser than regular paper, so the product will have a rigid shape and beautiful appearance. We bend this sheet in the middle along the narrow side.
Step 2. Fold the resulting workpiece again along the short side. And then we turn it back.
Step 3. We connect the corners at the fold of the folded sheet together.
Step 4. Bend the rectangle upward at the bent corners.
Step 5. Turn the workpiece on the other side and bend another rectangle. We bend the corners of the folded strips on both sides to form a triangle.
Step 7. Bend one of the separate corners up. We perform similar actions with the other angle to form a triangle.
Step 8. Open the bottom again and connect the opposite corners. Now you need to pull the corners at the top of the triangle to open the boat. To do this, one hand takes one bent end, the other takes the second.
Step 9. For stability, you can slightly expand the base of the paper boat. And now the amazing paper ship is ready!
Step 2. We bend the corners of the square again towards the middle to get another square. We turn the workpiece again and bend the corners to the center again.
Step 3. Turn the square over one more time and perform similar actions with the corners.
Step 4. Turning the paper ship over one last time, straighten the two opposite corners until you get a rectangle. The result will be a kind of ship's pipes.

Step 5. We take the workpiece by the remaining corners and unfold the boat, while the pipes are connected.
A steamer with two funnels is ready to set sail. A more detailed diagram of how to fold a paper boat can be seen in the video below.
Method 3. Making a boat from paper.
To answer a child’s question of how to make a paper boat with your own hands, you also need the best step-by-step instructions.
To work you will need a square sheet of paper. You can take a regular landscape piece of paper and make a square out of it. To do this, connect the top of the sheet to the left side, and cut off the remaining part. Here we follow the instructions:
1. Bend the square in half, connecting the top and bottom of the workpiece.
2. Now we bend the free edges of the workpiece towards the middle to make a rectangle like this.
3. Then we place the resulting figure in a vertical position and bend one edge. But we connect the corners of the long rectangle at both ends together.
4. Bends the future boat in half so that the connected corners are inside.