Very much even brooches made of beads. Master class on making your own bead brooches with step-by-step photos and video lessons
Today, handmade items are in trend, from decorative items for the home to sweet products. The cost of such products is quite high, but with a little perseverance and minor material investments, you can do something similar yourself. In this article we will dwell in detail on beadwork, namely on brooches embroidered with beads with our own hands. Let's consider the necessary materials and tools. Let's learn how to make a brooch from beads on felt, a master class will help us with this.
Required materials and tools
The set of tools may vary depending on the type of product. In the future, each master will have his own preferences and tricks, but we will look at the basic tools and schemes.
Tools


- natural. They have a wide color palette, they are soft and tactilely pleasant. There are also disadvantages - low strength, they tear quickly, they rot in high humidity (after treatment with beeswax this disadvantage will be eliminated);
- synthetic from polyamide and lavsan. Their advantages are high strength, resistance to external factors, low shrinkage, high durability and sliding ability, and do not get tangled. But such threads can cause allergic reactions due to chemicals;
- reinforced from a lavsan core, braided with a second thread. They have high strength, elasticity, wear resistance, and resistance to external factors. Disadvantages include high cost and inclusions of chemical elements that can cause allergies.
In addition to the material, it is important to consider the thickness of the thread. Sometimes threads can be replaced with fishing line or monofilament.
- Scissors.
Materials for work
To make a beautiful brooch, you will need:
This is our base for embroidery. This material is based on wool fiber. Happens:
- natural – quite durable, malleable to coloring. It repels dirt and is hypoallergenic. It has a high cost and increased ability to deform;
- wool blend - often the ratio of wool to viscose is 60:40. It is not inferior to natural in properties, but for small parts, for example, for a brooch, it is completely unsuitable, because... the product will lose its shape;
- artificial - acrylic or eco-felt. Washable, retains its shape, dyes well, does not fade, hard, not elastic;
- with bamboo fibers and viscose - hard, durable, easy to color, pleasant to the body, but loses its shape.

Beads
These are small beads of various shapes. When choosing the type of beads, it is better to stop at one, so that the pattern does not seem blurred, uneven, or individual beads do not get knocked out.
Quality control points are uniformity (the size and shape of the beads do not differ from each other) and do not stain when exposed to water.

Types of beads can be divided depending on the country of origin:
- Chinese - small, beads are not the same. Therefore, to create a brooch with beads on felt, it is better not to use them, since you will have to spend a lot of time and consumables to obtain the design;
- Czech. Beads with clear and even edges. It is very popular. Please note: color shades vary from batch to batch, and there are also defective beads. Czech beads are in the middle price category;
- Japanese is one of the highest quality: matching colors, shape, size, weight, but the price is an indicator of this;

Japanese Miyuki beads

Japanese Delica beads

Czech beads

Chinese beads
- Taiwanese or Indian. It cannot be classified as quality. It is very brittle, heterogeneous, there are sharp edges, a narrow range of colors, the paint is unstable;
- Indian - has all the characteristics of Taiwanese.
Each country has its own size classification system, so it is important to take these features into account.
According to the form they are distinguished:
- beads – round shape with a round or square hole, melted edges;
- cutting – short cylindrical shape (about 2 mm);
- glass beads – cylindrical shape (3-25 mm), rounded edges, faceted, twisted.

Round beads


Bugle beads
Size classification: 6.0 – 15.0. How to understand the marking: it is assumed that 1 inch (which is 2.54 cm) contains the number of beads stated on the marking. For example, 15/0 – 15 pcs. beads will fit in one row of 2.54 cm.
In addition, it also depends on the number:
- hole diameter;
- number of beads in 1 g.

There is no single measurement system; sometimes books on handicrafts have their own marking method.
- Genuine leather - for the back of the brooch.
- Beads have a smooth spherical shape. In a brooch they are used to highlight part of the picture and add volume. Beads can be natural, artificial and semi-precious.
- Stamens are an additional element for creating flowers (like the core), as a decoration.
- Ribbons are an additional element of brooch decor, useful for finishing the edges and adding volume. There are different types of material (silk, satin, cotton).
Where to start and how to choose the most effective combination of materials
First you need to decide on the type of decoration. It could be an insect, a flower, an animal, or part of a plant. Based on this, a weaving pattern is selected. As a rule, the master class knows what materials you will need. But you can change them at your discretion.
At the preparatory stage you need:
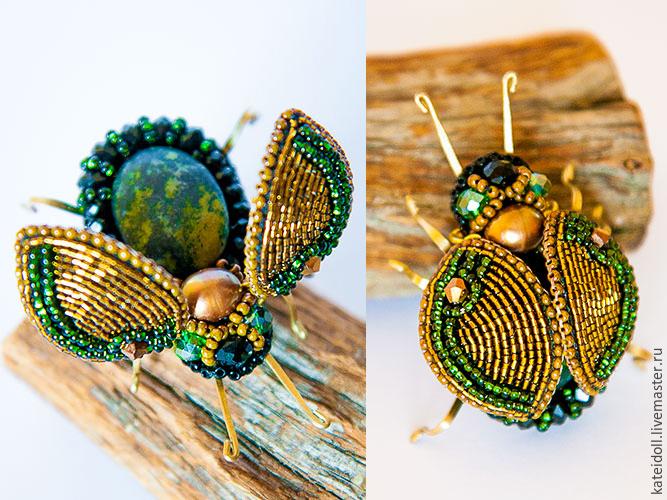
- choose the type of product (shape, size, purpose) - for beginners it is better to practice on simple flowers and butterflies. Before choosing the type of brooch, think about what you will wear it with and where to attach it. A funny bug, fruit or bee is suitable for a summer outfit or a spring jacket. For an autumn coat or knitted sweater - a voluminous, large sheet, not very colorful;
- select materials and their compatibility. A brooch can be made from budget materials (plastic beads, Chinese beads, plain felt), or you can weave a real jewel. Of course, for this you will need silver-plated beads, semi-precious or crystal stones, rhinestones and beads. But you must admit that the appearance of such a product will be much more representative and impressive.
- practice stringing beads and evaluate how smoothly the pattern lies and whether the tools are convenient.
Brooches made of beads and felt and their patterns
After preparing the necessary equipment, you can begin step-by-step master classes. There is no one universal pattern for any type of brooch, so we suggest focusing on the most famous ones.
Bead embroidery on felt - “Watermelon” brooch pattern, master class


Separate each internal segment with color shades, creating the outline of a watermelon using more saturated colors. 
- If you need to replace the thread, or if it runs out:
- do not use the entire thread, leave it to secure the beads;
- use the remaining thread to secure the last few beads several times;
- Using stitches on the wrong side, bring the thread to the center of the future brooch and secure with a knot;
- Bring a new thread through the middle of the embroidery through the last 3-4 beads.

- We transfer the drawing template onto the cardboard. The new template should be a few millimeters smaller than the embroidered design;

- carefully lubricate the felt with glue, thereby fixing all the nodes and transitions, and glue the cardboard;

- Now glue the pin onto the cardboard. Let the glue dry time;

- on suede or leather (back material) we make holes to the size of a pin;

- lightly lubricate the pin with glue to secure it;

- cut off unnecessary parts of suede (leather);

- sew the felt and backing material together. We make a knot on the wrong side, stringing beads, passing any processing seam along the edges.


Embroidery from felt and beads, “Butterfly” brooch pattern and master class

Some stages will be similar or repeated, so we will not dwell on them in detail.
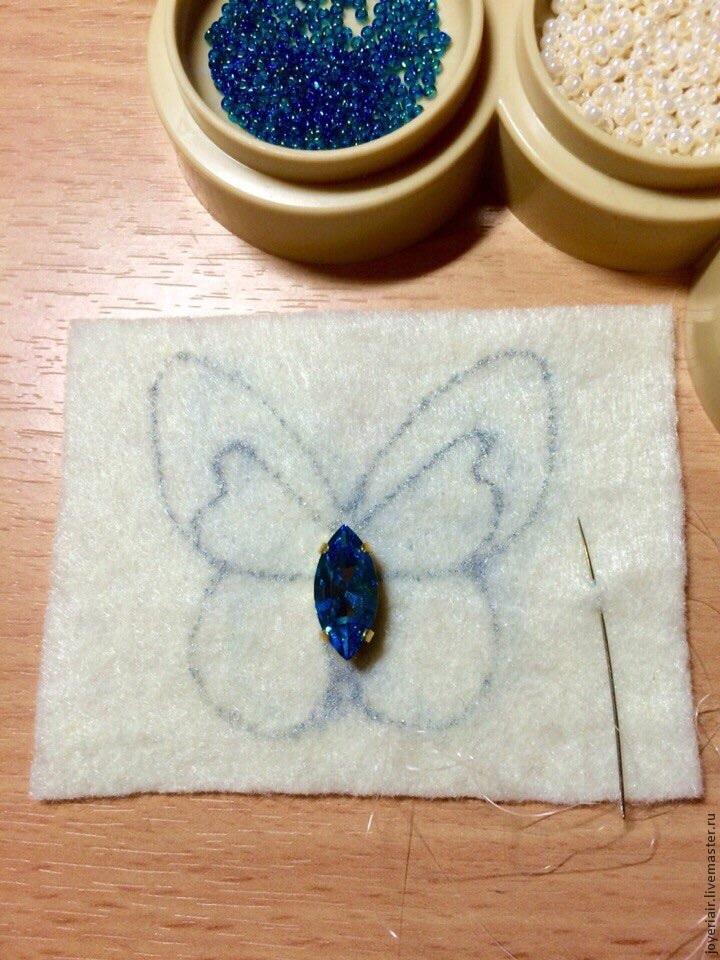
(Click on the picture to expand it to full size)

Beaded brooch on felt “Cat, cat”
There are many variations of patterns for cats and cats; let’s consider a more complex type of pattern – the Siamese cat. The difficulty is this: in order for the brooch to match the species characteristics of the animal, it is necessary to observe the transition of the characteristic color of the coat. Before you begin, carefully study and think about which beads and which shades will be best combined and not merge.
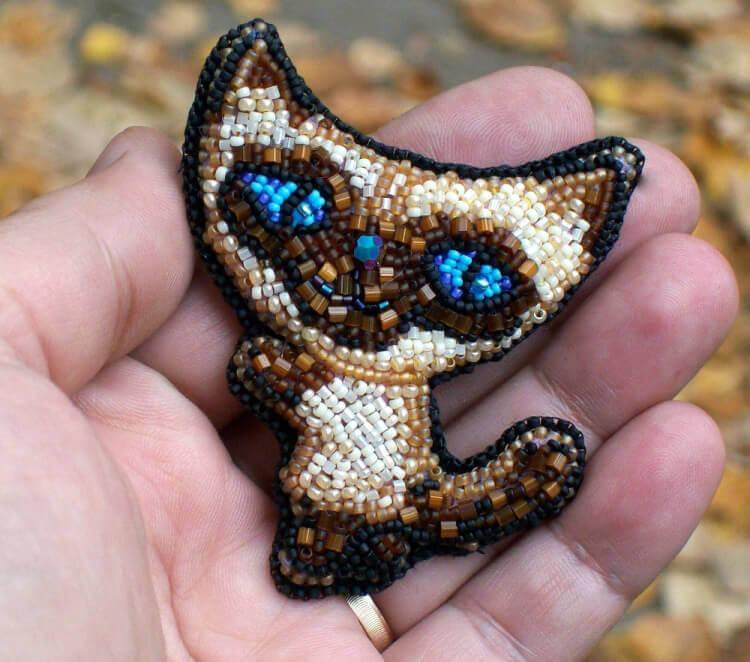


Please note that the technique for embroidering brooches on felt with beads is the same, just set the specifics first. For example:

Beads make beautiful not only brooches, but also necklaces, belts, collars, the latter are especially gaining popularity and are in trend.
Video Lessons
Additional SCHEMESbrooches and pendants
Dear master, if you are passionate about creating embroidered pendants and brooches, then this set is perfect for you! With it, you can create a variety of compositions for any occasion. We drew them ourselves, so they are 100% original and appropriate for the lesson. You can use them for any purpose, including commercial.
Indicate your Name and your email where to send a set of diagrams
Simple expert advice will help you create a masterpiece. Just listen to them:
- Pay attention to the size of the beads.
- Czech-made beads are more common on the market. It's inexpensive and good.
- When attaching a pin to the skin, pre-mark the insertion locations.
- When making cuts or holes for inserting a pin, let them be slightly smaller than necessary.
- It is better to sew beads on non-slip fabric, and felt is an ideal option.
- Use organizers or small containers to store beads. In such containers, the beads are calibrated by color and size (which reduces the time when embroidering), if this is not the case, pour small portions of beads onto a napkin.
- Collect beads with a needle.
- At first, it is better for beginners to use ready-made diagrams, gradually include one new element at a time and not deviate from the step-by-step instructions.
- If it is difficult to insert the thread into the eye of the needle, then you can use the end of the thread:
- dip in colorless varnish, dry, press down with fingers;
- With your fingers, press the end of the thread to the candle and pull it through;
- Use a lighter to slightly burn the end of the thread.
- It is better to start with schemes that include no more than 5-6 color shades.
- The process should not affect health, so use a lamp, magnifying glass, place materials and tools conveniently and nearby. Do not hold the product too close or too far from you.
- Do not experiment with new ways of attaching beads to a product; make practice stitches on a separate material.
- Don't limit yourself to one seam, learn new techniques. You will only benefit from this product.
Thus, despite the many nuances and features of embroidering a brooch with felt beads, this type of handmade work should not cause any great difficulties. The main thing is to clearly define the design and purpose of the product.
Greetings, dear friends! Every fashionista knows: without stylish accessories, the look will never be complete. Of course, you can always buy a beaded lip brooch on the Internet, but if you have a few hours of free time, a desire to create unique things and a small amount of materials, then of course it is better and more enjoyable to make it yourself. This brooch will be the highlight of your appearance!
Tools and materials Time: 3-4 hours Difficulty: 2/5
- Red beads (primary color of lipstick);
- Dark red beads (for outlining);
- White beads for teeth;
- Thick fabric (preferably felt) of any color;
- Non-woven material (spunbond) for stencil;
- A piece of natural or artificial leather, or felt;
- Thin fishing line or thread;
- Brooch pin;
- Superglue.
MK lip bead brooch

Tools on hand should be a pencil, a bead needle, and scissors. And 3-4 hours of free time. Now you can start making a lip brooch from beads with your own hands, just follow the instructions.
1st step
Let's choose a suitable drawing. It should be simple and clear, without complex small details (with beads it will be more difficult to repeat various shadows, strokes and fine lines). To obtain a stencil, you can use 2 methods: the first is to download a picture from the Internet, print it on paper, and place it under non-woven material. The second is faster - we apply the spunbond directly to the phone screen and trace the contours on it with a pencil or pen.
Let's choose the option we like for our brooch:

We transfer the design to non-woven material in any way:

2nd step
Place the resulting stencil on a piece of thick fabric. To ensure that the design does not move or wrinkle, we glue the spunbond to the felt. Now you can start working. First of all, it is necessary to highlight the contours of the lips using dark red beads, connecting both of our fabrics. We secure the fishing line and thread the needle from the wrong side to the front. We act according to the “two steps forward, one step back” scheme.

We collect 2 beads, retreating a distance approximately equal to their length, pierce the fabric and return through the nearest bead.

We pass in this way along the outer contour of the lips. Finally, we draw the fishing line through all the beads, forming a clear line without gaps:

Then we trace the inner contour in the same way:

3rd step
In the same way (two forwards, one back) we embroider “columns” in the center with white beads, imitating teeth.

4th step
When painting the main lip color, you can pick up 3 beads, returning only through the last one. We do the shading with vertical columns, filling the upper lip first:

And then the bottom one. And cut off the excess fabric along the contour. The main thing is to do this carefully, without damaging the fishing line.

5th step
The main work on making the brooch has been completed. You can start decorating the edge and back.
We sew a pin to the wrong side of the main fabric in the center, then using superglue we evenly glue a piece of natural or artificial leather to the brooch and trim it along the contour of the lips. Do not forget to make the holes for the “ears” of the pin strictly according to their size.

The last stage is to refine the joint of leather and felt with stitches and throw 1 dark red bead along the entire edge. Finally, we stretch the thread through the entire resulting row, smoothing and leveling the outline.

The finished brooch can be attached not only to a jacket or blouse, but also to a skirt, dress, trousers, scarf and even a bag.

You can make several brooches for different moods (bitten lip; lips spreading into a smile; duck lips), change their size and revise color schemes, following the steps of our master class. Lip brooches made in volume look unusual. It all depends on your imagination!
lip brooch made of beads master class video
Thank you for reading the master class to the end! We will be glad to see you again on our website, be sure to try making such a brooch and share your result with us in the comments. Good luck and inspiration to you!
Have a nice time! Today I want to show you the process of creating a joyful autumn brooch with a smiling hedgehog carrying a ripe apple on its thorns. I will be glad if this animal pleases you! I tried to describe in as much detail as possible all the stages of creating jewelry and make the master class as clear as possible, but if you have any questions, I will be happy to answer them!
So here is the list of required materials:

Japanese beads No. 15 (All embroidery is done with small beads, due to which the brooch turns out miniature and weightless)
Black - 2 beads
White - 9-10 beads
Beige - 1 g
2 shades of red - less than 1 gram each
2 shades of green - 5-10 beads
2 shades of bronze (Toho numbers used in works 422 and 83) 2-3 g each
The main brown beads for the outline (I used Czech beads No. 13 here), but you can also use Japanese ones, of course. - 5 g
Brown beads No. 10 for lining the edge of the hedgehog’s tummy - approximately 20 beads
Czech cutting No. 15 black-bronze color for thorns - 5 g
Japanese beads No. 8 beige - 4 beads (for paws)
Modeled felt of some neutral color on our theme - beige or brown, a piece of thin leather, cardboard, a base for a 3.5 cm brooch, threads (I used 2 shades of brown - lighter and darker), needle No. 13, glue (Super- moment gel), pen, scissors
Let's begin our work.
Using a pen on cardboard we draw our hedgehog. From the nose to the butt it turns out to be about 6 cm (when transferring the design to felt, it will turn out to be about 1 mm larger on each side). 
Cut along the outer contour and trace it onto the felt with a pen.

We finish drawing the inner contours of the hedgehog, outline the eyes and mouth. Let's smile together with the hedgehog! The base for the brooch was not in the general photo of the materials - I’m correcting it here.

We insert the thread into the needle, fasten it, coming out from the inside to the face, clearly at the tip of the nose. We begin to embroider the contours of the hedgehog with brown Czech beads No. 13 or Japanese No. 15. We place 3 beads on the drawn outline and exactly where they end, stitch the stitch on the wrong side.

We go from the inside to the face before the last of the collected beads. The needle comes out FROM the drawn outline - this way you can easily track the evenness of your embroidered lines.

We pass the needle through the third of the collected beads and tighten the thread. This will be the main working method of embroidery.

We embroider the entire outline of the hedgehog. When we embroider spines, sometimes we sew 2 beads or even 1, depending on the situation. We sew the spines to the top (where the arrows point), from the bottom up - and we begin sewing the stitch down from a new stitch, so that we get an acute angle and not a rounded line. We embroider a line separating the head from the body. We pass the thread along the entire contour, leveling it. It is important that the needle is thin, because the beads are small and if the needle is thick, there is a risk that some bead in the outline will split and you will have to painfully redo a rather large piece of work.

Preparing beads for the muzzle. There should be 2 black beads.

Sew on the pupil bead.

We trim the pupil with white beads.

We sew the eye with brown beads. The perky eye is ready! We sew three beads where we have a mouth. We go over the thread a couple of times so that the mouth doesn’t go anywhere when we sew up the background)

Using a stitch that is already well known to us, we sew up the background of the muzzle - from the line dividing the head and body to the nose, the tip of the nose is the second black bead. When we embroider, we make sure that the outline is not smeared - if you are not sure whether beads are needed, it is better not to sew them on, we use felt to match, so half a millimeter of felt that will be visible is not a tragedy, but if the outline becomes crooked - immediately It won't be pretty. You should get a complete face with a mischievous eye and a sweet smile.


We go out with a thread and from the upper left corner of the body we collect beads for the first spine - not necessarily in the same order, but I recommend not taking a bead for the first and last - since the bead has a sharp edge, the thread may break when tensioned - it will be a shame. Ideally, the first and last ones are beads No. 15.

We lay our thorn along the contour.

And we make a stitch A LITTLE SHORTER than the length of the beads. The stitch looks like a low arch, due to which the back with spines will be voluminous. There is no need to make the stitch much shorter.

Next, we begin to “paint” the back of the hedgehog with spines - we alternate the length of the spines from 3 to 6 beads. The felt between the spines should not be visible. The following photographs show the sequence of filling the back with beads.


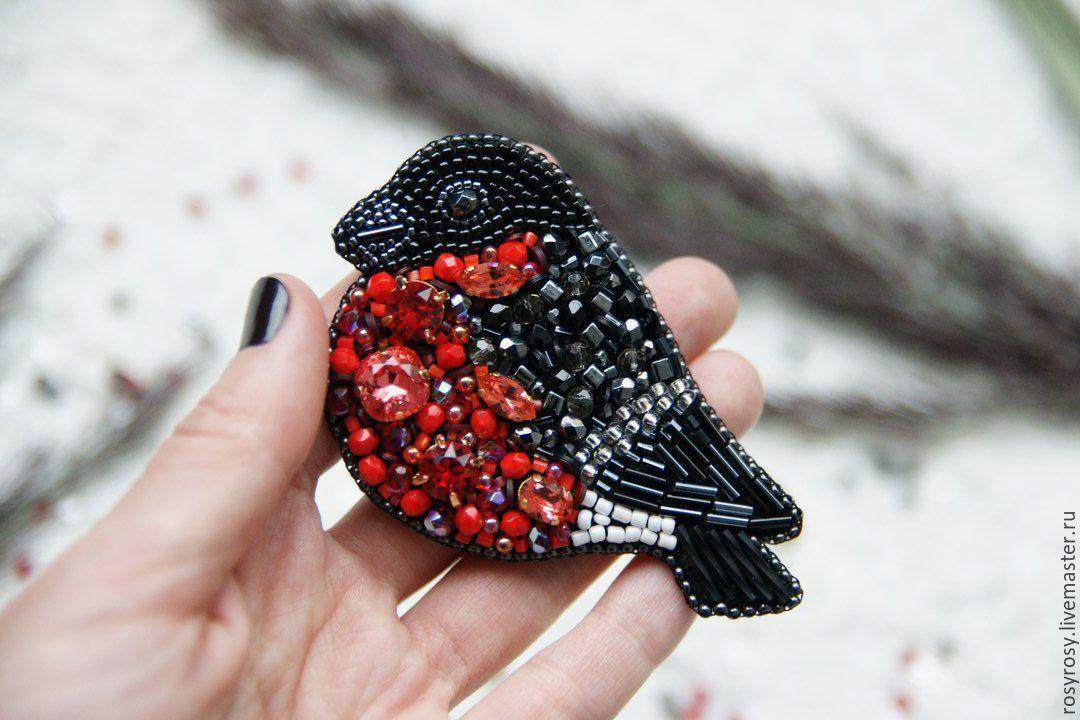
Almost every woman has many accessories in her wardrobe, but it is brooches that can give a wardrobe a special charm and attract the eyes of the opposite sex to its owner. Stores today offer a huge selection of jewelry and adornments for every taste. High-quality and original brooches are very expensive. Making a product with your own hands will help you become the owner of a truly exclusive item and will not require significant financial investments. There are many master classes that even beginner craftswomen can do.
In craft stores Today there is a huge assortment of beads for making designer products with your own hands:
- plain and multi-colored;
- small and large;
- smooth and textured;
- glossy and matte;
- varying degrees of transparency;
- round, oval, in the form of bugles;
- with hole edging.
Before starting work, you need to decide on the type of future product and select the appropriate type of beads. For beginning craftswomen You don’t need to immediately start making complex products; you can purchase or print a stencil and sketches. These can be embroidered beaded letters, a feather, a leaf and a flower, as well as New Year’s motifs. The simplest models are brooches in the form of flowers and butterflies.
Before starting work, it is worth practicing a little in stringing beads to achieve an even and accurate distribution. Such training will also allow you to understand how convenient the selected tool is to use:
- Is the fishing line chosen correctly?
- Is the needle thin enough for stringing beads?
- Are the scissors easy to use?
Checking the tools and materials for creativity in the first stages of work will allow you to understand how well the material for creativity has been chosen.
Gallery: beaded brooches (25 photos)


The most effective combination of materials with step-by-step
There are combinations of materials, the joint use of which guarantees the creation of a masterpiece.
Combination of beads and seed beads
 The basis of such products is beads. Beads in this tandem play a secondary role and serve as decorative decor. For ease of manufacture and further use as decoration, it is recommended to take special half beads. The half beads lie flat on the base of the brooch and are easy to sew on.
Brooches made of beads and felt
Felt is one of the favorite materials for the creativity of modern craftswomen. Its wide application making accessories with your own hands is associated with a number of significant advantages:
- strength;
- softness and ease of cutting;
- no need to process edges;
- the ability to maintain shape for a long time.
To make a simple brooch with your own hands, just apply the selected design to the felt surface, sew on beads and trim the edges of the excess fabric.
Brooches made of beads and stones
Brooches made of beads and stones look very impressive due to the contrast of stones against the background of shiny beads. Very often when making such brooches The material used is cabochons, which are semi-precious stones of oval or round shape. The technique using such stones in a beaded frame is called “cabochon”.
Beaded brooch master class step by step
Making a brooch from beads according to the proposed master class is recommended for beginning craftswomen and parents who prefer to create with their own hands together with their children. Initially, you need to decide on the general idea of the future product, that is, choose a design for the brooch.
It is necessary to prepare the material in advance for work and tools, which will save time on making jewelry. To work you will need:

Making a brooch consists of sequential execution of the following steps:
- transfer the design to felt;
- carefully and evenly fasten the beads with a needle and fishing line over the surface of the entire pattern, using a “forward needle” stitch;
- cut off excess fabric with scissors;
- attach a pin to the resulting brooch base.
How to make a beaded brooch: cabochon technique
To work on the proposed master class You will need the following materials and tools:

Consistently and accurately perform a certain sequence of actions.
Formation of the first row
- Take a small piece of fabric and glue the cabochon to it.
- Using a “forward needle” stitch, sew 2 large beads near the stone.
- Pass an additional stitch through the beads and add 2 more, that is, in the end we get 4 sewn beads.
- Thread the required number of beads to obtain a tight ring and beads around the stone.
- For a more secure fit, it is necessary to pass through each bead several times with a needle and thread.
Formation of the second row
- Take smaller beads.
- Form a tight ring of beads inside the first row.
- After forming the ring, go through each bead of the row several times for the best fixation.
Formation of the third row
- Take smaller beads.
- Form a ring of beads on the outside of the first row.
- Secure all the beads by re-threading the thread.
Attaching the brooch
- Take the brooch blank and carefully trim off the excess material around it.
- Cut out figures from leather and cardboard, the dimensions of which are 5 mm smaller than the size of the brooch.
- Glue a pin to the center of the cut out cardboard shape.
- After the glue has dried, glue the element with the pin to the brooch.
- Place a leather element on the pin.
To finalize the brooch, a “brick stitch” is used, which is used to secure small beads along the edges of the brooch. Then you need to put five beads on the thread and secure it around each sewn bead along the outer edge.
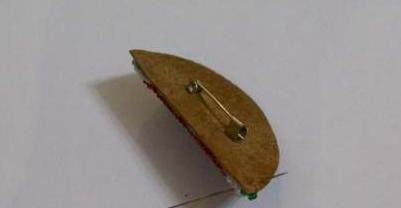
Original version: lip brooch
A very interesting and original option is to make a voluminous brooch in the shape of red lips with your own hands. Such a brooch can be made not only for yourself, but also for a loved one as a gift. To work you will need:

Manufacturing technology:

Master class: owl brooch made of beads and beads
Making a brooch in the shape of an owl will not take much time and effort, but such an accessory will definitely attract interested glances from strangers to the owner of the accessory. An owl brooch will be impressive look both on the lapel of a jacket and on a translucent blouse.
Every modern woman or girl can decorate herself with beadwork. Today, such jewelry is so diverse that everyone will find a piece to their taste. Beaded brooches have been and will remain very popular. They can be worn on clothes, bags, scarves, etc. But I still want to create a beautiful thing with my own hands. Fortunately, on the global network you can find lessons on making all types of jewelry, including do-it-yourself beaded brooches.
Beads, beads, beads
 For many years, from Ancient Egypt to the present day, beadwork has been very popular. Craftswomen all over the world created incredible jewelry from small glass beads; They were used to embroider the clothes of noble people, embroider pictures, and use them as a decorative element.
These days, beads are no less popular. It comes in a wide variety of shapes, sizes and colors. It can be combined with precious stones and metals, but at the same time used to decorate elements of everyday clothing to give them new colors and style.
And most importantly, you can make anything from beads.
Gorgeous brooches
Brooches have always been popular among fashionistas. The variety of forms and uses of this product is incredibly large. A brooch can be a fun little thing for everyday life or a luxurious decoration for a special evening, as well as a pleasant gift.

Brooches can be purchased in stores or ordered from craftsmen; these products are not cheap. But it will be much more interesting and cheaper to make such a decoration yourself.
Heart of the sea
The blue-green color is always associated with the sea and its waves crashing onto white sand, with holidays and vacations. And many would like to carry a piece of this beautiful element with them in order to remind themselves of summer, sun and salty wind on gray winter days. It's good that creativity has reached such a level that this has become possible.
Materials for a do-it-yourself brooch made of beads and beads:

 The craft is incredibly easy to make. This DIY beaded brooch is just perfect for beginner craftsmen. The combination of shades and sizes of beads and beads can be chosen to your liking, which will add individuality to the decoration.
Having set a clear goal to make a beautiful brooch, you can create real art from beads with your own hands.
First you need to decide on the parameters of the future product. This is entirely at the discretion of the master. A stencil of the desired shape and size will need to be cut out of cardboard, and then transferred to felt. Having attached the stencil to the material, you need to circle it with a thin piece of soap or chalk. You can draw directly on felt, but a cardboard pattern will increase the likelihood of symmetry and even edges of the brooch.
Step two is sewing on beads and seed beads. First you need to figure out which way to embroider is most convenient. The simplest and most practical seam is the stem stitch. It allows you to easily, without numerous knots, attach beads or seed beads to the material in any order.
Start sewing beads and seed beads onto the felt pattern. You can embroider any patterns that come to mind, or you can arrange elements completely chaotically among each other - the result will be good in any case. You can optionally add glass sparkles, bugles, chains or stones to the main composition - it all depends on the boundless imagination of the master.

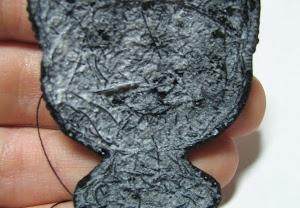
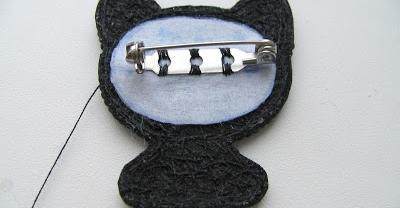
To prevent unattractive threads from being visible from the back, you need to cut out the base of the decoration using a stencil from leatherette, and then secure the base for the brooch in it.
A cardboard stencil will also come in handy. It will act as a frame so that the decoration holds its shape better. You need to cut the cardboard a little (no more than 2-3 millimeters high) along the edges and, after smearing both sides with glue, place it between the “bottom” of the embroidered part and the base. Then press down firmly and trim the edges.
Next, so that the border between felt and leatherette is not visible, you can decorate the seam with beads. To do this, you need to sew it in a circle, threading the edge with a needle from top to bottom (or bottom to top), stringing a bead on each turn. This technique is called a "fill seam".
Taking a critical look at the product, make sure that there are no threads sticking out anywhere and no glue smudges are visible. If everything is in order, now the master can accept congratulations on making a brooch from beads with his own hands.
Scarlet lips
 Plump lips have always been the standard of beauty. Photographers captured the curves of beautiful smiles in photographs, which later drove the public crazy on the covers of fashion magazines. Scarlet lipstick added charm, boldness and mystery, making the lips even more expressive.
Lips represent many logos; they are also used as decoration, including in the form of brooches. Such a product will brighten everything on which it is attached. This brooch is made with your own hands from beads.
Required materials:

 The first step is to make a sponge stencil out of cardboard, then transfer the design onto felt, but don’t cut it out yet! Also transfer the design onto the non-woven fabric. It will be convenient to do this with a ballpoint pen or a regular pencil. The clearer and thinner the contours, the better.
Glue the interlining onto the felt. Interlining is an adhesive interlining material that is often used in the sewing craft. Its function is to provide strength to the material on which it is glued, and it is also needed to avoid stretched edges during further work with the material. The interlining has 2 directions - in one it stretches slightly, in the other it does not. It is better to connect the product with non-woven fabric so that the length of the craft is parallel to the poorly stretching axis.
Non-woven fabric has two sides - the outer side (smoother) and the adhesive side. To attach it to fabric or felt, you need to place the bottom side of the interlining on the material and run an iron over it with the steam setting. If the parts are not connected well, you can use glue.
You can start embroidering the outline with a stem stitch using red thread and Japanese beads. When finished, to make the curves look smoother, go through all the beads at once and tighten slightly.

To prevent the brooch from appearing flat, you need to make it voluminous. Cut out the upper and lower lip from a piece of felt. For convenience, you can divide the stencil into parts and draw an outline along it, having previously drawn another brooch shape on cardboard - the future frame.
Secure the felt lips onto the embroidery. You need to make sure that the glue does not get on the beads, which will be very difficult to clean later.
The next step is to cover each lip with Czech beads. This is not done with a stem stitch, but is rather reminiscent of satin stitch embroidery. The number of beads must be selected “by eye”.
You need to fill the void between your lips with white beads, now the brooch can sparkle with your teeth.
Try to trim off any excess felt very carefully, being careful not to cut the threads. Next, you need to cut out the frame from cardboard, reducing it by 2-3 mm from the edge compared to the original dimensions, and glue it to the embroidery.
Then you will have to glue the base for the brooch to the cardboard and secure it with monofilament. You need to sew the product right through. The thread will not be visible and will provide an additional connection between the “pin” and the embroidery.
 The base for the brooch, which is already attached to the embroidery, should be secured in a piece of leatherette. Having marked the location of the edges of the pin on the leatherette, make 2 small holes. You should try to make the holes as small as possible so that they are not visible later.
After this, apply a thin layer of glue to the cardboard, connect the leatherette to the base of the brooch, smooth it thoroughly and let it dry.
The next step is to remove unnecessary things. Leaving 2 millimeters in reserve, carefully cut off the excess part of the leather substitute.
The final step is finishing the edge of the brooch with a closing stitch using Japanese beads and monofilament.
The brooch is ready!
Attention, TODAY only!