Step-by-step instructions on how to make a wolf toy with your own hands. Do-it-yourself soft toys cartoon character wolf To work on the wolf hat we will need
The baby learns about the world through toys: they tell him about life and allow him to broaden his horizons. And if you want to instill a love for animals in children, then you can think about how to make a toy wolf, so that you can then write educational fairy tales about it, reveal a lot of interesting things about wild fauna and love for nature.
Why do many people think about how to make a wolf toy with their own hands? Firstly, the character is very colorful, known from many Russian fairy tales, cartoons, and movies. Secondly, it is possible to make a toy that is close in image to a real animal or to make it comical and funny.
What images of wolves can you choose?
- Akella toy. The well-known character of “The Jungle Book” by Joseph Rudyard Kipling impresses with his courage and justice. It was in the pack of leader Akella that Mowgli was raised, and a strong wolf protected the human cub from the evil tiger Shere Khan.
- Stupid wolf from Russian folk tales. How often he got it for his greed and excessive trust in the words of Lisa Patrikeevna. And in fairy tales, the wolf was also the embodiment of a faithful friend, for example, as for Ivan Tsarevich, when the gray wolf helped a positive fairy-tale character pass tests.
- A character from the cartoon “The Wolf and the Calf,” when, it seems, the evil predator raised the calf kindly and in gratitude heard the word: “Dad.” And before that it was all “Mom, yes mom.”
- The simpleton wolf from the cartoon “Once upon a time there was a dog.” The image is created comical, but evoking sympathy. And if the question arises of how to make a wolf toy, then you can prepare a pattern for this particular funny character.
- The reverent character of the film “White Fang” leaves no one indifferent, so it will be interesting to create such an image with your own hands and display it in a toy.
Thus, the list of already created images is simply limitless: in cinema, in literature, in cartoons. There is plenty to choose from and think about how to make a wolf toy with your own hands, what material to use.
Let’s do “Akella” and we certainly won’t miss
Material:
- Scissors
- Threads and needles
- Marker
- Gray felt
- Pattern template
- Lurex threads
- Artificial synthetic fluff filler.

Stages of work:
- We look for a beautiful drawing of Akella on the Internet, print the image on paper, understanding that we are making a pattern, so there can be no approximate data. We enlarge the image to the desired size, that is, a 1:1 scale, and cut it out.
- Using needles, we pin the template to the selected fabric, folded in half, and use a pencil, soap or chalk to mark the boundaries of the workpiece.
- We cut out the toy blank from the fabric. The needles remain in place so that the two parts do not move apart and are the same size.
- We begin to connect the parts with a hem along the edge, not forgetting to leave a gap for adding synthetic fur inside.
- We sew and lay the product flat, take a paper template and carefully use a pencil to copy all the available details, lines and features of the paws, muzzle, and body. Provided that the felt is dark, and the child’s visual skills have not yet been instilled, then you can trace all the lines with chalk on a paper template and literally apply it to the fabric, pressing down for a few seconds. You'll see, all the lines will be printed and you don't have to think and guess how to make a wolf toy. If suddenly the lines are transferred in intermittent sections, then it is worth finishing them.
- We choose a thread for “drawing”. It can be lurex, contrasting or close to the natural range. Everything is at the discretion of a creative team of craftsmen who understand exactly how to make a wolf toy with their own hands and decorate it.
- Using the selected thread, we begin to stitch along the marked line, remembering that the product is two-layered, and you cannot touch the front layer; embroidery is done only on the front part of the craft.
- The painstaking work of embroidery is completed, then it is worth filling the toy with synthetic fluff so that it has a moderate density. As a result, it is also necessary to sew up the gap along the edge with the usual hem seam, which was necessary for stuffing the product with synthetic down.
- It is recommended to sew a loop and hang the product on a shelf, Christmas tree or in an organically suitable place for placing a new craft in the house.
How to make a wolf toy from the cartoon “Once upon a time there was a dog”
Material
- Plasticine
- Toothpicks or matches
- Board for working with plasticine
- Stacks-sticks for working with plasticine
- Decorative stand for the finished product
Stages of work:
- An image is selected, based on which the craft will be made. You can simply download it online and draw the image of a cartoon character yourself from memory.
- We begin to make parts, starting first with creating the head, and then we will discuss how to make a wolf toy with our own hands. We make the elongated muzzle of the wolf, very large eye sockets and sad eyes. We use gray and white plasticine. Gray is dominant; it forms the frame of the product, and then a “pattern” of the muzzle is applied to it in thin layers. Features and borders are adjusted using a stick stack.
- The body of the animal is made from an oval of plasticine. Not such a difficult stage.
- Then we take matches or a toothpick. We impale the head and torso on one of them on both sides, fix everything well, and disguise it.
- According to the proposed sketch, we make arms, legs, a tail, and then, using toothpicks, we secure small secondary parts. We are thinking about how to make a wolf toy so that it is practical and reliable.
Thus, if you are interested in how to make a wolf toy with your own hands from plasticine, then you should read the instructions, but you don’t have to follow them 100%; it’s better to bring your own flavor to the creative process, adding color to the image being created. You should not strictly observe the proportions; if you make, for example, the head or body a little larger, you will get a cartoon character that looks comical.

If a temporary fake is formed, it can be placed on a prepared stand so that it pleases the eye for several days. And in the case when a souvenir is made, the plasticine product can be coated with a special varnish, but before that the toy must be placed in a cool and well-ventilated place for a while. And then cover it with a protective layer of varnish.
Application "Wolf"
- We take cardboard or plywood - this will serve as the basis for the craft.
- On the prepared surface we draw a sketch of a wolf's muzzle.
- We take fur, beads and arrange the material according to the sketch so that the final result is a beautiful picture. Focus on the eyes - they should be expressive.
- When fur parts are cut out, the edges are processed, covered with glue, and the fur segment itself is glued to the plywood and cardboard surface.
It turned out that the question is not as difficult as how to make a wolf toy, the main thing is to choose the concept and the material available in the house. Suitable for product:
- Fabrics: fur, felt, corduroy.
- Plasticine
- Dough for crafts
The starting point of creativity is the material available for work; it will determine the image of the toy and the method of completing the craft, even the size and scope of application. It is very important to think about how to make a wolf toy with your own hands, if there are small curious children living in the house, then working with them on a craft, you can open up the world of creativity for them and give them pleasant hours of communication.

Greetings to all those who love working with metal. I present to your attention a very interesting hatchet with the silhouette of a wolf. In general, this is not an ax, but a whole picture; there are also pine trees, from behind which our proud wolf supposedly peeks out. The instrument looks very interesting. If you take one of these with you on a hike, you will surely surprise your friends. Of course, you don’t want to use such a tool for its intended purpose, because it is a real masterpiece. Such a gift will be appreciated by hunters, fishermen, tourists, and just collectors.
Despite the complex design, making such an ax is not difficult, and besides, you don’t need to have any fancy tools. An old splitting ax is used as a base. All parts are cut out separately and then simply welded into the cavity cut out in the axe. Of course, there is a lot of welding and grinding work to be done, but in general this task can be handled. So if you are ready to test yourself in such a matter as metalworking, let's start making an ax!
Materials and tools used by the author:
List of materials:
- an old ax of the “cleaver” type;
- an ax handle or material for its manufacture;
- sheet steel (from which we make the silhouette of a wolf, as well as a pine tree);
- oil for impregnating the handle.
List of tools:
- sandpaper or belt sander;
- drill;
- welding machine;
- Bulgarian;
- vice;
- marker;
- drill;
- paper, scissors, pencil (to make templates).
The process of making a hatchet:
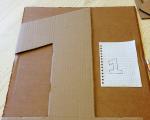
Step one. Prepare and transfer templates
First of all, you will need a template of what you want to do. In our case, we need a wolf template. Some part of his silhouette is cut out inside the axe, and the silhouette itself is then cut out separately and welded inside. We take paper and draw the silhouette of a wolf, or you can find a ready-made one on the Internet and simply adjust it to size. We print on the printer and cut out the template. Next, the template remains to be transferred to the axe; for this we use a marker.


Step two. Cutting out the excess from the ax
Now we need to cut out the silhouette that we transferred to the ax. The author does all this with the help of an ordinary grinder. To begin with, simply cut in a straight line and cut out a shape resembling a triangle. Well, then we cut out the remaining details of the silhouette. We grind the cutting areas using grinding wheels.


Step three. Cut out silhouettes of wolves
Now we need to cut out the wolf silhouettes from sheet metal. You can also cut them out using a grinder, but you will have to work hard. The easiest way to cope with this task is to use a jigsaw with a metal saw. The result should be two identical blanks in the shape of a wolf. All we have to do is weld them to the ax just like the author in the photo. The weld must be continuous and of high quality so that everything looks like one piece.


Finally, we need to make some parts of the wolf three-dimensional. To do this, take a grinder and grind the metal a little along the contour of the wolf’s head. Next, to make other parts voluminous, we will need welding. We simply weld metal where it is required. Well, then all you have to do is sand the product with a grinder and polish it to a shine if desired.


Step four. Making and installing Christmas trees
To make a Christmas tree, we take sheet steel of suitable thickness. Well, then everything is simple, using a grinder we cut out the trees and sand them with sanding discs. Once the trees are ready, all we have to do is carefully weld them into the cavity prepared in the axe. We sand everything thoroughly with sandpaper so that the structure is monolithic.


Step five. The final part of making an ax
The author welds a metal axle to the axe, which will serve to securely fasten the handle and also make the ax more stylish. This thing will also work as a protection for the handle; when chopping wood, sticks will not hit the wood and damage it. As a result, your hatchet will last a long time.


Step six. We make and install a handle
We cut the handle out of wood or buy a ready-made one and modify it. To make the pen look interesting and be well protected from moisture, the author burns it with a torch. Next, thoroughly sand the handle with sandpaper. It should be slightly dark in color. That's all, now you can apply oil to the handle to impregnate the wood. As a result, we have a high-quality and stylish pen. The author decided to install a plate at the end of the handle. We cut out the product from steel and fasten it with a screw.
Master class on sewing the Wolf from the film "Well, wait a minute."
Khitrik Julia
An unforgettable and everyone’s favorite animated series about a hare and a wolf “Well, wait a minute” and a felt master class.You can purchase from ushigh-quality and inexpensive felt for creating similar toys at the best price in Ukraine ( ).
To make a wolf we will need - patterns, hard felt, matching threads, scissors, glue gun, filler (holofiber), fabric marker and needles.
.jpg)
1. Cut out the “head” part. Glue on the eyes, nose (only from the bottom), embroider the smile line.
.jpg)
2. Glue the “hair” and “cap” parts to the “head” part.
.jpg)
.jpg)
3. Cut out the “Tube” piece and embroider the bend lines. Glue the free edge to the wolf's mouth.
We perform a similar action to the back of the head.
.jpg)
4. Cut out the “Vest” part and glue the stripes. We glue the “Belt” part only with the upper part to the vest.
We glue the hands after connecting the parts “Vest” and “Pants”.
We perform the same action to the back of the “Vest”.
.jpg)
5. Cut out the “Pants” part, paws and claws, and glue them together.
.jpg)
6. Glue together the parts “Head”, “Vest” and “Pants”.
.jpg)
.jpg)
7. We begin to sew the front and back parts of the wolf.
We start sewing from the inside of the vest.
.jpg)
.jpg)
.jpg)
Glue the parts Teeth, Anchor and ribbons.
.jpg)
9. The wolf is ready! Thank you for your attention)
My little nephew really loves watching cartoons about a wolf, and I decided to give him a gift - to sew a soft toy wolf of the cartoon character Well, wait a minute!
Handmade toys always bring more joy to children, probably because they bring warmth and love from loved ones.
When I make a toy, I become imbued with tender feelings for it, as for my child. The toy requires very few materials and does not take long. So, let's sew a wolf!
What you need for work:
- gray felt fabric,
- padding polyester,
- gray, white and black threads,
- eyes,
- black yarn for hair,
- a small flap for the cap is white and for the visor - black,
- red patch for tongue,
- flap for clothing to choose from: for a T-shirt and trousers.
Sequence of work
We make a pattern of the toy parts.

Here it is important to correctly set the dimensions of the toy parts, so I give you detailed instructions for marking the parts.


The height of the wolf is 22 cm.
1. Head: 9*9 cm. – 2 pear-shaped parts.
Ears – 4 pieces with a leaf. 2.5*1.5 cm.
2. Nose made of 8 parts:
The total length of the upper part of the nose is only 5.5 cm.
2 pieces for the side parts. The side parts of the upper jaw are 3.5 cm wide. Boat-shaped.
The upper part of the jaw is -1, 2.2 cm wide.
Nose nickel – 2 parts, drop-shaped. 1.5 cm.
Lower jaw – 2 parts and a tongue. The width of the lower jaw is 2.5 cm and the length is 4 cm.
3. Body – 2 pear-shaped parts with darts at the bottom. The width of the lower part is 8 cm, the upper part is 5.5 cm.
4. Upper legs: 2 pieces 10 cm long. Width 4 cm.
5. Lower legs: 4 parts 9 cm long. Width 4.5 cm.
6. Tail: length 8 cm, width 2.2 cm, shaped like a pea pod.
The most difficult part of the toy is sewing the nose, so we start with that.
We connect the 3 side parts. At a distance of 3mm. From the edge with a seam back using a needle we sew the parts together. We stuff it with padding polyester. We do not sew up the edge that will be sewn to the head!

Using black material, we sew the parts of the nose over the edge and push the synthetic padding tightly. The work is painstaking, small, and requires accuracy. We sew the patch so that it looks like a protruding bump.

Now let's start sewing the lower jaw. We connect the 2 parts, sew them on the wrong side and turn them right side out, add a little padding polyester and sew or glue the tongue. We sew the lower jaw to the upper jaw so that the mouth looks correct. First try it on, and then connect it over the edge with small stitches.
Using black thread, embroider dots near the patch where the mustache should be. You can draw with markers or a felt-tip pen.
Glue 2 white teeth. I cut them out of foamiran. It is possible to use white plastic.
The nose is ready.
Let's start sewing the head.
We sew the parts together and stuff them tightly with padding polyester. We take a gray thread and make drawstrings on the muzzle at the level of the cheeks on the right and left.
We pierce the needle on the side of the seam line and pull the thread from above to the nose, so as to separate the cheeks.
We sew the ears over the edge, immediately filling them with padding polyester, and attach them to the head.
Sew the nose to the head. We sew neat small stitches across the edge of the nose tube.

Glue on the eyes. Drawing eyebrows.


We sew the body. We connect the edges of the dart and sew. We make the dart smooth at the front so that it does not stick out at an angle.
We connect both parts and sew the needle back with a seam, leaving the top unsewn. We stuff it with padding polyester. We sew the tail and sew it at the back above the dart.
We attach the head to the body with small stitches, aligning the hole on the body and head to create a small neck.


Let's start making the upper legs. We connect the edges along the wrong side, sewing at a distance of 3 mm. Carefully turn it inside out using a pencil or a brush stick and fill it tightly with padding polyester. We stitch the fingers with black thread. We attach the legs to the body just below the neck.
We shape the paws using thread fastenings at the elbows.
We sew the lower legs. We wrap the feet and secure them with thread. We sew the fingers and attach the legs to the body.
The main work is done.


Now we will do the hair. We take black yarn and measure out strands for the bangs, 2.5 cm long. We pull them together in the middle and sew them between the ears.
We sew the next 2 strands, 6 cm long, to the back of the head one by one.


All that remains is to sew the clothes.
In the photo, see an approximate pattern for clothing.

Pick up the flap and cut the T-shirt into a rectangle no larger than 10 cm in size. Fold the edges under and over. Sew up the sides, leaving 1.5 cm slits for the paws. Sew 1 cm on the shoulders. That’s it, the T-shirt is ready.
Let's start sewing trousers. Fold a rectangle no more than 10 cm long from black fabric.
Draw the shape of the legs with chalk or soap, making a wider slit between the legs, about 1 cm.
Sew the top of the trousers with black thread, turning the edge for the elastic at least 1.2 cm. Sew the legs along the wrong side at a distance of 5 mm. from the edge. Fold up the edges of the legs and baste. Insert the elastic band and dress the wolf. Make a hole for the tail and pull it out.
And the final touch is the cap. Take white fabric, cut out a circle with a diameter of 5 cm. Cut out the side part of the cap along an arc. Its width is no more than 2.5 cm. The front edge is wider, and the back is narrower. Sew along the wrong side. We cut off the excess.
We turn the bottom edge inward by 5-7 mm. We make a visor and attach it to the front of the cap. Draw a symbol on the front of the cap with a felt-tip pen or marker.
We put a cap on one ear of the wolf.


Now we've finished the job! The wolf turned out funny! I hope that my experience will be useful to you and you will make your own cartoon spinning top. Visit the site for new crafts! Good luck!