Do-it-yourself vase from a jar and plasticine. Do-it-yourself plastic bottle vase: step-by-step master classes for beginners with a photo and a description of the work
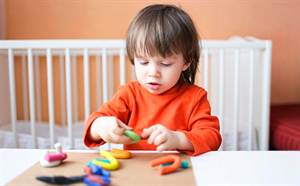
Plasticine is a universal material for children's and adult creativity and the development of older children. From it you can create not only crafts in a kindergarten or club, but also gifts for relatives and friends, and real sculptural masterpieces. A little imagination and patience, and a small shapeless piece of plasticine will turn into a cute animal, flower or other figure.
Plasticine is used in art therapy, sculpture and methods of early development of children. Modeling is incredibly useful for kids, as they:
- develop fine motor skills of the child;
- stimulate the imagination and fantasy of the baby;
- improve hand coordination;
- prepare a hand for writing;
- contribute to the activation of creative thinking and creativity.
You can also make small surprises for your family and friends from this material with your own hands. For example, one of the plasticine gift options is a vase for real or artificial flowers.
In kindergarten, classes such as plasticineography are held, this is when paintings and panels on paper and glass are made from plasticine - from there you can borrow the technique of creating a beautiful vase from a jar and plasticine. And what wonderful decorations you can make from improvised means! You can stick around a jar or bottle with plasticine and decorate with beautiful leaves, dried flowers, grains and cereals, shells and pebbles, even from buttons or dry pasta you can make wonderful decorations for such a vase. A vase decorated in this way looks very unusual, and even if the young decorator did not get exactly what he wanted ... or not at all what he wanted, the presentation of such creativity, as a rule, goes off with a bang.
There are several options for master classes on how to mold a plasticine vase with a child in stages. They involve both the use of only ordinary children's plasticine, and the use of improvised means - shells, plastic or glass jars for the base, beads or leaves.


How to make a classic plasticine vase - a simple master class?
For a simple vase, you will need several colors of material. One shade for the base, others for decoration. And you also need a simple pencil, a toothpick or a straw for cocktails.
 First of all, they form vase body. To do this, you need to roll two balls with different diameters - a large one and a smaller one. After the balls connect with each other, smoothing the joints with your fingers. Then make a hole inside the vase with a tube or pencil. The formation of a vase with a molded neck and wide margins is completed. When the body of the product is completely ready, you can start decorating the vase.
One of the decoration options - creating a border at the top and bottom of the product. Roll up two thin sausages and evenly attach it to the neck and base of the product. In the same way, you can apply a pattern to the base of the vase - make a wave or stripes.
As a decor, there can be small plasticine flowers that can be molded separately. Or bunches of pomegranate berries. Or viburnum, mountain ash. If desired, decorate the vase with additional natural and artificial materials - shells, pebbles, dry flowers or leaves, beads, beads, feathers, threads, ribbons, multi-colored clay, etc.
Another technology is painting a vase with a toothpick. With the help of a sharp edge, you can create unusual reliefs and patterns.
Plasticine bottle decor or glass vase, decorated with multi-colored material
To make a vase from a glass jar or bottle, you will need:
- packaging of multi-colored plasticine;
- base - a jar or a bottle;
- decor - beads, pebbles, threads, etc.
First of all, for the master class, you need to prepare a glass base. Clean the bottle of labels, wash well and dry to dryness. Then the surface is covered with a uniform thin layer of plasticine. Then proceed to the phased decoration of the vase. You can decorate the product with additional decor, flowers made from plasticine or colored polymer clay.
 For example, make a half-opened scarlet rose bud or chamomile. Or attach leaves made from green plasticine and vines. To keep the decor well, it is recommended to fix it with a thin layer of toothpaste or varnish.
Such a product will be a great gift for Women's Day, Autumn Festival or Teacher's Day. Plasticine crafts go well with bouquets of lush dry leaves, dead wood or bright autumn flowers.
Master class on creating a vase from plasticine sausages
Another option is to mold your vase and decorate the glass base, decorating the jar with multi-colored plasticine sausages. They can be attached evenly horizontally or vertically to make a striped rainbow vase. It can be decorated with small waves, which can be made ribbed with a regular dinner fork.
There are many master classes. For example, such a product can be made multi-colored, monochrome or striped. For example, make your product in a marine style, decorating a jar with blue, white and red stripes.
In order for the clay to hold for a long time, it is necessary to attach it to the surface of the can evenly, pressing strongly. To create a vase from a bottle and plasticine, the movements of the fingers must be strong, uniform, the edges of the sausage must be well smeared.
Take any transparent container: a glass, a bottle or a jar - and glue it with multi-colored squares of corrugated paper using PVA glue, stirring it with the same amount of water.
Multi-colored corrugated pieces on the glass will look spectacular and pretty refresh the spring bouquet. Just do not forget to cover the paper with another layer of glue on top (then it will become transparent), and after drying - with varnish.
Vases, pasted over with strips of corrugated paper of various thicknesses, also look interesting. If you want to make such a beauty, make sure that the strips overlap a little. So the color transitions will be more original.
A do-it-yourself paper vase will be a wonderful addition to your interior, and perhaps an unusual gift!
How to make a vase from a jar?
To make this exquisite vase, you will need bright multi-colored electrical tape. Paste the jar with strips of electrical tape of different lengths and widths and evaluate how exclusive and original the vase you have turned out to be.

Vase from a bottle
How to make a vase from a bottle? To start, find glossy magazine with bright pictures and cut its pages into squares.

Cut out pieces of the same color scheme, such as turquoise, blue, light blue and purple. To glue them to a glass bottle, use PVA diluted 1:1 with water or decoupage glue. Cover the vase with a layer of varnish.

Use the glue gun to attach the buttons to the vase. Most importantly, don't be afraid to experiment!

You can also make a vase from a glass bottle in another way - for example, by simply sticking elements of openwork napkins!

Or maybe turn a bottle into a vase with piece of lace?

wrapping a glass bottle colored thread or yarn, You will make a beautiful spring vase.

To better hold the threads on the glass, dip them on one side in decoupage glue or PVA, or spread them on a bottle. But remember that the glue dries quickly, so spread the bottle in parts and pull the thread taut.


To make the vase bright and original, use threads of different colors.

Decoupage - decorate a vase with your own hands
To beautifully decorate the purchased vase, you just need to cut out some cute drawing from a magazine or postcard and stick it on the surface of the vase. However, it is even better to purchase special napkins for decoupage, a primer and varnish: first we apply primer to the surface of the vase, then we glue pieces of the napkin with the desired image, and at the end we fix it with varnish! And it turns out such a neat vintage beauty.

How to make a vase from a plastic bottle?
To make this vase, you will need the help of your father or mother. Take a one and a half liter plastic bottle and cut several round holes in its upper part to insert the necks of cut half-liter plastic bottles into them and glue them with special glue for plastic.

Place a flower in each hole in the vase.
This is how bizarre and unique a vase made from a bottle made by oneself can be!
Vase of glass and balloon
Cut the balloon across at its widest point. Pull the top over the glass and tuck the hole into the glass. Tie the glass with a string, tie a bow. Voila! The vase is ready! You can put a flower in the hole of the balloon.

Plasticine vase
Oh, how interesting! Even a kid can make this vase. To do this, you just need to stick around it with plasticine and decorate it with various seeds, acorn caps or beads. Beauty!

Clothespin vase
Take a can of canned food and "garden" it with new wooden clothespins. That's all. The unique vase is ready. Just don't put water in it. Put inside a small glass of water, and already in it - flowers.
Vases from natural materials
cutting off birch bark(preferably with a cut or fallen one) and wrapping it around an ordinary jar, you will get an original vase, and at the same time you will take a piece of spring forest to your room.

Perfect for making vase tree branches with which you can paste over a jar or flower pot.


How about a vase of pencils?
Inside there may be a jar or a glass, and decorate it all with lace ribbons and beads.

I hope you liked my ideas, and you will certainly use them to create your own masterpieces. Good luck!
Valentina Zaitseva
The spring holiday is approaching - Women's Day on March 8th. Educators with children prepare crafts for congratulations. Such a vase with flowers, in my opinion, will be a wonderful gift for mothers, grandmothers, as well as kindergarten employees.
I bring to your attention friends, the phased production of such a vase.
To make a vase for a bouquet of flowers, we need:
blue colored paper, glue, scissors, silk ribbon, ruler, pencil.

We fold the vase using blue paper. Two sheets are folded into 16 parts with a fan. It is possible by folding parts of the sheets in half. If you make such vases with older children, you can simplify the folding process with a ruler and a pencil: draw lines, then the folds will be even and the same.


Then we connect the narrowed part. We glue two sheets.

We tie with a ribbon.
The flower vase is ready!

You can put any paper flowers in such a vase. As I have already noted that the manufacture of such a vase is available for older preschoolers. In the next publication, I will share with you, friends, the manufacture of flowers for a vase.
THANK YOU FOR YOUR ATTENTION!
PLEASANT VIEWING TO YOU, MAAM FRIENDS!
(to be continued.)
Related publications:
Today I want to bring to your attention a master class on making a vase from New Year's tinsel. This material has recently been gaining.
Today I want to tell you about how the children and I made a postcard "Vase of Flowers" from colored paper using various techniques.
Probably, many would like to receive a bouquet of wonderful flowers as a gift. And we will be able to please our relatives and friends by making for.
Very soon on August 22 in Russia we will celebrate the Day of the State Flag of the Russian Federation. This day appeared in our calendar.
A wise man once said that… “…Beauty is the work of God and man. God provides inspiration and images. And a person driven by inspiration draws.
"New Year, New Year, what is it? This is a miracle of miracles, the biggest!" And indeed, with the approach of the New Year, educators appear.
Materials and equipment: autumn leaves, PVA glue, water, scissors, balloon. When you have collected together with the children autumn wonderful.
A handmade vase may well become a bright element of any decor, as well as a great gift for a loved one.
Products can be made both from ordinary bottles and from volumetric five-liter ones. Their dimensions and appearance may vary.
A simple vase from a plastic bottle with your own hands
To create the easiest option, you should use only a bottle, scissors and a clerical knife.
So, for the manufacture of such a product, you need to mark a transparent bottle: draw a line of the upper fragment of the craft and the boundary of the beginning of the plastic "laces". Then cut off, focusing on the top line, the neck of the bottle. Then vertically cut stripes on it to the border of the bottom mark - this will turn out to be “lace”.


Such manipulations should be done with each stripe in order to eventually get a lace neck.
To give a shade to the product, you can insert a napkin inside.

Do-it-yourself openwork vase from a plastic bottle
Such a product is unusual and original. To create it, you should use an empty plastic bottle, a marker, paint, a nail based on wood or ordinary metal.
Master class step by step:
- Cut off the neck of the bottle and, using a marker, apply the desired pattern. Do not make only round holes. You can place them in a chaotic manner - it will also look original and unusual.
- Heat a nail or soldering iron and make holes based on the previously applied pattern. The most important thing is not to connect the holes together so that large holes do not form.
- Paint the vase using spray paint or stained glass paint.
- In conclusion, it is worth pouring water and putting flowers. Everything, the product is ready!

floor vase
A simple yet distinctive variation of the floor vase, made from plastic bottles and a glass jar, is the perfect addition to any decor. The height of the craft can be up to 95 cm. Such a product can be easily washed, because the hand freely penetrates inside the vase.
So, for the manufacture it will be necessary to use napkins, toilet paper; PVA glue, adhesive tape; plastic milk bottles, in the amount of 14 pieces; 3 liter jar. Having prepared all the necessary material, you can begin to design the product.

- Fix two bottles with each other with adhesive tape - 12 pieces bottom to bottom, and 2 - necks.
- Then fasten all the bottles together, while placing a pair in the center, fastened with necks.
- Then place on top of a three-liter jar, attaching it to the base using adhesive tape.
- Then decorate the product using the papier-mâché technique. Arrange the initial layer using napkins and undiluted PVA, the next - using toilet paper, using the same PVA glue, but it should be diluted with water in a 1: 1 ratio.
- After that, it is worth letting the craft dry and patch up the bumps with napkins.
- Using a glue gun, draw a pattern and, using the same glue, fix flowers or other elements. Using a stencil, napkins and putty, make an additional pattern.
- After applying putty, the napkin should be removed.
- Then leave for 1-2 minutes to dry.
- Then go over the pattern with sandpaper.
- Paint everything with spray paint.

small vases
To create them, you will need to use plastic bottles; scissors; stationery knife; tape or glue.
To begin with, it is worth rinsing the bottles, cutting off the neck and cutting the upper fragments into petals. Then bend these petals outward and fix them on the bottle using glue or tape. Then paint the received vases with any shade, decorate with beads, beads or other elements. At the bottom, you can make holes for water to drain, but in this case you will need a stand.
Vase from a bottle and corrugated paper
In the described case, paper can be used in two versions.
In the first case, paper of different colors should be cut or torn into small pieces. Then, in a glass container, it is necessary to dilute the PVA glue with water in a ratio of 1: 1, or use decoupage glue. Pieces of multi-colored overlapping paper should stick around the entire bottle in a random location. Then smear with a layer of glue, the resulting pattern.
Then, when the vase is completely dry, varnish it.

In the second case, the paper should be cut into strips according to the diameter of the bottle. You can choose different thickness. Stick the cut strips on the bottle, changing shades, which can be several or a couple.
Then the product on top can be decorated with a variety of beads, rhinestones or decorative flowers.
Making a vase from a bottle and plasticine
Both an adult and a child can handle this craft, so creating a vase from these materials will be an original idea for joint creativity.
In the process of creating a vase, you will need to use a plastic bottle, multi-colored plasticine, brushes and paints, as well as toothpaste.
So, remove the label from the bottle, thoroughly clean and dry. Then stick around the bottle using plasticine, if desired. The coating can be monophonic or multi-colored.
Fix the decor on the bottle.
After applying toothpaste on top of the plasticine and allow the product to dry. And after that, proceed to coloring with paints, while drawing decor elements.

Making a vase from a bottle and disc
Using a vase and a disk, you can create a product of the original form. An old damaged disc can be an excellent stand for an unusual vase. This craft can also be done with your child.
So, to create such a vase, you will need to use a plastic bottle, scissors, a CD, paint, a sponge and glue.
At the very beginning, cut off the bottom of the bottle. And cut off the upper part with waves or another pattern.

Glue the bottle cap to the center of the disc. Then put the bottle in there. Using a sponge, apply layers of paint to the walls and base. You can also decorate the vase as you wish.
Video on the topic of the article
Magnificent graceful vessels decorated with painting or stucco are called vases. They are made from various materials - clay, glass, metal, porcelain and even stone. This article will show you how to make a plasticine vase.
A bit of history
The first vases served as vessels for liquid and bulk products. They were made from clay. The finished vase was dried in the sun or fired in a kiln to give the material more strength. As objects of art, these vessels were used to decorate the tombs, even then the craftsmen applied various ornaments to Greek amphoras.
First of all, historical paintings depicting various important events were the decoration of such vases. By excavating and finding such works of art, archaeologists can judge entire eras.
Useful activities
Modeling is one of the types of fine arts. It is based on giving plastic materials various shapes and creating compositions. This type of creativity is one of the most tactile, because in the process of work you need to touch the material. Such contact develops fine motor skills of the hands, which contributes to the development of speech. This happens due to the proximity of the speech center of the child's brain with the center responsible for the coordination of hands and fingers.
From just one piece of plasticine, a child can create a large number of different images. At the same time, perseverance is developed, attention and memory are trained. By creating something with his own hands, the child not only realizes his creative potential, but also learns aesthetic thinking - the vision of beauty.
Dollhouse Decoration
Even kids can make the simplest vase for dolls. To do this, you need to form two balls of different diameters from plasticine and connect them together. The junction is carefully smoothed with fingers.

Using a pencil, you need to make a hole in the body of the vessel. Next, you need to form the neck with your hands. Having made the base, you can proceed to the design of the vase. Just show your imagination!

The finished vase will be an excellent decoration for the dollhouse.
Gift for mom
Fresh flowers are an indispensable attribute of the spring holiday on March 8. Of course, it is the privilege of adult men to give such gifts to the female half. But students in grades 1-4 are quite capable of making moms happy with an unusual vase. You can make it using the technique of plasticineography. This technique is based on applying plasticine to various hard surfaces. We suggest you make a vase from plasticine and a jar. To make a vase you will need:
- Glass jar;
- Plasticine;
- Green woolen thread;
- Various cereals (peas, rice);
- Toothpick or sharp stick.
A jar for a vase is best to take an elongated shape. Plasticine should be soft or should be softened first by placing it in a warm place.
To begin with, the prepared jar must be covered with a thin, even layer of plasticine.


Lay out the contours of the branches with a thread.
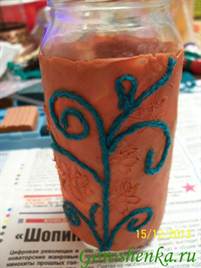
Lay out the chamomile from the cereal. Use peas as the yellow center of the flower, and rice grains as chamomile petals.


A wonderful gift for mom is ready. Such a vase will certainly please her, because it is made with love.

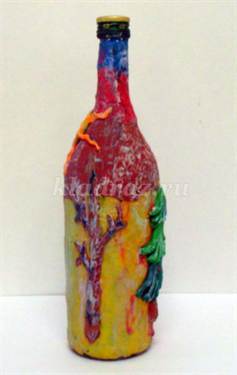
Winter vase
Bottles decorated with various ornaments look very nice. Try to make an unusual decoration for your home. In the proposed master class, the process of making a vase from a glass bottle will be considered step by step. Not only adults, but also children over 9 years old can cope with such work. And its implementation will help improve the skill of modeling and painting. To make a vase from plasticine and a bottle, you will need:
- Plasticine (you can take a used one);
- Glass bottle;
- stack;
- Gouache and brushes;
- White toothpaste and toothbrush;
- Varnish (you can take hairspray).
The selected bottle must be evenly covered with a thin layer of plasticine.
If the molding with which you will decorate the bottle is attached directly to the glass, then with a high probability it will simply fall off and ruin the product. And the plasticine with which the bottle is smeared will give greater adhesion of the stucco elements to the base.

In this work, a winter landscape is chosen. To make the sun, attach a small plasticine cake to the bottle, form rays from thin sausages. Using the made sausages of various thicknesses, form the trunks and branches of the trees. Attach them to the base.
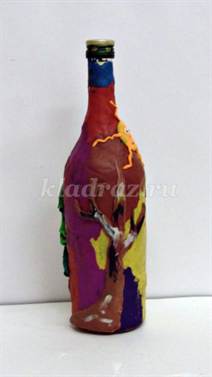
The Christmas tree is made from small triangular cakes, which are cut into fringes at the bottom using a stack. Attach the pieces to the bottle.

The next step in creating a winter vase will be its degreasing. It is done by applying a thin layer of toothpaste to the surface of the bottle. Degreasing is necessary so that the paint lies on the plasticine. After smearing the paste, leave the bottle to dry completely.
After drying, you can start painting the bottle. After applying the first coat of paint, let it dry.