Do-it-yourself sun skirt: a step-by-step guide to making a flared skirt with a wide belt for a girl. How to sew a do-it-yourself sun skirt with an elastic band
This element of the wardrobe has been popular for decades among women of all ages. With this skirt, you can emphasize the beautiful line of the hips, slender legs, or, conversely, hide wide hips behind a flowing fabric. If you love beautiful things, then you just need to get this piece of clothing.
Sewing is very easy!
The main thing is to choose a beautiful fabric, on which the appearance of the product will depend. Either it will fall easily over your hips, or it will sit heavy and bulky on you. So pay attention to the selection of material. Also get an elastic band of medium width, threads to match the fabric. It is advisable to wash and iron the material before use. After all the preparations, you can start cutting.
How about an elastic band without a pattern?
It is not so difficult to do this without a pre-prepared drawing. The main thing is to correctly and accurately apply subsequent measurements to the fabric. First of all, we measure the circumference of the hips. Fold the piece of fabric in half. We will postpone measurements on the fabric from the corner. We measure the radius equal to the girth of the hips + 5 centimeters for allowances. Divide the resulting value by 6. Smoothly draw a circle line with a given radius. Then we calculate the following measure: the required length of the product + the first radius. We also set aside this value from the corner and draw a circle line with a second radius. So we came directly to the question of how to sew a sun skirt with an elastic band. Cut out two identical pieces from the folded fabric. We do not need fabric from the corner to the first line. We fold these two elements with the right side inward and sew along the sides. We iron the seam and process the material on the overlock. After that, we prepare a belt, the dimensions of which are equal to the girth of the hips with allowances for the seam, the height of the belt is at your discretion, about 5-7 centimeters. Fold it in half and sew along the bottom edge, while bending the fabric inward. Iron with an iron so that the seam is not on the front side. Attach the folded upper edge of the skirt under the belt. The product will be ready after processing the hem.

What to wear with a sun skirt?
It looks great not only with tight-fitting T-shirts and blouses, but also with light, straight-cut sweaters. Almost everything goes under this skirt. In terms of shoes, you can wear both high-heeled or platform shoes, and low-speed ballet flats.

How to sew a sun skirt to the floor?
Today, dresses and sundresses have become very fashionable. Yes, and short clothes are not suitable for everyone, so many became interested in how to sew a sun skirt with an elastic band. But to do this is just as easy, you just need to stock up on a lot of material. And for such a length, it is better to sew a wide belt, which will make your figure even more slender. If your lines are perfect, then the elastic can be left a little wide. The product looks great, the belt and the base of which are made of different materials that complement each other.
In this article I will tell you how to cut a sun skirt without seams, and with two seams. This can be done immediately on the fabric, without first building patterns.
How to calculate the sun skirt
To calculate, you need to take 2 measurements:
From - waist circumference- measure the figure with a centimeter tape at the level of the waistline (the narrowest point of the figure, or at the level where you will wear a skirt). The tape should run horizontally, and wrap tightly around the body (not too tight, but not too loose).
Di - skirt length- we measure on the side, applying a centimeter tape to the waist line, and lowering the end of the tape down with the starting point to the level of the desired skirt length.
To cut the skirt, you can measure yourself. Only when measuring the length of the skirt you need to stand straight, do not bend over, otherwise the length will not be measured accurately. Therefore, it is better to stand in front of a mirror and see to what level to lower the end of the tape.
To build a sun skirt, you need to draw 2 circles: the inner one is the waist line, and the outer one is the bottom line.
Calculate the radius of the circles:
R1 = From: 6.3 is the radius of the inner circle.
For example, if From = 80 cm, R1 = 12.7 cm (rounded).
R2 = R1 + Di is the radius of the outer circle
That is, to R1 we simply add the length of the skirt. For example, if Di = 60 cm, and From = 80 cm, R2 = 12.7 + 60 cm = 73 cm (here it is easier to round up to a whole number).

How to calculate the sun skirt with an elastic band, without a fastener

About - hip circumference- We measure the figure at the level of the hips. The centimeter tape runs horizontally along the most protruding points of the buttocks.
When calculating the internal arc R1, instead of From, we substitute: (Ob + 2 ... 5 cm).
R1 \u003d (Ob + 2 ... 5 cm): 6.3
How much to add to the girth of the hips (from 2 to 5 cm) is chosen at will. If you want the skirt to be worn over the hips very freely, and there is more assembly at the waist, take it closer to 5 cm. In skirts for girls, they also take a larger value - closer to 5 cm, so that it is easy to dress.
How to cut a sun skirt without seams
I must say right away that this method is not suitable for everyone. But only for children's clothing, and for women of small stature and size. The skirt turns out to be quite short, and the larger the size and height of the woman, the shorter the skirt will be.
(Unless you are sewing a sun skirt from fabric with a width of more than 150 cm, for example, from fabric for bed linen, where the width is 220 cm; or from curtain fabric (rarely, but there are such fabrics with an eco-friendly composition that is also suitable for clothes)) .
And just below I will show with an example why this is so.
Please note that the skirt will be seamless! Therefore, it is advisable to do it on an elastic band, without a fastener (processing a fastener not in a seam so that it turns out neat is quite difficult, especially for a beginner in sewing).
So, to cut the sun skirt without seams, we take a square of fabric (fabric width = fabric length). And fold in 4 layers - like a handkerchief.

The diagram shows the principle of how to fold the fabric. After that, we carefully align the fabric, combining cuts, folds, so that the fabric lies flat, without distortions.

(If the square of the fabric was not initially even, the cuts will not line up exactly. Align the fabric as you can, matching the folds.)
Then, from the corner of the fabric with folds, as from the center, we measure and draw two circles.
First, the inner circle with radius R1. This will be the waistline. Then the outer circle with radius R2 is the bottom line.

It is usually inconvenient to draw these circles on the fabric, there are no compasses of such sizes 🙂.
Therefore, you need to adapt. Someone can hold a piece of chalk on the end of a measuring tape, and hold the desired mark of the tape on the corner of the fabric (the center of the circle), so draw a line. It is convenient for someone to cut the rope of the desired length, and also, holding the crayon at the end, draw a circle.
I usually just make small marks on the fabric around the circumference, at a small distance from each other, and then connect them with a smooth line. It's more convenient for me, it's more accurate for me. Try it, find your own way, how it will be more convenient for you to draw these circles.
Then you need to check it out!
With a centimeter tape, we measure the length of the waist line (circumference R1). And multiply the resulting value by 4 (since the fabric is folded into 4 layers). The result should be equal to: (Ob + 2 ... 5 cm).
If the circumference turned out to be less (Ob + 2 ... 5 cm), then you need to increase R1 by a few mm, and draw the circle lower. If the circumference turned out to be larger (Ob + 2 ... 5 cm), then you need to reduce R1 by a few mm, and draw the circle higher.
The length of the new circle is also necessarily measured and checked.
Then we mark the allowances for processing along the waist line and bottom line. Since this is a sun skirt, we give small allowances: 1 ... 1.5 cm. (The waist and bottom lines are not straight, so large allowances will interfere with processing).

After we have noted the allowances, we take scissors and carefully cut out the sun skirt. When unfolded, you get a circle, with a “hole” in the middle.
Let's see, using an example, why only a fairly short skirt can be cut in this way, and it is more suitable for women of small size and height, and girls.
The maximum (and most common) width of the fabric is 150 cm. We take a square of fabric: width 150 cm, length 150 cm. We add it in 4 layers, we get a square with a side = 75 cm.
The skirt is without seams, so without a fastener - with an elastic band. Instead of From, we use (Ob + 2 ... 5 cm).
For example, Ob \u003d 104 cm. Then R1 \u003d (Ob + 5 cm): 6.3 \u003d (104 cm + 5 cm): 6.3 \u003d 17.3 cm.
And the side of the square of the folded fabric is 75 cm.
75 cm - 17.3 cm \u003d 57.7 cm - only 57.7 cm remain for the length of the skirt. And this is without taking into account the hem allowance. So the length of the finished skirt will be only 56 cm.
So you can figure out if this method is right for you. If your hip circumference is less than 104 cm, the skirt may turn out to be slightly longer than 56 cm; and if your hip circumference is more than 104 cm, respectively, the skirt will be shorter. This is with a fabric width of 150 cm. If the fabric width is smaller, then the skirt is shorter.
Well, if you make a sun skirt from a fabric, for example, for bed linen, the width of which is 220 cm, or a curtain, then, of course, the skirt can turn out to be longer, and with a larger hip girth.
How to cut a sun skirt with two seams
The sun skirt can be cut with two seams. And in this way you can make a long skirt to the floor, regardless of the height and size of the figure.

The sun skirt must be cut according to the same principle as the semi-sun skirt. Only for a sun skirt you need to cut two semi-sun skirts - two halves of a skirt.
And therefore the calculation of the radius of the arc R1 will be slightly different. Instead of From (waist circumference), we substitute St (half-waist circumference) into the formula:
R1 = St: 3
For example, if From = 80 cm, R1 = 40: 3 = 13.3 cm (rounded).
Thus, we cut out 2 half-sun skirts, as described.
And when cutting, to save fabric, the skirt panels can be laid out with an offset:

You can pre-make a pattern of the skirt panel on paper, so that it is easier to lay it out on the fabric, or cut it immediately from the fabric. Who better to figure it out.
How to determine how much fabric you need for a sun skirt
If the sun skirt is seamless, then you need a square of fabric - how much is the width of the fabric, you need to take the same length. For example, if the width of the fabric is 150 cm, then you need to take 150 cm length. If the width of the fabric is smaller, we take less length of the fabric.
If the width of the fabric is 150 cm, but the entire width of the fabric is not required for a skirt, for example, for a children's skirt. Let's say the length of the radius of the outer circle is R2 = 60 cm. Then we take 130 cm of fabric (60 times 2, + 10 cm for allowances / shrinkage / skew of the fabric).
If the sun skirt is with two seams, we calculate the amount of fabric as for 2 half-sun skirts. That is, we multiply R2 by 4, + by allowances of 10 ... 20 cm. Yes, the fabric consumption is significant, especially for a long sun skirt.
Well, the skirt will be quite voluminous, fluffy. Therefore, you need to choose the appropriate fabric - thin, light in weight, flowing. Otherwise, the skirt may turn out to be unbearable - there is a lot of fabric 🙂.
Fabric consumption can be reduced by laying out the skirt panels with an offset, as shown in the diagram above. But beforehand, it will not be possible to accurately calculate how much fabric can be saved in this way. You need to look at this in practice - make paper patterns of the desired length of the skirt, and lay them out on the floor, taking into account the width of the fabric. And so see how much fabric you need for the whole sun skirt.
 As you can see, cutting a sun skirt is not at all difficult. No pattern building is needed, no complex formulas, and calculations 🙂.
Good luck, and beautiful new skirts!
In order to learn how to sew beautifully, it is recommended for beginner seamstresses to start with a sun skirt. This skirt is very easy and quick to sew. In the process of its tailoring, almost no one ever has difficulties and questions. You can sew it yourself without resorting to the help of a professional.
To make a sun skirt with your own hands, you will need threads, needles, fabric, scissors, an elastic band of the desired thickness, a pattern and flesilin. We take the size of the fabric based on the length of the future skirt.
Technique for sewing a sun skirt with an elastic band
The sun skirt looks like a circle with a hole in the center.
In order to make a pattern, you need to determine the outer and inner radius. To do this, we measure the volume of the hips (B) and the length of the skirt (CI). The inner radius of the skirt is calculated by the formula R1=(B+5)/6.3cm. The outer radius is calculated by the formula R2=CI+R1.

First, we make a pattern on tracing paper. To do this, fold the sheet of tracing paper in half and draw a semicircle. We place the tracing paper on top of the fabric and fix it with sewing pins. We circle the pattern with chalk or a special pencil, do not forget to leave 1 cm of fabric for seam allowances. For the belt, we cut out a strip about 6 cm wide, it should be equal to the circumference of the hips plus 5 cm.
If the fabric allows, we immediately cut out a full circle or two semicircles. If you have completely cut out the full circle, then we simply process the bottom seams and sew in the belt, and if we cut out the skirt with two parts, then first we sew the skirt parts, and then we process the bottom of the product and sew in the belt.
To make a belt from thin fabric, you should always use flesilin. It makes it possible to sew a dense belt that will not lose its shape during washing and wearing the finished product. We iron the flesilin from the wrong side of the fabric. Then we fold the belt in half and sew it to the skirt so that there is a hole for the elastic band. After the sun skirt is completely ready, and iron each seam in the finished product.

- If the figure is full, then we choose the pattern of the fabric so that it does not emphasize the flaws of the figure, but only hides them, since such a skirt visually enlarges the hips.
- Before you start sewing a skirt, be sure to wash and iron the fabric, if this is not done during the first wash, the skirt may stretch. Synthetic fabrics do not need such preparation.
- If you want the sun skirt to be even more fluffy, we use a larger fabric size for its pattern and draw a larger inner and outer radius on the pattern in order to get folds. We evenly distribute the folds so that the skirt is neat and beautiful. Here, too, one should not forget about the right fabric, since not all types of fabric are suitable for this type of skirt. Lighter and flowing types of fabrics are suitable.

- The sun skirt always pleases the eyes of the surrounding people. This style of skirt can be sewn for both summer and winter. The main thing is to choose the right type of fabric. For a winter sun skirt, you need to take woolen, knitted types of fabrics. For the summer version, chiffon, satin, etc. are used.
- This skirt is very versatile, it can be worn with ballet shoes, sandals, high heels, and small ones, with boots, over the knee boots or ankle boots. The sun skirt is always appropriate and original, and it will suit a woman of any age. Often such skirts are sewn for little girls. They look very neat and elegant on little princesses.
When sewing a skirt, you can use any finish. Various laces, fabrics of a different color and even a completely different texture, appliqués, beads, etc. can serve as decoration.
Apricot: autumn planting of seedlings, care and preparation Apricot is one of the favorite fruits, it is grown with pleasure in almost every garden. How to plant ab...
Azalea (Rhododenron) - features of growing ... Azalea (rhododendron) is an evergreen shrubby perennial plant from the heather family.
You can sew a skirt of any length. In our master class, we opted for a long sun skirt.
How to build a sun skirt
A sun skirt is one of the options for a flared skirt. It is based on a circle. You can make a sun skirt pattern yourself with the help of our master class. A step-by-step illustrated master class will tell you how to take measurements correctly, make calculations for construction and complete the construction of a long skirt-sun, half-sun skirt and flared skirt based on 1/6 of the circumference.Step 1

We cut 2 halves of the "sun" and the belt, taking into account the allowances for the side seams and the hem of the bottom - 1.5 cm, and for the upper cut of the skirt and the belt - 1 cm.
Step 2

We overlock the side sections of the front and rear panels on the overlock on the front side.
Step 3

We grind the right side seam 1.3 cm from the edge.
Step 4
Iron out the side seam.Step 5
Cut out a strip of adhesive fabric or interlining 4 cm wide and equal to the length of the belt.Step 6

Duplicate the belt detail with glue cloth.
Step 7

We fold the part of the belt in half (along the long side) with an adhesive cloth inside and iron it.
Step 8

We overcast one long section of the belt detail on the overlock (on the front side).
Step 9

We lay two lines with large stitches along the front and back panels along the waist line 0.7 and 1 cm from the edge (for fitting).
Step 10
Slightly collect the front and back panels of the skirt on two lines along the waistline to the length of the belt.Step 11

We sew the belt (with a raw cut) to the fitted panels of the skirt 1 cm from the edge.
Step 12

We iron the allowances towards the belt.
Step 13
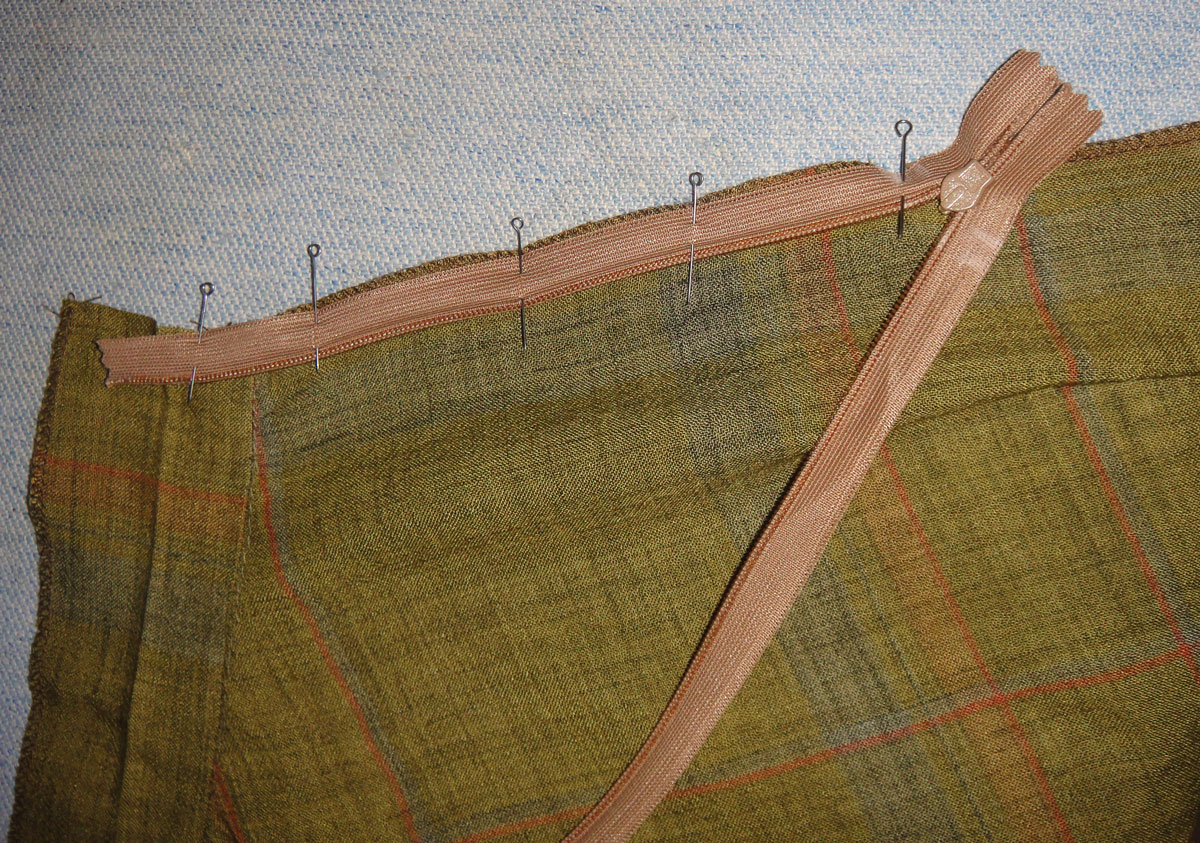
We prick with pins a hidden zipper on the front panel of the skirt “face to face”, the edge of the fastener coincides with the middle (upper) fold of the belt.
Step 14
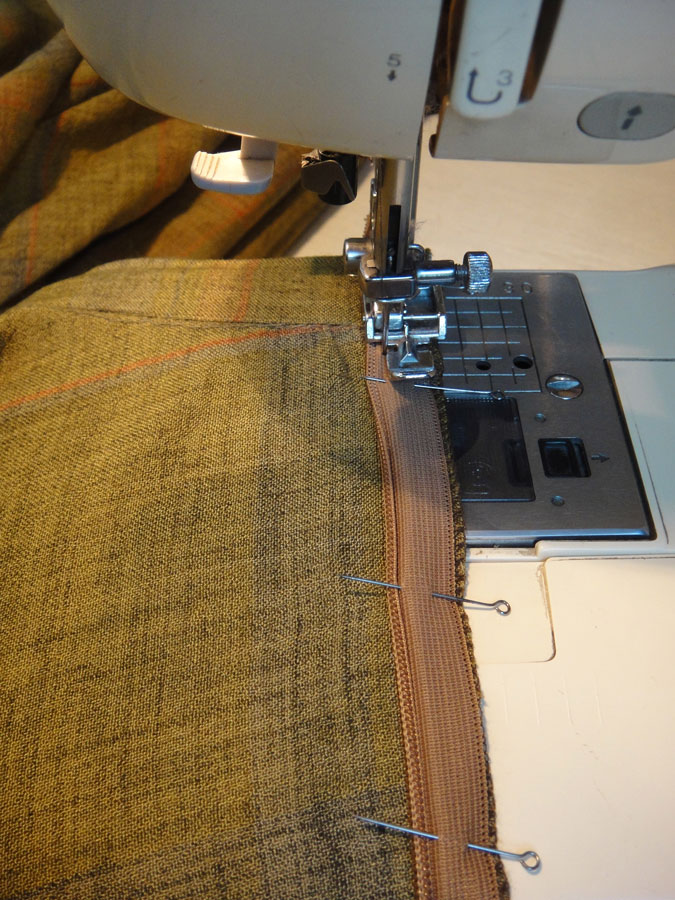
We sew a zipper to the front panel of a long sun skirt. We use a special foot for a hidden zipper.
Step 15

We prick with pins a hidden zipper on the back panel of the skirt “face to face”, the edge of the fastener coincides with the middle (upper) fold of the belt. We check whether the seam of attaching the belt matches when we fasten the zipper.
Step 16

Attach the zipper to the front of the skirt.
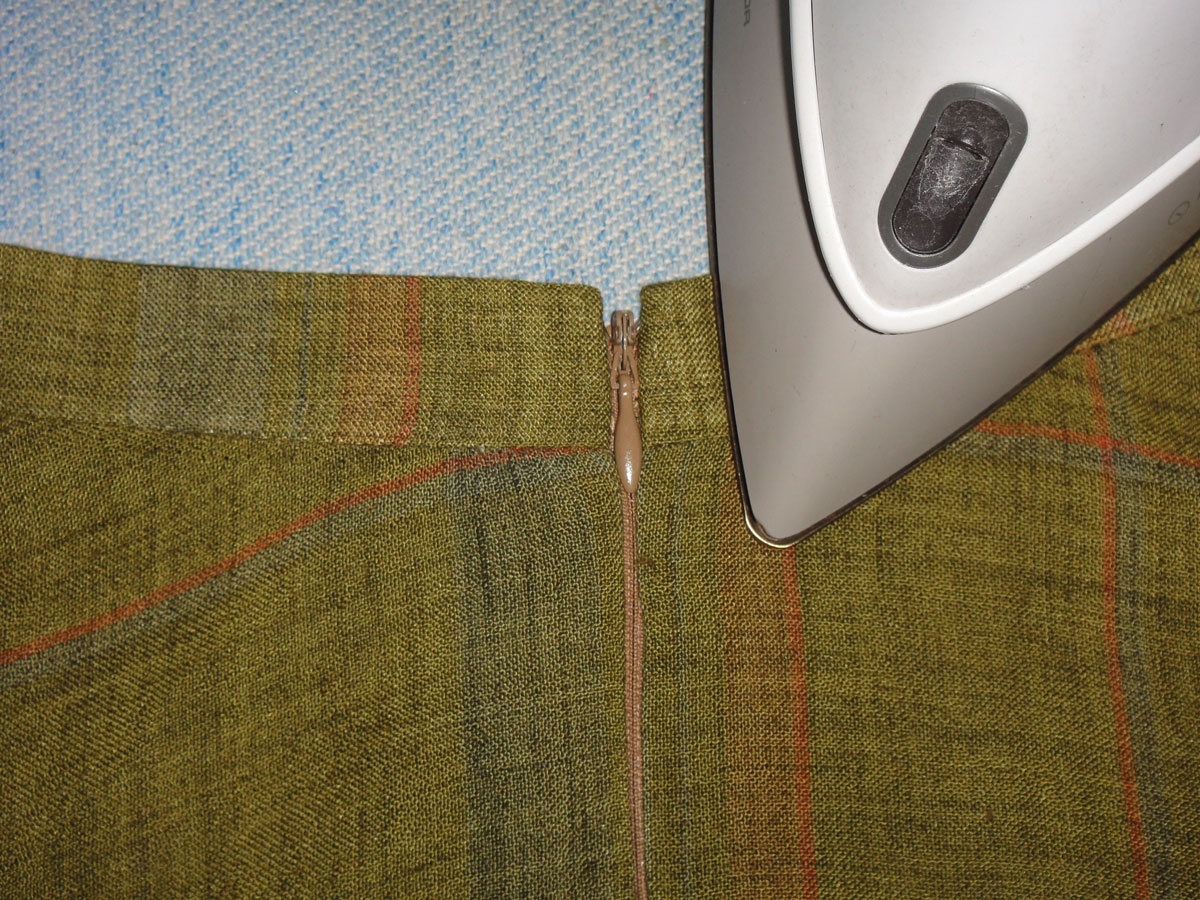
Step 17

We grind the side seam of the sun skirt from the bottom to the zipper, we make a bartack at the base of the zipper.
Step 18

Iron out the side seam.
Step 19

We fold the end of the belt along the upper fold line face to face (turn inside out).

We grind the outer and inner halves of the belt, laying the line in the line of attaching the zipper, or retreating from it by 1 mm towards the cut.
We twist the end of the belt, iron it. Repeat the same with the other end of the belt.
Step 20

We pin with pins or we outline the inside of the belt to the skirt. We adjust, laying a line along the front side of the skirt in the seam of attaching the belt.
Step 21
We iron the belt.Step 22
We level the bottom from the floor. It is best to do this on the figure on which we sew the skirt, but you can also use it on a mannequin.Step 23

We bend and iron the bottom of the skirt.
Step 24

We hem the bottom of the sun skirt with a hem seam with a closed cut.
Step 25
Iron the bottom of the skirt.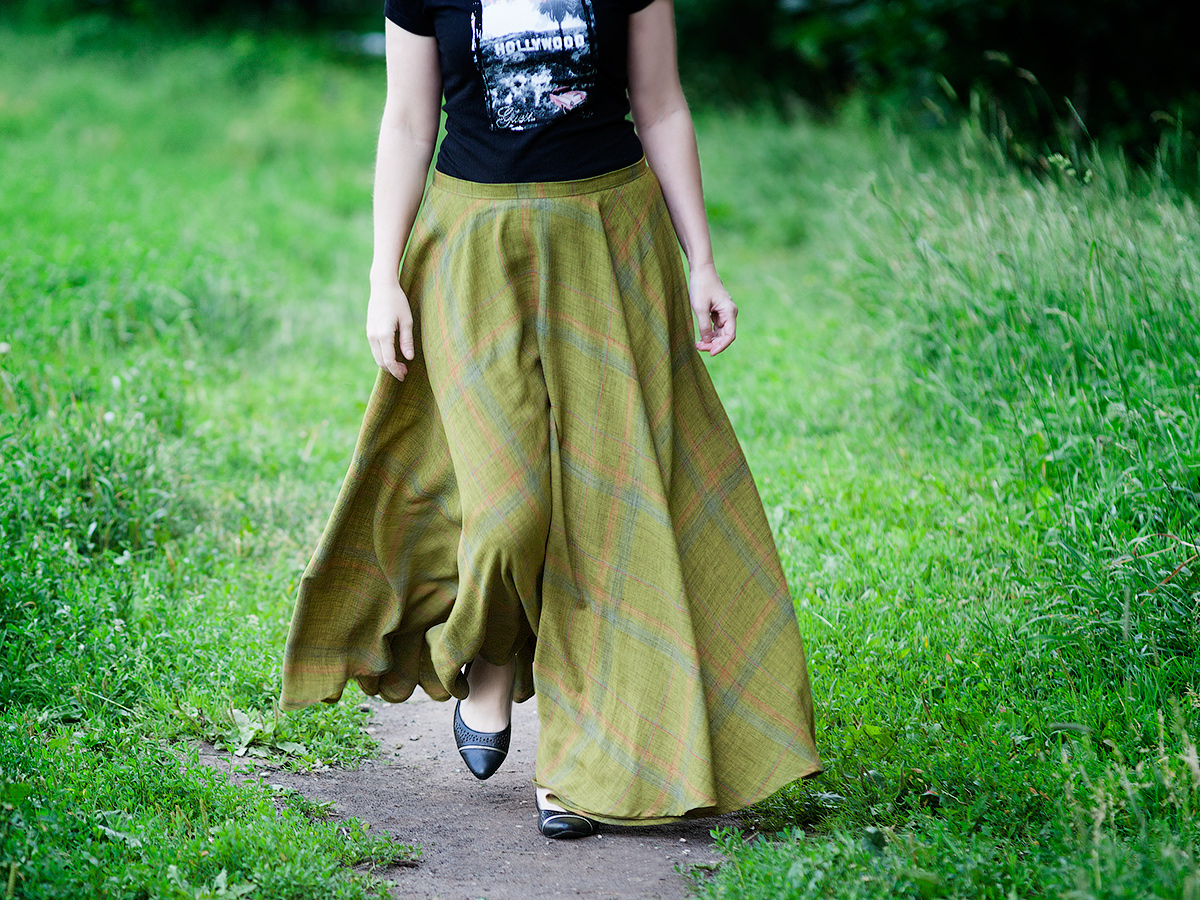
The long sun skirt is ready!
You can also sew.The sun skirt is known to all fashionistas, even the youngest. The skirt got its name due to its shape, which, when unfolded, reminds us of the luminary - the sun. The sun skirt has many advantages. It is comfortable to wear in any season, except for windy weather. It can be worn for an ordinary walk or for a social reception. She looks elegant. It just sews. And now we will consider the topic: a simple sun skirt pattern for beginners - step by step instructions.
Step-by-step instruction-pattern for beginner craftswomen
1. The pattern of any skirt begins with the fact that we take measurements. To do this, measure the waist with a centimeter, that is, the place where the skirt will hold. Why waist? So the skirt will emphasize your dignity.

In order to make a pattern for a skirt, we need two lengths. This is R - the length of the skirt, it is unforgettable to add 2 cm for lining and r - the radius of the circle, which we will calculate by the formula: r = waist circumference / 2 p.
Let's say the waist circumference is 65 cm, which means r = 65 cm / 2 * 3.14 = 11 cm. It is better to round the result up, since the reserve will never be superfluous.
2. Fold the material. So, we calculated all the sizes, now the sun skirt pattern for beginners - the step-by-step instruction continues with the preparation of the fabric. We take a square-shaped fabric so that one side is twice the length of the skirt. Fold in half, then - again, as shown in the photo.

3. Draw. We take chalk and first mark r from the corner of the square, that is, 11 cm. And then also mark the length of the skirt R at 53 cm from the corner. Since, let's say the length of the skirt is 40 cm + 2 cm for lining + r (11 cm). Rings can now be identified by marks. To do this, you can take a string and tie it to a pencil. We apply the pencil to the mark and, holding it, draw two semicircles.

4. Cut out. As you can see, a pattern for beginners does not require much skill and experience. Everything is quite simple, because now you can cut out a template for a future skirt along the drawn circles. As a result, you will get a circle with a void in the middle, but in one place you need to cut the circle and sew it back, leaving 15 cm from the top. The bottom of the skirt can be stitched right away.


This completes the step-by-step pattern instruction, it remains to prepare the belt and make our skirt complete. There is nothing complicated here either.
Belt to skirt
For the belt, you will need a fabric strip 10 cm wide and 75 cm long = 65 cm waist circumference + 10 cm for the fastener. Fold the strip in half along the entire length with the edges folded inward. First you need to sew the beginning of the belt, and then, inserting the top of the skirt, sew along the entire length.

Now you can sew on the button where we started sewing the belt to the skirt. And do not forget about the fastener from the protruding part of the belt, that is, we make a hole so that the button goes there and wrap it manually or on a typewriter.

Skirt - the sun is suitable for absolutely all women, regardless of their age and configuration. The main thing is to accurately choose the scope and length of the skirt. If you have a curvaceous figure, then you can start expanding from the hip line, and decorate the top with an adjacent yoke. Sun skirt pattern for beginners, step by step instructions will allow you to sew a skirt for any season, light or made of dense material.
If you find an error in an article, please highlight a piece of text and click Ctrl+Enter.


