How to make a beard from cotton wool. How to make a grandfather's beard from a fairy tale
It's no secret that on New Year's Eve, not only small children, but also most adults are waiting for Santa Claus. Everyone enjoys believing in magic and fairy tales at least once a year. In most cases, New Year is a holiday, which is an occasion to gather all relatives and friends. But if there are small children in the family, then this holiday turns into a real event for which you should carefully prepare.
Naturally, in addition to the actor for the role of Santa Claus, you will also need the most realistic costume possible. Since it is used only once a year, and the purchase option is expensive for most, it would be more advisable to make the suit yourself.
Manufacturing process
 Santa Claus's beard is one of the main accessories that you should work on when sewing your own costume for the New Year. It is she who complements the image of the main New Year's character and makes it complete.
The easiest option would be to buy it. Nowadays there are many specialized stores selling holiday paraphernalia, and you won’t have any difficulty finding a beard there. But since not everyone can afford such purchases, the most optimal and inexpensive option would be to make this accessory yourself. For this you do not need any expensive materials or a lot of time.
Cotton beard
If you do not have a lot of time and do not have special skills, then the most suitable option for you would be to make a beard from cotton wool.
To do this, you will need to find or buy the following materials:
- Cotton wool.
- Cardboard.
- Glue.
- Rubber.
- Scissors.
 First of all, you should make a cardboard blank. To do this, you need to measure the facial parameters of the person for whom the beard will be intended. We measure the width of the face and make a mark on the cardboard. From it we draw half an ellipse. This blank will be similar in size to the future product.
Take the elastic band and secure it at the top. It is with its help that the accessory will stay on the face. After the base is made, it can be coated with glue and fluffy cotton wool can be attached to it.
A more complex version of making it from cotton wool.
This option does not require the presence of a large amount of medical cotton wool, but it must be new and not open.
Manufacturing stages:
- The basis for production will be thin white fabric or cardboard.
- The cotton wool from the package is unwound and strips are formed from it along the length of the base.
- Using a needle and thread, we sew the cotton wool to the cardboard or fabric.
- The edges of the resulting product should be fluffed to make it more realistic.
Made from thick paper
 Not everyone knows how to make a beautiful beard with their own hands, so we offer you another simple and inexpensive way.
Making paper is somewhat similar to the previous option. The blank for the future accessory is cut out in a similar way as described above, and an elastic band is attached to it. Then you should take white paper and cut thin and not too short strips from it. Using scissors, we twist each element to give the beard a realistic look. The last stage of work will be gluing these strips onto a cardboard blank. As a result, you will have a beautiful beard that will look like a real one.
When making an accessory, you should choose a thicker type of paper. If this is not your first time making such a beard, you can try the option with corrugated paper. This option will look great and original.
From wool for felting and wig
 This manufacturing option gives the most realistic looking beard. Unlike store-bought or simpler ones, it looks better. The only downside will be the cost of purchasing wool for felting.
The basis for such a beard will be fabric. Wool is sewn to it in separate strands. It’s okay if it doesn’t come out perfectly straight, since it can be easily trimmed with scissors at the end. Also, the wool used is very easy to twist and change shape. When making, do not forget about the slot for the mouth, above which the mustache will be.
Made from hair.
This option is great if you have an unused human or synthetic hair wig. Natural ones will look more beautiful and realistic and will be easier to work with. To make the wig, strands are cut and sewn to a pre-prepared base.
Unusual materials
 Santa Claus's beard can be made not only from paper, cotton wool, wool, hair, but also from more unusual materials. Almost all white items are suitable for this.
For example, it can be crocheted from threads. This New Year's accessory will also look good made from a shower sponge or tulle. The manufacturing process is not much different from previous versions.
Remember that if you need a beard to celebrate one New Year, then you shouldn’t bother too much and spend a lot of time making it. But when holidays take place regularly, it doesn’t hurt to have a high-quality accessory. It can be used not only to create the image of Santa Claus, but it will also work for a gnome, a pirate or just an old man.
Attention, TODAY only!
Do you urgently need to get a beard for a theater production or a children's party? Here are some of the simplest and most common options:
Step 1
Take a piece of fur from an old fur coat (hat or any other product). Fur can be either natural or artificial.
Step 2
On the wrong side, draw an outline with chalk or a pencil - on top, according to the shape of the lower part of the face and below the required length of the future beard.
Step 3
Make a slot for the mouth.
Step 4
To attach the beard to your face, use a regular elastic band; it can be sewn or glued along the upper edge of the beard.
Step 5
Using a hair brush, you can comb or, conversely, ruffle your beard.

Making a beard from an old wig
Step 1
Take an old wig or hairpiece. Trim to desired length and shape.
Step 2
Sew an elastic band to it along the top edge.
Step 3
The beard is ready! Use a comb to give it any shape.

Making a beard from yarn
Step 1
Take wool knitting yarn of a suitable color.
Step 2
Using scissors, cut into lengths twice the desired length.
Step 3
Place on an elastic band, tying each piece in the center to the elastic band.

Making a beard from cotton wool
Step 1
Take a piece of any fabric, preferably thick. On the wrong side, draw the outline of the future beard.
Step 2
Cut along the contour, do not forget to make a slot for the mouth.
Step 3
Turn right side up and apply a thin layer of glue (any glue will do) to the entire surface.
Step 4
First, place a layer of cotton wool next to each other on the table, evenly distribute it according to the shape of the resulting outline. Then carefully transfer the cotton wool onto the fabric without pressing on top.
If you need a beard for the image of Santa Claus or any other character, the easiest way, of course, is to buy it in a store. However, you can try to make it yourself. How to make a beard? We will try to talk about this now. The main thing is that it is not at all difficult to do. And the most important thing you need is your desire.
How to make a beard with your own hands
If you decide to make a beard yourself, then the first question that arises is what can you make a beard from? Let's look at a few possible options.
- To make a beard from a wig, you need to buy an inexpensive wig in the color you need from the market or store. Simply sew an elastic band to the wig to keep it on your character. If you want a curly beard, you can simply roll your beard with curlers. You can replace the wig with an elastic band or a synthetic hairpiece.
- If you need a beard for the image of Santa Claus, you can make a beard from cotton wool. In order for the beard to keep its shape perfectly, you need to carefully glue or sew cotton wool with white threads onto a piece of fabric. Make a pattern first. To secure the beard, sew an elastic band around the edges.
- You can also make a beard out of faux fur. Make the width from ear to ear, and the length to the chest. Using scissors, give the beard the desired shape, do not forget to cut out the hole for the mouth. Don't forget to sew an elastic band to the upper corners of the beard.
- Another thing you can use to make a beard is clothesline. Cut a piece of fabric that will fit the size of your beard. Next, you need to disassemble the clothesline into separate threads, and then sew them to a piece of prepared fabric. Sew an elastic band to the top corners of the beard.
- You can also make a beard out of fabric. To do this, you need to cut a rectangle out of the fabric, and without cutting 1-2 cm to the end of the fabric, cut it into “noodles”. To make a full beard, cut out 4-5 similar rectangles and sew them to one piece of fabric in the form of tiers.
- The easiest way to make a beard is to make one out of paper. Cut the paper according to the shape of the intended beard, and cut them into noodles, without cutting 1-2 cm to the end of the paper. Glue the blanks in tiers. You can make your beard curly by twisting strips onto a pencil.
On the eve of the New Year, all thoughts are busy with preparation: what to cook, what to give, what to wear, and of course, how to decorate the house. Today we will talk about the main symbol of the coming 2017 - Grandfather Frost.
Key characteristics of Santa Claus include:
- warm earflaps
- long beard
- red fur coat
- staff
- gift bag
You can make Santa Claus yourself, together with your children, at the same time telling them where such a symbol came from and which children will receive gifts.
DIY Santa Claus from a bottle
A desktop Santa Claus can even be made from a plastic liter bottle, which is found in every home. You will need:
- liter empty bottle
- colored paper
- scissors
- red and white paint
- buttons
- threads
- Draw a face and mustache on the bottle with a marker. Paint all other parts red. Use acrylic paints or gouache, adding PVA glue to it for better application. Paint your face flesh color and make your beard white.
- Wrap white thread around the transition to the tapering part of the bottle - this is Santa Claus's hat.
- Make a pompom from threads and a disk and attach it to the lid.
- Make a belt for Santa Claus from threads and buttons.
- Eyes and mouth can be drawn on or small buttons can be used.
- To make the legs and arms, fold long strips of paper several times to form an accordion and glue them to the bottle.
- Cut out small palms or mittens and glue them instead of handles.
- You can use round bobbins as boots, covering them with red paper.
Using the same technique, you can make a Snow Maiden and a snowman to accompany Santa Claus.

Santa Claus: DIY toy
To make a bright and cheerful Santa Claus toy, use one of the patterns given below. Depending on your preferences, you can make Santa Claus in the style of Tilda dolls or a more traditional version.
- You need to purchase small pieces of fabric or use existing scraps; you don't need much for the toy.
- Print and cut out the patterns, place them on the fabric and trace, you will need about 0.5 cm for an allowance.
- Cut out all the parts and sew them together by hand or on a machine, leaving a small hole. Make cuts at the folds to prevent the fabric from wrinkling.
- Turn the parts out and stuff them with padding polyester or cotton wool and sew them up until the end.
- Collect all the parts.
- Add decorative elements.


DIY Santa Claus costume: diagrams and patterns
To please the baby, the “real” Santa Claus can bring him New Year’s gifts. To make everything look like something out of a fairy tale, sew a suit for Santa Claus. This kind of work will not take you much time.
- The most time-consuming part of the work is sewing the fur coat. You can purchase a long piece of red fabric, it can be fleece, satin, corduroy, or velvet. As well as white fabric for decoration.
- The size of the fur coat depends on who it is being sewn for; below is a simple diagram. You can take measurements from “Santa Claus” himself.
- All parts are sewn together, finish in white. The Santa Claus hat is made using the same principle.
- Make a beard from a piece of padding polyester by cutting out several layers and placing them on top of each other.
- For a staff, use a mop handle wrapped in gold packing tape.
- Sew scraps into a gift bag.

DIY Santa Claus beard
The beard is a very important element that will add naturalness to the image, we offer you a few more ideas for creating a beard.
- Option 1: cut out the base from white felt, sew ties along the edges and stick cotton balls over the entire surface.


- Option 2: Cut out an oval-shaped piece of felt - this will be the basis for your future beard. Fluff felt or thick white yarn and sew it to the base, imitating a mustache and beard.

- Option 3: You can use a respirator as a base for your beard, in which case the beard will hold securely. Cut out holes for the mouth and cover the remaining parts with padding polyester.


DIY Santa Claus staff
If you approach the issue of making a staff more seriously, you can try the following methods.
- Option 1: Glue a Christmas tree decoration, which is usually used to decorate the top of a spruce, onto the top of the mop handle, cover the joint with tinsel, and wrap the base with ribbon or wrapping paper.
- Option 2: Use a shovel handle, sand the base and cover it with white paint, wrap the staff with thin tinsel, decorate the top with a Christmas tree decoration attached to a glue gun, add glitter.
- Option 3: An express way to create a staff is to use foil for decoration. Wrap the base (mop handle, gymnastics stick, etc.) in foil, then wrap it on top with tinsel.

DIY Santa Claus sleigh
As a gift for little and big sweet lovers, you can make Santa Claus's sleigh out of sweets, gummies and cookies. And immediately an ordinary and familiar gift will look magical and festive in a New Year’s way.
Christmas candy canes are suitable as runners; the rest of the sweets are placed on them and the whole structure is tied with a bow. To prevent the surprise from falling apart along the way, you can fasten all the parts with a glue gun or double-sided tape.

DIY Santa Claus mittens
Since Santa Claus lives in the North, he would be very uncomfortable without mittens, after all, he’s not the same age anymore, he needs to take care of himself. Mittens can be knitted from red yarn or sewn from the remnants of red fabric from a suit.
Santa Claus's mittens are even more like large mittens, so to sew them you can use the following pattern:

DIY Santa Claus from scrap materials
To build Santa Claus houses, you don’t have to go to the store; use materials that you already have on hand.
Using quilling technique
To perform you will need:
- colored paper
- cutter
- toothpick
- Cut the paper into thin strips of 0.5 cm each and use a toothpick to twist it into a rope.
- Remove from the toothpick, let it straighten a little to make a circle and secure the end with PVA glue
- From such elements you can assemble a whole Santa Claus.
From toilet paper rolls or clothes cleaning rollers:
- the roller will be the base
- cover it with red paper or felt
- draw a face
- glue a beard from cotton wool
- you can make a hat from a napkin

Santa Claus using origami technique
Small gift cards in the shape of Santa Claus can be easily folded using an ordinary piece of colored paper measuring 10*10 cm. There are a lot of experimental schemes, they are easy to implement. Involve young children in the work, this activity is useful for the development of motor skills.


DIY Santa Claus made of colored felt
Felt is becoming an increasingly popular material among needlewomen because it is very easy to use, does not require edge processing, does not roll up, and attaches perfectly. You can make various versions of Santa Claus from felt:
- Option 1. Santa Claus toy for the Christmas tree: you just need to cut out all the parts according to the pattern below and sew them together, add padding polyester inside for softness.

- Option 2. Santa Claus on a Christmas wreath: more and more often in homes you can see decoration in the form of a Christmas wreath, more typical of Western culture. You can decorate the wreath with Christmas balls, branches or felt Santa Claus.

- Option 3. Santa Claus basket: you will need thick felt, about 4-5 mm thick, cut out all the parts and sew. Place a gift in the basket and hide it under the Christmas tree.

DIY Santa Claus made from cotton wool
Toys were made from cotton wool decades ago; probably your grandmothers still know this technique and can teach you all its intricacies.

The creation process is painstaking and time-consuming and the toy turns out to be very fragile. To create such a masterpiece you will need:
- paints
- threads
- wire
Making Santa Claus:
- Use wire to form the frame of the future Santa Claus, all parts of the body except the head.
- Wrap cotton wool around the frame and secure with threads.

- The next layers of cotton wool are attached using paste or PVA; apply the cotton wool in thin layers so that it sticks securely.
- Start making the head, first form a ball, then gradually sculpt the nose, brow ridges, lips, evaluate the proportions, the head should not be too large relative to the body.
- Attach the head to the body using glue and thread.

- Use wire to form a frame for a fur coat, which is attached to the waist.
- Wrap the wire with white thread.
- Cover the hem of the fur coat with cotton wool and form a hat, mittens, felt boots, and beard.

- After complete drying, start painting.

DIY Santa Claus made from tights
Ordinary nylon tights are perfect as a base for a toy; they stretch perfectly and allow you to form the desired shape. To work you will need:
- light tights or stockings
- padding polyester or cotton wool
- paints
- thread with needle
- red fabric for clothes
- To get started, form 3 balls of cotton wool, one large for the head and three smaller ones for the cheeks and nose. Cut off the sock part of the tights and place all three lumps there, sew up the hole.
- Now shape the nose and secure it with pins for ease of work and sew with light threads. Using the same principle, form the eyes and lips.
- For the body, you can use the remaining tights, cut a piece about 20 cm long, sew up one edge and stuff it tightly with cotton wool.
- Sew the parts together, now move on to the clothes. For the fur coat, use the attached pattern. Make the hat from leftover fabric.
- Don't forget to add a beard and mustache, make them from leftover cotton wool.
- Now the hardest part remains - paint the face and the toy is ready.

DIY Santa Claus on a glass
Decorated glasses will become an interesting table decoration. The trick is that the glass is no longer used as a vessel, but as a candlestick. The New Year's atmosphere of your evening is guaranteed!
You will need:
- wineglass
- decoupage napkins with Santa Claus
- tassel
- PVA glue
- scissors
- Remove the bottom two paper layers from the napkins; you only need a bright picture. Cut out the elements that you would like to transfer to the glass.
- Dilute the glue with water or cook the paste.
- Using a brush dipped in glue, carefully spread the napkins over the glass, keeping in mind that the glass will stand upside down. Smooth out all the wrinkles to ensure a flawless decor.
- After complete drying, you can add a few more decorative elements in the form of stars or snowflakes.
- Place a candle on the foot and place it on the table.

DIY Big Santa Claus
Santa Claus can become a real interior decoration if done with quality and love. Here is a master class on how to make a big Santa Claus.
You will need wire, scissors, glue, needle and thread, thick cardboard, foam rubber, synthetic fluff, cotton wool, wool, white and red felt.
- The entire body and head is based on a cone. Its size depends on how big the toy you want to end up with. Cut out a cone and a circle from paper.

- Draw a diameter on the circle and divide it into three parts, the points equidistant from the center will be the legs.
- Wrap the circle on one side with bright felt or fabric, glue the edges on the inside, thread the wire through the holes and form loops in place of the feet.
- Wind a thinner wire to the middle of the wire; its length should be greater than the height of the cone. To prevent the figure from losing its balance, the junction of the circle and the wire must be generously glued with a glue gun.

- Cut out two rectangles from fabric about 4 cm wide and 10 cm longer than the length of Santa Claus's legs. Sew from the long side, turn it inside out and put it on the legs. Baste to the bottom of the circle.
- Cut a cone out of white felt, sew and turn right side out. Fill it tightly with synthetic down and thread a thin wire through it, sew it to the circle with a hidden seam.
- Cut out the soles from thick cardboard or plywood; they should be larger than the wire loops. Glue the soles using a glue gun. Glue foam shoes on top.

- Cover the boots with red felt and pull them down at the bottom.
- Draw eyes and mouth at the top of the cone
- From red felt or fleece, cut out Santa Claus's fur coat, as well as handles. The handles must be sewn and filled with synthetic synthetic material.
- Sew the fur coat directly to the cone with a hidden seam and decorate it with decor as you wish.

- Cut a white collar from white fleece and sew on it.
- Sew handles to the fur coat on both sides.
- Next, from the existing wool, you need to comb a beard and mustache and carefully attach them to the face of Santa Claus.
- Form a hat from the remnants of wool; its decor can repeat the decor on the fur coat.
- Santa Claus is ready to delight you and your loved ones!

DIY champagne Santa Claus
A bottle of wine or champagne is a good gift for a holiday, there are many free days and guests ahead, this bottle will definitely not be superfluous. To make the gift still thematic, you can decorate it by dressing it up as Santa Claus.
Of course, the easiest option is to sew a tiny cap on a bottle and it will immediately look different, but you can also be even more creative, for example, sew a cover and decorate it as Santa Claus.

- You can also make an amazing decoration for a bottle from a red satin ribbon.
- To make it removable, you first need to prepare the base in the shape of a bottle, and then wrap it with ribbons
- At the end, add white felt or fur decor

Knit a Santa Claus costume onto a bottle with your own hands
A bottle costume can not only be sewn, but also knitted. Here you have several ideas, symbolic simplified versions in red colors or humorous ones with Santa Claus hanging on the chimney.


Santa Claus - DIY pillow
Pillows with Santa Claus will help change the style of the interior and make it more New Year's; this can be decor made on a regular cover, or the pillow itself can resemble Santa Claus.

In order to sew a New Year's cover you will need:
- base fabric
- felt or fleece for finishing
- threads
- needle
- Cut a cover from fabric for an existing pillow and sew it together, inserting a zipper for opening and closing
- Cut out all parts of Santa Claus's face from fleece: beard, eyes, mustache, nose, hat, pompom
- Sew all the parts to the base one by one, you can use buttons as eyes
- Make a pompom from threads and sew it to the hat
- Santa Claus' mustache can be made voluminous by stuffing it with padding polyester.

If you have a lot of patience, you can try to cross-stitch a pillow with Santa Claus.

DIY Santa Claus made from spoons
Using disposable spoons, you can create unusual things, including lamp shades, vases and coasters. It turns out that by using your imagination, you can even build Santa Claus.
You will need:
- plastic spoons
- cardboard
- red paint
- felt-tip pen
- Cut and glue a cone out of cardboard, it will be the basis for Santa Claus
- Now use a pencil to mark the places where the mustache, beard and eyes will be located, paint over everything else with red paint
- Break off the base of the plastic spoons and glue them to the beard and along the edge of the cone
- Cut out handles from paper and glue on each side
- Draw the eyes and your Santa Claus is ready

If you only have one plastic spoon lying around the house, and you need to make Santa Claus, then you can go the other way:

Santa Claus made from plastic cups
Continuing the theme of creativity from disposable tableware, you can try to create Santa Claus from ordinary plastic cups.
You will need:
- plastic cups red and white
- threads
- balloon
- fleece for hat
- buttons
- Glue the cups together to form a ball-like shape. White cups will symbolize the hem of the fur coat and buttons.
- Next, the head can be made from cups or made from PVA glue, thread and a balloon.
- Glue the head to the base, add eyes and a beard using cotton pads.
- Stick the cups into each other and glue them as handles.
- Glue together a Santa Claus hat from fleece or felt.
- From the remaining cups, glue a bag with gifts and tie it with a ribbon.

Santa Claus from a plastic plate
The simplest exercise for preschool children is to make Santa Claus from an ordinary plastic plate. It’s better for you to prepare all the necessary details in advance so that your baby can create in peace.
You will need:
- plate
- red triangle for hat
- white rectangle for hat lapel
- black circles for eyes
- cotton balls for beard
- nose pompom
Show your child how easy it is to glue all the pieces together and assemble Santa Claus.
Using the same pattern, you can easily assemble a snowman and a deer!

DIY chocolate maker with Santa Claus
Recently, giving just chocolate bars has become unfashionable; everything needs unusual packaging. The chocolate box is a postcard-box, inside of which there is a treasured sweet, and maybe a few lines with wishes are also written.
- From thick red cardboard, cut out the base for the future box and iron all the folds, glue a pocket for chocolate
- Glue ribbons to make your gift look more presentable
- On the front side, glue or draw a face, beard, mustache, hat, nose and eyes
- Place your favorite chocolate inside and write wishes for the New Year


Santa Claus made of paper, DIY diagram
One of the simplest options for creating Santa Claus, and perhaps the most technologically advanced, is to simply print it out on a printer and glue it together according to the attached diagram. The most advanced ones can even print a three-dimensional figurine on a 3D printer, and then simply paint it!

Do-it-yourself volumetric Santa Claus
You can fold a three-dimensional figure of Santa Claus using the modular origami technique, which has become very popular in the last ten years.
The product is assembled from identical modules, which allow you to create any shape.
For example, for Santa Claus we will need 493 identical modules (1 red for the nose, 275 white, 198 blue, 19 flesh). Each module is assembled from a rectangular piece of paper measuring 37*53 mm, or 1/32 of a sheet.
The technique for creating a module is as follows:
- Having folded the required number of modules of a certain color, you can proceed directly to assembly
- At the base there are 25 BM (white modules), placed on the short side in a circle
- In the second row, place 25 BM in the same way as in 1, but on the long side and put it on the 1st row.
- The third row repeats the previous one
- In the fourth row, place 25 CM (blue modules) on the long side
- Fifth row: 22cm on the long side and 3cm on the short side, turn the ring out
- In the sixth row there are 4 BM and 21SM, all with the long side out
- In the seventh row there are 5 BM and 20 SM, located as in the previous row
- In the eighth row there are 6 BM and 19 SM, located as in the previous row
- In the ninth row there are 7 BM and 18 CM, located as in the previous row
- In the tenth row there are 8 BM and 17 SM, located as in the previous row
- In the eleventh row there are 25 BMs, located as in the previous row
- In the twelfth row there are 25 BM, located as in the previous row
- In the thirteenth row there are 1KM and 24 BM, located as in the previous row
- In the fourteenth row there are 2 BMs with the long side outward above the CM of the 13th row, on both sides of them there are 2 TMs (body modules) with the short side, the remaining 19 BMs
- In the fifteenth row there are 7 TM and 18 BM with the long, short and long sides facing outwards, respectively.
- In the sixteenth row there are 8 TM and 17 BM with the long, short and long sides facing outwards, respectively.
- In the seventeenth row, reduce the number of elements of the row by putting 6 modules on 3 corners, a total of 22 BM with the short side outward
- In the eighteenth row, 20 cm outward with the short side
- In the nineteenth 18 CM short side out
- In the twentieth 9 BM short side forward
- Form handles from the remaining elements, glue on the eyes and nose

DIY Santa Claus doll
To make your child remember this holiday for a long time, sew a doll Santa Claus for him. Print out all the patterns and cut out the pieces. 

- Lay out the fabric and trace all the details, leave 5 mm for an allowance. Cut along the outline and sew on a machine.
- Gather all the parts together, use a thick thread to decorate the doll’s clothes, the yarn will make an excellent beard.

Santa Claus on the Christmas tree with his own hands
On the New Year's tree, among other toys, there must be Father Frost and the Snow Maiden. They can be made from felt or cut out of colored paper to create an applique.

Another interesting idea is to make Santa Claus from beads; you only need fishing line and glass beads in white and red colors. String the beads according to the diagram, and at the end make a loop from the remnants of the fishing line.

Santa Claus made of balloons
A very convenient and compact option for later storage is Santa Claus made from balloons. You will need white and red balls for the fur coat and hat, pink for the face and black for the shoes.

- Inflate 31 red and 11 white balloons of the same size and arrange them in the shape of a cone, so that in the first row there are 6 white balloons, in the second and third 6 red, in the fourth 4 red 1 white, in the fifth 5 red, in the sixth 5 red, the seventh has 5 red, the eighth has 4 white.
- Blow up a large beige or pink balloon, this will be your head.
- Place a Santa Claus hat on top of your head and draw eyes with a marker.
- Make a beard from white felt or fleece.

Santa Claus made from salt dough
Another wonderful material for creativity is salt dough. It allows you to create amazing things that will last a long time.
- First, prepare the dough: mix 200 grams of salt and flour, 100 ml of water and half a teaspoon of PVA and knead the dough
- Form a cone-shaped base from the finished dough.
- Fashion sleeves and handles and glue to the cone
- Use two long strips of dough to form the lapel and hem of the fur coat.
- Make hats and noses from small balls of dough
- Add a beard and mustache, eyebrows
- Place in oven to dry for 40 minutes
- Then paint the finished product with acrylic paints and varnish

Santa Claus felted from wool
The felting technique allows you to create real masterpieces from ordinary wool. To felt Santa Claus, take flesh-colored and white wool, felting needles, red felt for a fur coat, wire, beads and glue.
- Felt flesh-colored wool into a cone-shaped shape with a ball on top. The cone is the body, so add a small roundness on one side, this is the solid belly of Santa Claus.
- Cut out a fur coat for Santa Claus from felt and sew it directly onto the base.

- Sew a small cone-shaped hat from the remaining red fabric.
- Felt flagella from white wool so that they are fluffy on one side, place them on a sponge and use a needle to drive them into the sponge. Glue the finished flagella to the fur coat using glue along the hem and collar.
- From the remaining white wool we form a beard and mustache and pin them with a needle.
- Glue on the eyes and nose
- From the wire, measure the required length for the handles, wrap the wire with red felt and glue it to the ends of the mittens. Stick the open end of the wire into the body.

Making toys with your own hands is a very interesting activity, if you haven’t tried it yet, now is the time to start. Don't be discouraged if something doesn't work out the first time, you can always try again. Santa Claus will bring New Year's mood and a feeling of the approaching holiday to your home! New creative ideas to you and a happy New Year!
Video: DIY Santa Claus step by step
There are times when you just need to get a beard! For example, if you play in a play or take part in a children's matinee as Santa Claus. Who said that Santa Claus's beard must be white? Of course, now you can buy everything in stores! But this article is for those who are not looking for easy ways and prefer to do everything themselves! This is the kind of thick, thick, natural-colored beard you can make with your own hands.
To make a beard you will need: a “Petal” respirator (sold at a hardware store), tow (sold there), PVA glue, viscose napkin.
In the photo you see a bearded actor who played a shepherd in the play. The elastic bands that hold the beard are hidden under his headdress (towel).
So, take a respirator and make slits in it for your mouth. Try it on to see if it suits you and whether it’s easy to open your mouth and speak.

The nose of the respirator will have to be cut off. In the photo below: this is what the respirator looks like from the inside out.
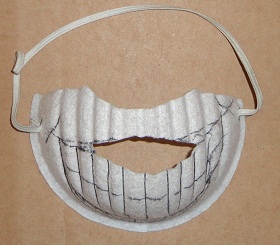
Take some tow and stick it on the respirator. The upper part will be a mustache, and the lower part will be a beard. If necessary, trim the respirator so that the beard on your face looks natural.

And this is what a finished homemade beard looks like from the inside out. As you can see, there is also a thick viscose napkin glued underneath, which is usually used as a rag. This is done so that the beard does not become disheveled and adheres more firmly to the respirator.


Since the elastic bands from the respirator will be visible on the actor’s face, they need to be disguised somehow. The shepherd in the photo above has elastic bands disguised as a cape, and this actor playing the sage has elastic bands disguised as tow. That is, the shape of the beard turned out to be wider - with an approach to the cheeks.