How to make a rooster from scrap materials. Do-it-yourself soft New Year's toy Rooster for the senior group of kindergarten and school
5 amazing options for how to sew a rooster with your own handsI suggest that all needlewomen sew a rooster out of fabric with their own hands. Why him? Because the coming year will pass under the auspices of the Red or Fire Rooster. This is what the Chinese calendar promises.
Those needlewomen who have never sewn textile toys will need an interesting pattern of a rooster made of fabric to create an original symbol of the year 2017. As well as a step-by-step description of this process. This is what we will talk about.
What materials to choose and how to sew a rooster with your own hands
Everyone knows that this bird is colorful and bright. Therefore, all materials for making a rooster with your own hands from fabric must meet these requirements.
For stuffing, cotton wool or padding polyester is useful. Since a fabric cockerel rests on soft legs, it will have to be placed on a horizontal surface. But you can “teach” him to stand if you insert a rigid frame made of thick wire inside his paws and body.
DIY fabric rooster patterns
First you need to choose the appropriate option. For the toy suggested above, this pattern option is suitable.

If you want to make the symbol of the year so that it looks more like a living thing, then you will need pieces of fur of different shades. Then the faux fur will imitate the feathers of a bird. By the way, the pattern of a rooster made of fabric may be different. For example this one.

But simply choosing them on the Internet is not enough. If you print them out, they will appear small. As a result, the toys will become very tiny. To enlarge the patterns of fabric cockerels, you will need to open the saved file in any graphic editor. In it, increase the image size. Then print it out on several sheets of paper. All that remains is to put them together to use in fabric work.
To do this, they must be transferred to cardboard.
This will make it easier to attach patterns to the fabric.
Step-by-step instructions on how to sew a rooster with your own hands:
Trace the details, leaving seam allowance. It should be at least 1.5 cm, and preferably 2 cm. Be sure to pay attention to the fact that paired parts of the rooster from different types of fabric should be outlined on the same material. Moreover, every second detail must certainly be turned upside down so that it turns out to be a mirror image.
Cut out all the details.
Sew the pattern pieces together in pairs from the wrong side. Here you should leave a gap of a few centimeters so that the piece can be turned out and stuffed. It is better to leave this gap on an inconspicuous part.
Turn them inside out and fill them with filler, except for the under-eye area. Sew up the gaps.

All that remains is to connect all the parts with each other. You can make the wings movable. To do this, they need to be fastened with buttons of a suitable color and size. This is how you can make various cockerels from fabric with your own hands.

The eyes of this symbol of the year can be sewn from pieces of fabric or round buttons that match the color. Someone recommends drawing the eyes of a rooster. Then you will need gel pens. And you can fix the drawing using transparent acrylic varnish from a spray can.


The second version of the cockerel made of fur fabric
This toy requires a rigid frame throughout the entire figure. It should extend from the paws to the head and tail. The beginning of production is similar to what was described earlier.
The differences are noticeable at the stage of joining the pieces of the body, since the pattern of the fabric cockerel is not formed by whole parts. First, from the wrong side, you need to sew the parts of the breast with the abdomen and torso. Then turn the workpiece right side out.
Now it's time to sew the two halves of the head together, leaving a gap for the stuffing. Do the same with the wings.
Insert a wire frame inside the body, from which leave leads for the parts of the tail and legs. You can simply pierce the fabric with wires for the tail.
Give volume to the body and head, that is, fill them with filler. Sew them together. There is no need to fill the wings. If desired, cardboard can be inserted into them to make them more rigid. Sew the wings along the top to the body.
Connect the two parts of the beard and beak.
Secure them in their places on the toy.
The tail of this rooster is formed by simple strips of fabric, which are sewn along one side. To avoid the difficulty of turning parts inside out, they should be sewn right side out right away.
Place them on the wire coming from the body. Sew them on. There are paws left. It is recommended to simply cover them with a suitable soft material over a durable frame. To complete the production of the Cockerel toy, you need to decorate the eyes.

Toy options
Those needlewomen who want variety will find other types of patterns useful. For example, if you have several suitable pieces of felt, you will get a bright felt rooster with your own hands, save the pattern.

Please note that the dotted lines on the pieces indicate extra stitching. It is necessary to give expressiveness to a felt rooster.
The toy will be unusual and cute if the pattern of the rooster made from fabric is like this.

And who said that a fabric rooster should be a simple toy? We offer you a product that is suitable for interior decoration. The following pattern will be useful for this.

based on materials from http:/www.dom-v-sadu.ru/vykrojka-petuxa-iz-tkani/
Sometimes, in order for a holiday to become special, the presence of traditional attributes is not enough. Yes, you can’t live without a Christmas tree and the capital’s salad in the New Year, but it’s time to introduce fresh ideas into the traditional celebration. Do-it-yourself New Year's crafts for the new 2017 Year of the Rooster will help us implement this idea.
Many of us carefully keep real rarities from our childhood in the form of now rare Christmas tree decorations, others every year in modern shopping centers purchase something new, trendy from the latest collection of some designer brand... All this, of course, is good, but if adding a couple of hand-made crafts to the holiday decor will immediately become clear - in this house they love and look forward to the New Year.
The first idea. Variegated balls
Do you want to completely transform your tired set of Christmas tree balls, but don’t want to buy new ones? Then you will like the next craft. To implement this idea, we offer a fairly simple master class:
- take the balls and wrap them in bright scraps of fabric,
- tie with satin ribbon, braid,
- add spruce branches or an artificial flower to the knot.
Such New Year's balls, decorated in a single color scheme and graphic designs that are consistent with each other, will be an excellent decoration for the Christmas tree. And if desired, the craft can sparkle with all the colors of the rainbow (it is better to choose the palette that the Rooster loves - fiery, from bright red to pastel yellow). You can simply put the balls in a vase or put them on a bookshelf, or you can assign them the role of cards for guests, providing each decoration with a sign with the name of the guest.
Idea two. New Year's installation in a frame
An object for inspiration that will help you create DIY New Year's crafts for the New Year of the Rooster 2017 can be the most ordinary photo frame. Paint the frame red - the traditional color of the winter holidays - and place it (hang it, lean it against a wall, against books) in a visible place. The craft will look organic with the same balls or snowflakes. Any New Year's decorations dear to your heart will do. It doesn’t matter whether there are many toys or just one - an advantageous frame will give any content a wonderful sound. Don’t forget about the bow, which can crown the top of the frame, be located on the side, or take on the democratic appearance of a ribbon that secures the craft to the wall. 
Idea three. With new happiness!
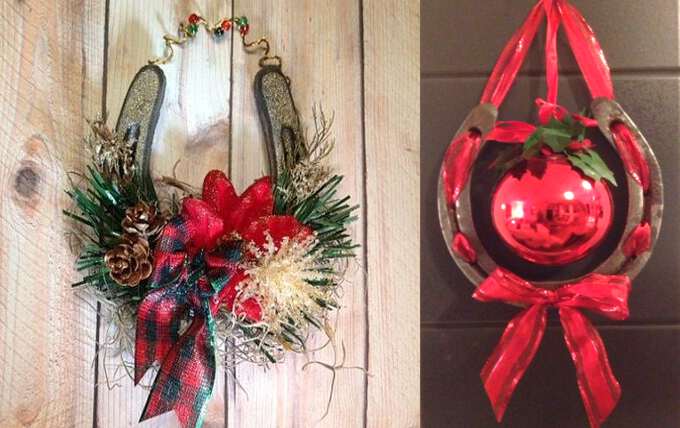
How do you like DIY New Year 2017 crafts with a horseshoe? This accessory can be purchased at a specialized souvenir store, or you can use one that was inherited from your grandmother. The effect in both cases will be amazing. A master class on turning an ordinary horseshoe into a bright New Year's souvenir can be presented in 2 versions.
Option one:
- Having placed the horseshoe with its “horns” up (this is the only way it will work to attract good luck and happiness), decorate its base with tinsel, spruce branches, cones, ribbons, in other words, whatever you have on hand.
- Attach wire, ribbon, braid to the horseshoe horns, as shown in the photo, to fix the impromptu Christmas wreath on the wall or door.
Option two:
Idea four. Hello Dedushka Moroz!
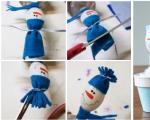
You have definitely never met such a Santa Claus as you see in the photo. The original master class on turning the most ordinary object into a favorite of adults and children is simple and at the same time ingenious.
When you decide to decorate your home with funny New Year symbols, just follow these instructions:
- take a regular paint brush, paint the handle red and paint a few snowflakes on its surface,
- We cut out a rectangular strip from fluffy material and attach it to the handle. This will be Santa Claus's hat. Glue a contrasting star or snowflake to the side,
- glue on the eyes and nose, as shown in the photo. You can use black buttons as eyes, and a round piece will serve as the nose, which can be purchased at craft stores.
- we thread a coarse twine through the hole in the handle and place the resulting craft where we like.
A funny Santa Claus can also be made from a round brush. The face can be made from pink paper or fabric, placing eyes and a round nose there, on which we can safely place wire glasses. We make the hat more elegant - for the fur trim we choose fluffier fur, and we roll the cap out of red thick cardboard. Such New Year's crafts will look great on a Christmas tree or become the center of a decorative composition. 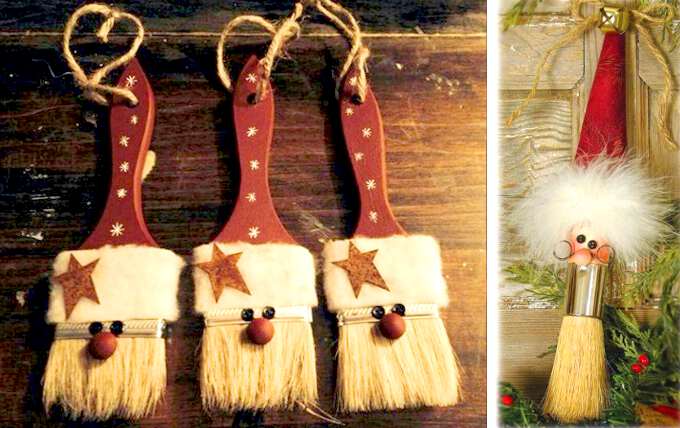
Idea five. Christmas wreath holder for photo
A master class on creating a creative wreath, which can simultaneously serve as a holder for memorable photos or greeting cards, consists of the following steps:

Idea six. Funny snowmen
Making a whole family of funny snowmen and decorating your home with them is a great way to create a festive mood. Crafts using our master class are easy to make. So:

Idea seven. DIY New Year's beauty
Surprise your guests with an unusual version of place cards by making a small creative Christmas tree. The craft is easy to make, so take our master class and get started:

Idea eight. For fans of minimalism
Try to “grow” a whole forest of Christmas trees from paper cones. This unusual craft requires thick paper, beads, braid, scissors and glue. Having rolled up a cone from paper of the desired color (not necessarily green, it all depends on your vision and preferences), decorate its top with a gold star - the main attribute of the New Year is ready with your own hands! And if you want to create something special, decorate the Christmas tree with rhinestones, snowflakes, and placing a transparent ribbon on the top. The base of the craft is decorated with a braid of beads - it will be very beautiful! Place such decorations around your apartment, decorate a table, mantelpiece or dressing table with them and you will immediately feel that the New Year is just around the corner. 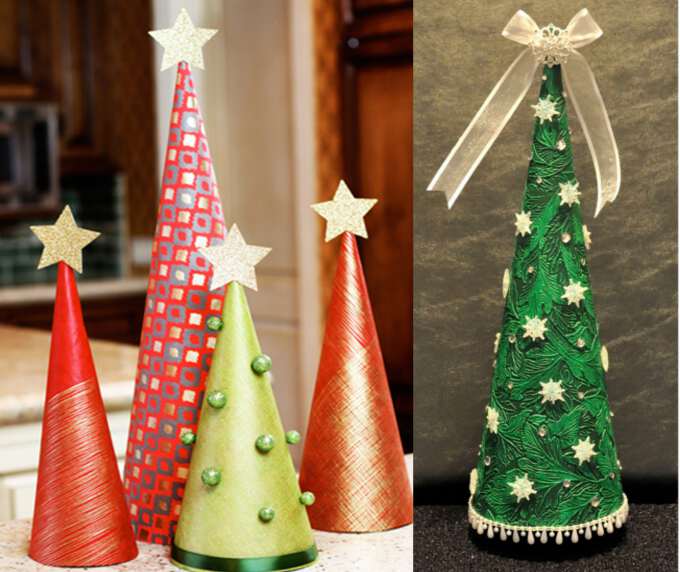
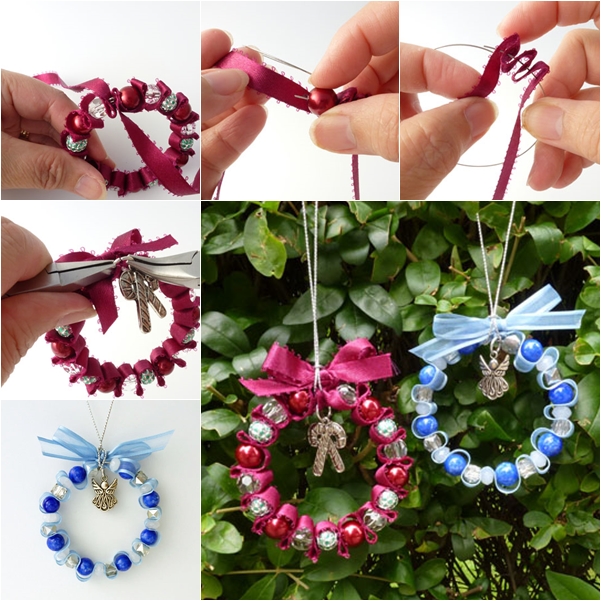
Idea nine. Charming wreaths
A very delicate and interesting Christmas wreath will be a wonderful element of New Year's decor. Making such decorations is quite easy; you need a minimum of materials and time. Prepare thin wire, satin ribbons of the desired color and matching beads, strong thread for hanging and get to work, based on the following master class:
- form a ring from the wire and start stringing a ribbon on it,
- alternate one fold of ribbon with a bead until the end of the wire,
- when the wreath is ready, hang a decorative figurine on top and tie a bow,
- secure the thread on which you will hang the wreath.
And finally. The owner of the coming year, the Fire Rooster, has great respect for handmade (English: hand made - made by hand), so what prevents us from conquering the proud bird with our creative abilities? Using the photos presented in the review with original ideas for New Year's crafts, you will succeed in this, surprising not only the eastern ruler of the year, but also all your loved ones with your own New Year's crafts for 2017.
A wonderful holiday is approaching again - New Year! A time of joy for children and adults, the fulfillment of dreams and desires. After all, it’s true that on this day people radiate some kind of special enchanting energy, and the spirit of magic blows everywhere around.
The symbol of the coming year 2017 will be the Fire or Red Rooster. The characteristics of this sign are cockiness and show off, but honesty, pride, and justice are also its characteristics.
On the eve of the New Year, time drags on for a sadly long time, so creating crafts for the Year of the Rooster with your own hands, but better with children, will be a wonderful entertainment here. This is a very good reason to distract the little naughty girls and a reason to spend time together. In addition, the eve of such a holiday implies many festive events in kindergartens and schools, when mothers are busy creating New Year's costumes and crafts.
This activity is useful for toddlers to do with their own hands, as it develops fine motor skills of the hands. With the smallest children, you can try to make easy crafts for the New Year 2017 using various cereals or plasticine of various colors. Plain and corrugated paper, pencils, felt-tip pens and safe paints are also perfect for this task.
Older kids won't be bored either. When creating crafts with them, you can use various techniques that are more complex and interesting. Materials such as felt, plasticine, wooden parts, cardboard and plastic boxes of various sizes, old puzzles, cotton wool and puff pastry and many other materials that are subject to flight of fancy are applicable here.
As for the types of crafts, there are plenty of them: voluminous and flat snowflakes, Christmas trees, snowmen and various animals, garlands and confiture, lanterns and Christmas tree decorations.
But we should not forget that the main decoration of the holiday on New Year's Eve 2017 is the Rooster. It also needs to be done with your own hands.
DIY crafts for the New Year 2017 for kindergarten.
From a very young age, children are taught to do things with their own hands. And you can’t do without crafts for the New Year 2017 in kindergarten. These, of course, are mostly simple products made from paper, foil and plasticine.
- Simple applications.
The easiest, but favorite activity for children. On a regular (colored) sheet of paper you can create very interesting pictures, create a house, a Christmas tree, a snowman and much more from colored paper parts and glue.
Photos of several ideas:

New Year 2017 card


Video: Applications for the New Year in kindergarten.
Video, Master class:

You will need: salt or sugar, semolina, small twigs, red cloth, plasticine, a wooden stick.
We make three plasticine balls of different sizes. Pour sugar (salt) and semolina onto a piece of paper, and roll the balls in this mixture until they become completely white. We form a snowman - put the balls on a stick in order, the largest should be at the bottom. We decorate: a bandage around the neck, twigs - these are hands, eyes, a nose and a nose can be made with buttons or plasticine.
Video: Snowman made of plasticine.
Video, Master class:

How could it be without the symbol of the year!
You will need: water, salt, PVA glue, flour, paints.
Making the dough: you need to mix 400 grams of flour and a glass of salt, add water (250 ml), add 40 grams of PVA. Now we use our imagination and sculpt the body, wings, beak, comb and head of the cockerel. We connect all the parts of the product and put it in the oven for one hour. When the craft has cooled, it needs to be decorated with paints, preferably acrylic, and dried well.
Video: DIY dough rooster.
Video: DIY symbol of the year:

You will need: cotton wool, glue, water, starch
First you need to cook a paste from water and starch: dissolve 1 spoon of starch in a small amount of liquid, put it on the fire and add a glass of boiling water, cook until thick, stirring. Throw cotton wool into the paste, set everything aside for a day until the cotton wool dries. Next, we twist the balls and make a snowman, combining the balls with glue. When it dries, we decorate and paint it.
Video: DIY cotton wool snowman.
Video, Master class:

You will need: pieces of fleece, beads and beads, scissors, various ribbons, a needle and strong thread, a pencil.
We make paper blanks - a large circle, a flower, a small circle for the middle, a leaf. Using these templates, we cut out the parts from the fabric twice, since the toy will be double-sided. We decorate the flower by drawing veins on it or embroidering them. Next you need to connect it with the leaves with thread. We sew a flower and a leaf to the base ball, attach the middle, and attach a bead or other decoration to the middle. The first part of the craft is ready. We do the second one in the same way as the first. Now we sew both parts together, connecting them to each other, and attach a ribbon loop on top - and the original toy is ready!
Video.
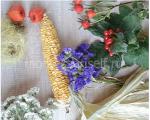
- Postcard-rooster made from cereals.
You will need: buckwheat, rice, semolina, cardboard, paints, brushes, glue, tweezers
The very first thing to do is find a rooster template and print it. Next, draw this template on a cardboard base of any color. Now you need to take a brush and wet it with thick glue, and then carefully apply it to the contours of the drawing. We place buckwheat on the glue with a stick or tweezers, although you can simply cover the lines with it and shake off the excess. Then we proceed according to the previous scheme. In this way you can make pea eyes, a beard from wheat, a crest, beak and tail from dyed rice, a body and legs from semolina. There is always room for experimentation here! Next, the painting needs to be allowed to dry thoroughly.
Video.
- Simple DIY snowflakes.

You will need: paper (white or colored) and scissors.
Take a simple square leaf and fold it exactly diagonally. Next, fold the triangle in half, and then in half again. We cut off the resulting figure at the bottom as you like: you can straightly, or along some beautiful contour. We draw patterns on the triangle that we will use to cut, and we do it. We take out the unnecessary parts of the paper and unfold the snowflake! Moreover, the patterns can be very diverse, there are no restrictions here.
Video: DIY snowflakes for New Year 2017.
Video: How to make beautiful snowflakes for the New Year 2017.
DIY crafts for the New Year 2017 for school.
Since older children go to school, they can be asked to make crafts for the New Year 2017 that are more labor-intensive.
- Rooster made from napkins or corrugated paper.

Photo: Beautiful DIY craft for New Year 2017
The craft turns out very bright and voluminous.
You will need: a piece of thick paper, napkins (corrugated paper), glue in the form of a pencil, scissors, matches.
First, select a template design and print it on thick paper. Then we cut the napkins into small pieces, about a centimeter by centimeter, and decorate the product. We twist each square around the match in the direction of the arrow, and then we smear its base with a piece of paper with glue and attach it to the picture in a given place until we fill the entire part. We do the same with the following colors. It is better to look at such a craft from afar, since up close all the corrugated parts merge.

Photo: Do-it-yourself string Christmas tree for New Year 2017
You will need: several skeins of thread, tape (foil), glue, thick paper, decor.
The first step is to roll a cone out of a sheet of paper. Next we cover it with tape or foil. We take the threads, dip them in glue and thickly envelop the made cone with them. Then you need to dry the product well on a flat surface. When everything is well dry, remove the paper cone, separating it from the foil or tape, and begin to decorate the Christmas tree to your liking: with balls, rhinestones, sequins, sparkles and ribbons.
Video. DIY thread Christmas tree.
Video, Master class:

You will need: a stapler (glue), a lot of colored paper, scissors.
At the very beginning, we cut out many thin strips of multi-colored paper of the same size. Then we fasten the first strip so that a circle appears. We thread the next one through it and also connect it into a ring. In this way, a chain (garland) of links is obtained.
Video. DIY paper garland.
- Wooden decoupage.
You will need: a flat piece of wood, varnish, paint, a napkin with a picture, a sponge, brushes, glue, scissors.
To start work, you need to sand the piece of wood so that its surface is almost smooth. Then we paint the tree with white paint using a sponge. While all this is drying, we choose the design that we will apply. Then we cut out the necessary parts of the picture from the selected napkin, and glue them onto a wooden base: first we lay glue, then the napkin part, and glue again on top. When the pasted drawings dry, you will have the feeling of a painted picture. But it lacks a background, which we create around it using paints. At the very end, everything needs to be coated with a safe varnish, preferably in a couple of layers. Such products are also decorated with glitter, cotton wool and beads.
- Felt Christmas tree - DIY postcard.

Felt Christmas tree - DIY postcard
You will need: pieces of felt, plain and patterned cardboard, buttons, scissors, braid and glue.
First, you need to bend ordinary cardboard in half widthwise, and from the cardboard with the picture, cut out a rectangle smaller than the base of the product and glue it to the front side of the gift. Next, you need to cut strips of ribbon as long as the sides of the postcard, and glue them onto the patterned cardboard on the sides using PVA. Now we make a template from paper in the shape of a pear, and with its help we cut out blanks of Christmas tree branches from the felt (20 pieces). Now you need to form a Christmas tree. We start from the bottom, take about 8 blanks and lay them out in a fan. When you like the position of the lower tier, glue it to the cardboard. Next, we take 5 more blanks and also make a second layer of branches. And so on, just so that the next layer is smaller than the previous one. The herringbone must be completed by the last three pieces. In our case, the top of the tree will be a button. To imitate Christmas tree decorations, we use sequins or beads. The original postcard is ready!
Video.
Master Class:
- DIY vintage style star.
You will need: a glue gun, a brush, a pencil, scissors, corrugated cardboard, lace, paint, bag fabric, buttons, twigs.
We make star templates of different sizes, and with their help we cut out three blanks from cardboard. We also cut out a deer from regular paper. Next, you need to connect the stars with glue, and lay fabric stars between them. Then we tie the resulting product with a cord many times so that it also looks like a star. For a highlight, you need to paint the craft as if it were in the snow. To do this, use a brush with white paint to slightly touch the star at different ends. Next, we attach other decor with a gun: branches, buttons, deer. All that remains is to finish the gift with a fabric bow and attach a loop from the rope - the toy is ready!
Crafts for the New Year 2017 from paper.
It may seem at first glance that gifts made from paper are the easiest to make. Yes, this is partly true. Both the youngest member of the family and an older child can easily make crafts from paper for the New Year 2017. Therefore, it is simply necessary to consider the most interesting of them.

Beautiful application for the New Year 2017 with your own hands
You will need: colored paper, scissors, colored pencils, PVA glue, a template made.
To get started, you need to make a template for the base of the Christmas tree - print on white A4 paper a large triangle and an asterisk for the top. Next, cut out the triangle and glue it onto a colored background. Now we prepare needles for our tree. We take green pieces of paper, place our palms on them, trace them with a pencil and carefully cut them out with scissors. How many there are - we look at the prepared template and the size of the cut out palms. Next we glue our needles. We start from the bottom, and we need to make sure that the fingers remain not glued. You can glue the needles in two layers, the main thing is that the white base is not visible. Now we cut out a star of the color you like according to the template and glue it to the very top of the tree. You can decorate the product with colored balls and garlands, also cut out of colored paper.
Video: DIY Christmas tree applique.
- DIY lantern toy for New Year 2017 made from paper.
You will need: colored cardboard, scissors, a stapler, beads or rhinestones, a needle and a thick thread.
We divide a piece of cardboard with a pencil into four equal segments and a segment measuring one centimeter. We make folds along the lines and fasten everything with a stapler. Take another sheet of cardboard of the same color and wrap a thick thread around it. Next, we connect one side of the cardboard with a thread with a stapler, and cut the thread on the other side. We cut off the unnecessary part of the paper, leaving approximately two centimeters with threads. Now you need to fasten this blank to the first piece and make a loop on top. You can decorate it with beads and rhinestones. That's it, the toy is ready!
Video. Beautiful craft for the New Year 2017.
- DIY snowflake tunnel.
You will need: white and blue leaves, a stationery knife or quilling scissors, regular scissors, a pencil, and tape.
To work, you need to print out snowflake templates from paper, different in size, identical in shape. Next, we apply the templates and cut out snowflakes from paper (white and blue) only in the center. We remove everything unnecessary. Now, using double-sided tape or glue, you need to fold the tunnel in order, starting with the smallest part. From the largest template we cut out the main beautiful snowflake, which is attached to the larger base of the tunnel. Next, we make a frame out of paper and attach the tunnel there. For brightness, you can add sparkles or beads.

What a great idea to make a craft rooster, the symbol of 2017, with your own hands! By pleasing the Fire Rooster, you will receive his protection for a whole year. DIY gifts in the shape of a rooster, especially if they are made from the heart, will delight anyone, and they can also be an excellent New Year’s decoration in your home.
You have a chance to distinguish yourself with your imagination and creativity. Please note that the rooster has a homely character, does not tolerate disorder, but requires comfort and everything natural, natural, but he will not leave room for boredom and mediocrity. You don't need any special preparation, you can even involve your children in this to have fun together and develop their creativity and train fine motor skills. For crafts, you need to prepare a minimum of materials, and at the end you will get the maximum benefit in the form of a sea of positive emotions. Being a creator is not at all difficult, but it’s terribly fun and cool!
Take a look at the wide variety of ideas, let them inspire you, and maybe, thanks to them, you will come up with your own unique one. Just try it!
Happy chicken coop
A pillow with the image of a rooster or hens is a very beautiful and also practical accessory for the home in 2017. It will decorate any room and will add softness and comfort if you put it on yourself. How to do it?

From a sheet of paper or cardboard, draw and cut out a stencil, separately each part of the cockerel: wings, crest, beak, eyes, etc. Applying the patterns to multi-colored pieces of fabric, cut out all parts of the applique and sew them to the pillowcase. It is better to choose a plain light fabric for the base. A do-it-yourself rooster on a pillow can be made with various patterns: flowers, herbs or polka dots; use your imagination to vividly depict a poultry yard.
Let's fly!
Do-it-yourself voluminous toys in the form of chickens and a rooster, attached on strings to the top, are an interesting option instead of a stationary panel. You can change their locations, decorating one room or another, because such a craft will delight people of all ages. Each toy has its own special charm, it gives the warmth of the master’s hands and instills a festive atmosphere for the new year 2017.

Mother hens
Using a two-part pattern, we cut out and sew together the future chicken. We attach the remaining parts: eyes, beak, wings, etc. To suit your taste, you can add decorations to the hens from beads and rhinestones, bright flowers or feathers. You need to make legs for the chickens using thicker threads; buttons sewn together will serve as paws.
Naughty cockerels

We sew an egg-shaped blank for the toy and attach the remaining parts of the rooster to it: wings, comb, eyes, etc. Glue straws at the bottom so that the shape resembles a nest, and the rope on which we hang the cockerel can be decorated with beads. Attach the finished cockerels to a branch, which can be decorated with artificial leaves made of paper or scraps of fabric.
Cockerel with a heart
We sew a stuffed blank for a toy from two heart-shaped pieces. You can choose warm felt as a fabric. Sew the remaining parts of the rooster along the edges: beak, bushy tail, comb, beak, etc. In the middle, attach a ribbon or rope on which the toy will hang.
This master class has a lot of execution options, there is no limit to the imagination and courage of the author, the number and size of roosters with your own hands is not limited.
Anti-stress cockerels
 Such toys can be placed on a shelf or on any horizontal plane. A funny performance will cheer everyone up in 2017 and will remind you of fairy tales and the holidays. The fabric should be bright, plain, or with polka dots, stripes, and checkered patterns. Sew the stuffed blank in the form of a square bag, along the edges there will be a beak, tail and other parts of the cockerel. We sew the toy from the bottom to form a pyramid. To give an even funnier look, you can make a cockerel from a red paw thread. To such mischievous cockerels you can add a whole brood of birds with hens and even chicks. The toy holds its shape very well and will not leave anyone indifferent.
Golden comb
To create such a symbol of 2017 - a rooster, you will need fabric and cotton wool. From the patterns, sew the body, wings and comb, stuff them with cotton wool. Sew them together and attach the remaining details: eyes, beak, beard. You can attach a stylistic bow made of straw to your neck, it will look very authentic! Choose the material for the craft to your taste, for example, bright plain felt is good for the beak and comb with a beard; for the body and wings you can look for something contrasting. The rooster will definitely be pleased with your work!

Fashionista Pugovkin
A DIY rooster made from buttons is a perfectly simple and at the same time creative idea! After all, everything is brilliantly simple! You will definitely find old unnecessary buttons of all colors and sizes in your home. It’s a pity to throw away such buttons, and at the same time they were lying around unnecessarily, but nothing happens by chance, and now, finally, the buttons will find their purpose in the form of a wonderful craft for the new 2017 Year of the Fire Rooster!
Collect the New Year's rooster on a cloth or sheet of paper or cardboard. Decoration made from rhinestones will look good; it is better to choose buttons of different sizes and shapes. This will give the finished product a special flair. At the first stage, draw the base of the rooster so that the buttons do not go beyond its borders. The finished application can be placed in a frame in the most visible place in the house.

This is a DIY rooster master class for anyone who wants to diversify their leisure time and please their loved ones with unusual things. You will certainly please the arrogant and arrogant cockerel, and he, in turn, patronized you throughout 2017. But the main thing is that you get real pleasure from the creative process itself and the surprise of your loved ones.
If you liked our site or found the information on this page useful, share it with your friends and acquaintances - click one of the social network buttons at the bottom of the page or at the top, because among the heaps of unnecessary garbage on the Internet it is quite difficult to find really interesting materials.
According to the Chinese calendar, each year is endowed with its own patron - one of 12 animals. There are beliefs that in each coming year a specific eastern sign influences people's lives. That is why, on the eve of the New Year, it is advisable to learn all the subtleties and features of the patron of the coming year in order to properly meet and achieve his favor.
Having learned the preferences of the patron, you can try to appease him in order to achieve his favor and have success in all your endeavors throughout the 12 months. On January 28, 2017, the Red Monkey will pass the baton to its tenth comrade, the Fire Rooster.
The Fire Rooster is the embodiment of thriftiness, self-sufficiency and extravagance. With the exception of the animal, you also need to become familiar with its preferences.
It is not difficult to guess that the Fire Rooster brings with it fiery and bright colors: orange, red. Sages have long been of the opinion that fire symbolizes a continuous upward striving and has a powerful living energy that has purposefulness and self-improvement.
Red colors have always symbolized love and passion. So we can conclude that 2017 will be full of romantic adventures and adventures.
For established couples, the year promises turning points: marriage, revival of former passion, etc.
According to the eastern calendar, the Rooster appears as a sophisticated, witty and insightful animal. In all his endeavors, he strives for perfection and tries to bring everything he starts to an ideal end. In addition, he simply cannot ignore attention and loves compliments in his direction.
When celebrating the New Year 2017, its symbol should be present in every home, so in this article we will look at how you can make a rooster with your own hands. Such cute souvenirs can also be used as a gift, because they are always priceless.
There are always a few balloons at home. If from the yellow ball of yarn there is a thread about 1.5 m long left, and somewhere in the bins there are scraps of cotton fabric lying around, we will take out the listed wealth, PVA glue, a piece of cardboard and scissors. Let's make a colorful Christmas tree toy - a rooster.

In order to make a rooster with your own hands, you need to prepare:
- a ball of yellow yarn
- balloon
- scissors
- red fabric
- ready-made eyes for toys
- PVA glue, or better yet superglue.

First, let's inflate the balloon to the size we need. This makes it easier to decide what size to make the paws, beak and comb of the cockerel.
From red fabric we cut out a triangle - a beak, two legs and a trapezoid. The last geometric figure will soon turn into a real comb. We will not decorate the earrings; too many red details spoil the appearance of the toy.

Fold the trapezoid in half and round the fold line in two places. After this, shorten the base of the ridge slightly.


Lubricate the balloon generously and quickly with PVA glue. We take the ball in our hands and wind the thread around the ball in any order. The number of turns is not limited, only the second row will have to be additionally lubricated with glue.
On the last turn, we decided to leave a loop, with which we will hang the cockerel on the tree.


All that remains is to glue the parts cut out of red cotton onto the yellow base. I must say, the work is not easy. PVA takes a long time to dry. It is better, if possible, to use Moment glue or any other superglue.


While part of the Christmas tree decoration is drying, let's work on the wings of the cockerel. We will cut out a blank from cardboard that is similar in appearance to the crown shown in the picture.

We wind a thread of yarn between the teeth of the cardboard in several layers, after which we fix the bottom of the wing by stretching the thread between the rows. We remove the finished wing from the machine. Let's repeat the procedure again.


We glue the wings to the toy using PVA. We are waiting for the result - for the glue to dry completely for at least an hour. Well, all that remains is to attach the ready-made eyes purchased at the craft store.

We can't wait to put the cockerel on the Christmas tree and admire the toy we made with our own hands.

Everything is fine, but an orange ball with yellow yarn looks more harmonious. We recommend using fleece instead of cotton.


How to make a rooster from plasticine - master class with photos
Now let's look at how to make such a colorful rooster from plasticine.

For this we will need plasticine of a variety of bright colors and stacks.

Take half a yellow block.

And give it the shape of an egg.


We sculpt a red beak.

Attach the comb as shown in the photo.


Then - the eyes and beak.

We make blanks for wings from green plasticine.

And three blanks for the tail of different colors.