Step-by-step instructions for cutting out New Year's snowflakes. Step-by-step instructions for making a simple three-dimensional snowflake
I'll explain everything in order. I really wanted to decorate my house exclusively, unlike everyone else, for the New Year! And I decided to cut snowflakes out of paper with my own hands, to make a real snowfall of light and fluffy beauties! I’ve been doing this for a long time, and naturally I forgot the basics. I ruined more than one piece of paper. But the excitement grew with literally every copy! The fluff became more and more beautiful and delicate. It's so exciting that it's hard to put into words!
Join us! It doesn't matter if you forgot how to do it. Let's relearn the science of how to make a snowflake out of paper. Do you agree? Then let's involve household members in the creative process and organize a family contract to make holiday decorations.
How to cut a beautiful snowflake from paper with four rays with your own hands?

While you are preparing your workplace, I will explain why I remembered snowflakes. It's simple: it's almost impossible to cut two identical ones. Therefore, the decoration will be original. Thanks to our imagination, the New Year's decoration of the house will become truly unique and original.
You just have to imagine what a festive mood a beautiful and carved snowflake will give, and your hands will reach for paper and scissors. Introduced? Then it's time to start.
What do you think is the main secret of cutting snowflakes out of paper with your own hands? Absolutely correct in folding the paper correctly. In addition, the number of rays of the New Year's decoration depends on this. Let's start with the simplest option - with a beauty with four rays.
Let's prepare some simple accessories for the job:

- Paper. I had an ordinary writing paper, A 4 format. You can prepare any other one, even colored. If only the leaves weren't too dense.
- Simple pencil
- Scissors. You can even use thin nail polishes. And then see for yourself, as long as it’s convenient for you to cut.
A couple of tips from personal experience
- The crystal may not work out the first time; it requires some practice. So practice on rough drafts first so as not to spoil the paper.
- At the beginning of work, I advise you to apply the pattern with a pencil. You will be able to do without this assistant a little later, when you get better at it.
- If you use a pencil, prepare an eraser right away. It will be needed when the drawing needs to be corrected.
Step by step process

How beautiful she turned out! We have something to be proud of. We can draw the first conclusions. Having cut out one or two, you will understand that the more ornate patterns you cut out, the more delicate the work of hand-made art will be.

Fluffs with 4 rays will look great if you glue beads or glitter on them. They are glued to a snowflake pre-lubricated with glue.
It’s not a sin to decorate a New Year’s costume and even a hairstyle with such a masterpiece, using a beaded snowflake in the form of a crown.
Openwork paper snowflake with eight rays

Let's start work

Our snowflake came out light and tender. A real piece of soft and fluffy snow. Well, isn't it?
How to make a paper snowflake with five rays

Have you noticed that we are gradually making the task more difficult? Are we moving from simple to more complex? And now we will remember how to make paper snowflakes with five rays. We should have a paper square at hand.

Now you can admire the fruits of your labor. Well done!
DIY paper snowflake with six rays

Snow crystals with 6 rays also turn out to be unusually beautiful. Now we will start cutting them out.

The winter beauty is already making us happy and making us admire ourselves. What a fascinating event we have started with you! And one more point is worth noting. Have you noticed that with every piece of fluff you cut out, your skill increases? Exactly. This is called experience. It's only the beginning!
Terry paper snowflake

Terry snowflakes are light and fluffy. Making them is not difficult at all. Moreover, we already have the skills. They are made more interesting using the technique of cutting out snowflakes with 8 rays.
Let's start the process

This is such a complete miracle that we have achieved. Such fluffs will look gorgeous on snowflakes - paper ballerinas. Let's make this decoration for the New Year.
Snowflake - DIY paper ballerina

Friends, imagine how a miniature ballerina in a snow-white snowflake skirt will twirl in the New Year's decorations at home. How lovely! Let's bring joy to ourselves and our loved ones. And no matter what you surf the Internet, I offer the sophisticated ballerinas I liked.
Preparing the necessary materials
- The cardboard is white. You will need to cut out a dancer figurine from it
- Templates of soaring ballerinas
- White paper for snowflakes
- Scissors, a simple pencil
- Line or thread
- Tape or button.
Let's get started with some fun creativity

Snowflakes - ballerinas will begin their charming dance at the slightest movement of air, and will receive applause from family members and guests. Bravo to the dancers! Bravo to the craftsmen and handicraftsmen who created such splendor!
Fluffy paper snowflake

Looking at the white and fluffy snowball, you, like me, will want to cut out the same snowflake – tender and airy. What's stopping us? Now we will learn how to cut fluffy snowflakes from paper with our own hands.
Step by step process

Listen, you can’t take your eyes off the fluffy crystal! And although we still need to grow and grow to perfection, it still turned out beautiful and unusual! They can be made from multi-colored paper. The decorations will be very impressive.
So we cut paper snowflakes with you. Agree that it turned out very well. And how the mood has lifted! I just want to show off my work. Let's share our joy with our classmates on social networks. I am sure that they will also be carried away by the New Year's idea. To make it easier for them to navigate, we advise them to subscribe to this wonderful blog. Then they will be aware of all the most interesting things. On trend, as it is fashionable to say now.
Until then, goodbye and thanks for the company! We'll meet Again. After all, our hands are not for boredom, and we will certainly come up with some other exciting and useful activity. See you at your desk!
Everyone wants to create an atmosphere of joy and magic in their home before the New Year. The New Year tree and garlands have become integral attributes of the holiday, as well as snowflakes cut out of paper with your own hands. It’s not only beautiful, but also interesting; you can involve not only children, but also adults in this activity, so that everyone can contribute to creating the New Year’s mood.
There is nothing difficult about cutting out a snowflake from paper with your own hands; even small children can learn how to do it.
Tools and materials for beautiful paper snowflakes can be found in every home.
We will need:
- Paper.
- Scissors.
- Round plate.
- Colored paper (optional).
- Pencils (plain and colored).
Cutting snowflakes
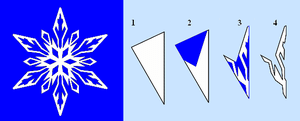
There are several simple step-by-step ways to cut out a Christmas decoration from paper. Let's consider first The easiest way.
You need to take a sheet of white or colored paper, put a round plate on top of it and trace it with a simple pencil. Carefully cut out a circle along the contour. Then the resulting circle needs to be folded in half, then in half again. There is a preparation. Now it’s the turn of the scissors. You need to cut off all unnecessary parts from the finished template. You can first draw your intended design on paper or fantasize while you’re at it. Unwrap the finished snowflake and hang it wherever your heart desires or insert it into a beautiful frame.
Paper decorations you can cover the windows, but only without using glue! To easily remove snowflakes from windows after the holidays, you can prepare soapy water. To do this, rub a little toilet or laundry soap into warm water and dissolve. We quickly lower the snowflake into this solution and glue it to the glass. After drying, the decoration will remain securely on the window.
Gallery: paper snowflakes (25 photos)


Hexagonal and octagonal paper snowflakes
To create snowflakes in this way you only need scissors, paper and, if necessary, simple pencil.
Cut out the decoration step by step:

Thus, we got it octagonal snowflake.
To get in the end hexagonal snowflake you also need to prepare a square. We form a triangle out of it and turn its base towards us. We make marks on paper with a pencil: we need to mark 3 equal acute angles at the base of the triangle. After marking, fold the paper along the resulting lines towards the center. We also cut out patterns from the resulting base. After we unfold the paper, we get a regular hexagon.
For creating simple, bulky paper decorations You can use templates from the Internet. Nowadays, amateurs conduct a huge number of master classes on creating home decorations with their own hands, and learning how to do this quickly and easily is not difficult.
Paper snowflakes: photo


Cut out voluminous snowflakes from paper
If you are already bored with cutting out flat products every year and want something new and interesting, then you can start creating volumetric snowflakes. Cutting them is just as easy as bulk ones. Let's figure out how to do this step by step.
For this you will need: paper, glue, scissors, pencil and stapler.
 You need to take A4 sheets and make square-shaped blanks, as shown in the previous examples. We need 6 such blanks for one product. We fold each resulting square diagonally to form a triangle. We turn the triangle with the base towards us and make 3 cuts on it with scissors towards the center symmetrically on both sides. You need to cut carefully so as not to cut through the middle, leaving about a couple of centimeters in the middle.
 We unfold the resulting workpiece so that it lies with its edge facing us, turned horizontally. We fold two corners in the middle into a tube, connecting them. Turn over the paper. Take the next two corners and connect them in the same way. They need to be secured with glue. We do the same with all the corners to the edge.
Having prepared 6 identical parts, we connect them. You need to connect them one by one with a stapler on one side so that you end up with a regular circle. Our snowflake is ready.
You can attach a loop or thread to one corner of it and hang it in the room.
Snowflake made of stripes

To make such a snowflake you need to prepare identical paper strips in advance approximately 10 to 20 cm long and 0.5 to 1 cm wide. We will also need glue for paper and cardboard And sharp scissors.
We stack the strips of paper on top of each other crosswise (3 vertically and 3 horizontally), as if weaving them together. Then we glue the outer strips (vertical and horizontal). We get half of the finished product. We do the same with the remaining six strips and glue the finished halves together so that they cross each other, forming a regular octagon.
Hello dear blog readers Life Hand Made! If you haven't written yet, then hurry up! Good grandfather has a lot to do before the New Year! How are you in the holiday mood? Have you already decorated the windows? Have you prepared any gifts? Now I want to try decorating the room with a garland of snowflakes. To do this, I will tell you how to make paper snowflakes with your own hands.
There is a lot of trouble before the New Year, but it’s so nice!
Is not it?
Cutting out snowflakes is one of the directions of the ancient Chinese art of cutting out patterns from paper in general.
This skill became widespread after the 13th century, when paper became available not only to rich people.
And after the 17th century, the art of carving came to Europe.
Paper patterns were created in different shapes and subjects.
Stars or snowflakes, images of animals and plants were cut out.
Such cuttings were used to decorate windows, walls, and furniture.
Various new peoples introduced the specifics of their traditions into this art.
It is quite possible that the tradition of cutting out snowflakes from paper appeared in our country.
Russia is a northern country.
Our winters are snowy and long, so the beauty of frosty patterns could not help but be reflected in the creativity of folk craftsmen.
What are the options for paper snowflakes?
A lot of varieties have already been invented.
Now snowflakes are made not only from paper, but also from cardboard, corrugated paper, flat, voluminous, they are decorated with beads - whatever they can think of!
Various techniques are used to make them: origami, kusudama.
Let's take a closer look at all this diversity!
What you need to cut snowflakes from paper
First, let's choose paper.
The thinner it is, the easier it will be to cut complex patterns out of it.
It is better to take small scissors with sharp tips.
Snowflakes made from strips of paper

If you are not going to make snowflakes in splendid isolation, but want to involve the kids in this process.
Then you need to choose simpler snowflakes.
For example, from strips of paper, so that it is not difficult for children and they do not lose interest in the process.

Prepare in advance for the children cut strips of paper of different lengths and show them how to glue them together.
How to cut snowflakes from paper with your own hands step by step
Start with a simple snowflake. Detailed diagrams will help you on how to fold a piece of paper.

How to cut correctly


And when you get the hang of it, you can cut out such an openwork miracle

Do-it-yourself volumetric paper snowflakes
There are snowflakes and they are so original.

Let us consider step by step the process of making such snowflakes:

Here we have such a plump, beautiful snowflake!
Snowflakes made of corrugated paper
You can make fluffy, unusual snowflakes from corrugated paper.
You will also need cardboard and glue.

The result is such a beauty! Is not it?

DIY origami snowflakes
This is the most amazing option for making snowflakes.

Honestly, these snowflakes are more like the sun.
But in the pre-New Year bustle, no one will find fault.
On the contrary, everyone will be wondering when did you manage to master the origami technique?
Tools and materials needed: paper, scissors, pencil and ruler.
And note, no glue!
Step-by-step instruction:

You may not get the perfect snowflake the first time. But after several training sessions, moral satisfaction awaits you from the beauty you created with your own hands!
DIY paper kusudama snowmen
Kusudama is a Japanese technique for making ball-shaped paper decorations.

First, draw a triangular cone blank. You need to cut out 20 of these blanks.

A pattern must be cut out on each piece.

Glue 2 sides of the cone.

Glue five cones together.

Glue the remaining cones.
These are the big snowflakes you get.

DIY snowflake garland
We have already learned how to make snowflakes.
All that remains is to make a lot of them and attach them to thin twine.

Usually snowflakes are made into vertical garlands and hung on the window.
How do you like this garland? Not made of paper, but very cute!

Snowflakes can be glued together, then the garland will turn out horizontal.
You can make a snowflake template and draw on it and cut out the rest of the same ones.

Another good option for decorating a room

DIY paper snowflakes: diagrams
Making snowflakes is, first of all, drawing ornate patterns.
First we draw, then we cut.


Or not very ornate ones. The main thing is that you like them.


Snowflakes-ballerinas.

Light and airy

Snowflake is a star. Simple but beautiful.

Snowflakes create a unique atmosphere of the approaching New Year.
But that’s not all you can do to please yourself and your loved ones in anticipation of the holiday.
With respect to you, Margarita Mamaeva
P.S. And in order not to miss the release of the next article, play it safe and subscribe to blog updates
What is it difficult to imagine the New Year without? That's right, without the corresponding decorative elements, the main ones of which are snowflakes. And our collection of paper snowflakes is constantly growing! Surely you have all already seen and know how to make such light ones:
Winter is the most creative time of the year! Yes, yes, don't be surprised. If you count how many cards, various crafts, decorations, gifts and snowflakes are made in the world (this is not counting the production of snow in the clouds), then this entire huge set will more than cover other pre-holiday preparations! And every year I want to do something new, original and pleasing to the eye. If you are looking for such an idea, then you are on the right track. Moreover, 2018 is coming to an end.
We propose to make new voluminous paper snowflakes - many step-by-step master classes, step by step, diagrams and various photos of ideas for the New Year 2019! If you have your own original ideas for snowflakes, send them to!
Snowflake made from openwork napkins
To begin with, we suggest making a convex round snowflake from openwork napkins according to the new 2018 master class. Very light and beautiful, suitable for children, see detailed instructions.

To create such a snowflake we prepared:
- openwork napkins (6 pieces are enough);
- scissors;
- glue;
- decorative rhinestone for the middle.

We will make the snowflake itself from peculiar little bags. To create them, we first need to bend the openwork napkin in half. After that, cut it with scissors along the fold line.

Then fold each half in half again and cut. As a result, we get 4 blanks from one napkin.

Now let's use glue and connect the edges of this workpiece so that we get a little bag.

In total, our snowflake will require 12 of these bags.
We take another napkin, it will serve as the basis for our snowflake. First glue 2 bags on it opposite each other.

Then we fix 2 more blanks in the other direction.

After this, evenly distribute the remaining bags and glue them onto an openwork napkin.

For the middle of the snowflake we will use other blanks. To create them, just cut a napkin in half.

After this, we immediately make small bags from the halves of openwork napkins.

In total we produce 4 such blanks.
We begin to glue them into the middle of the snowflake.

Fix all 4 bags evenly.

And we decorate the middle with decorative rhinestones. Our snowflake made from openwork napkins is ready.
"Snowflakes on the Snow"
The master class was prepared by Anya Valerievna Solodovnik.
Snowflakes made from paper can be beautiful additions to your Christmas tree or to decorate your room.
 To make it we will need:
- colored or white paper;
- ruler;
- pencil;
- glue stick;
- skewer for curling curls.
For a snowflake you need to make 6 rectangles with sides 7.5 x 14 cm.

We measure 2.5 cm on each side, as shown in the figure.

We bend along these strips. Glue the bent strips together.

We bend the resulting strip in half and glue it.
Draw and cut out the template as in the picture. Trace the rest of the details and cut them out.

Glue all the parts together.

We make blanks for curls. To do this, you need to make cuts into three parts, as shown in the figure.

Take a skewer or ampoule and make curls. This is what you should get:
Volumetric snowflake made of paper No. 1

To create this craft you will need to take:
- - 2 square sheets of blue paper;
- - scissors;
- - glue.

Our snowflake will consist of two identical parts, giving it volume on both sides. Let's start creating one of them. To do this, fold the square diagonally.

Then fold the resulting triangle twice more.

On one side of the workpiece, you can first draw lines along which the cuts will run. In this case, pay attention to which side the fold is located on (in our case, it is on the left side). It is at the point of the fold that you do not need to cut all the way through; this will be the center of the snowflake.

We take scissors and cut along the previously marked lines.

At the very bottom of the workpiece, you can make additional slots that will add delicacy to our snowflake.

We unfold the first blank.

The central strips of all 4 rays should be folded into the center and glued.

Using the same principle, we make the second blank for the snowflake.

Now all that remains is to glue them together, moving them slightly to the sides so that all the rays are evenly spaced.

As a decoration, you can glue a rhinestone to the center.

A new three-dimensional snowflake made of blue paper is ready.

Simple but effective 3D snowflake:
To create a New Year's atmosphere, you need not only to put up and decorate the Christmas tree, but also to create appropriate decor in the room. And the easiest way to do this is with the help of a variety of snowflakes. We offer a simple master class showing how to make a three-dimensional snowflake from plain white paper. Photo 1.

To work you will need to take:

Let's start by folding the accordion. To make it even, first fold a sheet of paper in half several times in the transverse direction. This is how we will outline the lines for the future accordion. Photo 3.

Now we fold the accordion along the marked lines. Photo 4.

We mark with a pencil the middle of the resulting accordion and, focusing on it, draw the places where we need to cut. In the photo they are indicated by shading. Photo 5.

Take scissors and cut it out. Photo 6.

From the second sheet we fold the same accordion, marking and cutting out elements on it as on the first accordion. Photo 7.

Now we take white threads and tie two accordions together in the middle, securing the end of the thread. Photo 8.

We straighten the two accordions in the form of a circle and see the places that require connection. Photo 9.

In these places, carefully glue the snowflake in its lower part. Our volumetric paper snowflake is ready. Photo 10.

Beautiful furry snowflake:
Creative paper snowflake No. 3
The feeling of the New Year holiday comes long before December 31st. And this happens largely due to the creation of a festive atmosphere. Using a variety of New Year's decorations, many of which can be made with your own hands, will help with this. In our master class it is proposed to do a simple snowflake from separate modules Green colour. Photo 1.

To work you will need to take:
- - 6 square sheets of green paper (we used size 8x8 cm);
- - scissors;
- - pencil;
- - glue.

Let's start making a snowflake with one of the modules. To do this, fold one sheet of paper in half transversely and draw lines with a pencil for subsequent cutting. In this case, the central element of each ray of the snowflake will be the Christmas tree, so it is its outline that needs to be drawn in the center. Photo 3.

Using scissors, carefully cut through all the lines, removing the excess that was completely painted over with a pencil at the previous stage. Photo 4.

We unfold our blank, this is what one of the modules of the future snowflake looks like at this stage. Photo 5.

But it still needs to be improved. To do this, take the central strip, bend it towards itself and fix it with glue. Now one of the modules is completely ready. Photo 6.

Using the same principle, we make 5 more elements. Photo 7.

Now let's start assembling our snowflake. To do this, use glue to connect 2 elements together with a slight overlap. Photo 8.

So we continue to glue all 6 modules. Photo 9.

Our snowflake is ready. To decorate its middle, you can add some decorative element; we used rhinestones. Photo 10.

Blue and white snowflake made of modules
Modular origami is available to everyone; using this technique you can create a variety of crafts, including New Year's ones. Snowflakes made from individual modules look especially interesting. We propose to make one of these snowflakes according to our master class.
 To create such a snowflake you will need:
- 6 blue square sheets of paper;
- 6 white sheets;
- a small circle of blue paper;
- PVA glue. Photo 2.
 First we will make modules from blue paper. To do this, take a square and fold it diagonally. Photo 3.
 We unfold the square and fold its sides in the direction of the central fold. Photo 4.
 Let's turn the module blank over to the other side. Photo 5.
 Let's fold the sides again. At this stage, the module is shaped like a diamond. Photo 6.
 Turn it over to the other side. Photo 7.
 The layers located on top need to be bent to the sides. Photo 8.
 Using the same principle, we make 5 more blue modules. Photo 9.
 Now let's start creating white modules, they will be located on the inside of our snowflake. To do this, fold the white square along two diagonals and unfold it. Photo 10.
 The corners of the square must be bent towards the center. Photo 11.
 Let's turn the module blank over to the other side. Photo 12.
 Let's make the folds of the sides of our workpiece. Photo 13.
 On the back of the module, unscrew the sides. Photo 14.
 Now let's bend them in the direction of the central vertical line. Photo 15.
 For our snowflake you need to fold 6 such white modules. Photo 16.
 Let's start assembling the snowflake. We take a circle and glue two blue modules onto it, placing them opposite. Photo 17.
 Glue the remaining 4 modules evenly in a circle. Photo 18.
 Between the fixed blue rays of the snowflakes we fix the white modules with glue. Our snowflake is almost ready. Photo 19.
 All that remains is to decorate its core if desired. Photo 20.

Volumetric snowflake made of modules:
Master classes were prepared by Marina.
Blue snowflake made of modules
Using the modular origami technique, you can make not only three-dimensional crafts, but also simpler figures. For example, in this master class we propose making a snowflake from separate modules.
 To create such a snowflake we took:
- blue paper;
- ruler;
- pencil;
- scissors.

How to make a snowflake using modular origami technique
Let us immediately note that we will make our snowflake without glue. It is based on 6 identical modules that are simply connected to each other. For the blanks of the future snowflake, we will prepare 6 rectangles measuring 12x6 cm. You can also take blanks of a different size, but it is important that their sides have a ratio of 2:1. Photo 3.

Now we will fold each rectangle in a certain way. First, we perform a longitudinal fold in half. Photo4

Then we fold the workpiece in half in the other direction. Photo 5.

Now let's straighten our rectangle and see that in the middle there is a fold line we just made. Photo 6.

Focusing on it, we bend the sides down at a right angle. Photo 7.

Now we need to completely expand our blue rectangle, and change the diagonal folds so that they are directed upwards. Photo 8.


We bend the lower part on the right side upward at an angle. Photo 10.

On the left side we make the same fold. Photo 11.

In place of these folds we make internal folds. Photo 12.

Now we bend the lower triangles on one side upward. Photo 13.

Turning the blue workpiece over to the other side, we also bend the lower corners up. Photo 14.

Now we bend these triangles again so that small triangles are formed. Photo 15.

On the other side we will do the same. Photo 16.


We fill these triangles from the top and bottom. Photo 18.

We straighten our blue blank and see that we have received the first ray of the future snowflake. Photo 19.

Using the same principle, we make 5 more elements from blue rectangles. Photo 20.

Now all that remains is to connect these rays with each other. We don’t need glue, but it will be enough to insert one part of the ray into a similar part of another ray. Photo 21.

We completely combine these triangular parts, as a result of which we have connected two elements. Photo 22.

After connecting 6 elements, our modular snowflake is ready. Photo 23.

All that remains is to decorate the middle with a blue rhinestone. Photo 24.

More snowflakes from modules:
Unusual openwork snowflake:
Openwork snowflake using false quilling technique
Our master class on creating an openwork snowflake using the false quilling technique will help you make a decoration from strips of paper with minimal time and materials.

For the creative process you need to prepare the following materials:
- a sheet of white (or double-sided blue, silver) A4 paper;
- simple pencil;
- ruler;
- eraser;
- glue;
- scissors.
How to make an openwork snowflake using the unusual “false quilling” technique
The snowflake will consist of three types of elements, to create which you will need strips 1 cm wide. Each type of element must consist of six parts, so we need to draw a sheet of 18 stripes. The first 6 stripes should take up the length of the entire sheet. Draw the next 6 stripes perpendicular to the first. Draw the third type of stripes under the long ones, starting from the perpendicular stripes.
 Cut strips of paper and fold them into three rows, depending on their length. In places where pencil lines are very visible, use an eraser.
 To make it more convenient to work with strips, wrap them around a pencil and remove. Unlike the “” technique, our task is somewhat simplified, since we will not be working with dense curls, but with their similarity.
 Take a strip from the “short” row. To wrap the strip into a ring, twist it around your finger, close the edges and glue it. Make the next turn a little weaker and glue it again at the base. Make a third turn in this manner. Cut off excess paper with scissors.
Do this with the remaining five short strips, making sure they are the same size.
 Make exactly the same ring curls with stripes from the middle row.
 Bend the longest strips in half.
 Wind each end tightly onto a pencil and carefully remove the ring - you will get these double curls.

 Press the smallest curl rings on both sides with your fingers, giving them an almond shape.
 Press the middle curl rings from the ends to the center to form a figure of a four-pointed star (diamond).
 Let's start collecting snowflakes. Connect the six almond-shaped parts together with glue. You will get something like a flower.
 Glue double curls between the “petals”.
 For convenience, glue double curls across one petal.
 Then glue on the remaining double curls.
 Glue the “stars” where the double curls meet.
 That's all, the voluminous openwork snowflake is ready!
Look how twisted it is, like lace!
Thanks to the three-dimensional elements, folding such a snowflake is easier than when creating a quilling figure. Even small children can cope with such creative work if they are shown everything and helped, if necessary. Older children will figure out the intricacies of the work on their own. You can also come up with other elements and make several snowflakes to decorate a festive tree or interior. The main thing is desire, and everything will work out for you!
Snowflake made of paper squares

What to prepare to create snowflakes from paper squares:
- squares 8*8 cm, cut from decorative double-sided colored paper (scrap paper);
- scissors;
- pencil;
- glue;
- rhinestones, sparkles, sequins.

How to fold unusual snowflakes from ordinary paper squares
To work, you need two squares of the same size. If you want to make small snowflakes, use small squares and vice versa.

Cut squares of the required size from decorative paper. It is best to use paper that has a pattern on one side and a base color on the other, then the snowflake will look original.
Fold the squares in half twice.

Straighten the squares, the main lines will appear on them.

Fold the edges to the center line, pressing the folds with your finger.

Do exactly the same on the other side. When you straighten the squares, you will see that markings of small squares have appeared on them.

Using scissors, cut along the center folds to the length of one square.

Fold the corners at each edge as shown in the picture.

Tape the corners so that the patterned side is on top.

Glue one part of the snowflake onto the other so that the rays do not overlap each other.

Decorate the resulting snowflake with self-adhesive rhinestones, or stick on glitter with glue.

A beautiful figured snowflake made of squares is ready!
So, with very little effort, we got an unusual snowflake. Such beauty was created from two squares, it’s hard to believe! You are convinced that children can handle this kind of work, which means you can make a lot of wonderful snowflakes and use them to decorate rooms, gifts for loved ones and relatives, a festive tree or a Christmas wreath. And if you connect several snowflakes, you can make a garland, pendants or a crown decoration for the holiday.
Volumetric snowflake made of foamiran
Our regular author Marina will show you how to make a shiny three-dimensional snowflake in her new master class.
Snowflakes can be made from various materials. In this master class we propose to make such a craft for the New Year 2019 from shiny foamiran. But you can also choose colored paper; the folding technology is the same.

To make such a snowflake we prepared:
- shiny (glitter) foamiran of blue and silver color;
- scissors;
- toothpick;
- sharp knife;
- ruler;
- glue gun

Step-by-step instruction
We decided that our snowflake would be two-color, so we use foamiran in two colors - blue and silver. If desired, such a craft can be made in one color. The snowflake will consist of individual elements - rectangles. First, we cut out 3 rectangles measuring 2.5x14 cm from blue foamiran.

Now you need to make certain cuts on each rectangle. But first, let's use a ruler and a toothpick. On the wrong side, set aside 1 cm along the edges and draw small vertical lines with a toothpick. After this, the central part needs to be divided into 5 equal strips, the width of each of them will be 5 mm.
On the eve of the New Year 2017, it is customary to decorate homes, offices, kindergartens and other institutions. Beautiful paper snowflakes are one of the traditional New Year's attributes, the creation of which requires a minimum of consumables, as well as a little patience and perseverance. Thus, many from their “Soviet” childhood still remember hand-cut snowflakes from plain paper (as a more elegant version, from thin tissue paper) - using nail scissors and a simple pencil. Today, you can make your own paper snowflakes using the techniques of conventional or modular origami, quilling, as well as three-dimensional 3D products. How to make a beautiful paper snowflake with your own hands step by step? Today we will study the best master classes with step-by-step photos and videos on cutting out New Year's snowflakes using different techniques. We offer interesting ideas, as well as ready-made original templates and patterns of paper snowflakes - you will find all this on our pages. Creating large and small New Year's snowflakes with your own hands using photo and video lessons is quite accessible for children in kindergarten or elementary school. So, let's start creating New Year's “miracles”!
Do-it-yourself voluminous openwork paper snowflake for the New Year - step-by-step master class with diagrams, photos, videos
As a rule, we devote the last days of the outgoing year to preparing our home for a series of New Year and Christmas holidays. How to beautifully decorate your home or workplace for the New Year? Light airy paper snowflakes made by yourself will be an excellent element of New Year's decor in any room. And most importantly, when making these wonderful winter “flowers” you can move away from the usual “flat” shapes and make a three-dimensional three-dimensional snowflake. We bring to your attention an interesting step-by-step master class with diagrams, photos and videos on making a voluminous openwork snowflake with your own hands from paper. For greater effect, you can use paper of two or three shades - it will turn out unusual and beautiful.
Materials and tools for making voluminous paper snowflakes with your own hands:
- squares of the same size made of white paper - 6 pcs.
- scissors
- pencil and ruler
- stapler
How to make a voluminous snowflake out of paper with your own hands - step-by-step master class instructions:
- To create our three-dimensional snowflake, you will need to first prepare a special stencil - in the form of an equilateral triangle, according to which we will make the details of the product. We draw six lines on this triangle (three vertical and three horizontal) at equal intervals. Vertical and horizontal lines should be placed at right angles to each other, but not intersect (the distance between the cuts is approximately 1 cm).
- Fold a sheet of colored paper in the shape of a square in half diagonally.
- We make three cuts along the lines of the stencil.
- The resulting square must be unfolded and the corners of the square located inside folded. We glue them together with glue or fasten them with a stapler.
- We turn the sheet over to the other side and also fasten the folded corners of the inner square.
- Now you need to turn the product over again and do the same manipulations. As a result, the smallest square will be inside the larger square.
- At the end, turn the craft over again and fasten the corners of the largest square. It turns out to be a blank for a future three-dimensional snowflake - it’s very easy to make them with your own hands, even children can handle this task.
- We make five more such blanks. Then we fasten 3 parts together - we get two halves of a snowflake.
- We connect the two halves into one whole and “snap” it properly with a stapler - the structural parts should adhere well to each other.
- For extra strength, we fasten all the elements of the snowflake with brackets at six points.
- That's it, we got an original three-dimensional snowflake made of paper, assembled from several individual parts. The craft can be used as a decoration for a Christmas tree or window.
Alternatively, you can take a pine or spruce branch, decorate it with snowflakes, shiny “rain” and tinsel - and the elegant New Year’s composition is ready.
A simple and beautiful DIY paper snowflake - cutting master class, diagrams, templates, photos
In kindergarten or school before the New Year, children make paper snowflakes to decorate windows - it’s festive and beautiful! We offer the easiest option for creating paper snowflakes with your own hands, as well as diagrams and photos. So, we invite you to master our master class on cutting out paper snowflakes with your own hands for the New Year.
List of materials and tools for cutting out snowflakes from paper yourself:
- paper - white office paper or multi-colored napkins
- manicure scissors
- simple pencil
A step-by-step description of making a paper snowflake with your own hands:

DIY Christmas snowflake made from paper strips for children - simple master class, photo
Cutting out New Year's snowflakes from paper with your own hands is an extremely exciting activity. Especially if it is possible to use many templates and diagrams that greatly simplify this process. We have prepared a simple master class with photos for children and adults on how to make a paper snowflake from strips with your own hands. Take advantage of our lessons and you will quickly master all the intricacies of this ancient art.
List of materials and tools for making snowflakes with your own hands from paper strips:
- A4 sheet of paper – 1 pc.
- scissors
- ruler
- simple pencil
- stapler
- PVA glue
How to make a New Year's snowflake from paper step by step with your own hands:
- We mark seven strips along the width of a sheet of paper, each 3 cm wide.
- Now you need to cut the paper along the lines of the strips.
- We place the resulting strips on top of each other and bend them exactly in the center - in half.
- At the bend we punch the strips with a stapler.
- You need to apply a little glue near the bracket and, folding part of the top strip in half, glue it.
- Now we bend the glued strip upward and again apply a drop of glue at the bend.
- Then we glue the next strip - similar to the top one.
- Now you need to smooth out the folded strip.
- In this way, we continue to glue the strips to the end - we get a blank of 14 parts of the future paper snowflake.
- We cut each strip of the workpiece into three equal parts (width 1 cm), not reaching the middle by 3 cm (the distance between the end point of the cut and the center of the workpiece). You can cut several strips at the same time - both more conveniently and quickly.
- The result is a cute base for a snowflake.
- We move the ends of the side strips slightly to the sides, bend them and press lightly.
- We repeat the same action and “process” all the other strips.
- That’s it, the beautiful New Year’s snowflake made from paper strips is ready – as you can see, it’s as easy as pie to do it yourself. For crafts, you can use paper of different colors, and then decorate a room or other room with such snowflakes.
DIY New Year's snowflakes made of paper using the "Modular origami" technique - detailed master class, photo, video
Making New Year's decorations with your own hands is one of children's favorite activities on New Year's Eve. And while many people have long mastered cutting out simple snowflakes from paper, they are just yet to become familiar with the “Modular Origami” technique. Indeed, in the origami style you can create amazing three-dimensional crafts - animal figurines, fairy tale and cartoon characters, Easter eggs and baskets. Today we will study a detailed master class with photos and videos on creating New Year's snowflakes from paper using the Modular Origami technique. Try it - and you will get wonderful and original elements of New Year's decor.
We stock up on materials and tools to create our own paper snowflakes in modular origami style:
- paper – white and blue
- scissors
- simple pencil
Step-by-step description of making paper snowflakes with your own hands in origami style:

DIY New Year's snowflakes made of paper - original master class with photos
New Year and Christmas are always awaited with impatience and faith in miracles. On the eve of the winter holidays, it is customary to decorate the home with various New Year's paraphernalia - pine branches, paper snowflakes, animal figurines - symbols of the coming year. We offer you an interesting master class on making paper snowflakes with your own hands, and with the help of photos the learning process will become clearer and easier. For this craft, it is better to choose gold or “silver” paper - such a snowflake will turn out beautiful, shiny and festively elegant. Although white paper snowflakes look great in New Year’s compositions, lifting your spirits and evoking a unique feeling of a fast New Year and carefree fun.
Necessary materials and tools for making snowflakes with your own hands from paper:
- paper – double-sided cardboard
- scissors
- double-sided tape or glue gun
How to cut snowflakes from paper with your own hands - step-by-step guide:

DIY paper snowflake using quilling technique – master class with step-by-step photos and videos
Quilling is a technique that allows you to create light, airy crafts from twisted paper “rollers.” If you are not familiar with quilling, we suggest you master an unusual master class with step-by-step photos and videos on making your own paper snowflake for the New Year. Of course, the process of “producing” individual parts of the craft will take several hours. However, the result is worth it - a quilling-style snowflake will become an exquisite decoration for the New Year tree or an element of the festive decor of the office workplace.
Materials and tools for creating a snowflake with your own hands from paper using the quilling technique:
- strips of white paper – 5 mm wide
- scissors
- quilling tool
- lumograph
We make a New Year's snowflake out of paper with our own hands in quilling style - step by step:
- To begin, cut strips of paper of the specified width - from an A4 sheet. You will need a lot of strips, so you will have to devote some time to this work stage.
- We select six strips 14 cm long and bend them in half.
- Now let's start twisting the “rollers” - we will need six strips (length 27 cm). We twist the strips one by one and make compact parts for the snowflake.
- We leave the resulting “rolls” “alone” - during this time the part will straighten out a little. Then you need to glue the tip of the “roll”. All finished “rolls” must be the same size, which is checked using a lumograph.
- We press the paper “rollers” on one side with our fingers - the part takes on a beautiful teardrop shape.
- Each resulting “droplet” must be glued into the middle of a paper strip folded in half. We connect all the elements together and glue them together - we get the core of a snowflake with “rays” in different directions.