Decoupage Christmas balls in different ways. Decoupage of New Year's Christmas balls Decoupage of a foam ball for the New Year
New Year is coming soon, and we want to decorate our Christmas tree in something very beautiful and at the same time original and unusual. Therefore, today’s master class will come in handy for us, thanks to which we will independently decorate plastic balls using the technique.
Materials we will need:
Two large plastic balls with a diameter of 8-9 cm, it is better to take a silver color so as not to shed;
Two napkins for decoupage: with New Year's gnomes and Santa Claus;
White acrylic paint;
PVA glue;
Acrylic varnish for decoupage;
The brush is fan-shaped;
Glass or ceramic plates;
Kitchen foam sponge;
Sequins for decoration;
Two bamboo sticks.

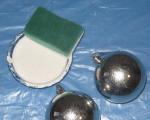
Place the bag on the table, remove the top caps from the balls, and take the ball by the top. Now pour white paint into one plate, dip a sponge in it and begin to paint the ball. First, we paint one ball, carefully place it on a bamboo stick and leave it to dry, then we paint the second ball, and also place it on the stick.


The first coat of paint takes about an hour to dry on the plastic. Then we paint with a second layer and a third with intervals for drying.


Preparing napkins for decoration. We iron them and unfold them. In a second bowl, dilute water with PVA nanopoly glue and stir thoroughly.


Immediately tear off the fragments with drawings onto napkins.


We remove the top layers from each fragment of the napkin, we get these blanks.


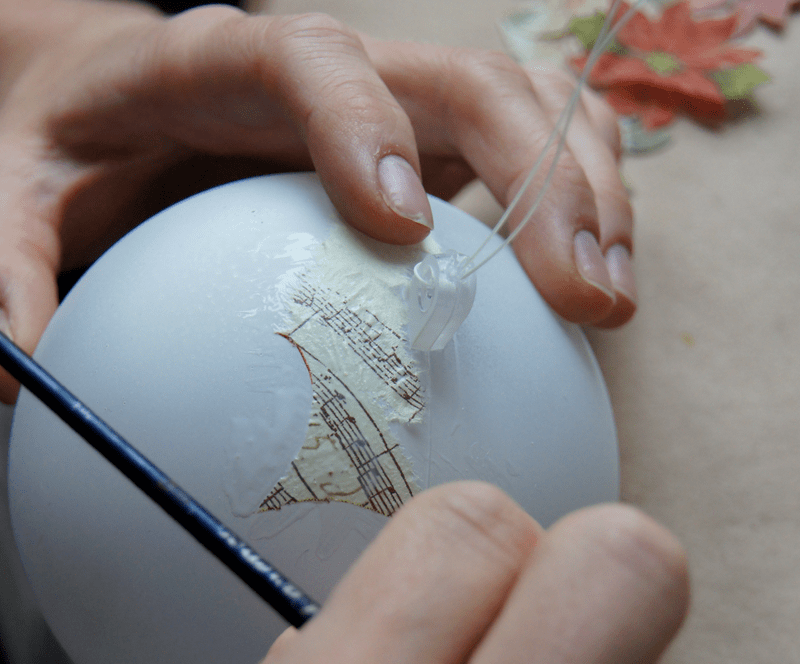
We apply one design to the ball and carefully dip the brush into the glue mixture, glue the design to the ball, then the second fragment in a circle.


Also the third and fourth. Let the surface of the ball dry completely. For now we decorate the second ball in the same sequence.
In preparation for the New Year, I started sorting out the toys for the Christmas tree. Some toys are no longer suitable, others are a little outdated, but I treasure them as rarities, and now I can update and decorate some myself. I discovered Christmas balls that were absolutely faceless and small in size and decided decorate in different ways.
I went from simple to complex.
First ball I decided to do it using technology direct decoupage.
For this I needed:
- Nail polish remover, cloth
- Foam sponge and stationery clip
- Brushes
- PVA glue
- Paint white
- Double-layer napkin with bullfinches
- Acrylic varnish
The ball was degreased with a napkin and nail polish remover. I took the liquid without acetone, since the ball is plastic (Photo 1).

For convenience when painting, I put the ball on a thin stick. I primed it with white paint and waited for it to dry (Photo 2).

I pasted a small torn fragment onto one side of the ball. I applied glue from the center to the edge, and, if necessary, made tears on the sides so that the napkin would fit the ball (Photo 3).

Then I glued the same small fragment on the other side. I chose a picture so that it would fit on the ball and would not be too deformed when glued to a round surface (Photo 4).

After the entire ball was glued and dried, I coated it with varnish (Photo 5).

The first ball is ready (Photo 6).

Second ball I decided to do it using .
- Red acrylic paint
- Craquelure varnish
- Bitumen varnish
- Three-layer napkin
I degreased the ball in the same way (Photo 7).

I primed it all with red paint. Dried it (Photo 8).

I applied craquelure varnish and left it to dry for 15-20 minutes (Photo 9).

I did not dry the varnish until it was completely dry, as stickiness should remain. I applied contrasting white paint, touching only once in one place (Photo 10).

After some time, cracks appeared (Photo 11). I waited until it was completely dry and started working after a while. Otherwise, the paint would get wet and smear all the cracks.

I glued fragments of napkins on one side of the ball, then on the other, and between the pictures I glued snowflakes (Photo 12,13). Dried it out.


I covered the entire work several times with varnish (Photo 14).

Dried each layer well. To give the ball an antique look, I stained it a little with bitumen varnish (Photo 15).

The second ball is ready (Photo 16,17).


Decor of the third ball I decided to do it in style mix media.
Here, in addition to the existing materials, tools and decorative elements were needed:
- Glue gun
- Narrow lace
- Buttons
- Fabric flowers
I glued the lace onto a previously defatted ball using a glue gun (Photo 18).

I tinted the ball with a thin layer of paint and painted the lace more densely (Photo 19).

Using a glue gun, I glued the flowers onto the lace (Photo 20), then the buttons in a loose order (Photo 21).


Again I painted the entire composition red (Photo 22).

Dried well. The final touch was painted with white paint, giving the ball a “snowy” look.
The third ball is ready.


The Christmas balls turned out different, each one is good in its own way:
Did you like the product and want to order the same from the author? Write to us.
More interesting:
See also:
How to crochet a snowflake
Crochet. Snowflakes For the New Year, as a rule, we decorate our house with snowflakes. They can be made...
New Year is just around the corner, which means it’s time to start making exclusive decorations for the holiday. New Year's decoupage will help you breathe new life into old Christmas tree decorations and create unique accessories from champagne or candles.
This decorating technique is quite simple, but will bring maximum pleasure to everyone involved in the process. With its help, you can not only stunningly decorate your home, but also give decorated items to your loved ones.
What's a Christmas tree without Christmas balls? Balloons that are boring or have become boring over the years can always be transformed by decorating them using the decoupage technique. 
Balls made of any materials are used as a base: glass, plastic, wood, papier-mâché. You can buy new plain toys or take existing ones and breathe new life into them.
For decoration you will need the following materials and tools:
- the base, it should be smooth, this is important, so when using old toys they should be carefully cleaned;
- white acrylic paint;
- sponge or cosmetic sponge;
- PVA glue (can be slightly diluted with water);
- thin flat brush;
- pictures with New Year's themes.
Pictures with suitable designs can be printed on a color printer or cut out from decorative napkins; even clippings from books or sheet music are suitable. For decoupage, it is better to use very thin paper so that the finished product does not get wrinkles or creases. 
The first step is to prepare the toys for further decoration. To do this, apply acrylic paint to them with a sponge and let it dry.
While the balls are drying, you need to cut out figures from the napkins along the contour with a slight indentation. Typically, decorative napkins have several layers; to work, you only need the top one, on which the design is applied. If the picture is printed, then the image is cut out strictly along the contour or the required shape (circle, oval).
We apply the cut out image to the ball in the right place, carefully begin to coat it with glue using a brush, moving from the center of the picture to the edges. In this way we cover the entire required area, and carefully blot off the excess glue with a soft cloth. 
If the picture is printed, then before sticking it on, you should try it on. Attach the picture to the toy, cut off all excess and make small cuts along the edges of the image in places where the picture will not be damaged. This is done so that the thick paper lies on the spherical base without wrinkles.
In the place where the picture will be on the ball, we make marks, coat this area with glue, after which we apply the adjusted image and level it with a brush with PVA, as described above.
Important: The ink on printed images may be unstable. It is advisable to first coat the desired picture with water-based varnish, dry it and only then proceed with decoupage.
Let the glue dry and mask the edges of the design with paint and a sponge, carefully painting over the joints. 
Decoupage of New Year's balls should be as impressive as possible.
For further decoration you can use:
- Glitter. Apply transparent glue to certain areas of the ball, including the design, and sprinkle the toy with glitter. The shiny ornament will remain only in those places where there was glue.
- Glitters. Shiny contour paints can be used to create original patterns on toys. You can outline the picture or draw dots, snowflakes, etc.
- Beads and beads. An image, especially a round one, can be decorated along the contour with beads, gluing them onto super glue or transparent silicone.
- Stencils. Acrylic paint is applied through a pre-prepared template with a sponge.
- Shells, dried flowers, rhinestones, etc.
The finished ball does not have to be white; after the picture is pasted, you can carefully use a brush to give the background the desired color. 
Such New Year's toys can be effectively complemented with ribbons or lace, hanging on a decorative cord.
Decoupage bottles
You can decorate the New Year's table or create spectacular gift sets using bottles of champagne decorated using the decoupage technique. Even wine bottles can be decorated in this way, presenting exclusive gifts to colleagues or friends. 
To decoupage champagne you will need the same tools and materials as for the balloons. Additionally, use masking tape to cover the label while you work.
The bottle must be prepared by removing all unnecessary stickers and labels. You can put it in boiling water for a minute and remove the remaining paper.
Use masking tape to seal the top of the bottle. Using white acrylic paint, using a brush and sponge, coat all areas where the drawing will be located. This can be the entire surface of the glass, or individual places.
A pattern is applied to the dried soil and carefully coated with glue from the center to the edges. For large images it is better to use a wide fan brush. If the picture gets wet and begins to tear, carefully connect the edges of the picture in the places where it is torn; this will not be noticeable on a dried bottle of champagne. If the defect is noticeable, then you can disguise it with something: sparkles, paint.
When the pasted picture has dried, you can tint all open areas of the bottle. 

Using a sponge, carefully apply paint to all white areas. A paint that harmoniously matches the shades of the picture, gold or silver, is suitable. If necessary, the finished New Year's decoupage can be supplemented with spectacular details. 

Congratulatory inscriptions or an original ornament should be applied with glitter, and with the help of white paint, semolina and sparkles, you can create realistic snow and emphasize individual elements of the picture. 
In conclusion, you need to coat the entire product with a water-based varnish or a special one for decoupage. You should tie a ribbon around the neck of the bottle as a finishing touch. 
This champagne can be a good gift for the New Year.
New Year's decoupage of champagne can be done in various ways, for example, by covering the bottle with thin cotton cloth. The glass surface is coated with glue and wrapped in cloth. With the help of a brush and hands, the fabric is pressed as tightly as possible to the bottle, all kinds of folds, wrinkles and ornaments are formed. You can glue a pattern to the glass in advance and distribute the material around it.
Ideas for New Year's decoupage
New Year's decoupage is indispensable for creating holiday accessories or original gift design. You can decorate almost any object, the main thing is that its surface is smooth.
Dishes with Christmas decor look impressive. These can be individual plates, glasses, coasters, or entire sets decorated in the same style. Glass, ceramics, plastic – any base material will do.
After decoupage, the dishes should be varnished. Such glasses or plates cannot be used for their intended purpose, but as an original accessory or gift they will come in handy. 
Buy regular wide white candles and decorate them using decoupage. They will decorate any interior and become a pleasant gift for loved ones. Moreover, these are not only accessories; if desired, you can light them if you don’t mind spoiling such beauty. 
New Year's decoupage can turn even the simplest box into a stunningly beautiful box or gift wrapping. You can cover it all with New Year-themed pictures and add congratulatory inscriptions. Or decorate it in a vintage style, decorating it with a Victorian-style pattern, beads, braid, or ornate patterns. 
To extend the service life of products, it is best to coat them with decoupage varnish.
The decoupage technique allows you to change the appearance of familiar things, and the ease of execution makes such decor accessible to everyone. Create a festive atmosphere in your home with cozy handmade decorations.
Let's complicate the task: decoupage a Christmas ball using craquelure
I like!
The approach of the New Year can be felt long before the last days of December. And it is quite reasonable to start preparing for the holiday in advance - decorations for the home, gifts, decor. Of course, it’s good when new New Year’s balls appear on the Christmas tree every year. And if they are made with your own hands, at least they are decorated independently.
There is nothing stopping you from taking an ordinary Christmas ball and transforming it by making your own sketch. This is the simplest option, although not everyone likes it. Some people think that it is much more interesting to make your New Year's ball from scratch. Sometimes they use, one might say, the old-fashioned papier-mâché method. And this is not the worst option.

In specialized stores you can buy a whole batch of blank balls at once. Most often these are plastic monochromatic balls in quantities of 4,6,10 pieces. So, taking advantage of all the advantages of the decoupage technique, you can make a whole collection of balls.
Beautiful New Year's ball: decoupage
Before decorating the surface of the New Year's ball, you need to prepare it. Remove the wire fastening from the ball, and for convenience, firmly attach it to the rod. Then, using fine sandpaper, you clean the sparkles from the ball (we are talking about a simple Christmas tree ball). The paint is washed off with nail polish remover. Then rinse the ball with water, and then sand it again.

- The base for the pictures is a primer. Add PVA glue to 30 ml of acrylic paint. This composition is applied to the workpiece with a sponge, then you leave it to dry. Then the workpiece is primed again.
- Next, proceed directly to decoupage. Select the necessary pictures, cut out the motif and try it on the surface. In most cases, napkins are used.
- Make cuts on the cut out or torn picture - this will allow the picture to take the shape of a ball and avoid the formation of folds.
- For gluing, you can use PVA glue, which is diluted in equal proportions with water.
- You can glue a picture like this: attach the image and brush it on top with a soft-bristle brush. Or glue is applied to the surface of the ball, and the New Year's motif is already glued to it.
- After the ball has completely dried, it needs to be coated with acrylic paint again to carefully align the edge of the background and the glued picture.
After the glue dries, it may leave rough traces. They can be corrected a little with sandpaper. Well, the finishing decor will depend only on your imagination. You can add sparkles, highlight the outlines of the image with paint, or use glass beads.
MK: DIY Christmas balls, decoupage
There is a well-known method of decoupaging balls, which is not very complicated; semolina will be used in this work. If you are still completely new to decoupage, you can safely use the proposed method, it is interesting and quite accessible. At the same time, you will practice.

What materials do you need:
- The Christmas balls themselves;
- Three-layer napkins with New Year's motifs;
- PVA glue;
- Acrylic paints;
- Brushes;
- Sponge;
- Glossy varnish;
- Outlines;
- Semolina.
Prepare the ball as described in the previous paragraph. It should be smooth and clean. Apply paint mixed with semolina with a sponge, do it in a dotted manner - you will get a snowy effect. While the balls are drying, you need to prepare napkins. Separate the top bright layer, and the pattern should be torn off along the contour. Glue it on, carefully smoothing the pattern from the center to the edges.
Continuation of the master class on decoupage of Christmas balls
When the napkin is dry, the real artist in you should turn on. The edges of the glued pattern need to be sanded, and the untouched part should be painted, choosing a paint tone that is consistent with the tone of the image. To give the image volume, you can use structural paste.

Repeated coating of the ball with a layer of acrylic varnish is not always necessary. Perhaps you specifically want to make textured, rough balls. Or cover the ball thickly with glitter.
Contour painting will also be interesting. And the most original way is probably reverse decoupage. All manipulations are performed inside the ball, which is divided into two halves. Each part can be processed in turn. The picture will be glued to the inside of the half-ball.
Nuances of a master class on decoupage of New Year's balls
All MKs are similar to each other, unless you take on particularly complex work. But in each case there are some defining nuances that determine the highlight of the work. Or simply details that a beginner, out of ignorance, may not pay attention to.
Nuances in decoupage of balls:
- Always prepare the ball thoroughly for decoration - remove fat from the ball using alcohol or dishwashing liquid;
- You can dry the New Year's ball with a hairdryer, and if you make craquelure (cracks), they will be more expressive;
- Each layer of varnish must dry before you apply the next one - hurry up and ruin the whole job;
- All additional methods of decoration can be used - eye shadow, glitter, pastels, even pencil shavings.
You can take photos of family members on Christmas tree balls. Just stylize them in retro or, for example, ethno style. Then it will be a truly memorable toy.
Snow decoupage of New Year's foam balls
You need to work very carefully with breakable balls. But with foam balls there will be no such problems. You can cut out a foam ball that you can decorate however you like. Tie it with threads, wrap it in beautiful fabric, wrap it in designer paper, and of course, paste it over.

Or you can decoupage a snow ball. To get artificial snow, you need to take semolina, glue and white paint. Mix everything together and the snow is ready. The resulting mass covers the balls completely or partially. And after the ball has dried, you can stick on the pictures.
Decoupage of New Year's balls (video)
Decoupage of Christmas balls is another opportunity to decorate something using creative appliqué. As a result, you get a completely new thing, without any defects, beautiful, unique. And most importantly, all this was done with your own hands!
Beautiful results!
Preparing for the New Year includes many interesting things. This includes decorating your home, setting up a Christmas tree, and making gifts for friends and family. New Year's balls using decoupage technique can be a wonderful souvenir. Or a decoration for your apartment. You will learn how to make these cute little things with your own hands by reading this article.
Decoupage of New Year's balls. Master class
Inside every person lives an artist who is ready to create masterpieces from the simplest things. However, some people are embarrassed to express themselves and prefer to buy ready-made jewelry in a store. We invite you to change the situation and become a real creator for a while. Decoupage of New Year's balls is a simple and exciting technique that even a child can handle. Read the instructions carefully and feel free to get to work.
Materials
To make one original Christmas tree decoration you will need:
- Large plastic ball.
- PVA glue and brush.
- Liquid for degreasing surfaces.
- Acrylic white paint.
- Sponge for washing dishes.
- Colored napkin with a pattern in Christmas style.
- Semolina.
If you are afraid of ruining a new toy, take an old unnecessary ball that has already lost its presentable appearance and is not suitable for decoration. Remember that decoupaging Christmas balls with your own hands is a very exciting activity. So involve your children and spouse in it. The fruits of collective creativity will remind you of a wonderful time and bring you closer to each other.

Surface preparation
Before starting work, carefully inspect the toy. If it is covered with cracked paint, then sand the surface with sandpaper. Thanks to this action, the coating will become even and the paint will adhere better. After this, treat the ball with a special degreasing agent. If you don’t have one on hand, use vodka or nail polish remover.
Stages of work:
- First we need to apply white paint to the ball. For this purpose you can use a brush. But tinting with a sponge will help you achieve better results. To do this, fold it in half and secure the edges with a clothespin. Take a makeshift pen, dip the sponge in the paint and apply the first coat. You can paint the entire ball or cover only a small area. Paint over the surface again and hang the decoration to dry.
- Prepare a colored napkin. To do this, carefully separate the top layer and carefully tear off the picture. It is very important that the edges of the design are uneven - then it will look better on your ball.
- Attach the picture to the toy and start gluing it from the center to the edges. The New Year's decoration is almost ready. If the selected design is large enough, make several tears along its edges.
As you can see, decoupaging Christmas balls is very simple, and even a beginner can handle it.

Finishing touches
There are several little tricks that will hide the roughness and small imperfections of your work and give the decoration additional charm. Use the following tips:

Decoupage of Christmas balls can be done in many ways. Use these ideas or rework them as you wish:
- Take a small ball and a colored square napkin. Coat the paper with glue and wrap the decoration in it. Tie the top of the bag with a beautiful braid or ribbon.
- Cut strips from multi-colored napkins and wrap them around the ball. Disguise the upper part, where the ends meet, with a beautiful bow.
- Cut out even circles from colored napkins and glue them overlapping over the entire surface of the ball. The resulting “cone” will look great on your Christmas tree.
We hope you enjoyed the ideas we shared with you in this article. Don't be afraid to experiment with available materials. And soon you will learn to create original things with your own hands that others will never tire of admiring.