New Year's toys for the Christmas tree from plastic bottles. New Year's toys from plastic bottles - a sea of \u200b\u200bideas! Wreath of plastic bottles
The Christmas tree is the main decoration of the New Year, every time we try to decorate it in an original way. In addition to classic Christmas toys, you can hang original handmade decorations on the Christmas tree. Crafts made by a child on their own are pleasing to the eye and look especially beautiful.
paper toys
This is the most common version of Christmas decorations. For example, to make jewelry from thick paper, you will need:
- thick textured paper;
- hole puncher;
- decorative pin with beads
First, cut the paper into even strips. We punch holes at the ends of each strip with a hole punch. Then we thread the pins into the holes and fasten. Now we bend the strips into a circle and make a hemisphere. At the end, simply straighten the strips and decorate with a ribbon. It turns out an interesting decoration for the Christmas tree.
DIY Christmas tree toy
We will make a beautiful star for the Christmas tree from cardboard. We cut out an asterisk from it and wrap it with colored threads, beaded thread or twine.

How to make a beautiful Christmas tree toy
It is very easy to make multi-colored bows on a Christmas tree, but such decor looks unusual and catchy. For work you will need:
- colored paper;
- glue;
- scissors;
- sequins and tinsel;
- bow pattern
First of all, you need to cut out the details according to the presented template.

Template of a voluminous Christmas toy-bow
Then carefully cut out all the details on colored paper. On a large part, glue the edges of the wings in the center. We glue the prepared part onto the leaf-shaped blank. We attach the strip to the middle of the bow, clasping it across. We decorate the cat toy for the Christmas tree with sparkles and chopped tinsel.
creative balloons
Old CDs make great ice shards. For work, we use plastic balls, CDs, scissors and a glue gun. First, we cut the CDs in any shape. We apply glue to the surface of the ball and fix the fragments from the disk in the desired order. We do not leave empty spaces on the ball. As a result, we get a festive toy with a soft sheen.

Master class: a ball with disc decor
From whole CDs, you can also make voluminous ball toys for a street Christmas tree.
Plastic bottle toys
From small bottles we will make funny penguins. Below is a step by step guide.

Children's New Year's toy for the competition
From the neatly cut bottom of a plastic bottle, we will make a pretty snowflake. Using white paint, draw a pattern, and decorate the edges and the middle with beads.

Snowflakes from plastic bottles
felt toys
A fluffy felt toy will look beautiful and stylish on the Christmas tree. To create it you need:
- felt from different colors;
- strong thread;
- scissors;
- mat;
- ruler
Using a ruler, scissors and a mat, we cut out strips of felt of all colors 8 cm long and 0.5 cm wide. We take a thread 20 cm long. We collect multi-colored strips in the desired combination and tie tightly in the middle with a thread. Having fluffed the strips with your hands, we tie the two ends of the thread together. The result is a fluffy and bright "bomb".
From felt, you can make interesting little animals or a Christmas tree if you decorate them with beads and beads. By the way, such toys will become original gifts for children to school and kindergarten, if you are going to organize competitions at the holiday.

Felt toys for kindergarten.
Toys from old Christmas balls
There are several ways to transform an old Christmas ball:
- glue the ball with multi-colored buttons of different sizes, and glue beads on top;
- paint with white paint, then glue sparkles, sequins, beads on the ball;
- hand paint the toy.
In addition to the restored balls, pine cones decorated with bows and sparkles will perfectly fit into the decor of the New Year tree.
Volumetric toys for the Christmas tree are easy to make from papier-mâché. To do this, prepare a mixture of paper. First, we take any paper, cut it into small pieces and pour hot water over it so that it is completely soaked and soaked. Stir the resulting mass until a homogeneous slurry. Then we pass the finished mass through the grid. Small pieces of paper will settle in it. We take it out of the grid, grind it again and add glue. As a result, we get a dough-like consistency. From this dough, we begin to sculpt figures with our hands or with the help of molds. We leave the toys to dry for a day. As soon as they dry, paint and decorate with decorative ribbons, beads, buttons.

Master class: children's papier-mâché Christmas tree toy
Used light bulbs can be painted with bright colors, sprinkled with sparkles or pasted over with beads.
Do not rush to throw away the remnants of fiberboard, plywood. From them we cut out animal figures with a jigsaw, paint them with bright colors and varnish them. They will serve for a long time even for a street Christmas tree.
These homemade Christmas decorations are easy to make from improvised means at home. Decorating a house for the holiday with them is pleasant and interesting, and it is not at all necessary to buy expensive decorations.
DIY Christmas toys for the Christmas tree / Christmas toys
1. Christmas tree made of plastic bottles
Make such a Christmas tree green plastic bottle, scotch, scissors(such that they can easily cut a plastic bottle, paper tube. The only thing that can be added to such a Christmas tree is that you can decorate it with beads by gluing them to the Christmas tree with glue. You can hang a ribbon of rain. You can do this craft with your kids. Next, we do everything as in the photo:
To make a decorative New Year's craft: a Christmas tree from plastic bottles, you will need the following:
- Plastic bottles - 3 pcs;
- Scotch;
- A sheet of thick paper, ideally whatman paper (A4);
- Scissors;
So, cut the bottle as shown in the photo below. That is, it is necessary to cut off the bottom and neck so that a straight pipe from the bottle remains.

Cut each plastic bottle lengthwise into 3 equal parts and only then adjust their sizes so that each subsequent tier is slightly smaller than the previous one. Then each blank must be "dissolved into needles." The neck of one of the bottles will serve as a stand for our future New Year crafts

The next step is to roll the paper into a tube. We insert it into the bottle neck and fix it with tape in a circle.

You can decorate the top of our Christmas tree with a homemade Christmas tree toy or complete the Christmas tree the way we did.
If you want to make a Christmas tree from PET bottles more fluffy, such as in the photo below, when making a Christmas tree, the needles need to be cut as thin as possible (more often).


2. For Christmas trees from plastic bottles you will need green bottles of various sizes and a wooden stick, with a diameter slightly smaller than the neck. The length of the stick will determine the height of the tree and the number of bottles.
Probably done.)
4. Another very interesting option

For the manufacture we need:
- scissors
- green bottle
- cork stopper
- round cup of cottage cheese dessert
- candle
- glue.

Also find foam rubber. We cut off a piece of kitchen sponge for washing dishes.

First, cut the green bottle into squares or circles of different sizes. For the lower part of the Christmas tree, the width of the square should be at least 6-7 cm, the middle one should be about 5 cm, and 2-3 cm is enough for the crown.


Now with scissors we densely break through the edges of the stars. You can call family members for help. In fact, the work is painstaking and requires a lot of patience. Time edging the edges takes about 30 minutes. To make the spruce paws look more natural, we will bring the plastic to the flame of the candle. The tips of our coniferous twigs gracefully wrap down. Here is the finished result.


The turn has come to apply glue and foam rubber. Cut the sponge into small pieces (1x1 cm).

Now we grease the largest spruce paw with glue, apply a cube of foam rubber on top. We drip glue again and cover it with green plastic.

We continue to work until the details run out. Do not forget that we are “building a pyramid”, and therefore, with each subsequent gluing, we focus on the size of the plastic star.


It remains to arrange the trunk of a coniferous tree. Of course, cork will play its role. However, to make the craft resistant to tipping over, we will place the Christmas tree in a small yellow bucket. Cut it out of a round glass.

Lubricate the bottom of the bucket with glue, put the cork barrel in the center. Set aside the part for 2-3 minutes, let it dry completely.

We connect the crown with the trunk. It turned out a slender emerald plastic bottle tree. A true forest beauty.

Outcome
5. By the way, the Christmas tree looks quite creative with larger “branches”
We cut the bottle into 3 parts. Only cuts are made in a circle to the center, straight.
In the center, a puncture is made with an awl and the needles are bent up and down in order. In the lid of a cream or mineral water, a puncture is made into which a skewer of the desired length is inserted.
The parts are strung in descending order, a large bead is placed on top of the glue. The Christmas tree can be decorated with foam, rain, etc.
Glue the Christmas tree to the stand from the disk.
Christmas tree is ready
Undoubtedly, the New Year is a wonderful holiday, the onset of which is awaited with pleasure not only by children, but also by adults. In order for the expectation of the holiday to happen faster and more interesting, it is worth making crafts. Children can be involved in this activity. Surely, the gizmos that they make on their own in your home will be able to take pride of place. Crafts for the New Year 2018 can be made from completely different materials. In this case, it is not necessary to purchase something expensive. For example, in many cases even the most ordinary plastic bottles can be used. In this publication, we decided to list crafts from bottles on the theme of the New Year for you. We are sure that our article will be interesting for you and you will be able to learn a lot of interesting things for yourself.
Ideas for New Year's crafts from plastic bottles
Miracle tree.
Why not replace the usual spruce in your home with something unusual? If you have such a desire, then it will be easy to realize it. First of all, prepare:
- A cardboard tube 140 cm high. Such a tube is available in hardware stores. She remains after the sale of oilcloth.
- The bottles themselves are made of plastic, which should have a volume of: 2, 1.5, 0.5, 0.33 liters.
- Small wood screws and screwdriver.
- Cardboard circle with a diameter of 40 cm.
- Scissors, awl, polyurethane foam.
- Varnish spray and green enamel spray, matt white enamel spray.
- Gouache or acrylic paint, sequins and sparkles for decoration.
Progress:
- Using an awl, bottle caps are pierced in the center. They are attached to a cardboard tube, which is pre-installed vertically. For the first row you will need 7 pieces. In this case, use 2 liter bottles. For the next row, 0.5 liter bottles are suitable.
- In order to strengthen the base, put it on a circle of cardboard. Then it is filled with polyurethane foam. At the same time, it is worth filling the space between the bottles. The foam will increase in volume and will be an imitation of snow under the Christmas tree. After the foam dries, the remaining rows of covers are screwed on. The design will have 18 rows, which consist of 7 bottles.
- To make the Christmas tree from the bottles look natural, you need to alternate the volume of the bottles. The first row should consist of large, and the second row of smaller bottles. In doing so, you must maintain a conical shape.
- The base with bottles should be painted. And before painting, it is recommended to spray the bottles with varnish. It is recommended to apply green paint 2 times. In this case, it is worth waiting for the drying of the first layer, and then apply the second.
- In order to simulate snow, white enamel is applied to the tips of the bottles.
- Then you can start decorating the Christmas tree. At the same time, the bottle can be unscrewed and decorated as you wish. However, the drawing, which was applied to the bottles with gouache, must be fixed with varnish.

Funny penguins from plastic bottles.
Plastic bottles are an affordable material. Much can be built from it. For example, penguins look quite interesting. To create, which require plastic bottles, as well as bright colors.
Progress:
- A plastic bottle of any size is cut in half. With the help of paints, the bottle is decorated. And also the features of the muzzle of a penguin are drawn.
- At the next stage, the bottom is cut off from the other bottle. It is also decorated with paints, and a pompom made of threads is also attached to it.
- In order to complete the image of a penguin, it is worth making a scarf out of bright fabric, with which the figure is tied.

Christmas themed bottle craft.
Crafts for the New Year can look unusual and beautiful. In addition, plastic bottles can be used in this case. A lot can be done from this material. For example, you can even make an Orthodox church. Use plasticine to mold domes. For crosses, ordinary wire is used. For a presentable look, they are wrapped in golden paper. It is worth cutting windows in bottles, and drawing a stroke over their office. You can also perform them with a thin strip of white plasticine.

Bells.
If you cut off the top of the bottles and fasten them accordingly, you get stylish bells. Additionally, they are decorated with tinsel and a red satin ribbon.

Snowflakes.
Snowflakes are an essential part of winter. Therefore, at the New Year they should be present in large numbers. Transparent and blue bottles are suitable for creating snowflakes. In particular, bottoms are used. They are painted with white paints. It is worth drawing beautiful patterns on them. These snowflakes are strung on a fishing line and beautiful curtains are made from them.

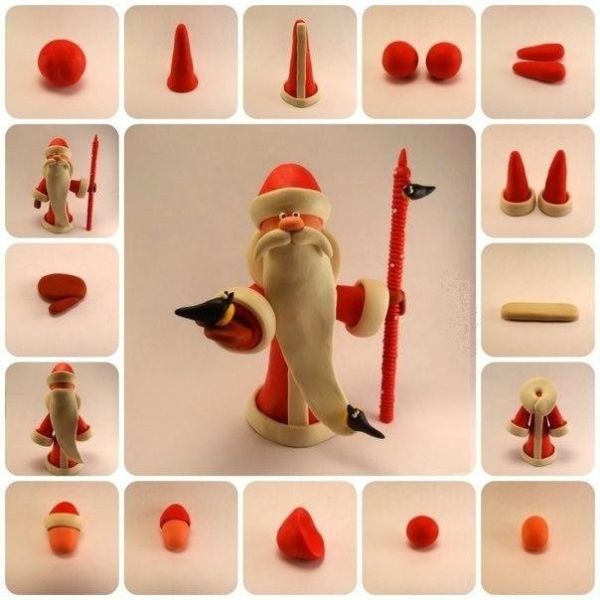
Santa Claus from a plastic bottle.
If you use a plastic bottle, then it can be a frame for Santa Claus. In this case, a napkin or colored paper is used for the face. But in order to make a beard and hair.

Unusual tree.
Not only plastic bottles can be used to create Christmas crafts. It turns out that glass bottles can also be used. In creating the next craft. The bottle will play the role of the base. And for the manufacture of a Christmas tree, it is recommended to use:
- Tinsel and glue.
- Large beads of different colors.
- Small Christmas star.
- A little cotton and thread.
Progress:
- If the bottle seems unstable and light, then it is filled with sand.
- Open the lid and place the edge of the tinsel and thread under it. After that, the bottle is closed with a cap. Elements all need to be masked. At this stage, the thread is still removed to the side.
- At the next stage, they begin to form the crown of the future spruce. In this case, the bottle is simply wrapped in tinsel. The glass should not be visible. And so that the tinsel does not fall off, it is fixed with glue.
- Then beads should be strung on the thread. In this case, the distance between them should be small.
- A star is placed on the top of the spruce. It is fixed with glue.
- The cotton wool will be used as snow. It is attached in several places. As a result of this, a beautiful Christmas tree will be ready.

Original balls for the Christmas tree.
Not sure what to do with old plastic bottles? You should try to make Christmas balls out of them. They look very attractive. In this job you may need:
- Several plastic bottles.
- Acrylic paints of various colors and glue.
- Scissors and thread.
- Decoration elements: sequins, sequins and rhinestones.
Progress:
- Bottles must be taken without bends - straight. The lower and upper parts are cut off from them. As a result, there will be a tube. It is cut into small rings.
- Each ring is painted with acrylic paints. Then, it is pasted over with sparkles or sequins. In general, you need to decorate the product in an original way.
- The next step is to start forming the balls. Connect one ring to the second, and slightly turn the second. At the points of contact, the parts are fixed.
- Then take another ring. It is glued to the junction of the first two. It also needs to be rotated slightly.
- Thus, these rings are glued together. As a result, you get a ball of different colors.
- Now it remains to thread the thread into one of the attachment points. The work uses a needle. And the loop is fixed with a knot.

Another version of the Christmas tree.
Above, we offered the option of creating an unusual spruce. Now we are ready to offer you another wonderful craft. To create it you will need:
- plastic bottles,
- Scissors and sandpaper,
- Scotch.
Progress:
- Cut off the bottom and neck of each bottle. Then prepare blanks from the branches. Branches should be of different sizes. To make the spruce ball cone-shaped.
- Then the plastic bottles are cut lengthwise into 3 pieces. Subsequent tiers should be smaller than the previous ones. Needles must be formed on each workpiece. For this purpose, they are cut with scissors, but not completely. Form a bottle stand using the bottom of one plastic bottle.
- Take a sheet of cardboard. Roll it into a tube and place it in the neck of the bottle. Secure it with tape. After that, each tier of branches is fixed on the Christmas tree. Some kind of toy is placed on top of the product. In order for the spruce to turn out fluffy, the needles are made as thin as possible.
On a note! For such crafts, it is recommended to use transparent or blue bottles.

Golden bells.
Golden bells will be able to decorate the Christmas tree in an original way. For manufacturing, you may need:
- The plastic bottles themselves
- Acrylic paint.
Progress:
- To create bells, a 0.5 liter bottle is suitable. You can also use larger bottles if the Christmas tree in your house is large. The bottom of the bottle is cut off. To get the petals, the edge of the bottle is cut off in the form of a zigzag.
- Using a knife, make the petals of the craft pointed. Also holes are made for the rope. This is done with a hot knitting needle.
- The finished bell is painted with paint and allowed to dry. After that, it will be possible to decorate with tinsel or other decorative elements.

Cones from plastic bottles.
To create cones, you will need the plastic bottles themselves, as well as scissors.
Progress:
- Squares are made from plastic bottles. Then, their corners are rounded off. Get products that in their appearance resemble chamomile. Their edges are treated with a candle. As a result, they will sink to the bottom.
- Then all the details are strung on a thread. Do it in descending order. Insert a bead between them. Then make a branch from a Christmas tree, it is fixed on a cone. As a result, your product will be ready.

Finally
In this article, we have listed crafts from plastic bottles that you can make for the New Year. Of course, these are not all products. And you can arm yourself with your imagination and create something wonderful for winter decor with plastic bottles.
Hello, friends! Well, have you already started New Year's Eve fuss? Yesterday we finally bought an artificial one, but the truth is that there is still nothing special to decorate it with. Therefore, an interesting idea came to my mind about how to make Christmas decorations with my own hands.
I want to invite you to do this exciting business. So throw laziness aside, call your kids and start creating New Year's!
After all, in any case, you have paper, glue, plastic bottles and other materials at hand. Well, there is, right? That's all we need today. From them you can make the faces of little animals, and carved ones, as well as the Snow Maiden and Santa Claus and a bunch of other wonderful decorations. So do not think for a long time, but rather start the fun process.
Moreover, there will be more than enough ideas for such an undertaking. I, as always, tried and found from the Internet the best options for making toys for the Christmas tree. And if you are ready, then we begin. 😉
Do not forget that in any case you need to use your own imagination. Only in this way you can get amazing and exclusive souvenirs.
DIY Christmas tree toys from improvised materials for children
First of all, I want to offer you interesting ideas for creating jewelry from different and almost any materials that are in every home.
Be sure to involve your children in creativity, because it is they who are most waiting for this magical holiday - the New Year. And they will be extremely pleased to hang toys that they will make themselves on the Christmas tree.
I suggest you make an interesting decoration in the form of a small Christmas tree from an egg tray.
"Christmas tree from an egg tray"

You will need:
- gouache;
- Super glue;
- paper packaging from eggs;
- scissors;
- brushes;
- PVA glue;
- thread;
- pencil.

Manufacturing process:
1. Take a paper egg carton and cut out 5-7 cells. Cut out the details from them as shown in the photo. Cut one of the cells in half, this will be the top.

2. Glue the pieces together to form a tree. Roll the parts that came out of the halves into a cone and glue at the top.

3. Take green gouache and paint the workpiece.

4. Cut out decorations from the remnants of paper packaging, and if necessary, glue them together. Make small balls from a mixture of small pieces of paper and PVA glue.

5. Color in the decorations.

6. Decorate the Christmas tree by gluing all the decor. Don't forget to glue the thread with which you will weigh the toy.

7. Cover the product with a transparent varnish, dry. All is ready!

If you are a lover of expensive wine, then after emptying the bottle, do not rush to part with its cork. Collect them. And they will come in handy at the right time. For example, apply them for the following purpose.
"Wine Cork Souvenir"

You will need:
- 6 natural corks from wine bottles;
- natural twine;
- Super glue;
- scissors;
- confetti, small beads.

Manufacturing process:
1. Carefully cut each cork with a knife into 3 equal parts.

The knife must be sharp so that the corks do not crumble.
2. You should end up with 18 pieces.

3. Now lay out small triangles from these pieces on a hard surface. One triangle should consist of 6 pieces of traffic jams. There should be 3 triangles in total.

4. Glue each resulting triangle.

5. Cut three 40 cm ropes from the twine.

6. Tie each rope in the middle, forming a loop.

7. Take a dried triangle, attach a knot of loops to the top, while smearing the place of their contact with glue.

8. Circle the twine around the entire triangle, and tie the loose ends tightly in a knot.

9. For a tighter fixation, the thread can also be smeared with transparent glue.

10. Do the same with the two remaining triangular blanks.


Well, now try to make beautiful snowmen from iron corks.
"Snowmen"

You will need:
- tapes;
- bottle caps;
- acrylic paints;
- buttons;
- glue.
Manufacturing process:
1. Take three good, not deformed bottle caps. Wash and dry them. Then paint with white acrylic paint.

2. After the workpieces have dried, glue the covers onto the tape, while leaving a loop on top.


4. Cut a small strip from the satin ribbon. This will be a scarf. Tie it over the corks. And glue a button in the middle. A bright decoration in the form of a snowman is completely ready.

You can also use not only corks, but the bottles themselves. Only not glass, but plastic. For example, cutting them into halves, and then gluing the parts to the desired length, you get an excellent blank for any toy. Dream up. And then, using paint, revive the plastic blanks.
That's how beautiful and bright you can make a penguin. I think the diagram will make it clear to you.

Or fill the bottles with any New Year's souvenirs, and decorate on top.

You can also cut strips of plastic and assemble a ball.


Here's a simple idea for making small toys out of paper and satin ribbons. Find New Year's pictures on the Internet, print them in the shape of a circle, cut them out. Then glue onto cardboard. Weave the ribbons together and glue the contour with them. Glue the loop.

And here's a paper assembly for you. Also very simple product, just for kids. Print the diagram, cut it out. Assemble the craft along the fold lines, glue. Decorate with beads, plasticine, etc. Glue on the loop. That's all!

"Crystal ball"

You will need:
- half beads made of glass and plastic;
- foam balls;
- trimming satin ribbons;
- scissors;
- glue gun.
Manufacturing process:
1. Take a foam ball and start pasting it in a circle with half beads. At the same time, you can lay out a certain pattern, or make the craft monophonic.
Remember that the glue must be applied in a thin layer, otherwise the foam will melt.
2. After you glue the entire ball over completely, you just have to embellish it a little more. Just tie a bow of satin scraps and glue to the product. Don't forget the loop too.

In the same way, you can make balls from buttons. Only first paint the foam balls with paint, and only then glue the multi-colored buttons.

And disposable plastic cups are generally a godsend for creativity. They just need to be turned upside down, and pasted over with paper decorations, sequins, duct tape or painted with paints. And as a result, ringing bells, funny snowmen can turn out.


For a change, choose a very simple product - sew or assemble a large Christmas tree bow. You can make many small bows.

I also came up with the idea to combine the purchase option with homemade art. Buy transparent balls for the Christmas tree, carefully unscrew the top and sprinkle sparkles there. Screw the item. Or apply glue on the surface of the ball in the form of any pattern and also sprinkle with sparkles. Very beautiful handicrafts.

Of course, do not forget about needlework from dense threads and ordinary glue.


Moreover, the use of this technology will allow you to make anything.

You can learn more about this technique here.

And here are the instructions on how such a miracle can be created.


Interesting products are obtained from pasta. Usually they are glued together and thus make snowflakes.


And a cool idea would be to decorate unnecessary old light bulbs. Usually they are painted with acrylic paints and decorated with knitted, rag and other attributes.

Also, toys can be molded from salt dough, plasticine or clay.

Well, or bake real edible souvenirs.

In fact, there are still a lot of holiday products that you can make with your own hands from improvised means, and you can’t list everything. Therefore, we move on.
Christmas toys, crocheted with patterns
Now a selection for those who are fond of knitting. I found the coolest, in my opinion, crocheted souvenirs. I'm sending you along with the diagrams. Knit, to health!
- "Bell";

- "Herringbone";

- "Angel";

- "Snowflake";

- "Father Frost";

- "Sweetie" and "Sock";

- "Snowmen";

- "Dog";

- "Mouse";

- "Piggy".

Do-it-yourself Christmas toys for the Christmas tree made of felt and fabric (patterns and templates are included)
From crocheting, we move on to sewing from felt and any other fabric. Guys, this time I won’t explain to you what and how to sew, I’m sure you already know all this. After all, the main thing is to find patterns. That's exactly what I'll help you with.
Loaded up a variety of options. I kindly provide them to you. Save, cut and start sewing.


Master class on making a star on the top of a Christmas tree from paper and cardboard
Well, now let's start making almost the most important attribute of a green tree - a star.
Of course, you can choose another way to make it, but I really liked the following magical transformation.
"Shiny Cardboard Star"

You will need:
- shiny cardboard;
- scissors;
- glue gun.
Manufacturing process:
1. Take cardboard and cut out strips of the same width and length from it.

If your cardboard is shiny on only one side, then first glue two sheets of cardboard together so that both sides are shiny.

3. Now bring the free ends of the strips together and glue them together as shown in the photo.

4. Pin the side strips together. You should get something like this.

5. Repeat steps 1 to 4, that is, glue another exactly the same part.

6. Connect and glue the two blanks together so that you end up with an eight-pointed star. Your voluminous star on the top of the spruce is ready.

I think that such a masterpiece will bring a lot of pleasure, especially when the lights will flash on the branches and the star will also sparkle with new colors.
Christmas tree toy 2019 in the form of a symbol of the year of the pig
Do you remember what year is coming? That's right, Year of the Pig. So do not forget to appease the Mistress and make souvenirs in the form of funny pigs.
"Pig made of colored paper"

You will need:
- double sided tape on foam;
- semi-cardboard pink and red;
- black marker;
- pencils;
- markers;
- glue;
- scissors.

Manufacturing process:
1. Take a pink semi-cardboard and cut out many strips from it 1 cm wide and 7 cm long.

2. Now, using a pencil or scissors, twist each strip.

3. Apply glue to the top of one of the strips, and attach another strip on top. Thus, glue the strips in a circle.

4. As a result, you should get such a blank.


6. Now cut out a long pink strip 0.5 cm wide.

7. Twist the strip so that you get a curl like a pig's tail.

8. Glue the tail to the ball.

9. Cut out two circles of different diameters and ears from half-cardboard. From red paper, cut out two small circles - these are the nostrils.

10. Glue a piece of double-sided tape on a circle of smaller diameter. Attach it to the big circle. Use glue to glue the "nostrils".

11. Draw eyes with a black marker and draw the contours.

12. From red paper, cut out two strips 2 cm wide, 5 cm long. Paint them all with the same black marker. This will be a scarf.

13. Glue the scarf to the back of the pig's head. Then glue the head to the body (3D ball). And don't forget to cut and glue the ribbon loop.

Agree, this is a very easy craft and is available for children's creativity.
Step-by-step instructions on how to make a New Year's toy from cotton wool
And ahead of us is a detailed master class on creating another Christmas decoration in the form of a bright cockerel. We will make it from ordinary cotton wool.
"Wadded Cockerel"

You will need:
- cardboard (dense, but cutting);
- cotton wool (from a pharmacy, regular in a roll);
- cotton pads;
- threads are white;
- potato starch;
- half-bead eyes in black;
- tailor's pin (with a loop at the end);
- paints for painting.
Manufacturing process:
1. Take the cardboard and draw the outline of the cockerel on it. Cut it out.

2. Unwind the cotton wool from the roll and tightly wrap the cut out contour to the legs with it.

3. Now wind the thread over the cotton. Do the same with the leg.


5. Cut out wings (4 pcs) and tail parts (4 pcs) from cotton pads.

6. Cut out one comb from the cotton pad and two parts for the beard.

7. Cook a starch paste and coat our cockerel figure with it. Then wrap our product with thin pieces of dry cotton wool. Lubricate all irregularities with a paste. Next, soak all other parts with a paste and carefully attach them to the cockerel. Form folds, fluff the tail, additionally you can make a thin strip of cotton wool and stick it around the neck. Glue on the eyes.

8. Dry the product upside down (hang on the thread that we left). And then paint to your liking. Cut the thread and insert a pin, thread an elegant rope.

Use this technology to make other animals, fairy-tale heroes and characters.
Christmas tree toy "Garland" from plastic bottles
Now we will make a decoration in the form of a garland. Moreover, the garland will not be simple, but from plastic bottles. How do you like this idea? Personally, I'm delighted.
"Flower garland"

You will need:
- plastic bottles with caps;
- paints in spray cans;
- scissors;
- electric garland;
Manufacturing process:
1. Cut off the tops of the bottles. Make cuts to make a flower.

2. Round the petals and paint the blanks in any color.
3. While the flowers are drying, make cross cuts in the caps of these bottles. Insert light bulbs from an electric garland into the cuts.

4. When the blanks are dry, screw them to the lids, spread the product over the Christmas tree and turn on the electric garland. Enjoy the creation!

Well, a simple manufacturing option garlands of icicles Crafts for the Christmas tree from polymer clay
I will briefly tell you what figures can be molded from clay. You can also take plasticine as a material.
Here it is important to come up with a hero, mold the details, then put them together, well, make a loop.
Here are a couple of patterns for sculpting winter characters.
- Father Frost;
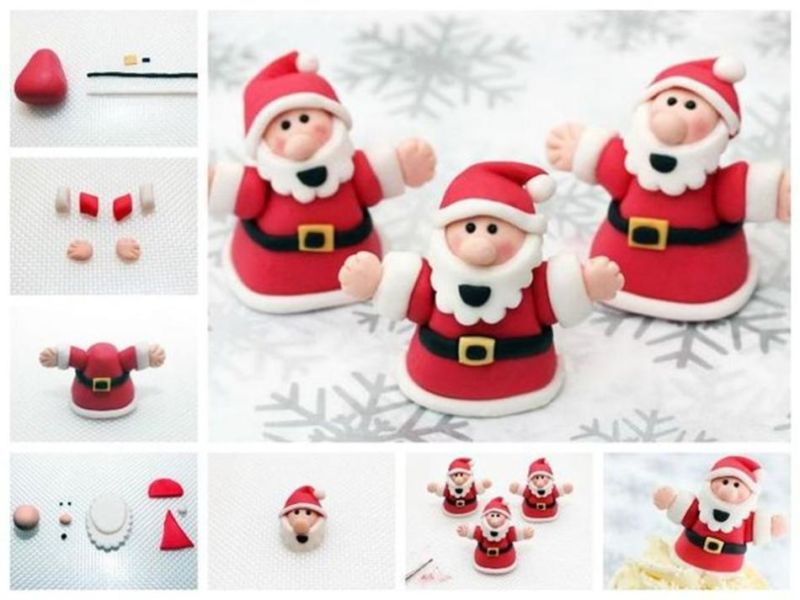
- Monkey;

- Girl;

- Snow Maiden;

- Piggy.

And options for finished work.


Video selection of the best toys for a Christmas tree made of wood
Well, if you are fond of woodworking, then you will be interested in the following story. It contains ideas for creating wooden toys at home. So watch and create. By the way, such souvenirs are perfect in quality.
And this is where I end today. I look forward to your comments! Am I helpful and creative? 😀 I think that it is undeniable - "yes".
I wish you to make what you like and decorate the Christmas tree with homemade toys together with the kids. With coming!
A wonderful winter holiday is approaching - New Year 2019. It's time to decorate your house for his arrival so that Santa Claus does not pass by on his magic sleigh and leaves good gifts under our Christmas tree. It is very interesting to decorate the Christmas tree and rooms with handmade toys for the holiday. The very process of their manufacture is fascinating, however, like any creativity. Such crafts can be made from the simplest materials, for example, from plastic bottles. From ordinary plastic bottles, you can make a lot of interesting and beautiful things that will successfully replace store counterparts. Our today's story is dedicated to the 7 best and original crafts from plastic bottles for the New Year 2019, which will be held under the sign of the Yellow Earth Pig. Let's look at them in detail in our article.
Christmas tree
An unusual Christmas tree can be made from simple plastic bottles. It is important to collect the necessary materials for this craft and follow the master class step by step.
This will require:
- Plastic bottles;
- Scotch;
- Sandpaper (cardboard);
- Scissors.
Progress:
- The bottom and neck of the bottle should be removed, and then a straight pipe will turn out. Then you should prepare blanks from twigs. They must be of different sizes so that the Christmas tree turns out to be cone-shaped.
- Then plastic bottles need to be cut lengthwise into 3 parts so that subsequent tiers are less than the previous ones. On each blank, you need to make needles, and for this they are cut into thin strips, but not completely. In order for the Christmas tree to stand steadily, it is advisable to use the bottom of one of the bottles as a stand.
- A sheet of cardboard must be rolled up into a tube and installed in the neck of the bottle. You can secure it with tape. Now each tier of branches needs to be fixed on the tree. You can put a toy on top or come up with something else. To make the Christmas tree fluffy, the needles should be cut thinner. Usually blue or transparent bottles are used for this. That's all, our craft is ready!
Christmas balls
You can decorate your Christmas tree with handmade toys. In work, it is important to follow all the steps step by step, and then you will get wonderful products.
This will require:
- Plastic bottle;
- Glue;
- Rain;
- Any shiny jewelry.

Progress:
- The paper needs to be wrapped around the bottle: this will help mark blanks on it. It is necessary to cut 4 rings 1 cm wide. Then the rings must be fastened together according to the “crosswise” principle and secured with glue. The result should be a ball of plastic strips. You need to choose beautiful threads or rain so that the toy can be used for the Christmas tree.
- To decorate the resulting blanks, it is better to use foil, beads, beads, etc. A small ball can be placed inside such a ball. In this craft, you can fantasize as much as you like. For children, this will be a very interesting activity.
Snowflakes from plastic bottles

To expand the range of crafts from plastic bottles for the New Year 2019, you can also make snowflakes from the bottoms of bottles as a Christmas tree decoration. This process will be possible for beginners in this creative business.
For work you will need:
- Scissors;
- Acrylic paints of white, blue, golden, silvery colors - to choose from;
- Plastic bottles, preferably blue;
- Paint brush;
- Wire;
- Pliers.
Progress:
- We take plastic bottles and cut the bottom as low as possible to the base with a clerical knife or scissors, leaving only the corrugated part.
- After the bottoms are ready, we take up the painting of our future snowflakes. Depending on the desired pattern, we select the thickness of the brush, and then proceed to the artistry. As drawings, you can use various ornaments that come to your mind. This also applies to the choice of color of paints with which you will decorate your New Year's product.
- When your snowflake has turned into a beautifully painted masterpiece, let it dry, and use wire and pliers to make a small eye for the thread. Fasten it to the snowflake and pull the thread into this ring.
Well, our New Year's toy for Christmas tree decorations is ready, which you now have the right to be proud of. A do-it-yourself snowflake can serve as a worthy decoration not only for your home, but also for a kindergarten, if you have a small child, and also act as an exhibit at an exhibition at the school of New Year's products.
Penguins from plastic bottles

The original New Year's decoration of your house for the New Year 2019 can be plastic bottle penguins, which should be placed in the rooms and under the Christmas tree as a decor. Such a craft will delight all your relatives and guests, and especially children. Without spending a lot of time, you will create a real masterpiece of art with your own hands, which will cause a lot of positive emotions and sincere smiles in your household.
For work you will need:
- Plastic bottles (one toy takes two bottles);
- Scissors;
- Acrylic paints - white, black, red and others;
- brushes;
- Small colored shreds for a scarf;
- Buboes or bows for hats;
- Glue.
Progress:
- We take a bottle and cut off the upper part almost completely or in half to get the body of a penguin. The head is already made from another bottle and also from the bottom, but the workpiece should be slightly smaller.
- We connect both blanks, inserting the upper part, which is smaller, into the lower, which is larger.
- After you have built the body of the penguin, proceed to its coloring. Take acrylic paints and apply gently on a plastic product, imitating the color of a penguin, as shown in the photo. Use more bright colors, because the brighter your New Year's penguin turns out, the warmer and more fun the smiles of your family will be.
- When your penguin looks realistic, you can tie a small scarf around his neck, and attach a bubo or bow to the cap with glue.
Here is such a cartoon miracle you got!
Video tutorial on making penguins from plastic bottles
golden bells

Golden bells will look original on the New Year tree. Such work is carried out very quickly and is suitable for kindergarten.
This will require:
- Plastic bottles;
- Acrylic paint, if desired, fabrics, tapes and accessories can be used instead of acrylic paint.
Progress:
- For work, you should take bottles of 0.5 liters each, but more is possible if the tree is very large. The bottom of the bottle should be cut off. To get the bell petals, you need to cut the edge of the bottle in the form of a zigzag. Since the resulting edges will be sharp, care must be taken.
- The petals of our crafts need to be made pointed, and with a knife you can give them a shape. To make holes for the rope, you need to heat the knitting needle and make holes. You can do this job with scissors, but be very careful. At the end of the work, the bells should be painted, and they will dry within an hour. To give the products a New Year's look, they need to be decorated with tinsel, garlands or sparkles. The instruction is simple, and you can do the work in your sequence.
Plastic bottle candlesticks

This will require:
- Plastic bottles;
- Scissors;
- glue gun;
- Universal glue.
Progress:
- With your own hands, you can make a wonderful candlestick for the holiday. You can use bottles of different colors. Containers must be cut in half. The edges of the part that remains with the bottom should be cut into strips, not reaching 4 cm. The strips can be of different widths. The resulting container will be a stand for a candle.
- Strips of plastic should be melted over the candle. Then, using a glue gun, you need to attach a candle in foil. The space near the candle can be decorated with beads or pebbles. So the candlestick will have a small weight, our craft is ready.
Video master class on making candlesticks
Cone
You can make original cones with your own hands, this craft from a plastic bottle will perfectly decorate your Christmas tree and house for the New Year 2019.
This will require:
- Plastic bottles;
- Scissors;

Progress:
- From a plastic bottle, you need to create squares, after which their corners should be rounded. The result will be products, like chamomile. After that, you need to process the edges of the petals with a candle so that they fall down.
- All details must be strung on a thread in descending order. Between them you need to insert a bead. Then you need to make a sprig of spruce and fix it on the cone. The product is ready to create a festive atmosphere.


