Methods of cross stitch on canvas. Ready set or just a diagram? Video on how to work with the circuit
Your favorite hobby will help relieve stress after a hard day. One of the ways to spend an evening, which is popular among women, is embroidery.
There are several types of it: cross stitch, ribbons, beads, satin stitch. Scientists have proven that needlework allows you to relieve nervous tension and calm down after stressful situations. The most accessible is cross stitch for beginners. Craft supply stores offer a large assortment of ready-made kits for this hobby, containing everything you need.
If you don't like the ready-made kits sold, buy the accessories separately. A self-assembled starter kit is more expensive than a ready-made one; for cross stitch you will have to buy:

If you wish, buy additional materials: magazines with embroidery patterns, a special marker. The patterns can be downloaded on the Internet for free or taken from an experienced craftswoman. Experienced embroiderers draw up patterns on their own on graph paper or squared notebook paper.

Find a convenient container for materials and tools: a plastic container, basket or small cardboard box. This way you won't lose anything. If possible, dedicate a chest of drawers or desk drawers for them.
Preparing for embroidery
Set up a workplace. Find a suitable seat with a backrest: a sofa, an armchair, a computer chair. There should be a table nearby on which you will lay out the diagram, threads and other important devices.
Due to prolonged stress during embroidery making, the neck often hurts and the eyes feel tired. If discomfort occurs, take a break for a few minutes, walk around, and move to the kitchen to drink a cup of tea.
After purchasing everything you need, you won’t be able to start working right away. Prepare for it using step-by-step rules:

- Prepare a piece of material.
The dimensions of the canvas are equal to the size of the picture with allowances for attaching it to your fingers or framing it with a baguette. Treat the edges of the canvas with glue so that it does not fall off.
- Some craftswomen do not like to feel starched material under their fingers.
If you are one of them, wash the fabric. For beginners, it is best to skip this step. Canvas with a printed pattern cannot be washed.
- Using a canvas marker, mark the fabric into 10 x 10 crosses.
If you didn't buy a marker, use a pencil.
- Make a thread organizer from a piece of cardboard.
Cut a few holes to thread the floss through. Divide the skein of floss into separate threads. You can replace the organizer with bobbins.
Most often, embroidery is done with double threads. To do this, you need to take one thread from a skein of floss, fold it in half and thread it through the eye of a needle. With this method, it will be convenient for you to make the fastener at the beginning of work.
The number of threads can be changed as desired: the more there are, the more convex the crosses will be in the end. In landscapes, it is recommended to use a larger number of threads for close objects, and embroider distant objects using one thread.
Where to start?
There are 2 approaches to embroidery: start work from the middle or do crosses first, with the dominant color in the pattern.
The benefits of starting from the center of the picture:
- the drawing will not shift in relation to the canvas;
- all schemes are adapted for this option;
- it is more interesting to carry out the work, since the largest objects are located in this area.

Finding a work center is very easy. Carefully fold the fabric into quarters. At the intersection of the fold lines there is a middle, mark it. If you use a diagram, find the center on it. Paper diagrams may wear out as you work, so make a color copy of them in advance. Mark the center on both copies, and record the progress of work on the copy.
There is no need to mark the center on a previously marked or independently marked canvas. If the pattern or mesh is visible on the fabric, then you can start working from any angle. In this case, it is better for beginners to work by squares rather than by colors. Embroidered one - move on to the other.
Fasten the thread
To prevent the embroidery from unraveling during washing or changing threads, secure it. Many people are interested in how to secure the thread when embroidering? All beginners face this question. It is not customary to make knots in embroidery, although beginners often use them. You can secure the thread when cross stitching in the following ways:
- A purl loop will help hide the thread under the work. Step-by-step instruction:
- Turn the work inside out and insert the needle into the embroidery canvas.
- Make a half cross on the front side, but do not tighten it too much.
- On the reverse side, thread the thread through the resulting loop.

- You can avoid turning the work over if you are making a design with a double thread. Pass the needle under the canvas and pass the tool through the resulting loop.
- The beginning of the thread can be hidden under the stitches. This method is used on the front side if the crosses lie tightly. Most often, the thread is hidden under the wrong side.
- When using the Danish technique, the thread is secured almost by itself at the moment of returning to the beginning of the column.
Cross stitch has long been considered of high quality if its beginning cannot be found on the front and back sides. Always during training, girls were taught not to leave threads sticking out. Now each craftswoman independently controls the progress of embroidery. If you are making a drawing that will be placed in a frame, you can use small knots at the beginning of the work.
Work progress: how to make crosses?
Using canvas it is easy to control the size of the crosses. They consist of two stitches located at an angle. For each element, you need to direct the threads in one direction, that is, maintain the slope of the top or bottom stitch.

The embroidery technique depends on the preferences of the craftswoman and the features of the design. Master both methods using step-by-step recommendations:
- English or classical technique.
With it, each element immediately takes on a complete look. Embroider a half-cross, make a stitch crossing it. Suitable for a large number of small details, color transitions, sun flares.
- The Danish system is used for large jobs and is convenient for long posts of the same color.
Make a row or column of half-crosses, turn the work, and finish it with reverse stitches. The technique will allow you to avoid mistakes and lay the crosses in one direction. The finished work will be beautiful and technically correct.
For some schemes, other crosses may be used. They are more often found in ready-made diagrams for beginners, which tell you step by step about the progress of work. It is recommended to make some parts with double elements or a ¾ cross, which craftswomen use to mark the edge of round objects.
When working according to the pattern, start with squares made with dark floss. Often the work takes several weeks or months to embroider. During this time, the embroidered light details will lose their appearance.
What schemes should I use?
The choice of drawings depends on the preferences and desires of the craftswoman. Since ancient times, embroidery has been a talisman, which is why patterns of similar appearance can be found on national clothes. Ornaments made of crosses were defended; they spoke without words about a person’s position in society. Often girls start embroidering when they dream of getting pregnant. They choose schemes with the following:

- angels;
- children;
- soft toys.
The composition “Almost Perfect” is especially popular. Many who embroidered it became pregnant while making the design or within a year after its completion. Doctors believe that the embroiderers stopped thinking about a possible pregnancy and calmed down, so their wish came true. Medicine does not refute the miraculousness of this scheme; the picture helps to calm down and get rid of stress, so there is no reason to refuse to make it.
Schemes for beginners meet the requirements:
- minimum number of colors (no more than 6);
- lack of gradual color transitions, similar shades;
- small size.
An ideal option for the first cross stitch, for beginners are wedding or children's metrics. They are small in size, and the fabric is not completely filled with crosses. Such embroidery must be completed by a certain date (anniversary, birthday or wedding). Due to time constraints, a novice embroiderer will not give up her lesson.
It is believed that embroidery has a beneficial effect on the human condition, but one should not forget about basic safety precautions. When starting work, you need to learn how to make stitches correctly, since without this the embroidery will not turn out beautiful and neat. You can embroider with crosses in various ways, namely: from bottom to top and vice versa; rows can be vertical or horizontal; diagonal embroidery.
The most important thing when embroidering is that the rows go strictly in one direction. Each cross stitch made consists of two separate stitches: the bottom and the top. Initially, all stitches are embroidered strictly in one direction, and then the embroidery goes in the opposite direction. By following simple rules, you can quickly learn how to embroider very well and decorate your home with your products.

Cross stitch is considered a fairly easy and interesting type of needlework, but before you start working, you need to familiarize yourself with the rules of embroidery.
Before embroidering, it is necessary to carry out preparatory work, namely:
- Treatment of the canvas with a special adhesive;
- Marking the canvas;
- Wash and iron the fabric.
Since the canvas may crumble during work, its edges must be treated with a special adhesive before starting embroidery. This takes very little time, but the edges will remain intact. Pre-processing the edges of the border is especially important when embroidering large modular paintings. Then you definitely need to mark the canvas. All patterns for cross stitch are divided into separate squares corresponding to one cross. In order not to get confused in the embroidery, you need to mark the outline into 10x10 squares with crosses. It is quite possible to make markings using special markers, pencils or ordinary soaps.
Important! When choosing markers, you need to take into account their features, since some of them are fixed to fabric at high temperatures, so the product cannot be washed in hot water.
Embroidery threads need to be divided into separate threads, wound on special bobbins. Before starting work, the fabric must be washed and ironed thoroughly.
How to learn to cross stitch yourself
To learn how to cross-stitch very well from scratch yourself, you need to watch a master class that tells you step by step how to start the embroidery process and what you will need for this.
To learn how to sew beautiful pictures, you need:
- Correctly fasten the thread;
- Make stitches;
- Select drawings and much more.

You need to start embroidery from the upper left corner, in this case the crosses will go from left to right, and all existing rows will be embroidered in turn down one after the other. From the very beginning of embroidery, you need to learn how to fasten the thread without knots. To secure the thread, you can leave a long tail on the opposite side of the embroidery or fasten the tail on the front side of the embroidery under previously embroidered crosses.
To embroider with a cross, you need to thread a needle into the lower left corner of the future cross from the wrong side, and then pull the thread diagonally on the front side and thread the needle into the upper corner on the right. Then draw a thread on the wrong side and bring it out in the bottom corner under the top.
You need to make as many diagonal stitches of the same color in a row to the right side as indicated on the embroidery pattern. Then, in the same way, you need to return to the very beginning of the row. To do this, you need to thread the needle into the upper left corner and bring it out through the wrong side in the lower corner diagonally. As a result, smooth and beautiful crosses are obtained.
Important! You should never start embroidering a design from the middle of the pattern, as you can only get confused and incorrectly determine the location of the pattern.
Easy cross stitch: lesson for beginners
Cross stitch for beginners is an excellent opportunity to get a beautiful picture in the end without putting too much effort, since the main design is already applied to the fabric, the most important thing is to study the meaning of each color applied to the fabric.
You can use various fabrics as canvas, namely:
- Cotton;
- Matting;
- Sackcloth;
- Canvas.

All of these fabrics have a noticeable check pattern for cross stitch. The fabric can be with a large or small weave and it is better if it is light. By looking at sample patterns, you can choose the best option for yourself, which will look stylish and sophisticated on absolutely any item. The patterns are very convenient for embroidery, because in this way we learn to cross-stitch. It will be very interesting to combine a cross with a satin stitch on one canvas, as this will allow you to get a very beautiful and original design.
You can also embroider on colored fabric, because such embroidery will look very interesting and original.
The special meaning of cross stitch
Before you start choosing a pattern for embroidery, you need to clarify what symbolism each pattern carries.
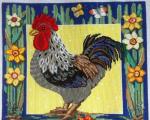
In particular, you can embroider such patterns and designs as:
- Flowers;
- Animals;
- Human.

Flowers are most commonly used as an embroidery design as they are a symbol of beauty, love and attractiveness. The lotus signifies perfection, grace, and peace of mind. Magnolia is considered a symbol of love and sophistication. Peony is a flower of joy, passion and love. It is considered the most favorable sign for young married couples. Chrysanthemum is considered a symbol of good luck, and a vase of flowers helps attract wealth. If you need to attract love into your home, then you should hang a picture on the wall with an aspen tree embroidered.
Very often you can see animals in embroidery. Many people prefer to embroider cats, as they are considered a symbol of home comfort. Therefore, if you want to get your own keeper of comfort, you should embroider a cat.
If you don’t have a loved one, you can embroider a couple of wolves, as this will help you meet your soulmate and also help you find family comfort. In addition, you can embroider a couple of birds; in particular, bullfinches look very beautiful, as the embroidery turns out bright, colorful and rich.
Cross stitch: ideas
Many people are interested in what are the best patterns for embroidery so that they can decorate their home.
Now embroidery is actively used to decorate many products, in particular such as:
- Decorative pillows;
- Handbags;
- Jewelry boxes and much more.

There are many embroidery ideas that children and adults will enjoy. To make a beautiful picture or postcard for children, you can use pictures with animals, in particular those that depict a bunny, fox, dog or cat are perfect. For kitchen towels, cross-stitched fruits, vegetables, tea and tableware can be a good decoration. In addition, if desired, you can decorate kitchen utensils with beautiful and original patterns. It looks quite stylish and unique.
Many people prefer to depict a person in embroidery, however, some rules must be taken into account. To bring coziness and harmony and comfort into your home, it is better to embroider a couple holding hands or kissing. This will help bring harmony into the relationship of a married couple and make the relationship more harmonious. Cross-stitched seasons of the year look very beautiful in the picture, especially summer, since in this way you can show all the beauties of nature. If you want to depict a New Year’s theme, then you need to depict on the canvas drawings of balls, a Christmas tree, Santa Claus and other fairy-tale characters.
How to cross stitch correctly: basic rules
Cross stitch is considered a rather interesting and simple activity; the most important thing is to follow certain rules. All required processes must be carried out very competently and carefully.
There are three main types of stitches that are used in embroidery, namely:
- Cross;
- Half cross;
- Tapestry stitch.

Cross stitch involves a pattern in which two threads lie on top of each other in the form of a cross. This seam is quite simple; the most important thing is to consistently carry out the embroidery process. A half cross is half a cross. The background for the design is usually embroidered with a similar stitch. In addition, the half-cross stitch is used for embroidering large-sized paintings, as this will save thread.
The tapestry stitch is very similar to the half-cross stitch, but only the reverse side is different. Vertical and horizontal rows are embroidered using tapestry stitch.
There are certain secrets of good embroidery that must be taken into account when carrying out work. It is very important that all stitches are the same and go in the same direction. Do not tighten the thread too much; it is better to make the stitch looser. For embroidery, it is better to use good quality floss threads, as they are strong, durable and have rich colors.
Important! When doing cross stitch, you can use a traditional (English) cross or a Danish one.
What you need for cross stitch: materials and tools
Before you start embroidery, you definitely need to prepare your materials and tools.
In particular such as:
- Overlay canvas;
- Hoop;
- Floss threads;
- Needles;
- Scissors;
- Scheme for the pattern.

The overlay canvas part is used to facilitate the embroidery process. After the embroidery is completed, its threads are simply pulled out from under the threads of the finished design. For cross stitch, floss threads are used, which manufacturers offer in a wide range of good quality. Before carrying out work, it is advisable to wash them to make sure that they do not fade and the finished work will not lose its attractiveness over time.
It is very convenient to embroider if a design has already been applied to the canvas, as this will facilitate the embroidery process. Many craftswomen do not use a hoop while working, but they help greatly facilitate the embroidery process.
Beautiful three-dimensional works: photos of cross stitches
One of the most popular types of embroidery is cross stitch. It is quite possible to make this type of creativity voluminous.
Volumetric cross stitch allows you to create simply unique three-dimensional products, such as:
- Caskets;
- Vases;
- Decorations;
- Decor items.

All things can be used for their intended purpose. To make the manufactured product three-dimensional, it is necessary to use a plastic canvas for the work. You can purchase such material at any craft store.
Cross stitch is done directly on the plastic base. In addition, the desired pattern can be applied to ordinary canvas, but small allowances are left along the edges of the fabric. After the embroidery is completely ready, the fabric must be sewn to elements made on a plastic basis along the outline of the embroidery. The result is strong elements, which are then fastened together to produce products of the required shape. Such products can become a home decoration or a rather interesting and original gift.
Modular cross stitch looks very beautiful and unusual. Modular paintings serve as a real decoration for home decoration.
Cross stitch lessons for beginners (video)
Cross stitch is very popular, as it allows you to relax, calm down and, as a result, get simply excellent results.
Cross stitch is a simple, but at the same time quite fascinating type of needlework. It consists of transferring the pattern printed on the counting chart to special canvas - canvas.
The fabric can be either clean or with a pattern already applied. For beginning needlewomen, it is better to buy sets with a printed pattern. This will relieve them of the need to constantly count crosses, which will allow them to focus on getting the stitches right.
In contact with
Classmates
The following tools are commonly used for cross stitch:
- hoop;
- scissors;
- needles with a blunt end;
- canvas;
- floss threads;
- scheme;
As a rule, threads and canvas are included in ready-made kits, which can be purchased at any hobby hypermarket or craft store. Needles are also quite often found in sets, but the final configuration directly depends on the manufacturer.
Hoop sold separately in specialty stores. They are two rings of different diameters. The outline is fixed between them. On the shelves of handicraft stores there is a large selection of devices for securing fabric. The hoops differ in diameter and the material from which they are made.
 Beginning needlewomen often ask themselves the question: should they immediately purchase a ready-made set or limit themselves to purchasing a pattern? Of course, purchasing just one canvas with a printed design will cost much less. However, not every craftswoman can independently choose the right shades of thread and their number. Manufacturers take on all the work of selecting colors and calculating their quantity. In addition, the manufacturer determines the size of the canvas required to transfer the design.
All sets are divided by difficulty level, which is determined by a number of factors:
- Number of flowers. The more there are, the more complex the drawing.
- Embroidery technique. So, one work can combine different types of stitches. In addition, the main pattern can be supplemented with ribbons or French knots.
- Canvas size. The size of the crosses also depends on this parameter. The most difficult thing is to create a pattern on small fabric. At the same time, it is the paintings made on small canvas that look most impressive.
- Canvas color. The darker the fabric, the more difficult it is to embroider on it. In order to learn how to cross stitch, it is better to choose kits with white or cream colored canvas.
- Size of the drawing. The larger the image, the more impressive it looks. However, embroidering it is much more difficult.
 An embroidery pattern is also usually included in the kits. However, in some sets, which consist of canvas with a printed pattern, the counting diagram may be missing. Each thread color is assigned a number that corresponds to a special designation on the diagram. The correspondence table is located on the sheet with the diagram. There are also recommendations on which stitch to use in each specific case.
Of course, ready-made kits cost embroiderers much more, but purchasing them saves embroiderers from unnecessary worries.
Cross stitch for beginners. Step-by-step instruction. Preparing for work
The first thing you need to do before starting work is organize a workplace. First of all, it must comply with safety rules and provide the needlewoman with maximum comfort. It is best to sit in a comfortable chair or on a soft sofa.
 It is also necessary to take care of lighting. The place in which the needlewoman will do embroidery should well lit. Daylight hours are best for embroidery. In the evening, you should take care of a table lamp, which should be used together with the main light source.
All tools and objects, necessary for embroidery, it is recommended to place them at arm's length so that they can be easily reached. At the same time, care must be taken to ensure that they do not interfere with the craftswoman doing what she loves.
Beginning of work
Before starting work, you need to decide where to start embroidering. Manufacturers of kits most often recommend starting embroidery from the center. This is true when the selected pattern is not solid. If the picture is continuous, then you can start working on it not only from the center, but also from any angle.
It is usually embroidered using two threads. However, some needlewomen prefer to apply the design so that the outline does not show through from under the floss threads. In order to determine the required number of threads, just embroider a few crosses on the canvas. Depending on the result, you can increase or decrease the number of threads.
How to secure the thread in the fabric?
 The following tips will help you learn how to embroider. First, let's look at the main ways to secure the thread in the canvas. The simplest one is the so-called loop method. It is suitable when embroidery is carried out in two threads. To secure the thread, simply fold a single thread in half and insert the cut ends into the needle. Now you need to pull the needle through the fabric, leaving a loop on the wrong side. After making the first stitch, pull the needle through the loop. So, the thread is secured.
Second way - pull the thread under the stitches. It is suitable when part of the design has already been applied to the canvas. In addition, you can make several small stitches in the place where the main pattern will be located. All that remains is to overlap the resulting stitches.

The photo shows main types of stitches. Basically, a full cross is used, which is the intersection of two diagonal stitches. It is important to remember that the upper diagonal of all crosses should be directed strictly in one direction (for example, from the lower left corner to the upper right). This will make the embroidery look neat.

Exists two types of seam: Danish and English. Both options are universal, and their use depends on the personal preferences of the craftswoman.
By doing Danish seam First, a series of diagonal stitches (half crosses) directed in one direction are applied to the canvas (picture on the left). The size of this row corresponds to the number of crosses of the selected color. Then you need to finish the crosses by stitching in the opposite direction.
By doing English seam Each cross is transferred separately. The transition to the next cross is carried out by  diagonals. The technique for making an English seam is shown in the figure below.
Both seams are universal, and each needlewoman is free to choose the most convenient option for her. In addition to the full cross, quarter, three-quarter and reverse stitches can be used during work.
The size of the quad stitch is 1/4 of the main stitch. It is performed as follows: you need to take the thread out of the bottom corner and pull it into the middle of the square. The three-quarter cross stitch consists of one full diagonal of the cross and a quarter stitch. As a rule, such stitches are used to “draw” individual details of the image.
In addition, reverse stitch is often used to shape the outline of the design. To perform it, you need to stretch the thread from the wrong side to the front side and then stick it into the hole located on the right. To perform the next stitch, you need to bring the needle into the hole located to the left of the first stitch and repeat the previous action.
Embroidery on canvas with a finished pattern
As mentioned above, sets with a pattern printed on canvas are more suitable for beginner needlewomen. Their main advantage is that the embroiderer does not need to constantly check the counting chart and calculate the number of crosses. Thus, such an outline will help you get better at making basic stitches.
 However, there is a small nuance: the drawing on such a canvas does not always coincide with what is shown on the diagram. For this reason, when performing small details, you will still have to refer to the counting diagram. If there is no diagram in the kit, then when embroidering small details the craftswoman will have to rely on her imagination.
Shutdown
Once the design is transferred to the canvas, you need to get rid of the print printed on it. This takes an hour soak the embroidery in warm soapy water. After this, the canvas must be rinsed and wrung out. Do not twist the canvas under any circumstances!
Now follows iron the work. To do this, place the embroidery on a terry towel face down and iron it. Once the fabric is dry, you can place the resulting painting in a frame.
These tips will help beginning craftswomen learn how to create real masterpieces.
 But you can master one of the most spectacular techniques - cross stitch - in just a couple of evenings. It is considered the simplest and most accessible, but at the same time it cannot be denied expressiveness and originality.
Touching “grandmother’s” napkins and tablecloths with embroidered flowers and birds are a thing of the distant past. Today, in the wake of the fashion for exclusive handmade work, this technique is considered leading in the creation of unique items for interior decoration. And of course, high fashion has not ignored it, decorating clothes and accessories using this technique is a fresh and relevant trend in recent seasons.
Learning to work in it and create your own masterpiece is really not difficult - you just need to master a few simple techniques.
Fashionable cross stitch in the photo:


Cross stitch technique for beginners
Like any fine needlework, this technique requires almost jewelry precision and careful preparation. You don’t need any complex or expensive tools or materials: ordinary hoops, canvas, needles and threads are the simplest set for needlework.
The technique of doing cross stitch is often called “counting” because while working you have to accurately count the number of stitches in rows and color blocks. Therefore, the first thing you should take care of is an easy-to-work canvas or base that will facilitate the counting process.
It is better to use, especially at first, a canvas with a large weave, on which the “squares” formed by the interlacing of threads are clearly visible. This canvas is usually made of cotton or linen; a more “readable” structure is provided by synthetic materials, in particular vinyl, which is what professionals advise beginners to use. Its only drawback can be considered only that the structure of the canvas will be clearly visible if the background is not completely “sewn up”. This effect, by the way, can be used as a stylistic solution for the work as a whole.
Unlike most handicraft techniques, even large cross-stitch works can be embroidered in fragments. This means that it is not at all necessary to acquire special hoops. Any that will allow you to tightly stretch a base measuring 20-30 square meters will do. centimeters. Experienced craftswomen advise choosing wooden hoops - they are not only convenient, but also pleasant to work with.
Needles also do not require much choice. To work with large weave canvas, medium-thick needles with a blunt tip are suitable. The denser the canvas, the thinner the needle should be. The only thing worth considering is the size and shape of the eye of the needle; it should easily pass the thread and not deform the canvas.
A variety of threads are used in cross stitch, but cotton and silk floss, as well as thin twisted wool yarn, are considered traditional. Such threads “lay” gently into the stitches, create an even, smooth texture and look great in the finished work. In addition, you will not have problems choosing even the rarest shades and color combinations - the choice of today's offers is simply endless.
Cross stitch: how to secure the thread
As in any fine needlework, in this technique the pinnacle of skill is considered not only the magnificent work itself, but also the impeccably neat underside. On the “clean”, as it is commonly called, the wrong side should not have any flaws: long stitches and ties that arise during the transition from one piece of work to another.
But in an ideal “clean” job there are no… not even knots on the wrong side. The fact is that when cross stitching, the thread is secured in a special way. To do this, a piece of thread is folded in half in the middle and the resulting “loop” is threaded into the eye of the needle.
After which, having determined the place to start work, the needle is inserted into the lower left corner of the “square” of the canvas. The same “loop” should remain on the front side. Having retreated literally a millimeter, the needle is brought back to the front side and the knot is tightened. Return the needle to the wrong side, and lightly pulling the thread, bring the knot there. The result is a miniature, durable knot, almost invisible from either the front or back side of the work.
Another technique that is worth mastering when taking your first steps is attaching a new thread. When moving from color to color, and this is especially important in multi-color compositions, a new thread must be carefully introduced into the design. To do this, you need to pull a new thread along the wrong side under several stitches exactly to the place where you will start embroidering with it. In this place it is necessary to make a neat stitch “back the needle”. That's it, the new thread is securely fastened and you can continue working.
In the same way, using the “back needle” stitch in cross stitch, the thread is secured at the end of the work. The tail of the working thread, about 5 centimeters long, is brought out to the wrong side, passed through several nearby stitches and secured with a “back needle” stitch.
Simple cross stitch technique for beginners
The main secret of beautiful and effective embroidery is even stitches of the same size. So that they turn out like this without special effort, you need to take as a basis a canvas with a large, clear weave of threads, which literally divides it into “cells” along which it is easy to make even stitches.
The needle with the thread attached to the wrong side is brought into the lower left corner of the canvas “cell” and brought out to the wrong side in the upper right corner - strictly diagonally. And then they make a “mirror” stitch: from right to left and get a perfectly even cross. Even for beginners, the cross stitch technique is simple and accessible.
There are two ways to lay out stitches on canvas: English and Danish. The English or traditional method - the first cross is embroidered separately and entirely, like each subsequent one, laid out in turn they form a row, and then a colored block. And according to the Danish method, in each row the bottom stitches are laid out first - from left to right, and then they are “closed” with the top stitches, passing in the opposite direction.
The choice of method is a matter of personal preference, and in both cases the front side of the work turns out smooth and uniform, and the back side is neat. But it’s worth trying both methods and choosing the one that is most convenient for you. Often, especially in large works, they are combined, since it is more convenient for English to lay out vertical rows, and for Danish – horizontal ones.
For your first projects, you should choose simple schemes that involve no more than three or four colors. Choose a simple, proportional pattern with medium-sized details. This makes it easier to try out the nuances of the technique and develop your own working style.
Cotton floss is ideal for first projects. Experienced needlewomen recommend starting to master cross stitch in two threads.
How to learn cross stitch from video
Patterns and programs for cross stitch:


From the first stitches to complex plots, in fact, there are only a few steps, this technique is so simple and fascinating. Especially if you use well-designed patterns that take into account all the features of cross stitch. It’s not for nothing that this embroidery technique is called counting - it’s better to entrust the preliminary careful calculation of patterns to professionals and use ready-made patterns. Fortunately, today there are offers for every taste - from still lifes and landscapes and genre scenes to reproductions of famous paintings.
All ready-made schemes, regardless of their complexity, are built on the same principle. Each square of the diagram corresponds to the future cross on the canvas, and the symbol or number indicated in it corresponds to the color of the thread. All you have to do is choose the right shades. You can, especially at first, use ready-made sets that take into account everything - from the size of the canvas needed for work to the combination of colors and shades.
But one of the most interesting solutions that allows you to feel like a real designer is cross stitch programs. They allow you to convert any image into a well-developed diagram, it can be a photograph you took yourself or an image taken from the Internet. The programs provide unlimited scope for choosing a plot and implementing your own creative ideas, especially since they are designed for the average user, are not complicated and do not require special knowledge in design.
Today there are many such programs, but they all work on the same principle: you load an image into the program, and it calculates your future embroidery down to the smallest detail. The selection of threads, their quantity, color combinations and canvas size, you can even get an image of your work in finished form. But most importantly, the program will provide you with a diagram that is impeccable in its accuracy - all you have to do is pick up a needle. But it is worth considering that the more complex the plot of the planned work, the higher the level of your skill should be.
Cross stitch: technique
Before you start, check that you have everything you need at hand. Most often, it happens that during the work process there may not be threads of any shade that is important for the overall color scheme. This usually comes to light at the most inopportune moment. Therefore, it is worth using the rule that experienced embroiderers adhere to: there is never too much thread. Collect your own palette, you will definitely need it.


If you have already decided on the scheme, then you can start working directly. First of all, you need to pull the canvas tightly and tightly onto the hoop - this way you will better see its natural markings. The hoop does not have to be large; the technique allows you to embroider in fragments, dragging the canvas as you work. It is enough for them to “hold” a fragment measuring 20-30 square meters. centimeters - this is the most convenient option for work.
Where to begin? First of all, by determining the center of the composition or drawing, you need to start working from there. The best way to maintain proportions and dimensions is to mark diagonals on the canvas and adhere to them as the main directions. It is best to fill the canvas according to the “snowflake” principle, moving evenly from the center to the edges.
If you have chosen a complex scheme, start with the largest area of the same color. It is also better to start with darker blocks of color - this way you will set the desired outline, which is easier to complement with light shades and colors. And be sure to cross out already embroidered areas from the pattern so as not to mistakenly return to them again!
The technique of cross stitch does not depend on the size of the work or the complexity of the plot. It’s up to you to choose whether to work using the English or Danish method. But in large works it is worth taking into account color transitions, avoiding long ties on the wrong side of the work. It is best to stitch the design not with individual crosses, but with solid color “blocks”. Trying to finish them so that the last stitch is as close to the first as possible.
It is also important to monitor the direction of the stitches. If you started making the bottom stitches from left to right, and the top stitches from right to left, absolutely the entire pattern should be done in this manner. This way you will get an almost perfect front side.
Stitches that “look” in the other direction are used to achieve certain visual effects, and this must be reflected in the pattern.
Basics of cross stitch technique on video:
Cross stitch: how many threads - 2 or 1?
This question inevitably arises before the start of any, especially large, work. The correct answer to this can only be given by the scheme you have chosen and personal preferences. Some people like translucent airy textures, others prefer voluminous and dense ones - this effect is achieved by threads in several folds. More often they are used to work on large blocks of color, a color that contrasts with the canvas, or to give the additional effect of volume that a drawing requires.
For example, in landscapes. A tree crown embroidered with a cross in three threads will have an effect similar to 3D, especially against the background of the rest of the pattern. And the impression of a complex spatial composition will be enhanced by clouds embroidered with a cross in one thread - the outline will shine through them, and they will look more transparent and airy than the main background. You can create three-dimensional compositions in this way in any work; sometimes it is “integrated” into the design itself, and in some cases such a solution can be added on your own. Imagination and creativity in this technique work real miracles.
But when choosing the number of threads, it is worth taking into account the size of the canvas sections; the larger its “cells”, the thicker and more voluminous the thread can be used for work. Most often, cross stitch is done in 2 threads, but when starting a large piece of work, such as creating a painting or wall panel, it is better to test your choice on a sample. A small square measuring 5x5 centimeters will give you a complete idea of what the texture of the finished work will look like.
Floss, as you know, is produced in skeins of different sizes; each manufacturer has its own. But each skein of floss consists of six thin threads, which must be properly separated before starting work - if you don’t know how to do this correctly and try to separate the threads in a common skein, you can hopelessly ruin the entire skein.
First you need to carefully unwind the skein and cut the required length from the total skein - 60-70 centimeters. This is the most convenient length for work - the thread will not get tangled, and you will not have to bend and unbend your hand when working.
Then, slightly fluffing the tip of the skein, you need to carefully pull out one thread, after which the skein is straightened again. Pull out the threads only one at a time!
In order to save time and make the process of cross stitch, for example, with 3 threads easier and more enjoyable, the threads should be prepared in advance. You can thread them into needles or use a special organizer.
Visit our online craft store. In this lesson we will tell you about where cross stitch actually begins. You will find answers to the questions: what is the structure of fabrics for embroidery; how to position the needle correctly; how to do a single cross. Let’s also try to embroider a small piece of fabric together.
Fabric structure
The special finishing of the Aida fabric, which forms distinct squares, makes it easy to count the threads, and small holes in the corners of the squares make it easier to pass the needle.
Linen (or cotton) fabric with a uniform weave of threads is also used for cross stitch. As can be seen in the figure, the rather sparse structure of the fabric allows you to easily count the threads.
When cross stitching, the stitches of one cross are made exclusively in one square. At the same time, the needle is in a vertical position in relation to the canvas (the tip is facing up or down).

On tissue samples shown in enlarged form, the structure and position of the needle are clearly visible.
Performing a single cross
The cross stitch is formed by two diagonal stitches, which are performed in the same sequence throughout the entire work. First, a diagonal stitch is placed from left to right (bottom), and then a diagonal stitch from right to left (top). In the picture on the left, a circle marks one square of Aida fabric.


Embroidering on Aida fabric with an even number of threads
The cross stitch technique depends not only on the structure of the fabric used, but also on the number of threads - even or odd. On this page we will tell you how to start cross stitching with an even number of cotton floss threads, namely in two, four, etc. folds.
1. Thread the needle with threads, the number of which is half that which will be used for embroidery, and insert the needle into the fabric from the front side of the work at the point of crossing of the threads forming the lower left corner of the square.

2.Pull the thread to remove it from the needle.

3.Thread both ends of the thread into the needle, doubling it in this way and securing it to the fabric.

4. Start making a bottom diagonal stitch in one square of fabric.

Embroidering on linen with an even number of threads
1. Thread the needle with threads, the number of which is half that which will be used for embroidery, and insert the needle into the fabric from the front side of the work at the point where the two threads of the first square intersect.

2. Pull the thread to remove it from the needle, thread both ends of the thread into the needle, thus doubling it and securing it to the fabric. Start sewing the bottom diagonal stitch.

Embroidery on Aida fabric with an odd number of threads
Here we will tell you how to start embroidering with an odd number of threads on Aida fabric using iris No. 5 and No. 8 or cotton embroidery threads (or single-fold cotton floss threads on thin linen).
1. Thread the needle, stitch from right to left, passing the needle under the two vertical threads of the Aida square and from bottom to top under the two horizontal threads of the next square of fabric.

2. Repeat similar stitches (under the two vertical threads of the square and under the two horizontal threads) on at least three squares of the Aida fabric.

3. Insert the needle into the top left hole of the last square and out through the bottom right hole.

4. Tighten the thread so as to hide its beginning under the threads of the first square, then sew the bottom diagonal cross stitch.

Embroidering on linen with an odd number of threads
Determine the number of fabric threads (both in width and height) on which the cross will be made. The picture below shows cross stitch on a square of three threads of fabric in width and height.
1. On the front side of the work, mark under the threads corresponding to the three crosses. Bring the needle under the crossing threads in the lower left corner.

2. Tighten the thread to hide the beginning of the thread under the first basting stitch, then sew a bottom diagonal stitch, catching the indicated number of threads.

Continued work
Now let’s try to cross-stitch a small section of fabric together. As you may have noticed, the needle with the point facing up or down is always in a vertical position, maintaining the same direction throughout the row. Each stitch covers one square of Aida fabric or the same number of threads across the width and height of linen or cotton fabric.