Crochet knitted clothes for newborn boys. Crochet items for newborns
Things for kids are different in that they are knitted quite easily and quickly. That is why they are so loved by both beginning needlewomen and experienced knitters. But despite all their simplicity, children's things are simply a huge scope for realizing your imagination. Crocheting for a newborn has its own characteristics.
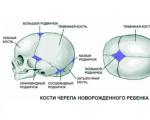
Since newborn clothing should first of all be comfortable for the child, its structure has some differences. Firstly, there should be a minimum of seams and a fairly elastic neck. Secondly, clothes for babies should be easy to put on and fasten simply and comfortably. You can use buttons or ties as fasteners. In addition to all of the above, you need to provide a place to use the diaper. In general, it’s a good idea for beginners to master crocheting on children’s clothing.
What you need for work
You should look at the diagrams of the models you like and determine what materials and tools are needed to create a certain thing. The diagram usually describes the entire process using special symbols. The description indicates which threads and which hook you will need. Hooks can be made of different materials, but the best are those made of steel. Although you may come across wooden, aluminum, plastic options and even ivory hooks. The size of the hook will depend on the thread used and the model chosen.
How to choose yarn
Crocheting for a newborn should begin with a selection of the right yarn. Babies' skin is very delicate and is easily exposed to almost any irritant. It is better for kids to knit from natural yarn. Naturally dyed cotton is ideal for these purposes. It is better to choose wool yarn so that it is not very shaggy and does not irritate the skin of a newborn. You can use special yarn for children, which is processed in a special way to give it softness.
Yarn preparation
Before you start knitting, any yarn should be prepared. To do this, wash it in soapy water and dry thoroughly. By carrying out such manipulations, you can prevent subsequent distortions of the threads or shrinkage of the finished product. To calculate the amount of yarn needed, you need to measure the length of the thread that will be obtained when the knitted pattern is unraveled.

To do this, you need to choose the model you like, as well as the pattern, and knit a full row of the product. After this, cut the thread and unravel the knitted row. By measuring the thread obtained after unraveling, you will know how much yarn will be needed to create one row. Next, you need to calculate the number of rows in the product according to the diagram. In this simple way you will determine approximately how much yarn you will need for the finished product.
How to knit booties

Crocheting for a newborn is a very exciting activity and provides an opportunity to diversify your baby’s wardrobe.
Booties are part of the baby's trousseau. It’s especially nice to make them yourself.
To crochet booties, choose a yarn that does not have excess lint. Cotton or linen thread is best. The main part of the bootie is the sole. They begin to knit it from the midline. The length of this line corresponds to one third of the length of the entire foot. After you finish knitting the sole, you need to move on to tying the sides and top. When making crocheted booties, you can use all possible techniques and create quite interesting patterns. When starting to decorate booties, do not forget that, first of all, they should be comfortable. Therefore, there is no need to be too zealous in this matter. Knitted leaves and flowers, as well as satin ribbons, which also serve as ties, are very suitable for decoration.
Crochet a cap
A bonnet is a headdress that covers the ears and can be tied under the chin. Threads for such a product should be chosen depending on the time of year when you plan to wear it.

In spring or autumn you can use wool threads, but in the summer you should take cotton or acrylic yarn. Before you start crocheting a cap, you should measure the circumference of the baby's head. The depth of the cap is equal to half the circumference. And the distance from the top of the head to the bottom of the back of the head will determine the size of the back part of the cap. Knitting begins from the back of the head and ends with ties. If you are learning how to crochet for beginners using a cap as an example, then choose simple patterns that will not require a long time to complete. And then, having mastered simple options, you can proceed to more complex patterns.
How to knit rompers
Crocheting for a newborn is not limited to creating only booties and bonnets. With the help of such a simple tool as a hook, you can create a huge number of cute, and most importantly, unique things for your baby’s wardrobe.

To crochet sliders, you need to choose the model you like, and then purchase all the necessary materials and tools, guided by the description of the model. Sliders can be linked in two ways. One of them is when two halves of a product are created and then connected to each other. In the second case, knitting is done in the round. First, the trouser legs are knitted, which are subsequently joined into one product, and knitting continues to the very top. When the work is finished, you can make straps, ties on the sliders, or sew buttons as a fastener.
Dressing up girls
From the very first day of a child's life, crocheting for girls can be much more interesting than for boys. After all, the variety of things for the wardrobe of little fashionistas is undoubtedly much greater.

These can be not only booties and hats, but also dresses, headbands, openwork scarves or woolen ponchos. In addition, all this can be decorated with ribbons, lace and cute knitted elements. And the “girly” color palette is much richer. But we should not forget that too bright colors have a negative impact on the emotional state of the child. It is better to choose calm shades of pastel tones or whitened colors. And keep bright elements to a minimum.
Crocheting for newborns may seem boring to some, but those who decide to try often turn it into their hobby. And after all the basics are mastered, they begin to create completely individual and unique things. After all, together with knitted things, you convey a huge amount of tenderness and warmth to the baby. All these openwork hats and warm blouses, made with love, will protect the baby from the cold, from the wind, and even from too bright sun.
Is your family expecting a baby? It's no secret that every mother wants her newborn to have the best. High-quality clothing and accessories are the first thing that future parents think about. Undoubtedly, everything a baby needs can be easily bought in children's stores, but we strive to ensure that the baby is dressed in truly exclusive things! By the way, organizing a unique wardrobe for a newborn is not at all difficult, and you can do it yourself! To do this, you just need to know the basics of crochet, and also have enough time to bring all the most original ideas to life.
The most interesting thing is that you can crochet almost all clothes for your baby - from simple socks and booties to elegant suits and fluffy dresses. The main advantage of such hand-made creations is that they are one-of-a-kind, because each needlewoman brings her own additions during the knitting process, thanks to which we can say with a 100% guarantee that no identical items, even crocheted according to the same pattern, will slip off the hook. comes out.

Today we present to the attention of needlewomen a bright selection of knitting for newborns, starting with a soft blanket for discharge, ending with a magical jumper for baptism and other appearances.
Before you start, we recommend that you carefully approach the choice of yarn for knitting children's clothes. The golden rule is to choose a yarn that is pleasant to the touch and, most importantly, hypoallergenic from the “Baby” or “Children’s” series, avoiding cheap but attractively bright threads.
As usual, we provide detailed instructions for knitting each model, supported by photographs of finished products, pattern diagrams and a detailed step-by-step description of the knitting process.
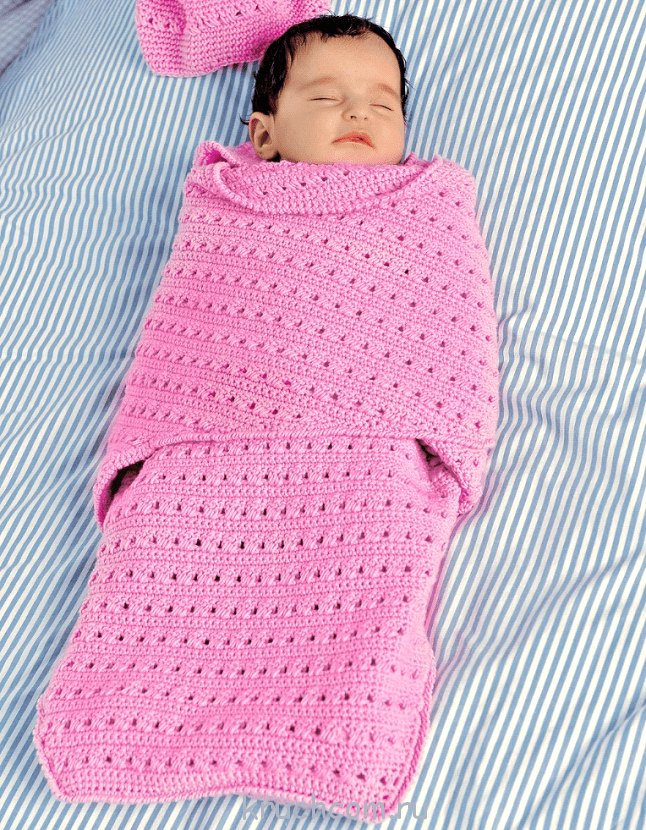
Unusually bright plaid envelope for discharge
The first thing the baby will need is an envelope for discharge from the maternity hospital. In order not to buy the same type, and, at the same time, not always comfortable blankets made of synthetic materials, you can knit a soft, natural blanket with your own hands.
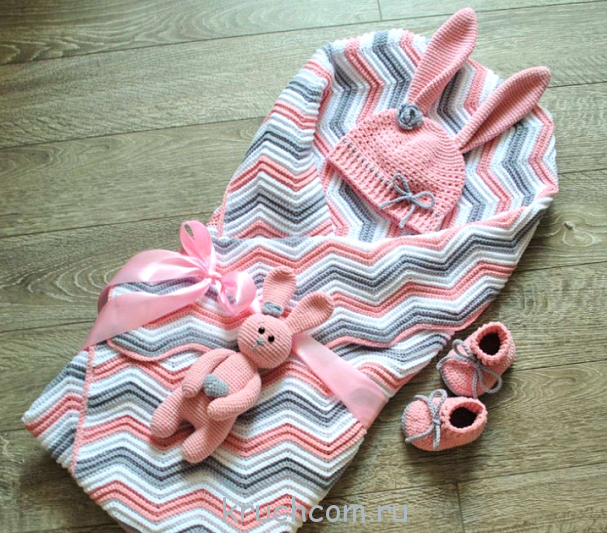
At the same time, even expectant mothers who have barely heard of crochet needlework can make such beauty. Minimal knowledge of crocheting techniques will help you knit such a cozy blanket envelope in a day or two at most, which will not only serve as the first carrying of the baby, but will also keep him warm in the future as a blanket in a crib or stroller.
Schematically, the knitting of the blanket looks like this:
Pattern:
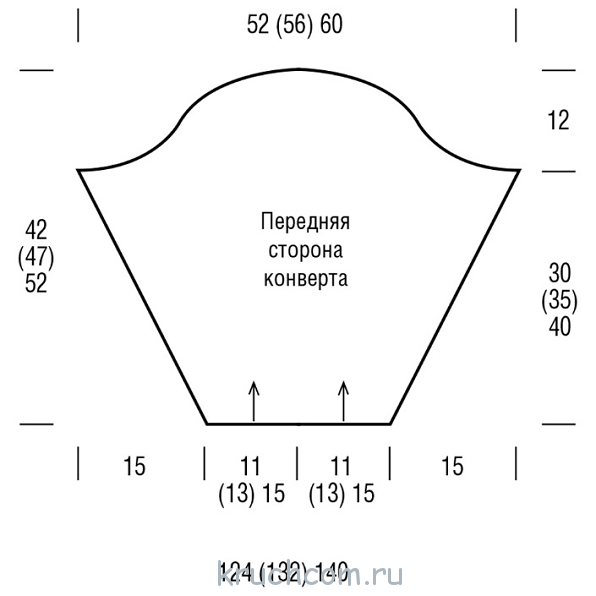
We strongly advise you to transfer the above patterns onto paper, making them life-size. This will make knitting a blanket easier, because you can make decreases and additions as you go, adjusting the knitted fabric to the size of the pattern. To do this, you just need to check the knitting by applying it to the pattern.
To knit an envelope blanket you will need 500-700 grams of wool yarn (if the envelope is winter) or 300-400 grams of mercerized cotton (for a thin summer blanket). Hook No. 1.5 or No. 3.
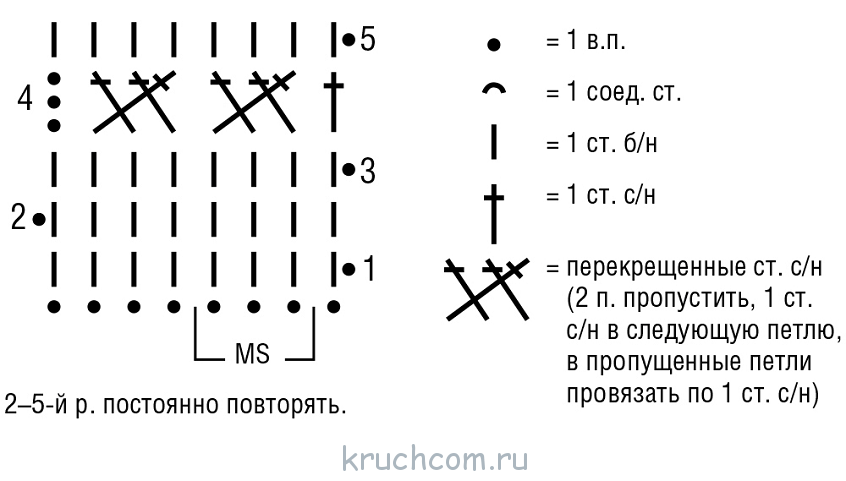
Patterns used in knitting:
- Single crochet stitches (hereinafter referred to as single crochet stitches): We knit in turning rows - we start each row with 1 chain stitch (hereinafter referred to as VP stitch), which replaces the first stitch. b/n, and we finish with one connecting column (hereinafter referred to as SS), we tie it into the VP.
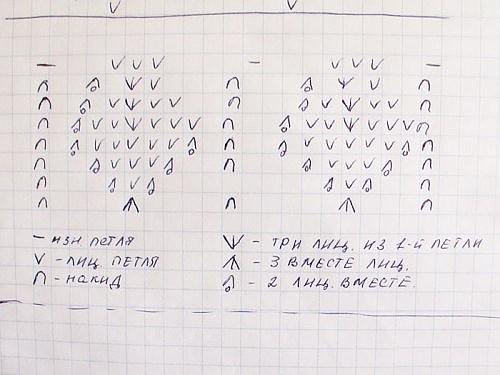
- “Crawfish step”: Knitted from left to right using single stitches. Pattern on three loops: knit in straight and reverse rows according to the pattern diagram provided above. We start with a loop before the rapport, which is constantly repeated, and end with loops after the rapport. Rows No. 2-5 are repeated until the blanket is knitted to the desired length.
Steps to complete the work.
Back of the envelope
We cast on a base chain of 62 VP + 1 VP (hereinafter read as an aerial lifting loop), knit according to the pattern, making additions/decreases according to the original size of the pattern. The total height of the knitted fabric should be approximately 90 cm from the first row. We finish the work with the help of CC.
Front of the envelope
We cast on a base chain of 62 VP + 1 VP (hereinafter read as an aerial lifting loop), knit according to the pattern, making additions/decreases according to the original size of the pattern. As soon as the canvas reaches 55 cm in height, we finish the work with CC.
Assembling the envelope
We moisten both parts with starch solution, iron them, and then sew the side seams. We first tie all the free edges of the product with a row of non-woven posts, then with a “crawfish step”. A cozy envelope for a newborn is ready!
In order to learn step by step how to knit baby blankets for discharge, we suggest watching useful video tutorials from talented crochet craftswomen:
Openwork cap for son and daughter
An important item of clothing for a baby is a thin hat - a cap, which protects the baby's tiny head from cold and wind. As a rule, caps are made from cotton fabric - they are simple in appearance and are suitable exclusively for home use. If a new mother wants to dress her child in an original headdress, she cannot do without a hook and her favorite yarn. With their help, you can knit an exclusive cap in a matter of hours that will attract the attention of everyone around you.

For mothers who are new to crocheting, we suggest trying to knit such a snow-white cap, which can be finished with an openwork border in either sky blue or soft pink.
Cap knitting pattern:

For the cap you will need white acrylic yarn of medium thickness (for hook No. 3) - approximately 50 grams, as well as toffee yarn in blue or pink tones for hook No. 1-1.5.
Knitting steps
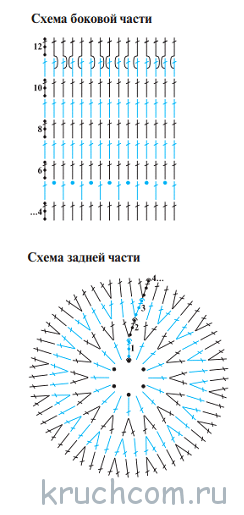
We start by knitting the back of the head in a circle.
Using white yarn, we cast on a base chain of 6 VPs and close it into a ring using a SS.
Row No. 1: 3 runways + 15 s/n columns in a ring formed by a chain of runways, the end of the row is SS.
Row No. 2: 3 runways + 1 column of s/n in the first runway, then repeat the following repeat 14 times: 2 columns of s/n in the next row. column s/n PR from the hook (hereinafter read as “previous row”). We finish SS.
Row No. 3: 3 runways + 1 column of s/n in the first runway + 1 column of s/n in the next. column s/n PR from the hook, then repeat the rapport 14 times: 2 columns s/n in the next. s/n PR + 1 column s/n next. s/n PR from the hook. We finish SS.
Row No. 4: 3 runways + 1 column s/n in the first runway + 2 columns s/n in the next. 2 columns s/n PR, then repeat the rapport 14 times: 2 columns s/n in the next. column s/n PR + 2 columns s/n next. 2 columns s/n PR. We finish the row with SS. We do not cut the thread.
The side part is knitted in straight and reverse rows.
Row No. 5: 4 VP (3 VP + 1 VP), then repeat the following repeat 25 times: 1 column of s/n in the second column of s/n PR from the hook + 1 VP.
We knit the subsequent rows in s/n columns according to the knitting pattern for the side part, up to the 11th row inclusive. SS, cut the thread.
Cap binding.
Row No. 1: using blue or pink “Iris” yarn and a hook No. 1.5, we knit columns of non-crystalline columns into columns of s/n of the fourth row of the back of the cap. We knit in straight and reverse rows.
Row No. 2: 6 runways (3 runways + 3 VP) + 1 column of s/n in the first runway + 3 VP + 1 column of s/n in the third column of s/n PR from the hook + 3 VP. Next, we repeat the rapport 16 times: 1 column s/n in the third column b/n PR from the hook + 3 VP + 1 column s/n in the same column s/n PR + 3 VP + 1 column b/n in the third column b /n PR from the hook + 3 VP.
We continue to knit rows No. 3-4 according to this binding pattern.
We knit ties.
Using a white thread, we assemble a chain of VPs of the desired length. We sew them to the cap. Starch the finished product to give it the correct shape and iron it.
Video on knitting a cap for a newborn:
Knitted clothes for newborns
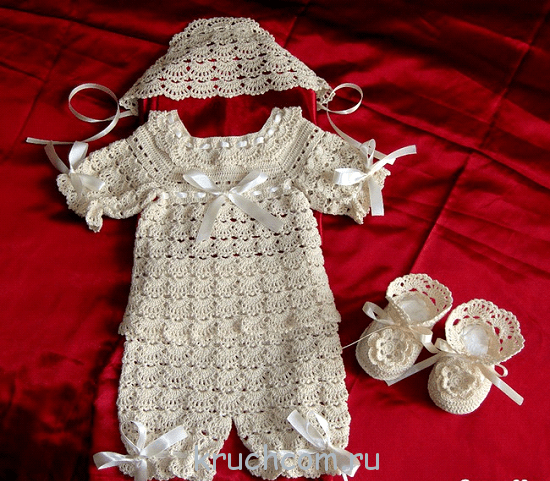
There are countless variations on the theme of crocheted clothes for newborns. Many mothers try to knit truly exclusive wardrobe items for their babies. Christening clothes are especially in demand - dresses, jumpers and entire elegant suits.
We suggest taking the “simple” route and trying to knit a snow-white jumper with short sleeves, which can be used for christenings and as an everyday outfit.
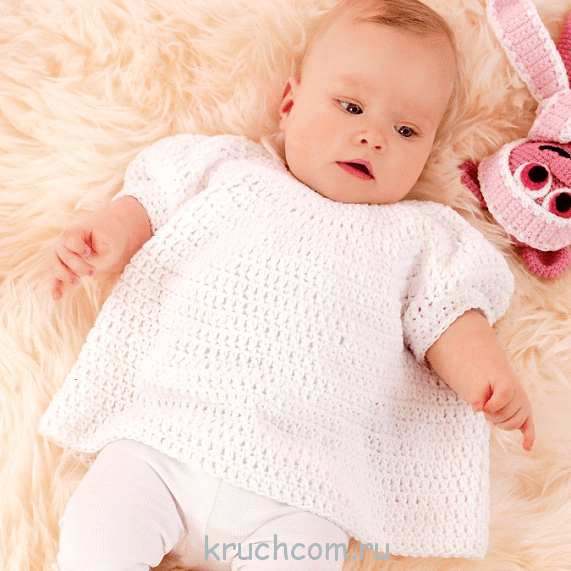
For size 62 (for a newborn) you will need approximately 150 grams of white yarn (cotton + acrylic), a hook No. 4 and buttons for decoration. The jumper is knitted with a simple pattern - single stitches and s/n stitches.
Product pattern:
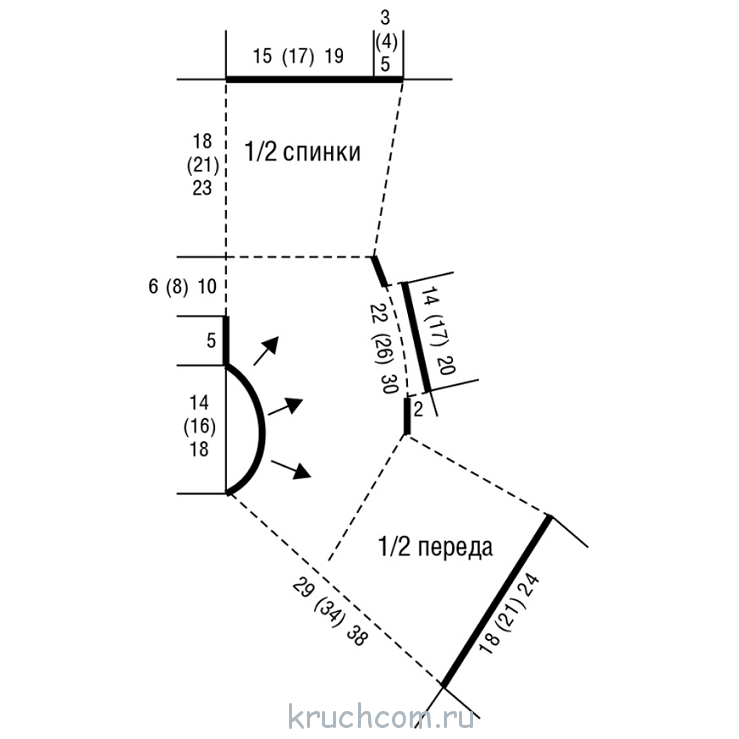
Work progress.
The jumper is knitted in one piece, starting from the neckline.
Row No. 1: cast on a base chain of 40 VPs, knit in single stitches.
Row No. 2: go to the main pattern (s/n columns), and double each loop (except those on the sides) (knit two loops each), respectively, you need to get 78 loops.
Row No. 3-4 is knitted without any additions using s/n stitches. Close all rows into a circle using SS.
Row No. 5: Double every third stitch 25 times, for a total of 103 stitches.
Row No. 6: Double every fourth stitch 25 times, getting 128 stitches.
Row No. 7: Double every seventh stitch 18 times, for a total of 146 stitches.
Having received 146 working loops, using special marker pins we divide them into parts of the product: 42 loops for the back, 31 for the right sleeve, 42 for the front, 31 for the left sleeve.
We knit the front and back using the circular method - there are 84 loops in the work.
We knit two more rows with s/n stitches without additions. On the third row we double every tenth loop from the hook 8 times, we get 92 loops in the work. We knit the fourth and fifth rows again without any increases. In the sixth row we double every ninth loop 13 times, for a total of 101 working loops. Next we knit without any additions. The total length of the jumper should be approximately 30 cm.
Let's start with the sleeves. We knit in circles, using single stitches. First, we knit all 31 loops, then we gradually decrease 9 loops, there should be 22 working loops left, which we knit with non-woven stitches for three more circular rows.
We assemble the jumper using an end seam and sew buttons on the back of the yoke. Ready!
We also provide an interesting selection of video master classes on knitting a variety of clothes for newborns:
And, finally, for even more inspiration for knitted creativity, we bring to your attention several original little things for kids that you can make with your own hands using a crochet hook!


You can knit anything for your beloved baby, and not just items of clothing. Lately, crocheted babywearing beads and comfort toys have become especially popular; they not only develop the child, but also provide him with absolute comfort even when mommy is gone for a few minutes.
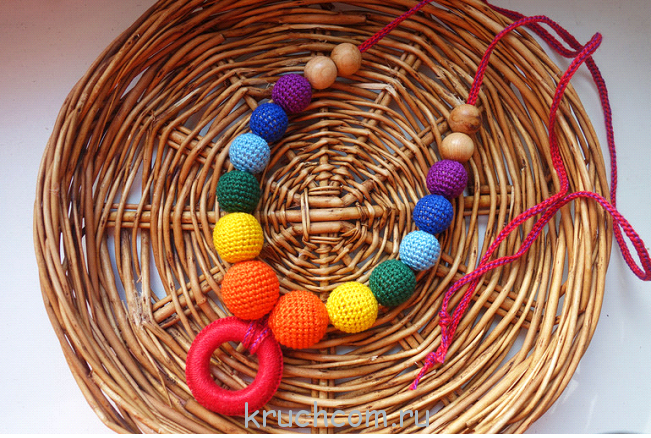
Create for the joy of yourself and your children, we guarantee that your children will appreciate all your efforts!
I immediately apologize to those who were waiting for MK just yesterday... everyone has such frantic days when you have to be in time for the bank, post office, studio, shops, breakfast-lunch-dinner, 2 times school, dances and, in addition, a parent meeting and it also turned out that the child’s shoes are too small - urgently need to buy them - the rains started... and we weren’t expecting them
Well... these hats were called pies, since you can “bake” them very quickly, more than one a day
The size of the hat was not determined at the very beginning, since it was not knitted to order, but for the sake of a master class, for you, my beloved mothers and grandmothers. You will need thick yarn. I have this Pekhorka - Soft Surprise. Hook 2.5 or 3. In the process, I wanted to add white baby acrylic (from the bins, unmarked, but unusually soft) 
We collect 12 dc in a circle 
we knit according to the pattern, pay attention... green row - no increases
Addition: to find out to what diameter you need to knit a “pancake”, you need to divide the head circumference by 3.14 (Pi number), you can take 1 cm or less from the result obtained 


then knitted 10 rows without additions 
Next I knitted 4 rows with single crochets and a row of crochets 
Let's start with the rose. It needs to be knitted very loosely (I'm on No. 3.5), otherwise it will be small and heavy. I made 48 petals, that is, the beginning of 96 air loops 

Young mothers will agree: with the advent of an infant, even the most inexperienced mother gradually turns into an inveterate needlewoman. The main thing in this matter is to start. Once the first step is taken, there is no turning back. Magazines, patterns, and equipment will appear in the house in order to knit various children's clothes. Knitting for newborns is a process so fascinating and addictive that once started, young mothers simply do not want to stop there - they want to dress up the child and show off their new baby clothes to their friends.
Knitting for newborns is a fascinating and addictive process
No matter how difficult knitting for newborns may look from the outside, it is actually not so. Knitting very beautiful, exclusive things with knitting needles for your beloved child is much easier than it seems.

The main thing is to start. You don't need much: imagination, some skills and, of course, the warmth of your soul. If all this is available, then even the simplest dress for girls will look like a dress of a little princess. All that remains is to try to connect it. Below is a dress option for a girl of three to nine months.
- To work you will need the following:
- yarn (acrylic) hot pink - 150 g, dark blue - 50 g, 350 m/100 g, blue ribbon (satin) - 80 centimeters, beads - 4 pieces;
circular knitting needles number three, additional knitting needles.
- Knitting technique:
- patterns following the diagram;
- facial smooth surface;
- garter stitch;
pearl pattern.
- The knitting density is loose.
- You need to cast on 80 stitches on the knitting needles (hot pink yarn). Close in a circle, knit 8 r., plat., elm.,. To 8 r add 20 p. Elm.. pattern, according to the knitting pattern (yoke).
- From 6 rubles. between the yarn over and the pattern of leaves, knit purl, st. Then divide the knitting: 20 sts each. Set aside for the sleeves on additional knitting needles, 30 sts each, for the front and back. Connect the front and back. Replenishing 10 points for armholes.
- After 60 rubles, start the hem pattern. Here we start knitting with a blue thread. 1 yarn over loop of the hem pattern is made blue, the remaining ones are made pink. Add 1 yarn over stitch to each row using blue yarn. Accordingly, decrease the pink loops, achieving a wedge.
- After connecting all the loops of blue yarn, knit 6 rows in blue, k... Ch. Then change the blue to pink. Knit., 6 r., plaid., knitting., and 4 r., knit.. Ch. Then knit 10 rows with blue yarn in a pearl pattern. Closed, all loops.
Assembly and finishing:
Knit the sleeve placket in the same way as on the hem - with blue yarn (pearl pattern). We close the loops. Zavyaz., h. 4 ribbon bows. Sew on. Attach beads in the center. The girl's dress is complete. This dress will look charming on a little fashionista!
Knitting for a newborn boy: a warm and beautiful sweater
This master class (with diagrams and detailed descriptions) is on the topic of how to knit a sweater for infant boys. A very easy option for beginners - your beloved little person will be pleased.

Size: 62, up to 3-4 months.
Materials:
- thin yarn (acrylic) - 80 g;
- silk thread (pink) - 20 g;
- knitting needles number two and number five;
- hook number two.
- Elm, plaid: knit, p, knit, knit, and purl, p.
- Persons, ch.: persons, r. - knit, p, purl, - purl.
- Pattern - according to the diagram.
- St., b/n.: insert the hook into the loop of the chain or bottom row, pull out a new loop. Fix the thread, knit two sts, crochet, in 1 pass.
- “Crawfish step”: knit in the same way as a single crochet, only from left to right.
- Knitting density 10 x10 (29 p. - 52 r).
- Back: 67 stitches are cast on with thread (acrylic), 2.5 centimeters are knitted in front, front, (inside, edge, folds), 2.5 centimeters in knots, according to the pattern (outside, edge). Next, knit the scarf, knit... When the height reaches 19.5 cm from the beginning of knitting, mark with a marker on 2 sides of the armhole and knit further in a straight line. After 7 cm from the beginning, the armholes are closed, 15 c. p. From each, art., from them, in each, 2 p., 3 p., and 2 p.. At a height of 28.5 centimeters, close 21 p. p/each, shoulder.
- Front: knitted exactly the same as the back. Closed, at height, 24.5 cm from the beginning, knitted in the center, 15 sts on both sides. Overall, high, 28.5 cm closed, 21 stitches under each, shoulder.
- Sleeves: 39 stitches are picked up with thread (acrylic), folded (as on the back). Next - plaid, knit, adding from 2 stitches, in each, 12 p., 6 p., 1 p. = 51 p. At a total height of 19.5 centimeters, all loops are closed.
- Assembly: shoulders are sewn together. Baiki: along the edge of the armholes. Using acrylic thread, pick up all the loops. Knitted, 2 centimeters plat., elm. Closed, loops. Make the rest, seams. Sew the sleeves into the armholes. Armhole trims should be on the outside. The cutout of the throat is tied with a thread (silk) crochet, in 1 r., st., b/n and 1 r., st., “rac., step.” Bottom, edge, bend the folds. Hem it from the inside out. Once the sweater is knitted, dampen it and dry it.
- Sweaters - These types of pullovers can be seen in magazines in many photo shoots. You need to have such magazines on hand - there will always be something interesting in them or there will be some kind of hint that young mothers need.


How to knit rompers for babies: comfort comes first
To knit rompers or seamless bodysuits for babies, you will need the following:
- four skeins (acrylic - 70 percent, lamb wool - 30 percent);
- eight buttons;
- knitting needles number three and two and a half.

You can choose any color
- The back is knitted in one piece. Start with the left pant leg. After 26 stitches, knit faces. p. Add 1 p., for each., 5 r. Repeat. nine times. After 13 cm, 44.
- Set aside and knit the right leg like the left. Connect the loops that were set aside. The total should be 88 points.
- Before you start knitting like the back. At 22 p. closed, one-time 8 p., under the clasp = 62 p. For an armhole of 34 centimeters, decrease: 1 p., - 2 p., 4 p.. - 5 p. = 50 p. At 35 centimeters, closed. , in the center of the canvas. Finish each, side, dept.
- Through a row of closure: 1 r., - 4 p., 1 r., - 2 p., 3 r.. - 1 p. Through four rows 1 r., 1 p. Place the button at 42 centimeters, hole ., = 1 p., in the middle of the shoulder. At 43 centimeters, 7 stitches are closed one-time, shoulder.
- Plank: for each, cast on 9 sts on the back. Knit 11 centimeters, closed. For the front slats, everything is done the same way. Only in the center you need to make 3 stitches, for buttons. The first one is indented 1.5 cm, the others 4.5 cm.
The sock is made with the sole and top of the foot. Knitting needles number 2.5. Cast on 15 sts, knit 7.5 cm. Add 30 sts on both sides = 75 sts. After 3.5 centimeters close. Knit, 3.5 cm, wide, - 14 p. Each, 4 r., decrease: 2 r., 1 p., every other 2 r., - 1 p. Closed.
Assembly:
Sew in the strips. Connection, front with back seams (side). Collect socks. Sew them to the bottom of the rompers.
Knitting kit for a newborn: diagram and description for beginners
Knitted sets are much more practical to make than each item individually. Therefore, it makes sense to knit a set at once rather than return to this issue later.
Knitting a set is divided into two components:
- Blouse for a newborn.
- Pants for a newborn.

Knitted sets are much more practical to make than each item individually
Blouse:
- To knit a blouse with your own hands, you need number 3 knitting needles and yarn interspersed with merino wool.
- Use knitting needles to cast on 135 stitches. Knit ten rows in the usual way.
- Then knit the six outer loops with knitting needles. Knitting - scarf. The remaining loops are done in a simple way.
- At the same time, on the right side, make 4 openings for buttons.
- The diagram shows the sequence of actions:
- After ten centimeters from the beginning of knitting, knit one row with knitting needles as follows: 6 knit, 29 knit, evenly removing six loops between them. Then bind off four stitches, followed by 29 knit stitches, decrease 6 stitches between them, 6 knit stitches. There should be three elements of the product. Each of them is then knitted separately, elm. Closed, p.
- Using 2.5 knitting needles, knit 10 rows with an elastic band. After this, again, with the third number, knit in the same way as the base of the sweater was knitted. While knitting, add 8 stitches evenly.
- Knit to the end of the sleeve (approximately 14 cm).
Model assembly:
Tie off the shoulder and neck seams. Sew in the sleeves so that they fit exactly to the base of the sweater.
Pants:
- Using 2.5 knitting needles, cast on 27 sts. Knit., 10 r., plat., knit..
- Next, use the third number, using stockinette stitch, adding 1 stitch for each row.
- Set aside 36 stitches. Knit the second part in the same way as the first.
- After this, make another element, repeating everything again. You will get two pieces of pants. The parts are connected using a side seam.
As you can see, knitting children's products with your own hands is not so difficult. Numerous magazines will be a good help for new ideas, models and drawings.
- Japanese bamboo knitting needles are considered the best - a special coating does not allow the yarn to slip;
- In addition to ordinary knitting needles, knitting needles with removable fishing line may be useful - they will not hurt in stock;
- You should always have an auxiliary hook, double-sided pins, and pins with multi-colored heads in your arsenal;
- various snap-on markers;
- tips for knitting needles;
- needles for stitching.
Knitted children's bodysuit with knitting needles (video)
Knitting for children (video)
Write down everything you consider necessary in a notebook - sooner or later it will come in handy. The notebook will show you what you need to buy in order to knit the item you like. Don’t neglect such little things and everything will get better and better every day.
Oh, these modern mothers! As soon as the baby is born, in the delivery room he is dressed in beautiful caps and openwork blouses. Diapers and standard clothing are a thing of the past. Nowadays mothers want their babies to look fashionable and modern. They spare no money or time for this purpose. That is why topics about crocheting for newborns are so popular today. You can find many options with diagrams and descriptions, and this is one of them.
The baby has very delicate skin. He just needs to buy natural things. Therefore, by purchasing threads yourself, you will be convinced of the quality of your future clothes. After all, harmless fabrics are being invented for children, and the latest technologies for the production of natural fibers are being developed. Things knitted by the mother protect the newborn from unkind glances and illnesses.
Popularity of crochet for newborns
Crochet crafts have become a part of our daily lives. It is gaining more and more popularity every day. Such beautiful things are much more diverse than when knitting. Models for newborns are especially popular. Things turn out so fragile and airy. Many mothers try to make a unique little thing even before the birth of their baby. Crocheting things for newborns has become very popular today for beginners. After all, there are so many useful things you can make for your baby or toddler with your own hands.
A wonderful hat for beautiful babies
Products for newborn girls are very delicate and exclusive. The baby will be beautiful in a dress crocheted according to a special pattern. Babies often need hats to protect their heads. You need to stock up on natural threads and crochet. Creating a hat begins with an amigurumi ring, in which you simply need to knit 12 double crochets.


For further crocheting, the following pattern is suitable. If you want a bright hat, then you can knit each row in a different color. And at the same time, there are no special costs; you can collect leftover yarn and create unsurpassed beauty.

By doing the work according to the above scheme, you should get a multi-colored circle like this.

Subsequent work consists of knitting with double crochets in the previous row in each loop. The thread color changes again. You need to knit about eight rows.
Important! Take into account the individual characteristics of the baby, try to try it on her from time to time.
We knit the last rows without a crochet, there will be about three of them. And mommy already got an amazing hat for her daughter.

The beauty is ready, but it definitely needs to be decorated. Flower knitting is provided for such purposes.
Master class on flower decoration for kids
Such a simple, but quite beautiful flower is used not only to decorate a hat. It can be attached to absolutely any thing. Knitted items look great with such a flower if they are suitable for newborns.
Six single crochets need to be knitted into an amigurumi ring.


Be sure to increase each stitch. You will get twelve single crochet columns.

Then we knit three air loops. Skip one stitch at the bottom. In the next one, knit a single crochet. This is a kind of circular knitting.

Next row: two air loops, five double crochets in the arch, two air loops and single crochets in the arch. Thus, we knit in a circle until the row ends. Do not cut the thread.

It's very easy to do. So little work, but it turned out to be a beautiful flower.

We also knit the second flower. We knit a single crochet into the arch of the bottom row. The next two air loops, and again a single crochet in the lower arch. Knit in this way until the very end of the row.


The next row begins with two chain stitches, knit four single crochet stitches into the column arch, then two chain stitches and a single crochet stitch into the arch.

This is what will come out in the end:

You can also finish the third flower, then it will become more voluminous. The scheme of operation of the third flower is the same.

And now our work is ready. All that remains is to finish the middle. We knit about six single crochets into a ring, and increase twelve loops in the second row. Then knit twelve single crochets and decrease six stitches.

All that remains is to fill the middle of the ball and attach it to the finished flower.