Knitted jumpsuit for baby. How to knit a do-it-yourself baby jumpsuit for newborns and babies up to a year old with knitting needles or crochet for beginners and experienced craftsmen: diagrams, descriptions, sizes, step-by-step photos and video master classes
Overalls for the baby spokes.
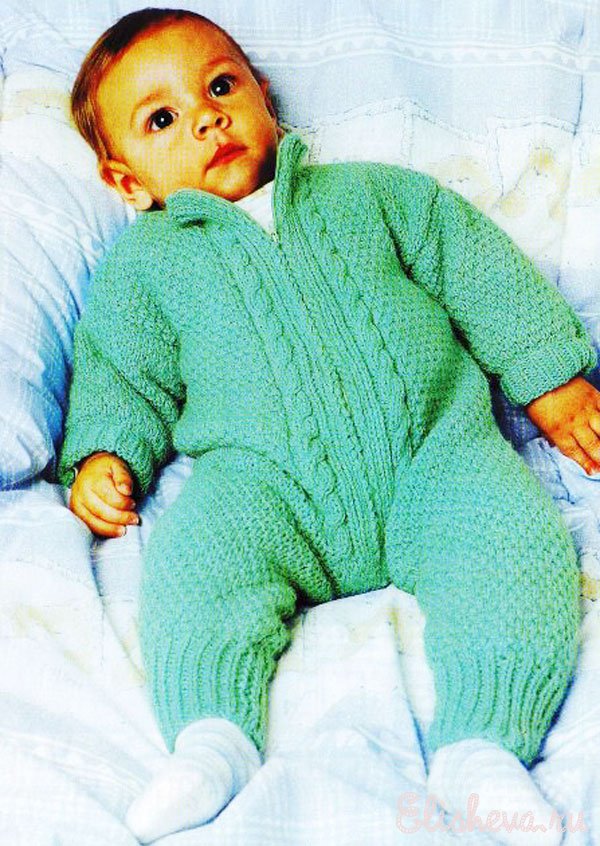
 From materials, we need 200 g of green acrylic yarn, a 30 cm long zipper to match and knitting needles with numbers 2.5 and 3.5.
Patterns that we will need to perform: elastic band 1x1 (1 front, 1 purl), the wrong side is knitted according to the pattern. Fantasy patterns are knitted according to patterns.
The density of our knitting is 10 cm = 22 loops.
The work is knitted with a thread folded in half!
Let's start with the back part. On knitting needles 2.5, you need to dial 20 loops (for each leg) and knit the next 7 cm with an elastic band. Then you should switch to knitting needles with number 3.5 and continue knitting (diagram 1), while in the first row you need to add 8 loops. In each 8th row, you need to add 1 loop along the line of the crotch seam only 4 times. When 22 cm is knitted, the loops of both legs are combined (for this, 8 loops are typed between them), another 20 cm must be knitted straight. When only 42 cm is connected, 4 loops are closed on both sides for armholes. Then you need to continue knitting and at a height of 55 cm close 21 loops for both shoulders and 22 loops for the neck. Everything, knitting ends.
Now it's time to start knitting the front part, which is done in the same way as the back. When a height of 24 cm from the beginning is reached, the knitting is divided into two parts for the cut, while the loops are distributed as follows: 6 loops on both sides of the cut are knitted with an elastic band, the next 6 loops are knitted according to scheme 2, and the remaining loops are knitted according to scheme 1 When 42 cm is knitted, 4 loops for armholes are closed on both sides. Knitting continues, and after 10 cm you need to close 4 loops to form a neckline, while in each 2 row it decreases on both sides 2 times 3 and 1 loop. When the total knitting height is 55 cm, 21 loops are closed for each coat hanger. Knitting ends.
To knit the sleeves, you need to dial 32 loops on the knitting needles with number 2.5 and knit with an elastic band 4 cm. Then go to the knitting needles number 3.5 and knit the pattern according to scheme 1, and in 1 row you need to add 12 loops, and in each 6 row - on both sides add 6 times 1 loop. When only 19 cm is connected, the loops need to be closed and the knitting finished.
Now you can start assembling. Shoulder seams are made, then with 2.5 needles 32 loops are raised along the edge of the neckline, another 3 cm are knitted with an elastic band. Then all loops are closed according to the pattern. The remaining seams must be completed, then only sewing on the sleeves and sewing in the zipper remains. When the product is ready, it must be moistened and left to dry.
The jumpsuit is ready! Now your baby will definitely not freeze!
A jumpsuit is a blouse and trousers combined into one. It can be summer or winter, festive or everyday. Very comfortable clothes, especially for small children! The kids are comfortable in it, they move freely, while always looking neat. You can order a universal little thing for an experienced knitter, but, honestly, it makes sense to decide on an independent step. We will help you create a knitted jumpsuit for your baby. The scheme will allow you to cope with the task, even if the magic loops are not yet too subject to you.
Hooded
Most often, parents rely on the fact that in clothes resembling a cocoon, their child will be warm and calm. Therefore, soft, rather thick yarn is suitable for creating such a thing. If you only have a spoolie, do a few additions. Many people like to work with a thin acrylic thread. The costume can be knitted and crochet, with or without a hood, with a complex or simple pattern. The choice is yours!
Experienced needlewomen are advised to put aside doubts and experiment. In the end, you can always dissolve the canvas and start all over again. We offer you a knitted jumpsuit for a baby (scheme with a hood). It will fit a boy or girl between the ages of six months and nine months.
Two hundred grams (200 g) of acrylic should be enough for you. Choose a zipper (length 35 cm) according to the tone of the yarn. This model is crocheted No. 2. Used loops: air (ch.p.), double crochet (st. s / n). Fantasy patterns. By the way, having become fascinated with knitting, many discover that they can create simple patterns themselves. It is important to observe the density: 24 loops is 10 cm.

We start with warming the legs
So, let's get to work. Despite the fact that there are two legs, in the end the product looks like one piece. In the meantime, we are creating “apart”: we collect the initial chain of one leg - 58 air. p. We knit 3 cm (knitted jumpsuit for a baby, scheme No. 1). Then we go to scheme No. 2, reducing one loop (57 p. Remains). This is necessary to maintain the rapport of the fantasy pattern.
The output should be a canvas 20 cm high. We keep count from the beginning of work to the place where the trousers are combined, the second is knitted similarly to the first. We connect the future "houses for legs" with a chain of eleven air. n. At the same time, add 5 air. p. on the sides is now a single part (total - 135 p.).
We unite into one
Having knitted 13 cm from the junction of the legs (step seam), we reduce one loop. Remains, respectively, 134 p. Next, we return to the crossed double crochets (knitted overalls for the baby, scheme No. 1), repeating the pattern until it reaches a height of 4 cm. After that, we switch to scheme No. 2. At this point, be sure to add one loop to become 135 p. When 44 cm has been passed from the beginning of work, it is necessary to divide the loops into groups. To mark the "islands" use threads of a contrasting color. Twenty-eight (28) loops are allocated to the front parts. A contrasting thread for designating groups is a universal technique. It is used when creating both a knitted jumpsuit for a baby (the knitting pattern will be described below), and any other knitwear: skirts, blouses, sundresses, dresses.
So, let's continue: eleven loops (11) will go to the armholes. Later we will sew the sleeves here. Fifty-seven loops (57) will make up the back (back). Next, knit eight (8) cm (report point - beginning of the armhole) on the right side of the front. This, as you remember, is 28 loops. To form a neckline (the cutout is formed in steps), gradually close 7 sts at once. Then 2 times 3 sts and once 1 st. You should have 14 loops left. At a height of 56 cm (from the very beginning) we finish knitting. The left shelf is reproduced in a mirror image (i.e. symmetrically to the right one).

Shelves, back, sleeve
Raise in height and back (part of 57 p.). We reach a total height of fifty-six centimeters (56 cm from the beginning), we stop. We mark (visually or with a thread, as you like) 14 loops on the coat hanger. The main part is ready. Now it's time for the sleeves. For each, we collect a chain of air loops (38) and reproduce three cm of the first pattern already familiar to us (knitted jumpsuit for a baby, scheme No. 1). Next, we go with a pattern according to scheme No. 2. On the transition from one pattern to another, add one loop (up to 39).
We bring the number of loops to 57. This is achieved by adding in every second row nine times, one on both sides. Thus, the sleeve gradually expands. At a height of 23 cm, we finish it and proceed to create a hood. This important detail will protect the baby's ears from the cold if the hat is forgotten at home or the wind rises.

The head will be warm
For the headdress, we collect a chain of thirty-three (33) loops. We go ten centimeters with a fantasy pattern (knitted jumpsuit for a baby, scheme No. 2). After that, we form a ledge: on the right we “get” 24 air. loops and knit the fabric with a total complexity of 57 loops. Having reached a height of 22 cm, close 24 loops. Our presentation is ready. So, we returned to the original 33 loops, which we knit until the total height of the hood reaches 32 centimeters. The detail is ready. It remains to assemble the product and, of course, admire the work.
Let's make shoulder seams, having formed armholes, we sew sleeves into them. We sew a hat, combining the letters (knitted jumpsuit for a baby, crochet pattern "Hood"). Connect it to the neckline. Let's sew a zipper. This clasp is very practical. It remains to slightly moisten the finished product. As soon as it dries, you can try on a new thing.

Good luck, needlewomen!
Knitting needles give the fabric softer than a hook. There are craftswomen who prefer to work with this particular tool, creating a knitted jumpsuit for a baby. The scheme of the picture can be any, even a simple front surface is suitable, which is easy to decorate with simple embroidery or overhead details. Rely on the size indicated for the crochet model.
Often, experienced mothers make knitted clothes for growth, slightly lengthening the legs and sleeves: in the process of wearing them, they are simply tucked up. With older children, such a “knight’s move” does not happen to work. But for babies growing by leaps and bounds, it becomes a godsend. We wish you to successfully overcome such a miracle as a knitted jumpsuit for a baby. Scheme for beginners (knitting needles): we collect any number of loops. 1 row: 1 l., 1 out.; 2 row (and all purl) - according to the pattern (how the loops look); from the third row, we repeat the pattern in a checkerboard pattern: 1 out., 1 persons. The drawing is simple (reminiscent of "rice"), but very pretty. We wish success to all needlewomen!
What could be warmer and more comfortable for a baby than a warm knitted jumpsuit? You can't do without this piece of clothing on cool days. And how cute and funny the kids look, dressed up in fluffy overalls. In this article you will find a detailed master class for beginners, which tells and shows step by step the entire process of making such things. Pay special attention to photo and video tutorials. In addition, other interesting and original models of overalls are offered to your attention.
A simple version of a children's knitted jumpsuit for beginners
You can knit the first jumpsuit for your child yourself. To help you, the craftswoman Tatyana Vinogradova created the following master class. You just have to stock up on threads and knitting needles, study the following diagrams, descriptions, instructions and go! Knit, and everything will turn out!
The jumpsuit is designed for a child from 0 to 4 months. To work, you will need “grass” yarn - 3 skeins, cotton / acrylic yarn - 1 skein, knitting needles No. 2, hook No. 4.5, buttons - 4 pcs.
Pants.Cast on 27 sts with cotton / acrylic thread and knit with an elastic band 1x1 8 p.

Introduce “grass” yarn into work and knit faces. stitch 40 p., evenly decreasing in the 1st p. 7 p. (=20 p.). Postpone knitting.

In the same way, knit 3 more parts of the legs.
Combine 2 parts of the legs into one piece, knitting the last loop of the 1st part and the 1st stitch of the last leg together. On the needles, you should get 39 p. Next, knit 40 p. persons. stitch, mark the beginning and end of the row (sleeve) with a marker. Knit another 16 p. persons. satin stitch.


A skilled mother needlewoman will easily knit using our instruction article.
Front end.Connect the two remaining legs in the same way as the previous ones. Knit 8 p. persons. satin stitch. In the 9th r. close the central 3 p. and then tie both parts of the front separately. Knit one half and on the 40th row mark a place for the sleeve with a marker. Knit another 15 p. and begin to form a neckline, closing 1 time 3 p. In the 17th p. close 1 time 2 p., in the 19th p. 1 time 1 p., In the 21st close all the loops. Knit the second shelf of the front of the overalls in the same way.

Hood.
With cotton / acrylic threads, dial 68 p. And knit 8 p. rubber band 1x1. Attach yarn "grass" and continue to work, decreasing in the 1st p. evenly 14 p. (= 60 p.). Next 20 p. knit faces. satin stitch.

Divide all loops into 3 equal parts and knit the hood using the sock heel technology. Knit faces. stitch 17 p., 18th and 1st p. knit together, turn the work over. Next, knit out. a number of out. loops: 16 p., Knit the 17th loop of the middle and the 1st loop of the 3rd part together. In this way, knit until 18 central loops remain on the knitting needle and then cast off all loops.

Sew the product along the lines of the shoulders. Cast on the knitting needles on the faces. side 34 p. Knit faces. satin stitch 25 p. On the 26th row, insert cotton / acrylic thread and knit 8 p. rubber band 1x1, while evenly subtract in the 1st p. 4 p. (= 30 p.). Close all loops.
Knit the second sleeve in the same way.

Product assembly. Complete all seams.

Crochet the strips on the shelves and sew on 4 buttons.

Optionally, you can tie bunny or kitten ears on the hood. But overalls made in white and with teddy bear ears on the hood are especially popular and in demand. Tatyana Vinogradova, the author of the product and the master class, called this jumpsuit “Umka”. You can see his photo below. Jumpsuit "Umka" is knitted according to the same master class.

Semi-overalls: knitting patterns and a description of further work
Children's semi-overalls are a very practical thing. It is convenient to play in it. It holds well on the body of the child, does not slip or twist. It is especially convenient to play in such a model on the floor, grass or in the sandbox.

This model is suitable for a child of 1 year.
To work, you will need cotton / acrylic yarn - 100 g of red, 50 g of pink and yellow; 5 pieces. buttons, knitting needles number 3.
Knitting density: 10 X 10 cm = 26 loops X 36 rows.
Sequence of alternation of bands No. 1: persons. smooth surface * 4 p. red yarn, 4 p. pink yarn*, repeat from * to *.
Sequence of alternation of bands No. 2: faces. smooth surface * 2 p. pink yarn, 2 p. red yarn *, repeat from * to *.
Sequence of alternation of bands No. 3: persons. smooth surface * 2 p. red yarn, 2 p. pink yarn*, repeat from * to *.
If, nevertheless, you still do not have enough skills to knit a jumpsuit, look at the link and knit beautiful and high-quality things with us!
Description of the knitting process for beginners
The back of the product.- Start knitting from the left leg.
- With yellow yarn, dial 32 sts on the knitting needles and knit faces. stitch, adding in every 2nd p. on the right edge 5 times 2 p. (= 42 p.).
- At a height of 4 cm knitting set aside. Knit the right leg of the back part symmetrically to the left.
- At the height of the right leg 4 cm, attach the loops of the left leg (= 84 p.) to it and knit further in a straight line. satin stitch.
- Form a gusset as follows: in the 1st person. R. on the middle 8 p. remove 1 p., 2 persons. together, stretch through them the removed item, 2 persons., 2 persons. together.
- In the next persons. R. on the middle 6 p. 'remove 1 p., 1 person., stretch through it the removed p. together *, repeat from * to *.
- In the next persons. R. repeat dec 3 more times (= 72 sts) and then knit in a straight line.
- At a web height of 11 cm, alternate strips No. 1.
- At a height of 29 cm, after 4 rows, knitted with red yarn, alternate stripes No. 2.
- At a canvas height of 31 cm, to form armholes on both sides, close in every 2nd p. 1 time 4 p., 2 times 2 p., 2 times 1 p. (= 52 p.).
- At a canvas height of 42 cm, to form a neckline, close the middle 30 p. And then tie both parts separately.
- Having knitted 2 rows, close 1 time 2 sts along the edge of the neckline. At a height of 43 cm, close the remaining 9 sts of the shoulder.
- Knit in the same way as the back part to a fabric height of 10.5 cm, performing the gusset too.
- At a height of 10.5 cm close the middle 4 p. And then tie both parts separately (= 34 p.). for each part.
- At a web height of 11 cm, alternate strips No. 1.
- At a height of 29 cm, after 4 rows knitted with red yarn, alternate stripes No. 2.
- At a canvas height of 31 cm, to form an armhole on both sides in each 2nd p. close 1 time 4 p., 2 times 2 p., 2 times 1 p. (= 24 p.).
- At a web height of 38 cm, to form a neckline on both sides, close in every 2nd p. 1 time 4 p., 1 time 3 p., 1 time 2 p., 6 times 1 p. At a height of 43 cm, close the remaining 9 p. of the shoulder.
- With red yarn, dial 50 sts and knit faces. smooth surface, decreasing on both sides in every 10th p. 5 times 1 p. (= 60 p.).
- At a web height of 16 cm, alternate strips No. 2.
- At a canvas height of 18 cm, to form an armhole on both sides, reduce in every 2nd p. 1 time 3 p., 1 time 2 p., 8 times 1 p., 1 time 2 p., 1 time 3 p. (= 24 p.).
- At a piece height of 25 cm cast off the remaining 24 sts.
To knit the product with the highest quality, study from our separate article on this topic.
- Run the seams of the shoulder lines.
- For the neckline, pick up 80 sts along the edge of the neckline and knit with a yellow thread 2 cm with an elastic band 2 × 2, starting and ending a row of 3 faces. n. After that, close the loops.
- To form a strap along the edge of the left shelf, pick up 108 p. And knit with a yellow thread 2 cm with an elastic band 2 × 2, starting and ending a row of 3 persons. n. After that, close the loops.
- Sew on buttons. Perform the bar of the right shelf in the same way, only with holes for buttons (1 yarn, 2 faces together).
- Run the remaining seams on the product.
Model for an active child 3-4 years old for walking on the street
It will be very convenient for a little fidget to walk, run, jump in a knitted jumpsuit. This thing does not constrain movements and well protects from wind and cold. The following model is suitable for children 3-4 years old. It is made of melange yarn, so both girls and boys can wear it.

To work, you will need wool mixture yarn - 600 g melange, a little lilac yarn, knitting needles No. 3, No. 2.5, hook No. 4.
Step-by-step MK with an analysis of all stages of work
Pants.- Knitting start from the bottom of the legs. Dial 61 p. And knit 3 cm on needles No. 2.5 with an elastic band 1x1.
- Next, switch to needles No. 3 and knit 34 cm with the main pattern.
- In every 6th p. add 2 sts at the beginning and at the end of the row to expand the canvas (= 101 sts).
- For the line of the buttocks close 4 sts at the beginning of each row, then 2 times 3 sts, 2 times 2 sts and 1 time 1 loop.
- In total, 12 sts should be closed on each side of the part.
- On the remaining 77 stitches, knit the fabric straight up to a product height of 59 cm.
- Start shaping the armhole. Knit 38 sts, turn the work and then knit half the width of the back.
- When the total height of the part reaches 79 cm, close the neck sts: 8 sts, 4 sts, 3 sts, 1 sts, in total 16 sts should be closed for 4 times.
- Next, close all the p. Shoulders.
- On the remaining 39 sts, knit to a product height of 77 cm and close the loops to form the neck of the front: 7 sts, 3 sts, 2 times 2 sts, 2 times 1 st.
- In total, 16 sts should be closed. Next, close all the loops of the shoulder.
Give your child a good mood: - these are cute, safe toys, knitted by your caring hands!
Sleeves.- Cast on 43 sts and knit 3 cm on needles No. 2.5 with 1x1 rib.
- Change to needle size 3 and knit 25 cm with the main pattern.
- In every 4th p. add 2 sts each to expand the canvas at the beginning and at the end of the row (= 87 sts).
- Sew the seams of the legs, shoulders, seam on the back and bottom of the front.
- Cast on 75 sts along the neckline and knit 8 p. elastic band 1x1 lilac yarn.
- Attach the thread to the top of the left shelf and crochet the button placket: 3 p. columns without a crochet.
- Fasten the lilac thread to the top of the right shelf and knit 2 p. single crochet, in the 3rd p. make buttonholes. In the 4th r. tie a fringe along the edge of the plank: single crochets in each column of the plank, and 3 air loops between them. Along the edge of the neckline, make the same fringe.

From this collection of material, you saw that overalls and semi-overalls are comfortable and convenient clothing for children of any age.
It is also useful to know, because our crumbs need warmth so much!
The jumpsuit will give the child warmth, comfort, care. And no more arguments are needed. It remains only to pick up the threads and knitting needles, decide on the model and start knitting. Good luck in this creative endeavor!


Description
Cast on 30 stitches with white thread and knit 8 cm with 1x1 rib. Change to a blue thread and in the first row cast on 15 more loops along the width of the fabric and distribute the pattern. You should have 11 rows of the pattern. then knit with a goose foot pattern to a height of 6 rows of the pattern.
Next, perform an addition, add 6 loops in total. And we knit 10 patterns to a height. Then, from the inside of the panties, immediately reduce 5 loops and 5 more loops through the row. then we knit in height 8 rows of the pattern.
We divide the fabric in half and knit the back and the shelf separately.
On the shelf, perform a decrease, as shown in the video. Also knit the second half of the jumpsuit. Sew both halves.
Neck. Cast on 46 stitches on the needles along the neckline and knit with an elastic band 2-3 cm. And immediately knit the hood with the HOOSE'S FOOT pattern. To make the Pattern symmetrical, add one more loop. There should be 47 loops on the hood in total. you get 11 rows of the pattern. Knit up 7 rows of the pattern. Then knit only the middle pattern, 7 loops, decreasing on both sides of the loop until 7 loops remain on the needles.
tie straps elastic band 1x1 leaving eyelets for buttons.
Draw a hood line
On the line of the hood, dial 62 loops, as on the shelves, from one hem 2 loops and knit 4 rows with front stitch, Then on the front side we knit 2 together front, yarn over, 2 together front, yarn over, etc. to the end of the row. On the wrong side, all the loops on the wrong side, yarn over so that there is a hole. Next, knit again 4 rows with front stitch. And then I showed.
Sleeves. Cast on 30 stitches on the needles and knit the cuff with an elastic band 1x1 8 cm. Next, knit with a pattern up 9 rows of the pattern. The width should be 7 rows of the pattern. Sew the sleeves to the armhole on the jumpsuit. Twist the decorative cord, make pompoms and insert into the trim of the hood. Sew on buttons.
Pattern
Video
Knitted jumpsuit for a newborn is a very comfortable and practical thing. It gives the baby comfort, protects against drafts, is easy to put on and take off, looks beautiful. Even a novice craftswoman can knit a jumpsuit for a newborn with knitting needles, the main thing is to be careful, study the pattern, pattern pattern and clearly follow the instructions.
Simple baby romper

Before starting work, the mother should remember that the yarn for children's things should be soft and not irritate the baby's skin. In addition, it is recommended to knit clothes 1 - 2 sizes larger, as children at this age grow quickly.
Overalls for newborns with knitting needles for beginners, even those mothers who took knitting needles in their hands for the first time can do it. Thanks to the detailed instructions, the craftswoman will quickly figure out the specifics of the work.
Sizes of overalls for a newborn- 50/56 (62/68), 74/80. This model is suitable for crumbs from birth to six months of age.
To knit a spring jumpsuit for a baby, you need to prepare 150 - 250 g of yarn (acrylic or cotton with a density of 220/50 g), knitting needles No. 3, short circular knitting needles of the same size, 7 buttons.
Knitting pattern for a jumpsuit for a newborn with knitting needles:
Facial surface. Front rows are knitted with facial loops, purl rows are knitted with purl rows, circular rows are knitted only with front stitch.
Wrong surface. Front rows are performed with facial loops, purl - purl, circular - purl.
Rubber. Alternate 1 loop of the front, and 1 - wrong side.
Knitting density: 27 p. × 39 p. = 10 × 10 cm front loop.
Jumpsuit for a newborn boy or girl is knitted according to the following pattern:

Course of action:
1. Pants. Cast on 44 (48) 56 sts on the needles, knit between the edge 2 cm with an elastic band, in the last row add 1 (3) 1 p. Then knit between the edge front loops, be sure to mark the middle loop (side seam). For step bevels, add on both sides in each 8 p. 0 (4) 7 × 1 p., And then in each 6 p. 7 (3) 0 × 1 p. After 13 (15) 17 cm of elastic, add 1 × 4 p. on both sides, then leave all the loops. Repeat these steps for the second leg.
2. Front and back of trousers. Transfer the loops of the right and left legs to the knitting needles, add 1 chrome each at the beginning and end of the row. loop (middle front) = 136 (148) 160 p. Then knit between the edge front loops. After 16 (18) 20 cm from the elastic, close 1 × 4 sts for the bar. After 21 (23) 25 cm from the elastic, add 20 r at the marks in each. 2 × 1 p. After 32 (34) 36 cm from the elastic, divide the back part at the marks - 70 (76) 82 p. And the details of the front part - 31 (34) 37 p. Finish separately.
3. Left and right front detail. To tie the left piece for one-piece sleeves, add 2 p. 1 × 1 p., 3 × 2 p., 1 × 3 p. After 38.5 (42.5) 46.5 cm from the elastic for the neck, close the left edge 1 × 5 p., Then in each row close 1 × 3 p., 1 × 2 p., 2 × 1 p. After 42.5 (46.5) 50.5 cm from the elastic, close the remaining shoulder loops. The right part is performed similarly, but in a mirror image.
4. For one-piece sleeves, add on 2 sides in each 2 p. 1 × 1 p., 3 × 2 p., 1 × 3 p. After 42.5 (46.5) 50.5 cm from the elastic, close on 2 sides for the shoulder 1 × 29 (32) 35 p., and leave the middle 32 p. for the neck .
5. Assembly. Sprinkle the product with water, attach a pattern on pins to it, leave to dry. Sew shoulder and crotch seams. On the edges of the cuts for the slats, type 81 (87) 93 p. on the knitting needles, knit 1 purl row, then knit 2 cm with an elastic band between the edge ones, on the left bar after 1 cm make 7 holes for buttons - close 1 p., and in the next row dial again. Close the loops. Sew the bottom short sides of the slats from left to right.
On circular needles to the left 32 p. of the neck of the back, dial along the front edge of the neckline (without affecting the short sides of the slats) 17 p., tie 1 p. Wrong side, then knit between the hem 2 cm with an elastic band. Close the loops.
On the edge of the sleeves, dial 57 (63) 71 p., Tie 1 purl row with front stitch. Then knit 2 cm between the hem with an elastic band, close the loops.
Sew the sleeves, lightly steam the seams, sew on the buttons. Ready!
Summer jumpsuit for girls

Light overalls for a newborn girl The straps are very comfortable and look great. This model is suitable for babies 0 (3) 6 (12) months. To make it, you will need 1 (2) 2 (3) skeins of white yarn (93% acrylic, 7% elastane), 1 skein of yellow threads, knitting needles No. 3, 3.5, hook No. 3, 5 buttons (diameter 9 mm), 2 buttons yellow (diameter 15 mm).
Knitting pattern:
With knitting needles No. 3.5, knit the front rows with the front loops, and the wrong ones with the wrong ones.
Knit facial loops in turn 2 p. Yellow threads, 2 p. - white.
The bar is knitted with knitting needles No. 3 in turn 1 front, 1 purl.
Right edge \u003d chrome., 1 person., Then 2 p. And pull it through the removed loop. Left edge - when 4 sts remain on the left needle, tie 2 sts together with the front, 1 person., Chrome.
Knitting density: 28 p. × 40 p. \u003d 10 × 10 cm. The thread is elastic enough, so after knitting the details, let it lie down for a couple of hours, only then check with the samples.
Pattern of overalls for a girl:

Step by step job description:
1. Back and front. Start with half a leg. With white threads on knitting needles No. 3, dial 29 (31) 33 (37) p., Knit with a pattern for the bar 1 cm = 4 p., Start the row with the front loop.
Take knitting needles No. 3.5, knit with facial loops, in 1 p. for sizes 1 and 3, add 1 p. = 30 (31) 34 (37) p.
For a bevel after 2 (3) 5 (6) cm = 8 (12) 15 (18) p. From the bar, add 1 × 1 p. to the left, then in each 2 p. 2 × 1 p., 1 × 2 p. = 35 (36) 39 (42) p. After 3.5 (4.5) 6.5 (7.5) cm = 14 (18) 26 (30) p. from the bar, leave the work.
Knit the other half of the leg symmetrically.
Connect the loops of both legs, add the required number of loops between them, knit straight for 70 (72) 78 (84) p.
After 15 (17) 20 (22) cm = 60 (68) 80 (88) p. From the bar, subtract 1 × 1 p. from 2 sides, then after 4 p. 1 × 1 p., after 6 p. 1 × 1 p (in each new 6 p. 2 × 1 p.), in each 8 p. 2 × 1 p. (Through 8 p. 1 × 1 p., After 10 p. 1 × 1 p.) = 64 (66) 72 (78) p.
After 19 (22) 26 (29) cm \u003d 76 (88) 104 (116) from the strap, knit with front stitch, alternating stripes.
For armholes, close on 2 sides 1 × 4 p., Then in each 2 p. 2 × 2 p. and 3 × 1 p. = 42 (44) 50 (56) p.
Then knit straight, and after 26 (30) 35 (39) cm = 104 (120) 140 (156) p. From the strap, close all loops.
Knit in front in the same way, but start with a purl loop.
2. With a white thread, type 13 p. on the needles No. 3, knit 8.5 cm with a pattern for the bar, 1 p. Start and finish with 2 knit, cast off. Knit the second betel in the same way.
3. Crotch straps. With white threads, type on knitting needles No. 3 41 (49) 63 (71) p., knit 1 cm with a pattern for the bar, 1 p. And all facials start and end with 2 faces. n. Then knit 1 front row of faces. n. and several rows of persons. n. contrasting color. Iron the rows connected with the front stitch. Dissolve them when assembling to the main color.
4. Spray all parts with water, stretch to the dimensions indicated on the pattern and let dry. Sew the sides, sew the crotch straps with a quilted seam on the front side of the product. Sew 5 buttons along the crotch. Crochet the edges of the armholes, the neck of the back with a crochet No. 3 with a white thread of 1 p. Single crochet. Then sew 1 edge of the straps to the back. Make 1 hole for a button, spread the loops 1 cm from the second edge to each shoulder strap. Sew buttons to the front.
At the end of the work, do not forget to steam all the seams. Summer jumpsuit for a newborn is ready!
Winter overalls for a newborn

The presented knitted jumpsuit for a newborn is designed for a height of 56 cm. It will suit a large child immediately after birth or a very tiny one who will wear it for a few more weeks.
Winter overalls for a newborn knitted from 150 g of wool yarn. You will also need needles No. 3 for work.
This model is made according to the following pattern:

Using the same pattern, you can sew a plush jumpsuit for a newborn.
Detailed job description:
1. Knitting starts with panties. Cast on 56 stitches, knit 1.5 cm with English Rib. Add 1 stitch and follow the next 10 cm with the main pattern. For the right leg, add 1 st on the left. In each 3 p. add 1 p. Do this 2 times. After 11.5 cm, set the canvas aside. Similarly, knit the left leg, but in a mirror image.
The main pattern consists of front and back loops, the diagram can be seen below:


2. Connect the loops of the back halves of the legs, and then proceed to knitting the back. First, remove 2 sts from 2 edges. Then 6 more times in a row, decrease 1 st each. After 39 cm, make bevels for the shoulders. On each side, you need to close 5 p. Then remove after 1 p. 5, 4, 5, 6 p. After 40.5 cm, close the loops.
3. Before the product is also knitted from panties. Add 3 sts between the legs. Knit the next 18 cm according to the pattern. After that, you can form a fastener. Set aside 21 sts in the middle. Knit the rest separately, make out the bevels, as on the back. Knit the center loops to the end and close.
4. Sleeves are knitted from below. 1.5 cm knit with an elastic band, in each 10 p. add 1 p. three times. Then dial 3 points in each 8 p.
5. The assembly begins with the sleeves, then the legs are connected along the crotch. Then, on the front shelf on the side, type loops, knit a button placket. Close the loops and fasten the threads, then sew on the buttons.
Before putting on the jumpsuit, it must be washed and ironed.
According to the same scheme, one can connect jumpsuit with hood. It can be knitted separately or continue to knit from the neck.
Below is a video tutorial on knitting a bear jumpsuit.
Funny jumpsuit with ears is perfect for the cold season.
Openwork transforming jumpsuit

Children's overalls-transformer- This is a very interesting and attractive model. Suitable for newborns and toddlers over 6 months old.
It is knitted according to this pattern:

To make it easier for mom to figure out the pattern, you need to study the following schemes:


This jumpsuit is suitable for discharge, as it has a very beautiful pattern and is knitted from soft white yarn.
To knit a jumpsuit for a newborn, you need to stock up on knitting needles with 200 g of acrylic or half-woolen yarn (density 400 mg / 100 g), 5 buttons, circular knitting needles No. 2.5.
Knitting density: 10 × 10 \u003d 31p. × 42r. The jumpsuit is knitted according to the following pattern: elastic band 3 × 3, fantasy pattern (diagram 1), pattern No. 2 (diagram 2), pattern No. 3 (diagram 3).
Instructions for knitting overalls for newborns:
1. Back. For the right leg, cast on 44 sts, knit with an elastic band 10 cm. Then proceed as follows: 1 hem, 3 purl sts, 9 sts with pattern No. 2, 9 sts with pattern No. 1, 9 sts with pattern No. 1, 3 purl p., 1 edge. In each 4 p. add on the right side 15 × 1 (= 59 p.). The added loops are knitted on the wrong side. Postpone knitting after 15 cm. The left leg is knitted in the same way, but in a mirror image. Then the legs need to be connected, adding 1 p. = 119 p. between them. Next, knit 9 central loops with pattern No. 2. At the same time, from 2 sides, subtract 5 p. 18 × 1 \u003d 83 p. After 21 cm from the step, continue to knit loops with pattern No. 2, continue to knit loops that were made with pattern No. 1 in the same pattern, but from 49 to 71 p. At the same time, in 1 p. evenly remove 12 p. = 71 p. Then in each 2 p. dec sts for armhole 23 × 1 = 25 sts. After 12 cm from the beginning of the armhole, set aside the remaining 25 sts.
2. Knit in front like a back. After 3 cm from the beginning of the step, close the central 7 p. And knit them separately. At a height of 21 cm from the step, make 5 decreases on each half, knit the armhole in the same way as the back. After 10 cm from the beginning of the armhole, make decreases for the neck: 1 × 5, 1 × 2, 1 × 1. After 3 cm from the neck, 1 p remains on each half.
3. Sleeve. Cast on 53 sts, work 10 cm in rib. Then knit the front loops according to scheme No. 3, and the wrong ones without changes. In each 2 p. add 7 × 1 = 67 stitches, including loops in the pattern. After 12 cm from the beginning of the pattern in each 2 p. decrease 25 × 1 = 17 stitches, including them in the pattern. Set aside the remaining loops.
4. Hood. Sew the seams of the armhole, distribute the remaining loops on circular needles, additionally dial 20 sts = 101 sts along the neckline, knit with an elastic band. The scheme is as follows: 9 p. with pattern No. 1, 9 p. with pattern No. 2, finish 9 p. with pattern No. 1. At a height of 17 cm, close the loops.
5. Sew side seams, crotch seams, sleeve seams, sew the hood, fold it in half. To fasten, type 279 sts along the edge of the shelf and hood on knitting needles, knit with an elastic band for 3 cm, do not forget to leave holes for buttons. Sew on the edges of the fastener and buttons. Steam the finished product.
In the video below you can learn how to knit a seamless overalls for crumbs.
Now you know how to knit a beautiful, comfortable and comfortable jumpsuit for your baby. If you are doing this for the first time, then start with simple models. Be careful, strictly follow all the points of the instructions, and you will definitely succeed.