Crocheted amigurumi toys. Knitted toys: "Swan"
2809
Amigurumi is a technique for crocheting small animals. It was invented in Japan. Lately this activity has been very popular. Schemes describing how to crochet toys are necessary for choosing threads and creating a quality product.
Scroll:
Scroll:

Start knitting
You need to start crocheting toys by studying the description and diagram.
To do this, you need to know the basic conventions:
- VP – air loop;
- ss – connecting column;
- sc – single crochet;
- ps – half-column;
- dc - double crochet;
- ss2n – double crochet stitch;
- inc – knit 2 sc in one loop, triple – 3 sc;
- dec - make a sc in the next loop - there are 2 threads on the hook, again a sc in the loop next to it - there are 3 threads on the hook. We pull the main thread through 3 loops. This way the two loops are combined.
- *2sc, inc*. Repeat *2 times (8) – two single crochets, in the next column, etc. Repeat twice. This makes only 8 loops.
Some details
The amigurumi technique involves knitting on both walls. Increases and decreases are used to give the toy its shape. You can’t just skip a stitch to decrease, as this will create a hole. To make the toy heavier, small beads are used and sewn into the fabric.
When starting to crochet toys, you need to familiarize yourself with the descriptions and diagrams in advance. All abbreviated names of loops should be clear.
Ring: diagram and description of amigurumi knitting
Typically, most models start with a circle with a hole inside it. The amigurumi ring technique will help solve this problem.
Detailed diagram:
- Make a loop at a distance of 2.5 cm, the thread is between the index and middle fingers;
- Insert the hook into the loop and pull through;
- Grab the working thread, pull it through the loop and tighten;
- Pull the hook under both threads (warp and tail) at the same time;
- Grab the main thread with a hook (2 loops on the hook) and pull through the loops. The result is the first sc of the ring;
- Knit 6-10 sc and tighten the thread of the remaining ring. The result is a semicircle of sc;
- Insert the hook into the first loop and knit a sc.
Teddy bear - a simple diagram with a description for beginners
The height of the toy will be 8.5 cm, knit with brown and white iris, hook 1.15 (for a beginner 1.0). 
The details are knitted separately:
- Head
- Nose - white threads
Scheme:
- 2nd row - *pr* repeat 6 times (12);
- 3rd row - *2 sc, inc*, repeat 4 times (16);
- Row 4 – *3 sc, inc*, repeat 4 (20);
- 5 – 7 rows as 4th (20), sc for offset;
- Row 8 – 20 ss, do not knit stitches too tightly.
- Take brown thread. 9th row - 2 sbn, inc, 1 sbn, inc, 1 sbn, 3 increases, 2 sbn, 3 increases, 1 sbn, inc, 1 sbn, inc, 2 sbn (30);
- 10 – 12 row - * 4 sc, inc *, repeat * 6 times (36);
- 13 - 15 row - * 5 sc, inc *, repeat * 6 times (42);
- 16 – 17 row – *5 sc, dec*, repeat * 6 times (36);
- Row 18 - *4 sc, dec*, repeat * 6 times (30), sc for shifting knitting;
- Row 19 - *3 sc, dec*, repeat * 6 times (24), sc for shifting knitting;
- Row 20 - *2 sc, dec*, repeat * 6 times (18), sc for shifting knitting;
Fill this part with padding polyester and give the head a neat shape.
Face design: Using black thread (floss or simple thread folded in several rows), we embroider the nose in a triangle, with two hook-shaped stripes running from it to the sides. Sew on beads for eyes and embroider eyebrows.
- 21 row - *sc, dec*, repeat * 6 times (12);
- Row 22 - *dec*, repeat 6 times (6). Close the hole, hide the thread and fasten.
Ears: Knit an amigurumi ring from 7 loops. Pull the thread to close the hole. 6 times inc, 1 ss (13). Leave the thread to attach to the head. Tie 2 ears. Choose the color of the yarn yourself (brown or white).
Torso:
- 1st row – amigurumi ring of 6 loops;
- 2nd row - *pr*, repeat 6 times (12);
- 3rd row - *sc, inc*, repeat 6 times (18);
- 4th row - * 2 sc, inc *, repeat 6 times (24);
- Row 5 - * 3 sc, inc *, repeat 6 times (30);
- 6 – 10 row - * 4 sc, inc *, repeat 6 times (36);
- 11,12 row - * 4 sc, dec *, repeat 6 times (30);
- 13.14 row - * 3 sc, dec *, repeat 6 times (24);
- 15,16,17 row - * 2 sc, dec *, repeat 6 times (18);
- Row 18 - *sc, dec*, repeat 6 times (12); Fill with padding polyester.
- Row 19 - *sc, dec*, repeat 6 times (12), 1 ss
Leave the thread for sewing.
Lower paws:
- 1st row - 6 ch, 4 sc, start from the second loop, 3 sc in the last loop, 4 sc, right in the same loop (13).
- 2nd row - inc, 3 sc, 3 increases, 4 sc, 2 increases (19).
- Row 3 and a half - inc, 5 sc, * inc, 1 sc *. Repeat * 3 times, 5 sbn, * inc, 1 sbn *. repeat * 3 times, 7 sc (26). Change thread color.
- Row 4 – 26 sc behind the back wall for paw stability.
- 5.6 row - 9 sbn, 2 increases, 4 sbn, 2 increases, 9 sbn (30);
- 7th row - 9 sc, 6 decreases, 9 sc (24);
- 8th row - 8 sc, 4 decreases, 8 sc (20), sc for offset;
- 9 – 16 row – * 3 sbn, dec*. repeat * 4 times (16);
- Sc for offset;
- Row 17 - * 2 sc, dec *. Repeat * 4 times (12).
- Fill with padding polyester.
- Row 18 - * 1 sc, dec *. Repeat * 4 times (9).
- Row 19 - * 1 sc, dec *. Repeat * 3 times (6). Leave the thread for sewing the legs to the body. Do not stuff the top of the paws too much, otherwise the paws will stick out.
Upper paws:
- 1st row - cast on 2 ch, 6 sc in the second loop from the hook (6);
- 3 – 6 row – * 3 sbn, inc*. repeat * 3 times (15);
- 1 sc for offset knitting;
- 7 – 15 row – 3 decreases, 9 sc (12);
- 2 sc for offset knitting.
- Row 16 - * 2 sc, dec *. repeat * 4 times (9);
- Row 17 - * 1 sc, dec *. repeat * 3 times. 1cc (6);
Leave the thread for sewing the legs to the body. Do not stuff the top of the legs too much.
Ponytail:
- (6);
- 2nd row - *pr*. repeat * 6 times (12);
- 3rd row - *sc, dec*. repeat * 4 times. 1cc (8).
- Leave the thread.
Assembling the bear: Along with descriptions and diagrams, crocheted toys must be carefully assembled. This is a difficult stage and skill comes with experience. Pin the lower legs with pins. Sew the paws to the 6-7th row of the body. Sew the upper paws between the last and penultimate rows. Sew on the tail so that it does not interfere with sitting.
Chicken - a simple diagram with a description for beginners
Use hook No. 2, yarn of yellow, orange, blue, lilac colors.
 To crochet toys, you must follow the description and diagrams.
 Head (yellow threads):
- 1st row – amigurumi ring of 6 loops;
- 2nd row - 6 inc (12);
- 3rd row - (1 sc, inc)*6 (18);
- Row 4 - (2 sc, inc)*6 (24);
- Row 5 - (3 sc, inc)*6 (30);
- 6th row - (4 sc, inc) * 6 (36);
- Row 7 - (5 sc, inc)*6 (42);
- 8-13 row - 42 sc;
- Row 14 - 7 sbn, (1 sbn, inc)*3, 15 sbn, (1 sbn, inc)*3, 8 sbn (48);
- Row 15 - 7 sbn, (2 sbn, inc)*3, 15 sbn, (2 sbn, inc)*3, 8 sbn (54);
- 16-18 row - 54 sc;
- Then there will be a decrease, so between the 14th and 15th rows sew on the button eyes;
- Row 19 - (7 sc, dec) * 6 (48);
- 20 row - (6 sc, dec) * 6 (42);
- 21 row - (5 sc, dec) * 6 (36);
- 22 row - (4 sc, dec) * 6 (30);
- 23 row - (3 sc, dec) * 6 (24);
- 24 row - (2 sc, dec) * 6 (18);
- 25 row - (2 sc, dec) * 6 (12);
- Row 26 - 6 dec (6).
Stuff the body with holofiber and tighten the thread.
Beak - orange thread:
- 1st row - 5 sc in amigurumi ring;
- Row 2 - (1 sc, inc)*2, 1 sc (7);
- 3rd row - 7 sc;
- Row 4 - (2 sc, inc)*2, 1 sc (9).
Sew the beak between 16 and 20 rows, filling as you sew. Embroider eyebrows and eyelashes with black thread. Next, depending on your imagination, make a forelock and tint your cheeks.
Body – yellow thread:
- Fill with holofiber as you knit.
- 2nd row - 6 inc (12);
- 3rd row - (1 sc, inc)*6 (18);
- Row 4 - (2 sc, inc)*6 (24);
- Row 5 - (3 sc, inc)*6 (30);
- 6th row - (4 sc, inc) * 6 (36);
- Row 7 - (5 sc, inc)*6 (42);
- Row 8 - (6 sc, inc)*6 (48);
- Row 9 - (7 sc, inc)*6 (54);
- Row 10 - (8 sc, inc)*6 (60);
- 11-18 row - 60 sc:
- Row 19 - (8 sc, dec)*6 (54)
- 20-21 row - 54 sc;
- Row 22 - (7 sc, dec)*6 (48)
- 23-24 row - 48 sc;
- 25 row - (6 sc, dec) * 6 (42);
- 26 row - (5 sc, dec) * 6 (36);
- 27 row - (4 sc, dec) * 6 (30);
- 28 row - (3 sc, dec) * 6 (24);
- 29 row - (2 sc, dec) * 6 (18);
- Row 30 - 18 sc.
Leave the thread and sew the head to the body.
Ponytail:
- Yellow threads, does not fill
- 1st row - 4 sc in amigurumi ring;
- 2nd row - 4 inc (8);
- 3rd row - 8 sc;
- 4th row - (1 sc, inc) * 4 (12);
- 5 row - 12 sc;
- Row 6 - (2 sc, inc)*4 (16);
Fold and connect sc. Sew to the body at the level of the 8th row.
Wings – yellow thread, do not fill:
- 1st row - 6 sc in amigurumi ring;
- 2nd row - 6 inc (12);
- 3rd row - 12 sc;
- Row 4 - (1 sc, inc)*6 (18);
- 5-16 row - 18 sc.
- Fold and connect sc. Knit two parts. Sew at the level of the 24th row.
Legs – orange thread:
- Feet. Fill as you knit.
- 1st row - 6 sc in k.a.;
- 2-4 row - 6 sc.
- Cut the thread. Knit three parts. It turned out to be fingers.
- To connect, knit 2 sc on the first finger, knit the 3rd stitch of the first finger and the 1st stitch of the second finger together with a single crochet (i.e. we make a decrease), 1 sc, 3rd stitch of the second finger and 1st stitch knit the third finger together, 4 sc, knit the 6th stitch of the third finger and the 4th stitch of the second finger together, 1 sc, knit the 6th stitch of the second finger and the 4th stitch of the third finger together, 2 sc. You will get 14 columns.
- Row 6 - (5 sc, dec)*2 (12);
- Row 7 - (2 sc, dec)*3 (9);
- Row 8 - (1 sc, dec)*3 (6).
- Close the hole and hide the thread. Knit two parts.
- 1st row - 6 sc in k.a.;
- Row 2 - (1 sc, inc)*3 (9);
- 3-14 row - 9 sc.
Fold and connect the edges of the sc. We knit two parts. Sew the foot to the leg. Use the edge that was connected to the sc to sew the legs to the body.
Easter egg – blue yarn:
- 1st row - 6 sc in k.a.;
- 2nd row - 6 inc (12);
- 3rd row - (1 sc, inc)*6 (18);
- Row 4 - (2 sc, inc)*6 (24);
- Row 5 - (3 sc, inc)*6 (30);
- 6th row - (4 sc, inc) * 6 (36);
- Row 7 - (5 sc, inc)*6 (42);
- 8-16 row - 42 sc;
- Row 17 - (5 sc, dec)*6 (36);
- 18 row - 36 sc;
- 19 row - (4 sc, dec) * 6 (30);
- 20 row - 30 sc;
- 21 row - (3 sc, dec) * 6 (24);
- 22 row - 24 sc;
- 23 row - (2 sc, dec) * 6 (18);
- 24 row - (2 sc, dec) * 6 (12);
- Row 25 - 6 dec (6).
Close the hole and hide the thread. Cut the tape and glue it to the testicle. Tie a flower. Sew a bead to the flower and glue it to the egg.
Dog - a simple diagram with a description for beginners
Hook No. 1, orange and white acrylic yarn. 
Head:
- 1st row: in 1 v.p. - 8 sc.
- 2nd row: 2 sc from 1 loop.
- 3rd row: sc
- 7th row: sc
- 8th row: 2 sc from 1 loop, 4 sc
- Row 9: sc
- 10th row: 2 sc from 1 loop, 5 sc
- 11th row: sc
- 12th row: 2 sc from 1 loop, 6 sc
- Rows 13,14,15,16,17: sc
- 18th row: from 2 loops - 1 sc (dec), 6 sc
- 19,20,21,22,23 rows: sc
- 24th row: dec, 5 sc
- Rows 25,26,27,28,29: sc
- Row 30: dec, 4 sc
- 31,32,33,34 rows: sc
- Row 35: dec, 3 sc
- Row 36: dec, 2 sc, insert eyes between rows 22 and 23, stuff with toy stuffing.
- Row 37: dec, 1 sc, dec, close the knitting, thread the thread inside.
The head is ready.
Nose. Two details:
- 1st row: in 1 v.p. - 8 sc
- 2nd row: 2 sc from 1 loop.
- 3rd row: sc
- 4th row: 2 sc from 1 loop, 1 sc
- 5th row: 2 sc from 1 loop, 2 sc
- Rows 6,7,8,9,10,11,12: sc, cut thread.
- Fold 2 pieces edge to edge, knit 12 loops, connecting 2 rows.
Upper part of the nose:
- Rows 1 and 2: sc, tying the outer edge.
- 3rd row: dec, 2 sc
- 4.5 rows: sc
- 6th row: Dec, 1 sc Insert nose over eye, stuff
- Row 7: decrease, knitting 1 sc from 2 loops to the end. Sew the nose to the head.
White spot on forehead:
- 1st row: 15 v.p., 1 v.p. skip, 3 sc in 1 loop, knit until the last loop, into which you knit 4 sc
- 2nd row: you need to make 4 increases at both ends.
- 3rd row: where the increase was made, 2 sc in 1 loop, between them - 1 sc
- 4th row: entire row ps. Close knitting.
Eye sockets:
- 1st row: in 1 v.p. - 8 sc
- 2nd row: 2 sc from 1 loop.
- 3rd row: sc
- 4th row: 2 sc from 1 loop, 1 sc
- 5th row: 2 sc from 1 loop, 2 sc
- Row 6: ps whole row
- 1st row: 8 ch.
- 2nd row: 1 v.p. skip, knit sc, knit 4 sc in the outer loops (inc).
- Knit subsequent rows, adding where the row is visible in the previous rows. A total of 4 increments on each edge. in the last row you should get 9 sc
- Last row: sc without increases.
Sew the ears to the head so that one ear is raised.
Paws:
- Start knitting in white.
- 1st row: in 1 v.p. - 8 sc
- 2nd row: 2 sc from 1 loop.
- 3rd row: sc
- 4th row: 2 sc from 1 loop, 1 sc
- 5th row: 2 sc from 1 loop, 2 sc
- 6th row: 2 sc from 1 loop, 3 sc
- Front legs - knit 4 rows sc
- Hind legs - Knit 6 rows sc
- 1st row: dec, 3 sc
- 2nd row: dec, 2 sc
- 3rd row: sc
- 4th row: psbn
The result was pads: larger for the hind paws, smaller for the front paws.
Switch to a red thread. For the front paws: 2 rows of sc, on the 3rd row - dec, 2 sc Next we knit 4 rows of sc. Close knitting. For the hind legs: 7 rows sc. Stuff your paws. Connect the 2 hind legs with a connecting loop and make a harness. 12 rows sc. You should get approximately 49 stitches.
- Row 13: dec, 5 sc
- Rows 14,15,16,17,18: sc
- Row 19: dec, 4 sc
- 20,21,22,23,24 rows: sc
- Row 25: knit the front legs from the bottom side, where the armpits are.
- Row 26: knit the paws from the top side, where the shoulders are.
- Row 27: sc. Close knitting. Stuff and sew the body to the head.
Ponytail
- 1st row: in 1 v.p. - 8 sc
- 2nd row: 2 sc from 1 loop.
- 3.4 rows: sc. Close. Stuff and sew.
Embroider mustaches, eyebrows, eyelashes. The dog is ready!
Kitten - a simple diagram with a description for beginners
The threads are white and gray. 
Head:
- 1st row - amigurumi ring of 6 loops;
- 2nd row – inc, (12)
- 3rd row – sc, inc (18)
- 4th row – 2sbn, inc (24)
- Row 5 – 3 sc, inc (30)
- 6th row – 4 sc, inc (36)
- Row 7 – 5 sc, inc (42)
- 8th row – 6 sc, inc (48)
- 9 – 14 row sc (48)
- Row 15 – 6 sc, dec (42)
- Row 16 – 5 sc, dec (36)
- Row 17 – 4 sc, dec (30)
- Row 18 – 3 sc, dec (24)
- Row 19 – 2 sc, dec (18)
- Row 20 – sc, dec (12)
- 21 row – 4 dec (6)
- Fasten the thread.
Torso:
- 1st row - Amigurumi ring of 6 loops
- 2nd row – right (12)
- 3rd row – sc, inc (18)
- 4th row – 2 sc, inc (24)
- 5 – 8 row sc (24)
- Row 9 – dec, 2 sc (18)
- Row 10 – dec, sc (12)
- Fasten the thread and leave for sewing.
Hind paw (2 pcs.):
- 1st row - Amigurumi ring of 6 loops
- 2nd row – right (12)
- 3rd row – sc, inc (18)
- 4 – 5 row – sc (18)
- Row 6 – sc, dec (12)
- Row 7 – 2sc, dec (9)
- 8-9 row - sc (9)
Fold in half, stuff and sew. Leave the thread for sewing.
Front paw (2 pcs.):
- 1st row - amigurumi ring of 6 loops
- 2nd row – right (12)
- 3-4 row – sc (12)
- 5th row – 6 dec (6)
- 6 – 9 row – 6 sc
Stuff and leave thread for sewing.
Ears:
- 1 row – 5 loops amigurumi ring
- 2nd row – 5 sc
- 3rd row – right (10)
- 4th row – 10 sc, inc (15)
- Close and leave thread for sewing.
Ponytail:
- 1st row: in 1 v.p. - 6 sc
- 2nd row: 2 sc from 1 loop.
- 3.4 rows: sc. Close
The next stage: sew all the parts, sew on beads-eyes, embroider eyebrows, mustaches, claws with black threads.
Crocheting toys is not difficult if you check the description and diagram. Detailed instructions help you get the job done quickly and efficiently.
Chicken toy - knitting pattern and description
Knitting details:

Knitting begins with making the head and body. The parts are made separately: beak, 2 legs and 2 wings. After assembling them, the crest and tail are formed. The final stage is decoration. A flower is placed on the chicken's head, the neck is decorated with a pendant, and the cheeks will become brighter with the help of blush.
Bunny toy - knitting pattern and description
Knitting details:

Knitting time: approximately 2–3 hours. Work on the toy must begin with making the head. Crochet toys with descriptions and diagrams are easy to assemble. To get a finished bunny, ears are sewn to the head, which are done separately. Knitting is completed by sewing in eyes, cheeks, nose and mouth.
Elephant toy – knitting pattern and description
Knitting details:

Making an elephant begins with creating the head and body. Knitting the ears, trunk and legs is required separately. All parts are alternately sewn to the body and head. The final stage of working on the toy is sewing in the eyes, mouth and bows.
Kolobok toy - knitting pattern and description
Knitting details:

You should start knitting Kolobkov from the body. When the base of the toy is ready, eyes, mouth and hair are sewn onto it. The decor for a girl will be bows, and for a boy - blush on the cheeks.
Mouse toy - knitting pattern and description
Knitting details:

Making a mouse begins with creating the head and torso. The paws, tail and tongue are knitted separately and sewn on at the end of the work. The nose and eyes made of buttons are sewn to the head.
Piggy toy - knitting pattern and description
Knitting details:

You need to start knitting pigs from the head and body. Paws, ears and heels are knitted separately. They are sewn to the finished base of the toy. The final stage of work is decoration. The pigs should have hair, eyes, funny clothes and slippers.
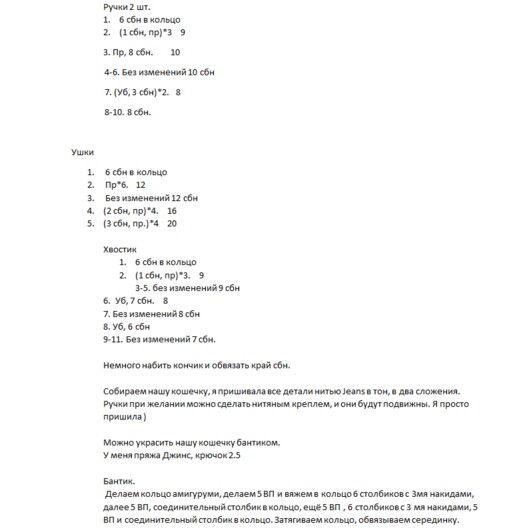
Toy Cat with Bunny - knitting pattern and description
Knitting details:

You should start making toys by knitting the head and body. With descriptions and diagrams it is not difficult to assemble crocheted toys. Ears, tails, paws, scarves and mittens are created separately and then sewn to the body and head.
Toy Cat - knitting pattern and description
Knitting details:

Creating a toy begins with knitting individual elements: head, body, paws, ears and tail. The final stage of knitting is assembling the finished elements. For decoration, a bow and wire whiskers are sewn onto the cat.
Snail toy – knitting pattern and description
Knitting details:
- The snail measures 10 cm in height and 5 cm in width (7 cm in body volume).
- The body and head are peach-colored yarn.
- Shell - orange yarn.
- Flowers - emerald-colored yarn.
- For the eyes you need 5 mm beads, and to decorate the shell - 15 pearl-colored beads.
- Knitting time: does not exceed 3 hours.


Making a snail begins with creating the body and head. When the base of the toy is ready, a separately knitted shell is sewn onto it. Then details are added: horns, flowers, beads and eyes.
Toy Elk - knitting pattern and description
Knitting details:

Knitting should begin by creating the base of the toy - the head and body.
The knitting is completed by assembling the finished elk. Handles and legs, horns and ears, knitted separately, are sewn to the base.
Panther toy - knitting pattern and description
Knitting details:

First of all, the head and torso are created, which will serve as the basis for the future toy. It is necessary to sew alternately the hind and front legs and tail to the finished base. The muzzle and ears are placed on the head. All parts for assembly are knitted separately. The panther is decorated with sequins embroidered in the shape of a heart.
Sheep toy - knitting pattern and description
Knitting details:
- The dimensions of the sheep are 15 cm in height and 5 cm in width (body volume is 8 cm).
- Head and body - white yarn.
- Legs, hooves and coat - pink yarn.
- Shoes – purple yarn and pink beads.
- For the eyes you will need 2 small black beads.
- Pink polyester is required for the skirt.
- Knitting time: no more than 4 hours.


Knitting begins with the formation of the head and body. When the head and torso are connected, the limbs are sewn to them. The head is decorated with eyes, nose and mouth. The shoes are decorated with beads. A fur coat is put on the finished toy.
Toy Teddy Bear - knitting pattern and description
Knitting details:

The basis of the toy will be the head and torso, which are knitted at the beginning. Handles and legs, made separately, are sewn to the body. The head is decorated with ears, muzzle and eyes.
Little Dragon toy - knitting pattern and description
Knitting details:

Knitting begins with the formation of the head. Following this, the body is formed. With the description and diagrams, it will not be difficult to assemble a finished crocheted toy from many parts. Handles and legs, a comb, and wings are attached to the body using a rope method. The head is formed by nostrils, eyes and ears.
Pony toy - knitting pattern and description
Knitting details:
- The size of the pony is 33 cm in height and 11 cm in width (body volume is 14 cm).
- The base of the head and body, ears and legs are made of purple yarn.
- Hooves, crest, tail - lilac yarn.
- The muzzle is pink yarn.
- For the eyes you will need black, white and blue yarn.
- Knitting time: no more than 4 – 5 hours.


You should start knitting by creating the head and neck. Then the torso is formed, as well as the legs one by one. The assembly completes the knitting. The head is formed by ears, eyes, nostrils and mouth. It is attached to the body using a neck filled with filler. Legs and decorative elements are sewn on: mane and tail.
Toy Doll - knitting pattern and description
Knitting details:

Knitting begins with creating the basis for the future toy: head, torso and legs. The handles are knitted separately and attached with thread fastening. The final stage is decorating the doll with hair, dress and shoes.
Amigurumi Kitten toy - knitting pattern and description
Knitting details:

You need to start knitting from the head and neck. Then the body of the toy is created. The work is completed by assembling small parts: legs, tail and ears. The finished kitten can be decorated with a bow.
Duckling toy - knitting pattern and description
Knitting details:

Knitting begins with creating a head and body with a tail. Wings, paws, straps and beak are sewn onto the finished base of the toy. Decorating the straps with buttons completes the job. When crocheting toys, it is important to rely on patterns. With their help, the toy will exactly match the description.
Modern needlewomen have long no longer limited their hobbies to knitting napkins and sewing oven mitts, but are learning more and more new types of craftsmanship. Among them, amigurumi is gaining increasing popularity - the art of crocheting or knitting, which came to us from Japan.
Amigurumi - what is it?
Crochet is most often used in this technique. Traditional amigurumi toys are various animals that have human characteristics, for example, elements of clothing, accessories, standing or sitting on two legs.

The head, which is significantly larger than the body, and small limbs give amigurumi toys a completely charming, cartoonish look. And if you add suitable eyes and decorations, it will be very difficult not to be moved by the resulting miracle.
Amigurumi toys are knitted in the round and very tightly, since even during the knitting process they are filled with filler. It could be padding polyester, padding polyester or something similar. As a rule, amigurumi animals are knitted in separate parts and then sewn together.

Most often they are small, about the size of a palm, but you can create a character of any size - from tiny (5-7 cm) to huge (more than 40 cm). This depends on the size of the hook and the thickness of the thread used.
Required tools and materials

The good thing about amigurumi for beginners is that it doesn’t require any special expenses for consumables. Any needlewoman can find everything she needs in her box:
- hook;
- threads (different colors and thickness);
- beads, beads;
- eyes, buttons;
- filler;
- paint for tinting toys (to brown the cheeks, face, etc.).
In the process of creativity, each craftswoman will experimentally calculate the hook number and thread thickness that is convenient for herself, and in the future she will be able to independently develop patterns.
Amigurumi diagrams with descriptions of work for beginners
For those who are taking the very first steps in amigurumi knitting, it will be quite possible to knit a cute heart.

You will need:
- red threads;
- hook.
Designations:
Sc – single crochet
St - column
Pr - increase
Manufacturing process First, we knit two “tops”.
1. In the amigurumi ring 8 sc, close the circle with an edge loop.
2. 3 stitches, repeat in the 3rd 3(+1).
3. We knit the third round without crochet. 4. 3 stitches, increase in the 3rd stitch 3 (+1). We knit the second tip in the same way.
5. Connect the tops with six sc.
7. We adjust the size of the heart by decreasing it - skip it if necessary or decrease it. We stuff the finished product and give it to a loved one as a keychain, brooch, magnet, etc.
Note! If desired, you can attach cute crocheted wings to the heart, as in the photo.
Step-by-step instructions for crocheting amigurumi: knitting a delicious cupcake

So, let's try to knit a sweet cupcake. You can use it as a keychain, a brooch, or make a whole plate of these delicious sweets.
Will be needed
- yarn, preferably pastel shades - 50 g;
- hook size 2.5 mm;
- filler;
- needle with a wide eye;
- black threads;
- scissors;
- eyes or matching buttons or beads;
- beads for sprinkling.
Designations
VP – air loop; sc – single crochet; dc - double crochet; ss2n – double crochet stitch; pssn – half double crochet; ss - connecting column or half single crochet; dec – decrease.
Manufacturing process
First we knit the dough, use beige yarn and a 2.5 mm hook.
- First row - make 6 sc in the amigurumi ring (6).
- Second row - add six loops (12).
- Third row - add two sc and repeat 6 times (18).
- For the fourth row, add 2 sb, repeat 6 times (24).
- Fifth row – add 3 sc, repeat 6 times (30).
- Sixth row - add 4 sc and repeat again 6 times (36).
- In the seventh row - we knit 36 sc loops behind the back wall (36).
- Eighth row – add 11 sc, repeat three times (39).
- In the ninth row - make 6 sc, (add 12 sc) repeat twice, then add 6 sc (42).
- Tenth row – knit 42 sc (42).
- Eleventh row - add 13 sc) and repeat three times (45).
- Twelfth row - knit 7 sc, then repeat 14 sc twice, add 7 sc (48).
- Thirteenth row – knit 48 sc (48).
- We finish with a connecting column. Cut the thread, leaving a long end.
We knit cream, take light pink yarn and a 2.5 mm hook.
- In the first row we knit 6 sc into an amigurumi ring (6), in the second row we add 6 loops (12), then in the third we add 1 sc and repeat 6 times (18).
- In the fourth we add 2 sc, repeating 6 times (24).
- In the fifth we add 3 sc and also repeat 6 times (30).
- The sixth (36) and seventh (42) rows need to be knitted almost in the same way, adding 4 sc and 5 sc respectively, repeating also 6 times.
- In the eighth row we add 13 sc, repeat three times (45), in the ninth row we knit 45 sc (45).
- In the tenth row we make an increase of 14 sc, repeat three times (48), from the eleventh to the thirteenth row inclusive we knit 48 sc.
- In the fourteenth we make a sc behind the front wall of the loop, skip 1 sc of the previous row and knit 5 sc from 1 loop, again skip 1 sc of the previous row and repeat this 12 times.
- We finish with a connecting column and hide the ends of the threads.
We knit the topping from chocolate-colored yarn using the same crochet hook.
- First row – make 6 sc in the amigurumi ring (6).
- Second row - add 6 loops (12).
- Third row - add 1 sc and repeat 6 times (18).
- Fourth row – add 2 sc, repeat 6 times (24).
- Fifth row - we knit 6 “smudges”.
- The first leak is sc, next to one loop we make hdc, dc, ch, next to one loop we make 3 dc2n, next to one loop we make dc, hdc, next to sc.
- Second leak - (4 loops of the previous row) - from one loop hdc, dc, next to one loop 2 dc, next to one loop dc, hdc, next to sc.
- Third leak - (3 loops of the previous row) - from one loop hdc, dc, ch, next to one loop 2 dc2n, next to one loop dc, hdc.
- The fourth drip - repeats 1 drip (5 loops of the previous row).
- Fifth drip - repeats 2 drips (4 loops of the previous row).
- Sixth leak - (3 loops of the previous row) - from one loop hdc, dc, ch, next to one loop 2 dc2n, next to one loop dc, hdc.
- Finish with a connecting stitch and cut the thread, leaving a long end.
Decorate the top with beads and sew them to the pink cream (the top part of the cupcake) using the watering thread. Embroider a muzzle on the dough and sew on the eyes. For stability, you can sew a cardboard circle to the bottom. Using dough thread, sew the parts behind the back walls of the cream loops, filling the toy with filler. Hide all the ends of the threads inside.
We admire it!
Step-by-step instructions for crocheting amigurumi: how to crochet a bunny toy

For the amigurumi level for beginners, a detailed master class on knitting a cute bunny is quite suitable. But you need to be patient and focus.
Will be needed
- Filler;
- Hook;
- Primary color yarn;
- Yarn of an additional color (for the muzzle);
- Clothes – blouse or dress, decide for yourself);
- Accessories for the bunny (bow, bracelet, etc.) – optional
Designations
- KA - amigurumi ring ;
- VP - air loop;
- sc - single crochet.
Manufacturing process
We start by knitting a head from the main color - gray, brown, etc.
- We knit 6 sc in KA
- Add 6 loops (12)
- Add 1 sbn like this 6 times (18)
- From the fourth (24) to the ninth (54) rows, inclusive, add one sc (in the 4th row - two, in the fifth - three, and so on) each time repeating 6 times (24)
- We knit the tenth row similarly to the first (54)
- Eleventh row - make 13 sc, then add 10 loops in a row, make 8 sc and again add 10 loops in a row, then make 13 sc (74)
- In the twelfth row we knit 23 sc, skip 10 sc and insert a hook into the 34th loop, knit 8 sc, again skip 10 loops and knit 23 sc to the end (54)
- From 13 to 19 rows we knit without changes (54)
- From rows 20 to 23 we decrease one sc at a time, starting from seven, i.e. in the 20th row (48) – 7, in the 21st (42) – 6, repeating each row 6 times .
Now we knit two beautiful ears.
We knit them on small circles of 10 loops, which were obtained on the 12th row of the head.

- We knit 10 sc (10)
- Add 1 sc, repeat 5 times (15)
- Same as row 1 (15)
- Add 2 sc, repeat 5 times (20)
- We knit without changes (20)
- Add 3 sc, repeat 5 times (25)
- From 10 to 19 rows - 10 rows without changes (25)
- Here you need to make 3 sc, decrease and repeat 5 times (20)
- 1 row without changes (20)
- We make 2 sc, we make a decrease and so on 5 times (15)
- 1 row without changes (15)
- Do 1 sc, decrease, repeat 5 times (10)
- Decrease 5 loops (5)
- Sew up the hole and hide the thread. We do the second ear the same way
- Next we knit the body with the main color.
- We make 6 sc in KA
- Next we add 6 loops (12)
- From rows 3 to 7 inclusive, add 1 sbn each, starting from one (i.e. in the third - 1 sbn, in the fourth - 2 sbn), repeating 6 times
- From rows 8 to 12 we knit 5 rows without changes (42)
- Do 5 sc, decreasing, repeat 6 times (36)
- From rows 14 to 17 we knit 4 rows without changes (36)
- Decrease by making 4 sc, repeat 6 times (30)
- From rows 19 to 20 we knit 2 rows without changes (30)
- Decrease 3 sc, repeat 6 times (24)
- From 22 to 23 we knit 2 rows without changes (24)
- We make 2 sc, decrease and so on 6 times (18)
- 1 row without changes (18)
We stuff the body with filler and sew it to the head.
Hello everyone!
I collect all the materials from different sites, and also look through a lot of information in newspapers and magazines, and then such a huge selection appears, which contains many interesting ideas.
Often, I visit contact groups on knitting and needlework, and it is from there that I get all sorts of new items. I remind all those who saw their work and do not want it to be distributed for free on this site, please let me know, I will delete it at the first request.
Today I will share with you mostly masterpieces that are popular at all times. These are wild and domestic animals and animals. Also, many of you asked to publish cartoon characters. Therefore, everything will certainly be presented here and now. Let's go.
Don’t forget, if you liked the note, share it on social networks, as well as with friends and relatives.
By the way, the next issues will be devoted to New Year's toys, namely symbols, so do not miss the necessary information and come visit me more often. Better yet, add my site to your browser bookmarks.
What good fellows are the needlewomen who share with us master classes and, of course, detailed instructions completely free of charge. So that even a beginner can master this business.
Knitted animals are always very popular, because our children certainly love them. Every year we make new masterpieces, and usually fill our shelves with symbols of the coming year. Do you agree? After all, it is the year that represents this or that animal. Therefore, my next note will be devoted to such a main character. So, if you are also interested in this topic, then scroll through and find the hero you need
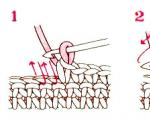
And we’ll start with banal descriptions, in case someone saw all this for the first time and wanted to try themselves as a craftswoman. The most basic thing is, of course, the ring (or oval), without it the toys will not work, this is a kind of basics, here is its visual reproduction of the actions.


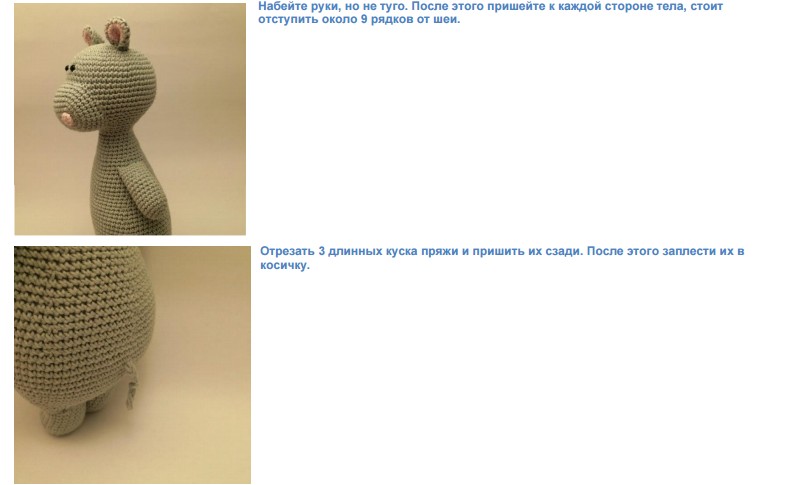
And now I propose to focus first on the simplest and most uncomplicated products. For example, make a hippopotamus or a hippopotamus.


Not a single cartoon, not a single fairy tale can do without this hero - the gray wolf. You must admit that our tough guys love them, and sometimes they’re even afraid of them.


Look, baby raccoon, his description is in PDF format. Whoever needs it, write, I’ll send it.

A very tiny and small toy can also be knitted, as shown in the example of a unicorn. You can also make a keychain.


And this toy is extremely cute and cute, such a cheerful and colorful hedgehog.


A sweet and charming dog whose dress and headband are removable (Anastasia Makeeva).


The next work is from Julia Piga. Such a funny and funny giraffe.


The most beloved and popular animal of all times is a bunny, hare... Whatever the kids call it. I propose this model, reminiscent of toys in the tilde style (Antonina Krykanova).


Here is another free master class from Ekaterina Stroikova - Milka the hare, her Instagram @igrushka_1


Or something like this. By the way, I have an excellent selection of . And not only that, there are a lot of descriptions of Easter toys, such as a cockerel, a hen and a chick.

Or make the product simpler. These are such bright, handsome boys and girls.


A funny tiny monkey (monkey) is waiting for its owner (Natalia Shumova).


I would also like to show the bear, or perhaps you will knit a huge bear.


And this teddy bear is very tender, and most importantly, it knits easily and quickly.


Funny little red fox or little fox, call him what you want.

Well, accordingly, you can’t do without the king of beasts - this is a lion.

The long-legged frog will also delight you.


You might be interested in this work, I can send you instructions by email, write me.

In addition, there is also a fish in the form of a shark with illustrations and step-by-step explanations.

This mischievous sheep will enchant you.


Or would you prefer lamb? In any case, the choice is yours.


Dedicated to all horse and pony lovers.


Or this cat, or rather the cat Marshmallow from Yulia Koroleva, will cheer everyone up, you can knit it as a gift.


Kids really love another cartoon - this is about Malyshariki or Smeshariki. I found descriptions of the Hedgehog.


But also all the other participants - Pandochka.


Well, let's start in order, Krosh will be the first.


Now I offer a diagram of the calmest hero - Barashik.

And let’s not forget about the beautiful Nyushenka.

A character from a Soviet cartoon - Cheburashka. Who needs it, write, the instructions are too long, I couldn’t post them here.
Nowadays “Three Cats” is still popular - these are Caramel, Korzhik, Sarzhik and Compote. There is also, write.
Of the Barboskins, I only came across Druzhok. The instructions are in PDF format on 15 pages, but they don’t fit here.
By the way, there is also such a selection, it also has many options. Take a look. Unfortunately, I am not able to fit everything into one article, so I have to publish something here and send something if I want. As you can see, this is Booba, the lion cub and the turtle from “I’m Lying in the Sun,” Goldie and Mimimishki.
I’ll try to find Minions (already exist) and Fixies to add to this article, perhaps I’ll publish a separate post on this topic to include everything I have.
Knitted amigurumi toys. Over 1000 free patterns
For those who don’t like to sit and painstakingly search for something on the Internet, I have prepared ready-made materials that I borrowed from Irina Korneva, she shares them on social networks and makes selections. Thank you so much for this! There are quite a lot of unique works in her collection. There are just so many of them, you can’t count them. But before that, I’ll show you a few other examples.
This beautiful doll in the shape of an angel is also in my collection. Write to whoever needs it, I’ll send it to you.
Quite original, girls will definitely appreciate it - the little mermaid.
And this cutie will make anyone smile. This, as you might have guessed, is a dragon. A song immediately comes to mind about Tosha, the Carousel channel is now playing.

For the boys, I have an airplane in my chest.


Well, finally, I will be very glad to see all of Irina’s achievements that you can get if you leave your review or comment below.
Well, let's begin. Those who love dolls and there are many options for you.

Then a large collection of hares.
Also bears.
A collection of dogs, I repeat again.

Kittens and other representatives of the cat family.
Plus, sea creatures such as whales, turtles and even fish can soon become yours if you start creating right now.
Those who love rodents or their representatives, such as mice, rats or hamsters, are also located here.
There are also birds and insects such as bees, butterflies and even a penguin.

Of course they are predatory animals.

And also elephants, giraffes, etc.

And in conclusion, the most favorite detailed instructions from Leithygurumi, according to which you can tie any animal.

If you liked the work, please comment below and I will certainly email you the necessary diagrams and master classes.
But in general, of course, needlewomen create such masterpieces, you are often simply amazed at their fantastic skills and ingenuity, they even make baby rattles or mobiles for newborns over the crib.

In conclusion, I want to say thank you to everyone for stopping by to visit me. Patience, perseverance, creative success and of course a great mood, you can’t go anywhere without it. Write reviews, I will be glad to receive your wishes. Bye! See you.
Amigurumi is the art of creating small soft toys that are crocheted or knitted. The birthplace of amigurumi is Japan, but knitting cute little toys has its fans all over the world. The revival of such traditional Japanese handicrafts began back in the 70s, when the concept of “kawaii” appeared. “Kawaii” means something cute, touching, charming.
Crochet amigurumi style toy
This art became popular after the appearance of the Hello Kitti toy, which was invented by designer Yuko Shimizu. The product can have a variety of forms: be in the form of animals, movie and cartoon characters, all kinds of inanimate objects (cakes, cars or kitchen utensils). But, like any other type of needlework, it has its own characteristics and differences.
The main distinctive features of amigurumi:

Knitting technology toys
For fans of needlework, diagrams and descriptions of crocheted amigurumi toys have long been translated from Japanese into Russian, English, Spanish, German and other languages of the world. But in order to read the diagrams correctly, you must first become familiar with the Japanese conventions for it.
Amigurumi knitting technique:

Features of connecting parts
 There are several ways to connect the parts of a knitted product:
- Just sew the parts together with a needle and thread.
- Hinge method.
The hinge method is a connection of parts, but differs in execution technique. This method allows you to make movable parts for a toy (for example, movable arms and legs for a knitted doll).
Master class on connecting parts using the hinge method
Using the hinge stitching technique, you can make the amigurumi's arms and legs movable. Let's look at this using the example of a knitted amigurumi bear:

When choosing a method for connecting parts, do not forget about those for whom the product is intended. Children will be much more interested in playing with a toy that has moving legs, as this provides more opportunities for play and fantasy!
Knitting workshops for beginners
 Various crochet amigurumi animal patterns for beginners can be found on the Internet, but it is better to take them as a basis and create your own unique masterpiece. For needlewomen who are making such a craft for the first time, I suggest you study simple amigurumi crochet master classes, with their help you can easily learn how to knit cute toys, such as:
- Mouse.
- Spider-Man.
- New Year's snowman.
Toy "Mouse"
To work you will need:
- Yarn in two colors - gray for the body and black for the nose.
- Two beads for the eyes.
- Sintepon as a filler.
- Hook.
- Needle and thread for sewing pieces together.
To make a mouse it is necessary to tie each part of the body separately.
First we make the mouse's head. We take gray threads and start knitting the part from the “amigurumi ring”:

Until the last couple of rows are completed, fill your head with padding polyester and shape it into a ball.
Similarly, according to the pattern, we knit the remaining parts of the body and stuff them with filler.
All that remains is to tie the mouse's tail, which is made from one row of air loops. The length of the tail is chosen arbitrarily. We cut off the excess thread using scissors.
The legs and arms can be made movable by connecting them to the body in a hinged manner. The last thing we do is sew on our tail. The mouse is ready!
Such a mouse can be decorated with various clothing items, for example, a colored scarf or T-shirt. If the toy is intended for a girl, then tie a skirt for the mouse and a bow on its head. Your child will be happy with such a gift!
Spider-Man toy
An original gift idea for fans of Marvel and Spider-Man! As a basis for the toy, we take the amigurumi crochet “Mice” pattern, which we discussed above. But a toy "Spider-Man" will consist of only 6 parts:

To work you will need:
- Yarn of two colors - red and blue.
- Two white pieces of fabric for the eyes.
- Black bead and black thread for decoration.
- Hook.
 We knit the head first.
- The first eight rows are knitted with red threads, and from the 9th row we continue with blue threads. This is the beginning of Spider-Man's pants.
- We make the arms according to the pattern entirely from red threads, and the legs start with red and continue with blue.
- Before sewing the body parts of the toy together, you need to sew on the eyes from pieces of felt and use black thread to make decorative stripes on the head, as shown in the picture below.
- We glue a bead on the body and embroider the legs, making a small spider. We sew the parts together and Spider-Man is ready!
A knitted snowman is one of the easiest toys that even a beginner can make.
 To work you will need:
- White yarn.
- Colored yarn for scarf and hat.
- Two beads for the eyes.
- Orange and black threads.
- Sintepon.
- Needle.
- Hook.
Making a snowman step by step:
- We knit three balls for the body of the toy according to the pattern, stuff them with synthetic padding and sew them together.
- We knit a scarf and a hat according to the pattern below. You can use brightly colored yarn to make our Snowman look more festive. We sew the hat to the head and tie the scarf around the snowman's neck.
- We embroider a carrot nose with orange threads, and make him smile with black threads. All that remains is to glue the beads in place of the eyes and our snowman is ready!
 Additionally, you can decorate the snowman’s body with buttons.
This snowman will be a great gift for the New Year holidays. And if you sew a small rope to it in the form of a loop, it can turn into a Christmas tree toy or a cute keychain!
Crochet amigurumi toys An interesting activity not only for adults, but also for young needlewomen. It will allow you to create unique souvenirs and delight your friends with unusual gifts. And thanks to your imagination, they can have the most varied appearance!
Attention, TODAY only!