How to make nails from liquid mica. What it is? Using liquid mica in manicure
Definitely difficult to execute. In fact spectacular manicure you can create without even having professional skills. Today in specialized stores it is presented huge selection various decorative elements designed to make your nail art incomparable. Mica is especially popular for nail design, which can transform any manicure.
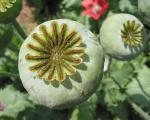
The decorative material owes its name to its similarity to a natural mineral. Artificial mica manufactured in the form of shavings, plates different colors, vaguely reminiscent of pieces of foil. The elements are light, and in the rays of the sun they shimmer and shine amazingly. Most often, decorative mica is used to create aquarium or any other volumetric nail art, giving the design additional depth. Such decor is usually used when working with since it is necessary to seal the picture. If this is not done, the manicure will turn out rough and lumpy.
Depending on its structure, decorative mica for nails can be regular or liquid. The latter has a fluid consistency and is a bit reminiscent of glitter in appearance. The different colors of the material allow you to create an original and unique design with mica every time. Various shades of decorative elements are presented in next video.
Manicure technology with mica
To make a manicure with mica at home, it is advisable to master the basics artificial extension nails On our website you will find all necessary information on this topic, as well as useful photos and video materials. When using gel or regular varnishes, you can experiment only with liquid mica, but it should be applied in a very thin layer. To create a luxurious design on your extended nails, follow a few simple steps.
- Lay out using gel or acrylic free edge, having previously installed paper form. At first, give preference to shorter nail tips.
- After polymerization (when working with gels) or drying of the composition, apply an additional layer of color coating.
- When using acrylic, without waiting for it to set, use a dot to arrange the mica in any order. It is more convenient to apply liquid elements with a brush. When extending nails with gel, mica is fixed after polymerization on a sticky layer.
- When applying decorative elements, make sure that they do not extend beyond the free edge. When the mica decorates your nails, press it with cling film, which you need to carefully wrap your fingers with. In the case of gel, carry out half-minute polymerization.
- Finally, coat your nails with a top coat. If necessary, file and sand. The mica design is ready! So that you can diversify your nail art and turn it into reality interesting ideas manicure, we have prepared a colorful photo gallery for you.
Sparkling Mica Nail Art Ideas
The design with mica is light and elegant. It looks great on nails of any length. You can use mica to decorate the ends, making a kind of jacket, or complement various patterns and designs with sparkling elements. Luxurious manicure, without a doubt, will attract everyone's attention to its owner. Make sure of this by looking at a few photos of the sparkling design.


Nail art with mica is the perfect finishing touch festive look any girl. The photo gallery will help you bring your ideas to life, and to clearly demonstrate to you interesting design, we bring to your attention educational video lesson from Svetlana Sokolova. Express your inner world through a manicure, and those around you will certainly appreciate it!
Geology and the beauty sphere are two different poles, two parallel ones, which, it would seem, will never intersect. But in our bustling world, everything is possible and mica for nails - bright that confirmation. After all, it is she who combines geodesy with manicure; it is she who has become an element of decoration that has become widely used in nail art. Nails with mica look fresh and unique, festive and extremely elegant. At the same time, such designs are easily adapted to everyday outfits and do not look flashy or provocative. Let's continue eternal theme shine on our website, where your faithful guideProstoNailwill tell you in detail what mica is needed for, where to buy it and how to use it.
What is mica for nails - a natural kaleidoscope
There are rumors that to create an attractive, stylish manicure Only a professional master working in a salon can do this. ProstoNail will take the liberty of debunking this myth. Our readers, using knowledge, useful life hacks and acquired skills, can easily independently implement the most intricate nail designs with mica and glitter - no exception to the rule. Surely many of you are overcome by the question - what does mica for nails look like and what is it? We hasten to dot all the i's.
Initially, mica was an object of study for geologists, since it is nothing more than natural mineral, which has a layered texture and the ability to bend light, creating bizarre holographic effects. This metamorphic rock very presentable and, most importantly, relatively inexpensive. This is why semi-precious jewelry with mica is so popular among the fair sex. Afterwards, the mineral became the inspiration for creating limited editions of accessories and fittings for outerwear. But mica has gained the greatest popularity and demand in the field of nail services.


True, manicure uses an interpretation or imitation of real mica, created from ultra-thin, pliable plastic particles. Mica for nail design - in demand synthetic material, which does not require special professional training. You can buy it in specialized manicure stores, and the price is literally symbolic, while the consumption is extremely minimal. There is an assumption that the Americans were the first to patent mica varnishes, but one fact is undeniable - this type decor is now produced in almost all countries of the world. Mica is often compared to Yukia flakes, but it should be remembered that the former is a product of plastic processing, and the latter is a pressed pigment, although the effect of their use is very similar. Next, we will take a closer look at the types of mica and how to use it.


Types of mica for manicure - in the world of mineral textures
According to social surveys, almost every third girl in Europe regularly does it, either in a salon. Every fourth person regularly experiments with design and tries out innovations created by enterprising businessmen. Often these experiments end unsuccessfully, but with mica for nails such an outcome is simply impossible. The uniqueness of this material is that it does not harm the nail plates and is incredibly easy to use. Globally, several varieties of mica are distinguished:
- wet mica or liquid mica;
- dry mica.
Below we will look at each of the subspecies in more detail, but first we will weigh all the advantages and disadvantages of such decor.
| Advantages | Flaws |
|---|---|
| Variability of combinations. Holographic mica, thanks to his unique ability reflect and wring Sun rays, can look appropriate with any varnish. So, for example, if you add a red manicure with shiny elements, you will get an intricate decor worthy of a true lady | Due to its “large caliber”, mica can crumble and stain clothes, as well as the desktop, so use special protective pads or regular office paper to prevent contamination |
| Relevance of decor. Many conservative young ladies consider rhinestones or modeling to be too pretentious and flashy, and sometimes even vulgar, which cannot be said about mica. If you use the material on your nails correctly, in doses and carefully, you can achieve a very universal coating, as relevant as for strict office lady, and for a perky student | Strictly regulate the amount of mica, otherwise it can create excess volume on your nails, “heaviening” the design |
| Excellent durability. As a rule, if you carefully follow the application technology and also “seal” the free edge well, the mica coating will last for a record long period of time without chipping or tarnishing | Soft mica requires extremely careful handling, otherwise it can literally break. Therefore, experts recommend using tweezers with long, flat edges that can easily pick up thin strips of foil |
| Correction. It's no secret that shiny manicure adjust the shape nail bed and hide minor imperfections. Use this advantage wisely | |
| Public availability. Mica for nail extensions and their decoration is sold in any cosmetic chain store, so you don’t need to spend days searching for the coveted glitter | |
| Diversity. Due to its enormous popularity among admirers of chic and brilliance, the variety of mica breaks all records. Large and small, round and diamond-shaped, holographic and mirror - the main thing is not to get lost in this wealth | |
| Application. Ease of use decorative mica It’s simply amazing, because if you follow life hacks and tips from the pros, even a novice in manicure can implement such a design. Don't believe me? Then hurry up and see for yourself |
Don't be afraid to experiment and feel free to realize your cherished fantasies on a manicure canvas.
Liquid mica for nails
Liquid mica for nails is essentially an ordinary gel polish or shellac with glitter. The moderately thick, viscous consistency is evenly distributed over the nail plates, has good adhesive ability and stays securely on the nails for a long time. It’s easy to work with such mica if you decide to cover the entire surface of your nails with shimmering particles; things are somewhat more complicated with partial decoration. In this case, use a special synthetic brush for drawing flat shape or a thin hair brush that creates graceful and straight lines.


Dry mica for nails
Dry mica for nails consists of many light, small shiny pieces that are obtained as a result of specialized processing of the layered structure of the mineral. Not sure how to make finer mica? Just take nail scissors and get it to the size you need. In addition, dry mica is easily layered to achieve the desired volume, and also naturally strengthens and compacts excessively thin plates. Aquarium nail design with mica is another area of application for such a functional material, creating the shimmering effect of pebbles lying on seabed, under the water column.


Mica for nails in a roll
Designs with mica are very common among modern beauties due to their versatility and trendiness. Therefore, it is much more profitable for practicing craftsmen to buy mica in whole rolls than to waste money on individual jars. If you purchase a large roll, you just need to separate the layers of material immediately before the procedure and cut it with tweezers.


Gel polish with mica
Gel polish with mica has been a find of the last few years. You simply choose the shade of pigment you like or take one with shiny splashes and apply it on top standard gel, creating an unusual, but at the same time stylish. Gel nails They are also “friendly” with such a universal coating, so such varnishes are often recommended after the extension procedure.


How to use mica for nails
Surely, after reading so much information and detailed viewing of a million inspiring photos, a completely logical question is brewing in your head - how to use mica for nails? The fact is that each variety of this decorative material has certain nuances that should be taken into account when applying. Therefore, read carefully and do not forget to take notes.


Step-by-step instructions for applying dry mica:
- do the usual hygiene procedures, adjusting desired shape and the length of the nail plates;
- do not forget to thoroughly polish your nails with a buff in order to eliminate all roughness and unevenness;
- using napkins or thin linen fabric, wipe your nails with a degreasing solution. If you don’t have one at hand, micellar water for makeup remover can successfully replace it;
- should not be leveled with acid-free or acid primer, significantly extending the durability of manicure;
- After waiting for the primer to be completely absorbed, apply a thin layer of base and polymerize it under UF or LED lighting;
- then apply your favorite shade of colored gel polish or shellac in two layers, distributing it evenly and immediately removing streaks with an orange stick;
- Now you can begin the painstaking and responsible process of decorating, using cut pieces of mica for this. Having picked them up with tweezers, place the particles on the surface of the nail and move them if necessary with a dot or stick, now fix the efforts with a layer of matte or glossy topcoat;
- remove sticky layer and enjoy your fingers, which are guaranteed to fall into.
- perform a routine trimmed or untrimmed manicure;
- then prepare your nails for applying varnish by first sanding them with a buffer, as well as degreasing them and covering them with a primer;
- when the primer is completely absorbed, repeat the steps for application and polymerization of the base, as well as the main color layer;
- Without removing the sticky barrier, dip a flat brush into a jar of liquid glitter and create a golden mica manicure;
- take a picture of your fresh manicure on your phone and don’t forget to post a new card on Instagram.
Nail design with mica
Colored mica for nails is an inexhaustible source for embodying the brightest and most memorable nail art ideas. Some of them are especially worthy of your attention, so the editors of ProstoNail decided to make stylish selection memorable designs. All you have to do is select a few from the proposed list:
- by itself it looks quite catchy, but at the same time goes chic with any sandals. Of course, you can stop at completely covering your nails with shimmering particles, but partially filling your nails, divided or divided, also looks stylish;
- mica for nails broken glass- another cool solution that complements and equally beautifully. By the way, for the warm season it is good to use a holographic one, shimmering with all the colors of the rainbow;
- French with mica is another neoclassical interpretation that modernizes the standard one. There is no doubt that by replacing the holes or creating a smile line with sparkles, you will definitely not go unnoticed;
- nail design with mica “honeycomb” is a bright theme, the implementation of which does not require a highly qualified master. You just need to buy mica the right size and forms, and then put it in;
- Since mica is quite a presentable and catchy decorative element, it is often used to decorate or. Fortunately, we have already collected unusual ideas for the celebration in previous articles;
- It also looks funny in combination with shimmering mica particles. A phantasmagoric picture, worthy of impressionist paintings, is guaranteed.


Let our ideas and bright pictures will serve as a source of inspiration, encouraging you to quickly make an appointment with a manicurist.
Having taken a leading position in nail art in 2015, manicure with mica is still a favorite design of many girls and masters. Due to multifaceted overflows and bright colors it can completely transform both natural nails and extensions.
Mica, what is it?
Natural mica is a mineral with a layered texture and a mesmerizing pearlescent sheen.
Design mica looks like pieces of cut foil when viewed. This mica is sold in the form of flakes and shavings and boasts a huge color spectrum.
Types of decorative mica
Dry or regular - has a dense structure that resembles pieces of foil. Sold in jars or bags, which may contain large particles, they are very easy to cut with ordinary nail scissors.
Note! Dry mica is used by nail technicians when doing nail extensions. This is because when using it, it is necessary to apply a thick covering layer on top. It is necessary to eliminate lumpiness and roughness on the surface of the nail.
Liquid mica ( liquid foil, wet shine) is a shiny pigment that applies evenly even to natural nails. Used for manicure with gel polish or regular polish.
French manicure with dry mica
To create an extended jacket with mica you will need the following materials:
- Orange stick.
- Nail clippers.
- Files: for natural nails(180-220 grit), for artificial nails(80-100 grit).
- Nail brush.
- Acid-free primer.
- Paper forms for extensions.
- Gels for extensions (base, modeling and finishing).
- Dry mica.
- Brush for extensions and dots.
- Sticky layer remover.
- Cotton pads.
- Ultraviolet lamp.
- Cuticle oil.
The first step is preparing nails for extensions:

Let's start building and decorating:
- We place a form under the nail, making sure that the “ears” connect without overlaps.
- Apply the first thin layer base gel When creating the shape of the future nail, dry it in a lamp for at least 40 seconds.
- Make the second layer a little thicker with base gel and dry for at least 40 seconds.
- Remove the paper form and remove the sticky layer. We file the surface with an artificial nail file and shape the free edge.
- Degrease the surface with a sticky layer remover.
- We draw a “smile” with modeling gel, apply mica to the sticky layer using dots, align the pieces, and polymerize for at least one minute.
- Cover the nail completely with the finishing gel in the lamp for one minute. We remove the sticky layer, file it with an artificial nail file, and degrease it.
- Apply a second layer of finish, dry for three minutes, degrease, apply oil to the cuticle area.
French nail design with mica is ready. Nails with such a manicure sparkle effectively and are suitable for both everyday look, and for the holiday.
Home manicure using liquid mica
Not all girls like extended nails, and not all know how to do them. Therefore, now we will consider two ways to create a simple manicure with mica, photo step by step process They will help even beginners perform it at home.
To get started, you can do regular manicure using nail polish containing glitter. There is nothing tricky about this process, but the effect will be sparkling in the literal sense of the word.
Step-by-step creation of a glitter manicure:

Everything is quite simple, but the nails already look much more original than with a simple colored coating.
You can also do a manicure at home using gel polishes and liquid mica:
- At the first stage it is necessary to do processing nail plate, follow the instructions from the nail extension example.
- We cover the nails with a thin layer of gel polish base, seal the end of the nail in a lamp for two minutes.
- Cover the nail with colored gel polish, then apply liquid mica with a flat brush or dots. Carefully align all the pieces and dry for 30-40 seconds.
- Cover the entire surface with the finishing coat. You can admire the shine and shimmer on your nails!
Any girl will appreciate the ease of execution and the original result of a manicure with mica. Its versatility and unpretentiousness continue to win an increasing number of fans. Perhaps the ideas below can inspire someone else to achieve this truly dazzling manicure.
In pursuit of leading positions in the field of fashionable nail art, the world famous designers create unique and inimitable techniques. Capable of surprising not only ordinary lovers simple manicure, but also regular clients of beauty salons. And if we take into account all the current trends of 2015, it is worth noting that manicure with mica is by far the most fashion trend stylish design nails And, despite its serious technical name, it looks very beautiful and bewitching on nails. In addition, the use of this material in nail art can transform absolutely any manicure, make the nail design voluminous and create a unique aquarium effect.
Main characteristics of mica
Artificial mica for manicure design, more like small pieces of foil. But unlike natural material, this decorative element presented in a wide range color palette and is offered in the form of plates or small chips.
In terms of its structure, this decor also has fundamental differences, as it is offered in liquid and dry form. Moreover, loose dry, can be purchased at any nail art boutique in various bags and jars. Liquid decor differs from dry, light fluid consistency, and in its own way appearance more like regular varnish with sparkles.
When designing nails with mica, you should remember that this material quite voluminous, and in some variations rough and lumpy. That is why mica is most often used on extended nails, which are then coated with a special fixing agent. It is quite possible to make such a design at home, but so that the roughness does not cause any inconvenience, it is necessary to cover the surface with several layers of a conventional fixative.
How to use dry mica correctly
The dry mixture for design can be used in different ways, for example, simply spread over the entire nail or decorate only the French area, distribute unevenly on one side of the nail plate, decorate moon manicure or do unusual pattern. However, in order to correctly and beautifully apply mica to the surface you will need: a container of water, dots, a toothpick or an orange stick, a base varnish, dry mica and a fixative. Once all the material is at hand you need to:
- Keep your nails in order by carrying out all hygiene procedures
- Then apply the base varnish
- And after the surface dries, apply a second layer.
- Without waiting for drying, you should start decorating your nails
- The process itself is quite simple, you should use a dot to grab a little mica and transfer it to the nail, distributing it in the required direction. To completely cover the nail with this decor, you should use a brush previously dipped in water.
- The final stage of manicure is drying and top coat.
Master Svetlana talks about how to work with mica correctly in the following video:
How to use liquid mica
Liquid mica is much easier to use than dry mica, because this decor is made on the basis of varnish and in some cases can completely replace common remedy for a manicure. But to make a nail design, you should:
- Carry out all hygiene procedures
- Degrease and coat nails with base
- Apply several layers of your favorite varnish
- And after complete drying, cover the nails with liquid decor, preferably several times
- Then secure with regular topcoat
The use of liquid mica in nail design not only simplifies the procedure as much as possible original design, but also preserves the manicure much longer than a design made with a dry shiny mixture. In addition, thanks to this decorative element, the manicure is less susceptible to chipping and can withstand everyday stress, compared to a conventional product.
What attracts women to the popular manicure with mica? The answer is clear: brightness, sparkle, volumetric effect. When you first see such a design, it may seem that special materials and complex techniques will be required to complete it. Not at all! You can create the same beautiful manicure at home!
Mica in nature is a mineral with a layered structure. Pieces of mica have a specific pearlescent luster, so they are used not only in industry and construction, but also in art.
Of course, for nail art they use a material that resembles a natural mineral in appearance. Manicure mica is small thin film plates different shapes. They have bright color and beautiful holographic effect. The plates sparkle beautifully in the rays of light, creating the appearance of volume.
Manufacturers noticed the growing interest of manicure lovers in this material and expanded their range. Synthetic mica is now commercially available different shades and sizes. There is an opportunity to create new volumetric designs unsurpassed beauty!

There are two types of mica for manicure: regular and liquid.
Ordinary (loose) mica is small plates, resembling pieces of foil that have a relatively dense, solid structure. There are large pieces in the jars that can be cut with nail scissors. Loose mica used in aquarium design, when building up. The particles will have to be covered with a thick layer of gel or topcoat so that there are no roughness or bumps on the surface.
Read also: Manicure with cats: show your character!
Liquid mica is a shiny powder, which has a softer structure, lies evenly on the nails, and shines beautifully in the sun. There are other names that the manicurists themselves came up with: wet glitter, liquid foil. This material is more suitable for working with gel polish and creating designs on natural nails.
Home manicure with mica: three techniques
Experts advise doing a manicure with mica at home using gel polish. The shiny material is firmly attached to the sticky layer. Therefore, we will talk about the three most popular techniques.
Design using regular mica
The initial treatment of your nails is always very important. Sanding nails, applying primer and base are mandatory steps, but we won’t dwell on them.
- Apply a thin layer of colored gel polish to the base. Dry in the lamp for exactly two minutes, as the instructions indicate.
- Use an orange stick to grab pieces of mica from the jar and distribute them over the plate. We fill them with the entire base completely or part of the nail, depending on the intended design. You can thickly cover the nail with thin plates or carefully lay them on a sufficiently long distance from each other. We try not to go beyond the edges of the plate and onto the side rollers.
- Cover the nail with cling film and press firmly. Use your finger to straighten the pieces a little as far as possible. The mica pieces stick tightly to the nail, and the surface becomes less lumpy.
- Place the film-wrapped finger in the lamp and dry for about 20-30 seconds.
- After drying, remove the film. Make sure that all the pieces lie evenly.
- We paint the nail with the finish and send it to polymerize in the lamp for 2 minutes.
- After this, we carefully inspect the base, go over it with a nail file, if suddenly pieces of mica are visible above the finish.
- To be on the safe side, we go through the base with a buff. Shake off the dust. Make sure the surface is smooth.
- The design is ready. Small pearlescent particles are sealed under the topcoat. If desired, you can additionally draw patterns with gel paint.
- We cover the nails with another layer of topcoat and remove the sticky layer.
Read also: Halloween manicure: both scary and beautiful
Liquid mica design
Soft, thin, small particles from a distance resemble sparkles. Cling film In this case, you won’t need it for a manicure. Liquid mica can be smoothed over the surface with a brush. It is this type of shiny material that is recommended for designing not only long, but also short nails.
Let's describe the scheme step by step.
- Apply the selected color of shellac or gel paint to the base. Dry it in a lamp.
- Using a flat brush, grab pieces of mica and place them on the sticky layer. We level it well, shade it, and distribute it evenly over the surface. Let dry for about 20 seconds.
- Cover the top with a finishing layer. Let it dry and admire the result!
- If you notice some unevenness or bumps on the record, you can sand them down with a buff. But in most cases this is not necessary. Usually one coat of finish is enough, but to be on the safe side, you can apply a second one.
- Brilliant designs with mica

How to cover only certain design elements with mica? How to create a shiny edge of a French nail?
- Paint the base with the chosen color and dry it.
- Carefully remove the sticky layer.
- We make drawings with gel paint: flowers with wide petals, stripes or geometric shapes.
- We dry the images, but do not remove the sticky layer.
- Now we apply mica to the drawings and shade them with a brush. The particles stick only in those areas where there is a sticky layer.
- Brush off the remaining mica from the base with a dry brush and cover with top coat. Removing stickiness.
- Now you can decorate the base subtle patterns, monograms, plant motifs.
- We cover the finished design with another layer of topcoat.