What does edged manicure mean? Trimmed classic manicure
Despite the growing popularity of the European unedged technique, classic manicure is used in practice by many masters both in salons and at home. It solves the problem of too rough cuticles, which simply cannot be softened at once with a remover, so you have to carefully trim them with scissors or nippers. A classic cut manicure can optionally be combined with spa treatments, the Brazilian manicure method and other types of professional nail treatment before applying gel polish. Mastering a classic manicure is not difficult; you don’t need any special expensive tools like hardware manicure, so this technique is great for home use, including for beginners.
Features of edged manicure
The difference between classic edged manicure and other techniques lies in its name. In the European technique, the cuticle is softened with a remover and then pushed back with an orange stick. Classic manicure uses metal tools (scissors, nippers, spatulas, etc.). The cuticle is first softened and then carefully trimmed. The main disadvantage of this type of cuticle treatment is the possibility of damaging the delicate skin around the nail. There is also a small chance of infection. However, experienced craftsmen masterfully master this technique, and it does not cause any complaints from clients. In addition, as mentioned above, the European technique is not suitable for all girls due to the cuticle being too rough. Masters recommend starting with a classic manicure, and then gradually moving on to a European unedged manicure when the cuticle becomes softer.

Also a distinctive feature of classic manicure is the use of water. Before starting to manipulate the client’s hands, the master prepares a hand bath to soften the cuticle.
The main advantages of classical technology :
- Available for home use;
- Suitable for working with rough cuticles;
- Does not require large expenses;
Disadvantages of trimming technique :
- If you handle the tool carelessly, injury to the cuticle or nail plate may occur;
- After the procedure, hangnails often form.
In general, the technique is simple to perform manicure at home and quite popular.
List of necessary tools for manicure

For a classic manicure you will need the following set of tools and cosmetics:
- Nippers, scissors, spatulas, pusher;
- Liquid for hand disinfection;
- Disinfector for tools;
- Disposable nail files and nail buffer;
- Dust removal brush;
- Hand bath and salt solutions to strengthen nails;
- Remover for too rough cuticles, oil for nail and cuticle care.
Classic manicure technology: step-by-step lesson with photos
The easiest way to demonstrate the technology for performing a classic edged manicure is with a step-by-step photo tutorial. Each master in the process of work can carry out some additional manipulations, use a variety of tools and cosmetics. Nowadays you don’t often see classical technology in its pure form; everyone brings some of their own tricks to it during the learning process. Beginners, having gained experience, combine techniques and select the optimal manicure process for themselves. Classical technology consists of 5 main stages. Let's see how to properly do a classic manicure for beginners.
STAGE 1 OF ANY MANICURE – ANTISEPTIC TREATMENT
Preparing the client's hands using a skin antiseptic. The master works in disposable gloves.

STAGE 2 OF THE CLASSIC MANICURE – NAIL BATH
The first step is to soften the rough skin around the nails and this can be done using a bath of warm water. The time is calculated individually, approximately the process takes from 5 to 15 minutes. Additionally, you can use sea salt to strengthen nails, aromatic oils and special cosmetic care additives. If the cuticle is very dense, then you can additionally use a remover (apply it before the bath).

STAGE 3: REMOVAL OF CUTICLE AND PTERIGIA
Using a pusher, you need to carefully clean the softened pterygium from the side ridges and under the cuticle. Movements should be from bottom to top. Next, you need to remove the cuticle using forceps, you need to start from the free edge and try to cut the cuticle in the form of one strip (this eliminates the possibility of further formation of hangnails). Nippers in relation to the nail plate (when cutting the cuticle) should be at an angle of 90 degrees to avoid cuts. If necessary, you need to use a pusher in the area under the cuticle. Remaining skin and dust can be removed with a soft brush.


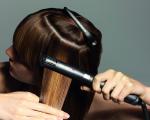
Pay attention to how to hold the forceps correctly and their position in your hands.


STAGE 5: CARE
If applying gel polish is not required, then you can treat the cuticle and nails with a special oil enriched with vitamins and minerals.

Classic manicure with gel polish
If after a classic manicure the application of gel polish is required, then it is necessary to perform a number of additional manipulations with the nails in order to prepare them for the application of gel polish.
STAGE 6: ROUGHENING
In order to improve the quality of adhesion of the base coat to the nail plate, it is necessary to set a slight roughness, namely, walk over the entire surface of the nail with a buffer, lightly pressing it. Also, after the procedure, it is necessary to remove all dust with a brush.


STAGE 7: LOW FAT
Using lint-free manicure wipes soaked in natural nail degreasing liquid, we remove dust, moisture and cosmetics from the nails.

STEP 8: DEHYDRATOR AND PRIMER
Many manufacturers recommend using a dehydrator and primer as additional means for preparing the nail plate. They are applied before the base (first dehydrator then primer). The dehydrator removes excess moisture from the nail, and the primer creates a sticky layer on the surface for better adhesion of the coating to the nail. Many masters manage without them. Depends on what brand of gel polish you use (usually the manufacturer indicates all the necessary steps for performing a manicure).

The dehydrator dries quickly enough in the air; there is no need to put it in a lamp.

The primer has a liquid consistency and is applied in a thin layer. The coating dries in air. Drying time 30 seconds.
STAGE 9: BASE COAT
Manufacturers of UV coatings for nails produce single-phase and three-phase gel polishes. Single-phase ones do not require applying a base and finishing layer (these are 3 in 1 coatings). But when using three-phase gel polishes, it is necessary to apply a base coat followed by polymerization in a lamp. The standard drying time for gel coatings in an LED lamp is 30 seconds, in a UV lamp 2-3 minutes, unless otherwise provided by the manufacturer.

The base is applied in a thin layer. To further strengthen the client’s nails, it is better to use rubber coatings; they have a thicker consistency and smooth the surface well. We also remember sealing the end.
STAGE 10: APPLICATION OF GEL POLISH (SHELLAC)
Apply 2 layers of colored gel polish to the base with drying between layers.

The main drop should be placed in the center, and then carefully stretched with a brush.

To do a manicure under the cuticle, while applying the second layer of gel polish, you need to take a thin brush, push the cuticle as far as possible and carefully walk the brush along the entire edge of the nail.

STAGE 11: FINAL COATING
The final stage consists of applying the finishing coat (top) in one or, if necessary, two layers. After polymerization, you need to remove the sticky layer with a cloth soaked in nail degreasing agent.

STAGE 12: CARE
After completing a classic manicure with gel polish, the cuticle area is covered with a special care oil.

Video tutorial on how to properly apply gel polish in a classic manicure
French manicure classic
A classic French manicure (French) is performed using different technologies: the smile line is drawn freehand with a brush, special stencils are used, the tip of the nail is dipped in acrylic powder or glitter, and a special brush is used for a French manicure. Whatever method you choose, the technique for preparing the nail plate will be approximately the same. The exception is the stage of creating a base: you can use a base and then apply a light gel polish, or you can use special colored translucent bases for a jacket. To draw a smile line, different materials can also be used: thick gel polish or thicker gel paint.

Step-by-step instructions for performing a classic French jacket

Photos with simple nail design options
At the end of this review, we posted a selection of photos of a classic manicure with gel polish for long and short nails of different shapes. Perhaps by looking at these photos of beautiful nails, you will get fresh ideas for your work. Beginners tend to use classic manicure colors: red, pink, beige, blue, gray, white and black.


Beautiful nails give self-confidence, lift your spirits, and increase the status of their owner.
But not everyone can afford to visit a salon all the time. For many, the topic of manicure at home is relevant.
To properly make a beautiful manicure, preliminary preparation is necessary.
It includes the purchase of manicure tools, disinfectants and related items that you cannot do without.
Necessary tools for manicure at home
Good, solid tools– this is the key to high-quality cuticle care, prevention of nail splitting and high speed of the procedure.
For a classic edged manicure you will need the following tools:
| Tool | Description |
| 1. Cuticle tweezers. | It is best to purchase a Solinger brand tool, this is an old German brand of cutting tools. Tweezers have their own sizes. They determine the length of the blade. It’s good to take 0.5 cm. |
| Double-sided cuticle spatula: on one side it resembles an oar, on the other it resembles a hatchet. Must be metal. | |
 3. Knipser 3. Knipser
|
Tool for cutting the length of the nail. It looks like a small guillotine, it can be used for fingernails and toenails. |
 4.File 180 grit 4.File 180 grit
|
The grid should be imprinted on the file itself. |
 5. Polisher 2000 grit 5. Polisher 2000 grit
|
There are double and triple polishers, then the grit for each side must be printed. |
| Related Items: | |
 1. A large bowl, preferably ceramic - it holds the temperature well; 1. A large bowl, preferably ceramic - it holds the temperature well; |
|
 2. Towel or napkin; 2. Towel or napkin; |
|
 3. Cotton pads; 3. Cotton pads; |
|
 4. Orange sticks; 4. Orange sticks; |
|
 5. Nail polish remover. 5. Nail polish remover. |
|
| Disinfectants: | |
| 1. Chlorhexidine; | |
| 2. Alcohol solution 70%. | |
| 3. At the pharmacy you can purchase a professional product for treating hands and metal tools. | |
Which manicure tools should you use and which should you not?
If you still have little experience in nail care, orange sticks will come in handy. They can move the skin near the cuticle and clean the eponychium.
Some people use it to trim cuticles. manicure scissors. This is acceptable, but the best quality manicure will be if you use tweezers. Scissors have straight blades, while tweezers have beveled blades. That's why It is the tweezer that cuts the skin more and deeper and after them the manicure lasts longer.
 Nail fork
 Since we are talking about the cuticle area, No blade pressure is allowed. This can damage the matrix - the growth cells of the nail under the hole. As a result, the nail will grow crooked for the rest of its life.
Choosing a nail file, which one is used for what
Files vary depending on the grit. Grits measure the amount of abrasive applied to 1 square centimeter of a file:
The coarsest file is 80 grit. It is used to reduce the length of artificial nails;
Technique for performing European unedged manicure at home:
Step 1: Wash your hands with soap;
 Hand washing
 Step 2: Apply cuticle remover;
 Applying cuticle softener
Step 3: Starting from the little finger, use the rounded tip of a file or an orange stick to push the roller away;
 moving away and grinding the roller
 Step 4: Remove the softened thin skin from the surface of the nail;
 Cuticle removal
 Step 5: Process the rollers with a 180 grit file;
 processing rough rollers with a file
 Step 6: Wash your hands with soap;
Step 7: Degrease nails with an alcohol solution;
 Degreasing nails
 Step 8: Apply varnish coating.
 Varnish coating
 How to paint your nails evenly and beautifully
There is no difficulty in painting your nails easily and quickly and doing it exactly at home, without using a brush on the roller.
First of all, the varnish must have a certain consistency. The new varnish applies well and dries quickly, because the solvents have not yet evaporated from it. If the varnish has thickened, add 3-5 drops of varnish solvent to it.
Do not try to thin the varnish with acetone. or nail polish remover. These products will cause the varnish to curl.
Technique for applying varnish in bright or dark tones:
Step 1: Dip the brush into the varnish, squeeze out the excess with the back of the brush onto the bottle in a “pull away” motion.
Step 2: Place the brush in the middle of the nail at an angle of 45 degrees and move towards the cuticle. Before reaching the roller, stop the brush and move towards the free edge of the nail. This entire double movement must be done without lifting the brush from the nail or stopping it.
 Positioning the brush
  Smooth movement towards the cuticle
  Moving the brush towards the free edge
 Step 3: Place the brush on the nail in the cuticle area so that the brush lies in the hand perpendicular to the finger. Make a stroke with the brush along the cuticle to the side roller, round the stroke along the contour of the nail (the brush changes position - now it lies in the hand parallel to the finger) and bring it to a free edges of the nail.
 Movement to the side roller
 Step 4: Repeat this movement on the other side of the nail. If you run out of varnish on the brush during the process, turn it over and continue.

Step 5: With a well-wrung out brush, run along the end of the nail, sealing it.
 Result
 Technique for applying varnish in nude and dense pastel colors:
 Nude polish
 Step 1: Dip the brush into the varnish, squeeze out the excess with the back of the brush onto the bottle in a “pull away” motion.
Step 2: Place the brush in the middle of the nail at an angle of 5 degrees and move towards the cuticle, holding it almost suspended. The brush does not put pressure on the nail, only the polish touches the nail. Before reaching the roller, stop the brush and move towards the free edge of the nail.
Step 3: Bring the brush to the cuticle area. Keep the hand parallel to the finger. Barely touching the nail, move the brush towards the side roller and down to the free edge. The brush should go along the side of the nail without touching the roller.
Step 4: Repeat this movement on the other side of the nail. If you run out of varnish on the brush during the process, turn it over and continue.
Step 5: With a well-wrung out brush, run along the end of the nail, sealing it.
Nail designs at home
There are beautiful design options for which you don’t have to go to the salon. They can be done at home: rhinestones, glitter, gel pen painting, stickers, bouillons, varnish painting, craquelure, velvet, cat's eye.
 Cat's eye - stripes
  Cat eye-waves
 1. Cat's Eye Design. For it you will need to purchase magnetic polish and a Cat's Eye nail magnet. Still releasing options “Wave”, “Stripes”" and others. But the most spectacular is “Cat's Eye”.
 Cat's eye - made with gel polish
 It is done on the newly applied layer of varnish. The magnet is brought to the nail so that the strip is along the nail. Hold for 1 second.
If you hold the magnet closer to the nail, there will be a clear line, further away it will be blurry.
If you bring a magnet first vertically and then horizontally, there will be a bright point.
 Gel polish - made with ordinary varnish
 2. Craquelure design. A new product, hard varnish, has appeared on the product market. This is a special cracking varnish that is applied to the dried previous layer.
Substrates made of gold, white, and black varnishes look good. Crack polish dries quickly. It can be thinned like regular varnish.
If you apply it in a thick layer, it will crack into large pieces. If in a thin layer - into small ones. You can combine it: make one side of the nail with large fragments, and the other with small ones.
 Craquelure - large, medium, small.
 3. Velvet design. The varnish for this effect is called “Satin”. After drying it becomes matte, hiding all the unevenness of the nail.
If you apply a top coat on it, it becomes shiny, like regular varnish. You can make two nails shiny and leave the rest matte. This design looks good in dark or bright colors. On pastel colors it is almost invisible.
4. Leopard design. On a dried substrate (for example, coffee-au-lait color), uneven spots are applied with a brush with a slightly darker (beige) varnish and, without waiting for them to dry, a black dot is added to each spot. Using an orange stick, each dot is given the appearance of a comma.
 Leopard design
 This design is classic. It can be performed not only in natural tones, but also in avant-garde ones. A turquoise backing with blue spots and black commas looks good.
5. Zebra design.
 Zebra design
 Black lines are applied to a dry white substrate with a thin brush. There are varnishes for design, they have just such brushes.
The lines are drawn diagonally on the nail. The first line is drawn simple. The second, parallel to it, with a thickening coming from the middle of the line. It looks like a very narrow triangle. The third line is drawn simple along the previous one. The fourth is drawn with a thickening on the other side. The fifth is simple.
You can draw with a regular black gel pen. When the drawing is dry, simply seal it with topcoat. One zebra nail looks good, the rest are white.
 Nails with rhinestones and bouillons
 6. Design with stickers, bouillons and rhinestones. It is used on special occasions (weddings, graduations) and requires a beautiful dress.
Decorate two nails, tightly covering them with rhinestones of different sizes.. Swarovski rhinestones are suitable; they can be purchased in a set. The largest stone is placed in the center, closer to the cuticle. Near it on both sides there are smaller stones.
The smallest stones are placed on the edge of the nail. The space between large stones can be filled with gold broths. On the remaining nails, place one small stone in the center near the cuticle.
 Pencil for rhinestones
 Place stones on wet varnish. The stone is taken by simply bringing an orange stick moistened with water or a special pencil for rhinestones to it and it sticks to it (there are special pencils for attaching rhinestones on sale). It is placed on fresh varnish, corrected, trimmed, it sticks to the varnish and releases the stick.
Sterilizing instruments at home
In nail salons, instruments are sterilized in a dry-heat oven.
 Manicure tools
 At home, you can use the oven for these purposes. Place metal tools in a specially designated bowl, turn on the oven at 250 degrees and heat for 15 minutes.
If during the procedure a wound was caused and blood came out, the instrument is soaked in the solution before sterilization chlorhexidine or wiped three times with 70% alcohol(in the presence of special pharmaceutical products, it is better to carry out processing with them, according to the instructions).
Files and orange sticks can also be soaked in a disinfectant solution. But if there was no blood while working with them, it is enough to wipe them.
Below you can watch a detailed video about sterilizing manicure instruments; some information will be useful to you at home.
What pharmaceutical products may be useful?
In addition to chlorhexidine, you can buy hawthorn tincture 70% in the pharmacy. This alcohol solution can be used as a disinfectant.
The professional line of pharmaceutical sterilization products is very diverse. Disinfectants are divided into two types: for hands and for metal tools. The pharmacist at the pharmacy will always tell you what products are available.
You may also need it glue BF-6. This is a medical glue for treating wounds. It is convenient for cuts, disinfects and seals the wound instead of a band-aid.
Good to have on hand for warts "Mountain celandine", brown herbal balm. If a wart is discovered during the manicure procedure, you can immediately cauterize it with this balm.
Baths and oils for strengthening and growing nails after manicure
To keep nails healthy, they need to be nourished and treated. The aggressive environment makes them thin and brittle, appear on them. To avoid this, it is good to do it with sea salt.
You don’t have to buy expensive sea salt; the kind sold in grocery stores will do. You can add it during manicure to steam your nails.
In the process of saturating the nails with such water, a phenomenon called osmosis. This is an exchange of salts between two environments. Nails, like appendages of the skin, are an excretory organ. Nail effusion emerges through microscopic holes on the surface of the nail.
After taking a course of antibiotics, it forms very actively, preventing artificial nails from sticking to the nail bed. That is why after taking antibiotics, two weeks must pass before nail extensions.
Those who spent a lot of time in sea water on vacation notice improvements in the condition of their nails. Baths do not have to be done for a long time. 15 minutes is enough. This procedure can be carried out in the evening while watching TV.
After the bath, hands are lubricated with nourishing cream. The best creams are with fruit oils. This could be avocado, aloe, or apricot oil. Just do not confuse them with essential oils. This is a completely different product.
If the cream says that it contains mineral oil, it is better not to buy such a cream. This is a product of chemical distillation of petroleum. It won't be good for your nails.
You can always look beautiful, you just need to get used to it.

 To ensure that your hands, especially your nails, always look well-groomed, you need to know how to do a manicure correctly. This procedure should be performed once every seven days. You can do everything you need carefully and quickly in a beauty salon. If you don’t have the desire or opportunity to visit it, then you can do a manicure yourself at home and it’s no worse than the one offered to you for money.
 When answering the question of how to properly do a manicure, it should be noted that there are a huge number of them. However, most often a woman is suited to cut, uncut or classic. The main thing is to choose and decide.
Classic manicure
The classic manicure procedure involves removing the cuticle using small metal tweezers or sharp nail scissors.
Trim manicure
 Preferred for those with thick and rough cuticles. Quite traumatic. If you are careless or inexperienced, you can injure yourself by cutting off too much skin. As a result, this injury can provoke inflammation, due to which the cuticle becomes even coarser and begins to grow more intensively.
Unedged manicure or European
 This type of manicure also involves removing the cuticle, but using a special product developed on the basis of soft acids, namely fruit and lactic acids. Unedged or European manicure is preferable to women with delicate and thin skin on their hands. The process of removing cuticles boils down to painless and delicate dissolution.
The procedure for a European manicure takes much less time than a classic one.
However, this method of cuticle removal is contraindicated for women with sensitive skin, since the components of the product can provoke an allergic reaction.
Twelve manicure tools
 The manicure is created using twelve necessary tools. Therefore, if you are really interested in the right manicure, they should always be in your feminine arsenal. In particular, we are talking about:
- sharp nail scissors;
- nail file;
- metal tweezers;
- a metal spatula or orange wood stick to push back the cuticle;
- bath products: sea salt, olive and essential oils;
- nail polish remover;
- cotton pads or balls;
- cuticle softening oil;
- cuticle remover;
- hand cream;
- base coat and fixer;
- nail polish.
Four stages of manicure
Only if you follow all the steps during a manicure will your nails be able to always look healthy and beautiful, and you will receive an answer to the question of how to do a manicure correctly.
Stage one “Bath”
 Having decided on a home manicure, you need to give your nails a bath in order to soften the cuticle and remove it further without any injury.
So, you need to pour hot water into the bowl to such a level that all the fingers of both hands can be completely immersed in it. You must also first add two or three tablespoons of olive oil, two tablespoons of colorless sea salt and a few drops of essential oil (for example, lemon) to the liquid.
The oil will not only soften your skin, but will also nourish your nails with valuable vitamins, and colorless sea salt will make them strong.
The fingers are immersed in this solution for about ten minutes. As soon as you notice that the cuticle has become soft, feel free to begin removing it.
Stage two “Cuticle removal”
 Taking your fingers out of the bath one at a time, use a stick or spatula to push the cuticle to the base of the nail. You must act carefully, but with sufficient force. You must always be careful not to overdo it. After all, there is a risk of damage to the base of the nail.
Using the sharp side of a stick or spatula, remove any remaining skin from under the cuticle. Remove the remaining nicks using tweezers. The skin should not be torn off, but bitten off to avoid cuts. When using an unedged manicure, the cuticle is removed by using a special product from the “cuticle remover” series.
In this case, the gel is applied around the nail, not forgetting the area under the nail. As a result, carefully, using a stick or spatula, the product is removed along with the dissolved cuticle.
It is better not to apply this product to all fingers at the same time, since the remover dries out quite quickly. Professionals recommend treating two nails at a time.
Many manicurists recommend applying cuticle remover to those nails that are still covered with old varnish. Since the product used has a fairly aggressive composition that destroys the nail plate.
Stage three “Nail shape correction”
 To do a manicure correctly, you must remember that if you want to shorten your nails as much as possible, you must use nail scissors, and all movements must be single and confident. If the nails are filed, then it is necessary to direct the file only in one direction so that the nails do not begin to peel. You also need to make sure that all nails are the same length.
Stage four “Applying varnish and care”
 In order to lay the polish evenly on the nail plate, you must ensure that it does not extend beyond the boundaries of the nail, as shown in these instructions. Pay attention to the photo.
Now let’s try to apply the varnish correctly ourselves:
- Degrease the nail plates with nail polish remover.
- Apply a base coat to protect your nails from the harmful effects of nail polish and further yellowing. The base also levels the surface of the nail plate.
- Use a brush with polish from the base of the nail to its edge.
- The second and third strokes should also come from the base of the nail, drawing a kind of arc with the brush, following to the edges.
- The final step will be to use a fixing coating, which will give your manicure not only shine, but will also extend its life.
Now you know how to properly do a manicure in the comfort of your own home without the participation of an expensive beauty salon in this process. The main thing is to understand that every woman by nature is an innate skilled in all matters of beauty.
To look good, you need not only to take care of clothes, hair styling and proper makeup. Hands always give away a woman. From them you can understand whether she does housework and whether she often devotes time to her appearance. Soft and delicate skin, no scratches or cracks, and this is how every woman’s hands should look. But not everyone has the opportunity to regularly visit a beauty salon. In addition, the services of masters cost a lot of money. Is there a chance to achieve the same brilliant result at home?
It’s not difficult, but this is only the final stage of proper hand care. And it’s worth starting with a long but necessary procedure. To do a trim manicure, you don’t need any special skills or special tools. Everything you need can be found in the most ordinary home. Are there other options? Of course, you can use a fundamentally different method - unedged manicure is also popular. Classic manicure suitable for creating any look, and you should start caring for your nails with proven and simple methods.

How to do a trim manicure at home?
You should immediately characterize the chosen method, since there are several different names for the same sequence of actions. For example, this type of manicure is called “wet” or “water”, because one of the stages - hand baths. The very name “edged” suggests cuticle removal special tweezers, as well as cutting off rough skin (if necessary). This method has its advantages and disadvantages, which, of course, must be taken into account.
Pros and cons of edged manicure
It's worth starting with positive aspects, of which there are incomparably more.
- a classic manicure will take a little time;
- you will need a minimum of tools and materials;
- This method is suitable for hands that are regularly cared for, as well as neglected nails in very poor condition.
Among the disadvantages of this method, we must first mention its high risk of injury. If you cut the skin or cuticles poorly, you can cause an infection. Another "minus" — risk of ruining the appearance of nails. Carelessly cut skin creates an unpleasant impression. Therefore, you should approach classic manicure with great caution.
What you need:
- an orange stick or a special spatula for moving the cuticle,
- nail file (it is best to use ceramic or glass),
- straight manicure scissors (as an option - nail clippers),
- cuticle tweezers,
- disinfectant liquid,
- cotton swabs.

First you need remove old nail polish(if available), use liquid and cotton swabs. This step cannot be skipped, since a layer of varnish will not allow you to do a manicure. In addition, after completing the procedures, the coating will look unaesthetic.

Pay attention to the sequence of steps, it is very important for the health of the nails and obtaining the most effective result.
After removing the varnish, start align the lengths of the nail plates. Use nail clippers or nail scissors. After this, you need to give the nails the desired shape. Special pay attention to the corners, cutting them at the desired angle. File the edge with a nail file, positioning it directly perpendicular to the nail. You need to file your nails before steaming! Many girls make the mistake of using a nail file after baths, which leads to splitting of their nails. If you want to get not only a beautiful, but also a safe manicure, then perform these procedures only on dry nails.

Small roughness can be removed using a buff, but this is not necessary. If there is a need for this, then polish your nail. But it is best to carry out this procedure no more than once a month, so as not to risk your health.

The next stage, which will definitely appeal to all representatives of the fair sex, is baths. Fill a small container with warm water and add one or more ingredients: bath salts, aromatic oils and special herbal mixtures. If there is nothing similar in the house, then you can use the most common liquid soap. It needs to be added to the water and stirred slightly, do not whip the contents into foam. Place your hands in the bath for five to seven minutes and relax. If you also care about the skin of your hands, you can purchase special compositions for baths.

Steamed skin is already ready for the most important stage. Try to work quickly but carefully. You should not rush too much so as not to damage the nail. Orange stick or use a spatula to move the cuticle, directing it not only from the nail, but also slightly upward. The video will help all beginners understand how to do a trim manicure.
The danger of the trimming method lies precisely in removing rough skin and cuticles.

Before starting the procedure, be sure to carefully process all tools disinfectant. To avoid harming yourself and ruining your manicure, try to trim the entire cuticle as a whole, and not in pieces. In this case, you will get a beautiful and well-groomed look for your nails. In addition, when removing parts in parts, the risk of burrs increases. Treat not only the nail hole, but also the sides. Don't be afraid to pull the skin away from the nail a little to get to those hard-to-reach areas. The more thoroughly you treat the surface around the nail, the more beautiful and well-groomed your hands will look.

If in the process you accidentally hit sensitive skin and get hurt, then be sure to treat your finger disinfectant. This could be iodine or its analogue, vodka or alcohol. This way you can prevent infection.

We recommend that you spend a little time and finish the procedure with a massage. Apply special cuticle oil and gently rub it into the skin. If you are going to coat your nails with varnish, wait until it is completely absorbed and degrease the surface.

Trim manicure: video tutorials for beginners
Despite the numerous ways in which you can do a manicure, the edged manicure remains the classic look. A traditional manicure is offered in every salon, after which your hands look beautiful and well-groomed.
What is a classic edged manicure?
Once upon a time, the classic edged manicure was popular; in nail salons it was the only way to get your hands in order.
First, the fingers were steamed in hot water and the cuticle was cut off. After the procedure, it grew back quickly, the manipulation had to be repeated often.
Removing cuticles and hangnails often causes new problems.
Some people learned relatively recently what a European manicure is: it uses a remover (cuticle remover).
There are products on the market to slow down cuticle growth, and if you regularly devote time to caring for your hands, you don’t have to resort to trimmed manicures at all.
Some clients believe that the hardware method of performing the procedure is better, but it also has disadvantages: it cannot be used for treating thin nails.
A properly performed trimmed manicure will be useful:
- nail growth accelerates;
- removing the cuticle eliminates the appearance of grooves on the plates;
- the risk of developing infection as a result of injury to the skin is reduced.
What you need for the procedure at home
To perform the procedure you must have the following tools:
- manicure scissors (preferably with straight and curved blades);
- nail clippers;
- a file with an abrasiveness of 180/320 grit (it is used to create the shape of the nail);
- polishing file;
- hand bath;
- double-sided pusher (one edge is a spatula, the other is pointed).
You will need not only tools, you will also need:
- orange sticks;
- hand cream;
- remover;
- care oil;
- nail coating;
- nail polish remover.

Professionals and beauty salons have a much larger list of products and tools; at home you can get by with fewer.
How to do it right
If you know how to do a trim manicure, you can perform the procedure yourself at home. The technology is not too complicated, it is easy to master:
- First, remove the old coating using a cotton pad moistened with a special solution (nail polish remover without acetone).
- To reduce the length of nails, use scissors. If you only need to correct the shape, you need a nail file. It is recommended to hold the file correctly (at an angle of 90°) so that the layers of the nail plate are cut evenly. Perform movements in one direction; do not squeeze the nail so as not to disturb its structure.
- You will need a nail bath. The water temperature should not exceed 40°C; you can add liquid soap or essential oil, sea salt to it. Fingers are placed in the bath for 10-15 minutes. If the cuticle is tight, apply remover before immersing your fingers in water. Use a spatula to push back the softened cuticle, and an orange stick to push back at the base of the nail and side ridges.
- Carefully trim the cuticle with nippers or nail scissors, being careful not to damage the skin. After this, the surface of the nail is treated with a sanding file (or buff), followed by the application of cuticle oil.
- At the last stage, a protective or decorative coating is applied. This is optional, but it makes the manicure look complete. Before applying the coating, the nail plates are degreased (you can use nail polish remover). Using coatings, nails are strengthened, whitened, accelerated growth, protected from fungal infections and the negative effects of household chemicals. The drying time of the coating can be reduced by using a special spray.
Pros and cons of edged manicure
Traditional manicure has undeniable advantages:
- ease of implementation (after mastering a simple technique, you can do it yourself);
- carried out at the lowest cost;
- a minimal set of tools is required (compared to hardware);
- you can quickly get your hands in order;
- available at home (the risk of negative consequences is reduced: the choice, disinfection and use of tools are controlled).
It may not be possible to do everything carefully right away, but over time it will become clear how to perform the manipulation correctly.
The disadvantages include the following:
- the need to process instruments;
- skills needed;
- rapid growth of the cuticle (you have to remove it every 2 weeks);
- possibility of damage (if the procedure is performed incorrectly, the risk of injury to the skin or nail folds increases; burrs often form after a trimmed manicure).

Also, manipulation is contraindicated for those suffering from bleeding disorders and diabetes mellitus. Their wound healing process slows down and the risk of infection increases.
When performing a classic trim manicure using scissors and tweezers, you need to take into account some features:
- when processing cuticles, it is recommended to first use nail scissors, then remove the residue with nail clippers;
- manicure tools should not have nicks or gaps;
- It is recommended to use an antiseptic to treat instruments.
The shape of the nails is affected by the length and thickness of the fingers:
- The square shape suits thin and elongated fingers;
- For wide fingers, a long, pointed shape is more suitable;
- The oval shape is considered a classic.
Glass files are useful for decorative manicure. Metal files with diamond dust are suitable for short and thin natural nails. With the help of buffs you can give your nails a mirror smoothness.
You can process the tools at home yourself by placing them first in a craft bag (sold in specialized stores for nail design), and then in the oven of the kitchen stove.