Templates of paper carnival masks. Carnival mask "Butterfly"
- a craftswoman, very capable of all kinds of surprises, - she had another significant “trump card” in store at the end of the competition. Well, here it is - the Venetian “Butterfly” mask, made using cutting and paper-plastic techniques. Perhaps I have nothing to add to what you see now. If you can put your impressions into words, please do so in the comments below. :)
Venetian mask “Butterfly”
Hello! I bring to your attention my version of the Venetian mask. I thought for a very long time whether to do it or not. On the one hand, I really wanted to, but on the other, there was no “sporting interest.” And when I saw that masks appeared at the competition, I decided: I’ll make them.
Time was running out, actually 1.5 days. Here is the result. Everything will be very brief, sorry, but I was in a hurry.
There is no diagram as such, but the blanks of the mask are photographed from above, and if desired, photographs can be used as templates.
1. Cut out the butterfly wings according to the design.

2. Cut out the base of the mask.

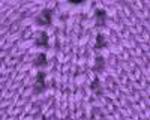
3. We do embossing.

4. Cut out the eyelashes: trace the hole for the eye cut out in the mask along the contour and draw eyelashes, then cut it out with an allowance for gluing.


Glue the eyelashes to the cutouts for the eyes on the butterfly's wings.

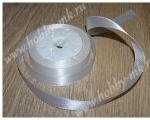
Glue the ribbons.

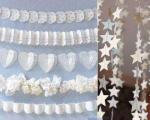
We decorate the mask with pearl half-beads.

And we try it on.


That's all!
Dear friends, that’s really all. :) On this stunning note, the publication of competitive works at the “Carnival in CARDONKINO” ends, and the time for general Internet voting comes!
Fabulous carnival masks of a butterfly, goat, bear, lion, owl and dog. Let's give our kids a holiday! Children surprisingly easily transform into various characters; for this they only need one small detail.
Even the most DIY one for children, made from unusual material, can lift the mood, bring a festive atmosphere, and turn an ordinary evening into a fabulous one.
A DIY mask for a child can be made from felt or other dense fabric. We propose to consider masks made from an interesting and slightly unusual material - sheet foam cardboard. It is quite soft and light, bends easily, but at the same time holds its shape perfectly.
To create several New Year's masks you will need:
- foam board packaging;
- scissors;
- pencil;
- tape measure;
- stationery knife;
- glue;
- thin round (hat) elastic band;
- paper for creating templates.

How the work is structured:
You need to cut out a template for the future mask. For example, if we need a butterfly mask, we measure the distance from the beginning of the child’s ear to the bridge of the nose with our own hands. Fold a sheet of paper in half and measure this distance from the fold. We draw the wings of the butterfly so that our mark falls on the center of the wing. We cut it out, apply it to the baby’s face and mark where to make the slits for the eyes.

It is better to make the slot large enough, since children move actively, and their masks usually move a little. You can measure the distance between the slots in advance with a measuring tape.
We trace our template on a sheet of foam board and cut it out. It is convenient to make holes with a stationery knife.

We decorate the mask with pieces of foam board or foil, gluing them with regular office glue.

We make two small holes along the edges of the mask, thread a hat elastic into them (its length must be measured in advance - this will be the distance from the beginning of one ear to the other).
We try it on and adjust the length.


Using the same principle, any animal mask can be made with your own hands. Most masks can be based on an oval with a concave center on one side (bean-shaped). It is accompanied by characteristic details of the animal.
A butterfly mask is another one of my twin daughters' passing desires.
To make a butterfly mask with our own hands, we decided to use one of the simplest options - take ordinary white cardboard as a base, and a beautiful fabric as the outer layer (the option was chosen by the daughter herself).
First, we just take a sheet of paper and draw on it the silhouette of our future butterfly mask. We cut it out and try it on to see if it’s the right size. If it’s the right size, great, let’s continue. We make holes for the eyes right away.

Then we outline (redraw) this silhouette onto the cardboard and onto the fabric. We cut out a mask from the fabric (it’s better not to cut out the holes for the eyes right away - it’s inconvenient), and glue it with PVA glue onto a cardboard silhouette (it hasn’t been cut out yet).

The next stage is decorating our mask. We took colored paper, cut out four hearts from it and pasted it on the bridge of the nose. I ran colored nail polish twice along the top edge of the product - I got a beautiful and neat outline. If desired, you can make such a contour around the entire product. When the varnish was dry, I cut out the finished mask.

We settled on this modest decoration. You can show your imagination further - decorate with rhinestones, tinsel, beads - there are a lot of options.
Next, we sew an elastic band at the back so that our butterfly fits well on the child’s head. That's all! Simple, fast, exciting. My daughter did not part with the new toy until the evening - she really liked both the process and the result.
Be sure to try it too, and send us your versions of your work - we will be happy to see what you come up with. After all, creating with your own hands together with a child is a great pleasure.
My second daughter ordered a bunny mask, so next time we’ll make a bunny))
- a craftswoman, very capable of all kinds of surprises, - she had another significant “trump card” in store at the end of the competition. Well, here it is - the Venetian “Butterfly” mask, made using cutting and paper-plastic techniques. Perhaps I have nothing to add to what you see now. If you can put your impressions into words, please do so in the comments below. :)
Venetian mask “Butterfly”
Hello! I bring to your attention my version of the Venetian mask. I thought for a very long time whether to do it or not. On the one hand, I really wanted to, but on the other, there was no “sporting interest.” And when I saw that masks appeared at the competition, I decided: I’ll make them.
Time was running out, actually 1.5 days. Here is the result. Everything will be very brief, sorry, but I was in a hurry.
There is no diagram as such, but the blanks of the mask are photographed from above, and if desired, photographs can be used as templates.
1. Cut out the butterfly wings according to the design.
2. Cut out the base of the mask.
3. We do embossing.
4. Cut out the eyelashes: trace the hole for the eye cut out in the mask along the contour and draw eyelashes, then cut it out with an allowance for gluing.
Glue the eyelashes to the cutouts for the eyes on the butterfly's wings.
Glue the ribbons.
We decorate the mask with pearl half-beads.
And we try it on.
That's all!
Dear friends, that’s really all. :) On this stunning note, the publication of competitive works at the “Carnival in CARDONKINO” ends, and the time for general Internet voting comes!
Not only for the New Year holidays, but also for other special occasions, you may want to make carnival masks with your own hands. To do this, just print out the template, and how to proceed further and decorate the masks depends only on your own imagination and manifestation of creative abilities. What can you do for the New Year?
You can download and print your paper stencil directly from this material. This does not require registration or any additional expense. However, if the mask does not suit you, then you can additionally find many options for the New Year and not only at this link. Depending on whether you have a boy or a girl, the printed stencil can be further decorated. Let's look at how to do this below.
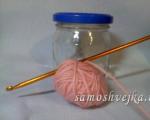
Carnival butterfly mask made of paper and cardboard
To make a mask for the New Year or another holiday according to this master class, you will need to prepare the starting materials and tools: purple cardboard, white cardboard is required. You also need glue, craft rubber, decorative accessories (roses, stars, beads, etc.), sushi sticks. Plus, you should have on hand some corrugated paper of two matching colors (pink and lilac paper were used to create this mask), scissors, a marker and tweezers.


DIY New Year's masks based on the butterfly principle are created by printing a regular template on A4 paper. A figure in the shape of glasses is drawn on felt, cut out and you get glasses - the first detail of the future mask.
After this, cut out the shape of the butterfly itself from the embossed cardboard and glue it to the white cardboard. Cut the mask with scissors; if there are any difficult areas remaining, they can additionally be processed with a stationery knife. Now we use rubber from which we cut out hearts and glue them to the edge of the mask. Next, decorate everything with accessories, you can do everything as in the photo, or you can distribute the decor prepared in advance on the mask at your discretion.


But this is not the last stage for the child to receive a New Year's mask. We offer our original version of its additional decoration. You will need to cut six strips 30 cm long from crepe or corrugated paper. Then place them in the gaps left on the sides and glue them together. Take a sushi stick and secure it to the mask, pass a spiral of corrugated paper along its entire length, also securing it with glue. New Year's masks for children can be very different.
Interesting! This stylish and bright butterfly for a girl is just an example of how to work with templates and stencils and how they can be decorated. In general, it is recommended to relax, look around what materials are available nearby and begin the process of your own creativity in a calm environment.
Remember that you can print mask templates on regular thin A4 paper and you don’t have to worry that the mask won’t be thick. The fact is that you then need to cut out a paper template and transfer it in shape to cardboard or other more durable material, which will be directly used to create a beautiful and stylish mask.


If you need stylish and beautiful New Year's masks, templates for printing in large quantities can be found in this material or in the selection at the link given at the very beginning of this material. We emphasize once again that no additional registration or payment is required to download and print the templates. We wish you pleasant creativity!