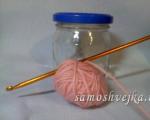
DIY pincushion from a jar MK. We make pincushions from jars with our own hands
I suggest making a pincushion from a jar by crocheting the lid. A jar for sewing items and a lid in the form of a pincushion are very convenient to use. The advantages of such a pincushion are obvious - all the necessary little things are at hand; The knitted fabric used as a pincushion has a loose structure through which the needles can be pierced well. The proposed pincushion from a jar has the shape of a flower - a pink center and white petals. It is convenient to attach pins to such petals, and in the jar you can store various crayons, bobbins, measuring tape, etc.
You will need:
- hooks No. 4 and 2;
- remnants of pink and white threads;
- jar with screw cap;
- cotton wool or padding polyester.
DIY pincushion from a jar, master class with photo
Cast on 3 air loops with pink thread, connect them into a ring, knit 10 single crochets under the ring.


We knit a circle with a diameter that is 2 cm larger than the diameter of the lid. Next, we change hook No. 4 to hook No. 2 and continue knitting in a spiral, only this time we make decreases by passing one loop at equal intervals.

We mark the beginning of the row with a contrasting thread.

Let's try it on the lid. When the diameter of the needle bar is equal to the diameter of the lid, break the pink thread and attach the white thread. We tie the needle bar in single crochets with white thread. We do not break the thread.

We fill the needle bar with cotton wool or padding polyester, coat the edges of the lid with fabric glue and glue the needle bar onto the lid. Let it dry thoroughly.


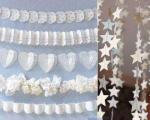
If desired, you can knit a decoration for the pincushion in the form of flower petals. To do this, use a white thread to cast on 10 air loops and knit 10 single crochets, a connecting stitch in the next loop, etc. until we knit all the petals along the diameter of the lid. If you vary the number of air loops, you can knit petals of different sizes.

The finished petals turn out curled, so it is better to iron them through a damp cloth with a low-heated iron.

Any housewife loves to have order and comfort everywhere in her house. Despite the fact that a lot of useful inventions have appeared recently (pen stands, pincushions, boxes and others), still various handmade products create an unusual, homely atmosphere. Any little thing made with your own hands will please not only the eye, but will also give the interior some zest. Even the simplest pincushion can decorate a needlewoman’s corner and turn out to be a very useful and convenient thing. Types of pincushions - master classes and photos in our selection.
The simplest and most convenient version of a pincushion for those who sew is a pad with an elastic band that is comfortable to put on your hand. How to sew easy options, watch this video:
On the Internet you can find a lot of options for homemade needle beds. They can be made of felt, foam rubber, embroidered on canvas and stuffed with synthetic padding or regular cotton wool. Making a beautiful pincushion is a creative process for a needlewoman. 
Crocheted pincushions
For those who know how to knit, it will not be difficult to give a gift to yourself or a friend. It can be absolutely any object or character. But of course, the ones most associated with needles are prickly hedgehogs, cacti or fir trees.
For example, a beautiful cactus in a pot turned out in this video:
We also have four knitting workshops:


You can link, for example, this:

Or any flowers:
And this is my pincushion, knitted a long time ago - “Fly Agarics”.


Crochet turtle:
But the most original idea is to knit yourself a little helper, like in these videos from YouTube:
Felt pincushions
"Fly agarics"
Mom is the dearest and closest person to everyone. I want to please my mother, give her a gift that will pleasantly surprise her. You can go to the store and buy it, or you can make a souvenir with your own hands.
Mom always has a lot to do, including repairs and sewing clothes. Sometimes needles get lost. Our pincushion is very convenient because it can be hung on the wall. Beautiful and practical. Felt is associated with warmth and tenderness.
At all times, the creations of nature were considered beautiful and perfect. Walking through the forest in autumn, you can come across fly agaric mushrooms. Everyone knows very well that they are poisonous, but how bright and beautiful they are. I really want to take them with me. Any mother will be pleased to receive a pincushion “Fly agaric” made of felt as a gift.

Target:
Learn how to make a souvenir pincushion “Amanitas” from felt.
Tasks:
1. Study the technological sequence and techniques for making a needle bed.
2. Develop creativity and spatial imagination.
3. Develop neatness and aesthetic taste.
Materials and tools:
1. felt (red, white green);
2. sewing threads (red, white, green);
3. scissors;
4. needles, pins;
5. paper, pencil, chalk;
6. Synthetic winterizer or synthetic padding.
Description of work:
1. Draw life-size templates and cut them out.

2. Select fabric for the fly agaric hats and outline the templates with chalk. Cut it out. There should be two of each part.
3. Select fabric for the legs. Pin the template to the fabric. We do not outline, because the chalk on the white fabric will not be visible, and dirt will remain from the pencil. Cut it out. There should be two of each part.
4. Cut out circles for the hats.
5. Before we start stitching, let’s assemble our composition and see if we like everything.

6. Let's start sewing from the legs. We fold the corresponding parts and sew them on the sides using a “Needle forward” seam. At the end of each line, be sure to make a knot. Leave the bottom part unstitched. Later we will stuff it with padding polyester. We perform the same operation with the other legs.

7. Now let's take on the hats. We put the lower part aside and work on the upper one.
Sew on the circles. There are two ways to do this. The first one is a “Forward needle” seam, the second one is “Over the edge”. We use the method that we like best. I've used both.

8. Sew together the details of the hat using the needle-forward stitch. We do not finish sewing it to the end, leaving the lower part for stuffing with padding polyester. We make a knot, but do not cut the thread. We will continue to sew with the same thread.

9. Insert the corresponding leg piece into the lower part of the cap part. We pin it on the left side with a pin.
10. Fill with padding polyester. Sew up the bottom of the hat.
11. Sew to the end, tie a knot. We stuff the mushroom stem with padding polyester. We repeat the same with other mushrooms.
12. We cut out a clearing.
13. We assemble the composition, pin it together.

14. We stitch the clearing, leaving space at the bottom for padding with padding polyester. We stuff and sew.

15.To prevent the mushrooms from falling apart, we will grab them on the left side at the joints with several stitches.
16. In order for the pincushion to be hung, we make a loop.

Our pincushion “Fly agaric” is ready. We hang it on the wall and stick in needles.
I wish you creative success.
A simple felt pincushion “Cactus” can be done even by children, students in grades 2–5:
Beautiful and functional - 2-in-1 needle case and tool stand for needlewomen:
Pincushion from a jar
Pincushion can be combined with button jar. It is very comfortable. By removing the needle cover, you can easily get the desired button. Colored buttons in a transparent jar will serve as an excellent decoration for a dressmaker's workplace.
Pincushion storage for various sewing items, the top opens. Galina Egorova.


Pincushion container for storing small items
A small pincushion is a thing that any housewife needs, and a container for storing all sorts of little things, such as buttons, cabochons, beads or sequins, will also be useful. You can make such a product with your own hands and decorate it with a flower bouquet, then the bright model will be a suitable gift. You can give such a souvenir to your mother or grandmother, and it will definitely find use. Real housewives love that everything is in its place and beautifully decorated. Master class by Elena Nikolaeva.

What you need to prepare to create a needle bed:
a small glass jar with a lid (from caviar or any canned food);
a small piece of fabric (about 10 by 10 cm);
thread and needle;
scissors;
padding polyester or cotton wool;
special gun and glue stick;
lace;
rhinestones on a thread (large, heart-shaped or any other);
various decorative elements for creating a bouquet: green twigs and leaves, decorative stamens, complex stamens, berries and so on.
How to make a decorative pincushion from a glass jar step by step
1. The basis of the product will be an ordinary food jar -. Be sure to wash it and wipe the glass with alcohol so that there are no smudges or fingerprints left. The top tin cover must be decorated. If the side part of the lid does not suit you in appearance, for example, inscriptions are visible on it, then additionally use braid or thin ribbon to decorate it.
2. Remove the cover and start creating a pincushion on it. First, prepare a beautiful lace and glue it around the circumference using a glue gun. Try to distribute the ring pieces evenly. You can either fold the ribbon while gluing, layering small denticles on top, or divide the lace into separate segments and make the ring uniform.
 3. From prepared fabric (it can be simple chintz), cut out a circle slightly larger than the base lid. Take a thread and a needle and sew stitches at the very edge of the circle.
4. Sew the edge of the fabric with thread and tighten it, stretching the edges evenly. Place cotton wool or padding polyester inside.
 5. Make a round pillow by tightening the thread. Turn it facing you and level the surface. Glue the upper soft part of the needle bed onto the lid.

6. Decorate the junction of the lace and the pad with rhinestones on the thread. Carefully glue the strip (if there is no such material, then use braid or thin tape of a suitable size and color).  7. Prepare berries, stamens and leaves for decorating the craft. You can use absolutely any materials you have that will make an interesting composition. Glue the prepared decorations to the side while assembling the bouquet.

 8. The beautiful pincushion is ready. All that remains is to place beautiful buttons, buttons, invisible things or other little things that women use in the container and close the lid. Now you can give this craft on March 8th. Delicate flowers look great on the surface of an ordinary jar.

Oksana Dubrovskaya offers another option - a “reverse” pincushion made from an ordinary glass jar. This can be a great gift for your grandmother or mother, because it is made by yourself. And besides, the needles are securely hidden inside - they won’t prick or get lost.
Reverse pincushion jar
 “The hat is a pincushion.” Kolesnikova Ekaterina Sergeevna, MBOU “Secondary school No. 17”, Dzerzhinsk. To make a pincushion, I needed the following: a piece of an old robe, a disk for the base, a hairspray cap and a padding polyester.
From a jar - not a simple one, but... well, not gold, of course, but really unusual! And I must admit that this is one of those optional, but pleasant little things that you want to have simply for aesthetic joy.
For a very long time now, on various occasions, I have seen many Western bloggers mention certain Mason jars - cute glass jars of different shapes and sizes that are used for all kinds of culinary delicacies and cosmetic products. But I didn’t come across them for sale here, so from time to time I just looked at beautiful pictures on the Internet, sighed and forgot until next time.
But once again patience has come to an end) Let the seeker find, so, to my sincere and unclouded joy, I discovered the store greenguru.ru, which sells authentic, real Mason jars, and a little later you will understand why it is so important to have the original and not a fake. But first, a little history!
What are jarsMason jar
They were named after their creator. In 1858, New York blacksmith and part-time inventor John L. Mason came up with a machine that cut the special caps that are so familiar to us today. Subsequently, he was able to establish the production of jars with reusable carved lids and a special sealing mechanism. This discovery, which at first glance might seem inconsequential next to the more global innovations and technologies of the 19th century, meanwhile, led to the spread of home canning throughout the country, which in turn marked the beginning of what we all love so much - the tradition of canning and pickles, jams, sauces and everything like that, which is so nice to uncork in the winter season!

Subsequently, many variations of the Mason jar were created, but the original is distinguished by its special lid design. As you can see in the photo, it consists of two parts - a metal cover and a fixing ring. For our master class you will need just such a lid!
How to make a pincushion fromMason jar
I really love it when items turn out to be truly functional, and if they perform several functions at once, then this is a huge plus! With such a pincushion, you simultaneously get both the needlecushion itself and a container for storing threads, ribbons, and so on.
Materials:
Mason jar with original lid design
Cotton fabric
Reliable glue
Felt (optional)
Ribbon (optional)
Step 1

Cut a circle of fabric 5 cm wider than the diameter of the lid. Fold in the seam allowance (0.5-0.6 mm) and manually place running stitches for subsequent assembly of the fabric.
Step 2

Place the stuffing in the center of the fabric, then place the lid on top, then gently and evenly gather the fabric around the lid.
Step 3

Before tying the knot, slightly loosen the gather and coat the lid with glue under the folds of the fabric, then quickly tighten the gather and press so that the glue sets well.
Step 4

Place the lid retaining ring over it and close the jar.
Step 5

If you want to hide the “wrong side”, you can glue a circle of felt of the desired size.
Your pincushion is ready!

If desired, you can additionally decorate the lid with ribbon.

As you can see from the process, such a pincushion can really only be obtained from an original, authentic Mason jar, so I can recommend a place I have already tested -
Every woman has needles and pins for sewing in her home, and it doesn’t matter whether she does needlework or keeps them solely for mending leaky things. Any sharp needle should be in its place. This is not only for order, but also for compliance with safety regulations. A do-it-yourself pincushion made from a jar would perfectly solve the problem of where and how to store sharp little things, so that it would be convenient, always at hand and absolutely safe. In this article we have collected the best ideas especially for you.
Baby food jars
A pincushion made from a baby food jar is very simple to make and its production will not require much of your time.
What we need for work:
- an unnecessary baby food jar;
- a piece of cardboard;
- needle and thread;
- transparent glue;
- a piece of padding polyester;
- colored ribbon;
- lace ribbon.

We cut out a circle from our cardboard that will be slightly smaller than the size of the jar lid.
Next, take a piece of padding polyester and carefully cut out a circle from it slightly larger than the size of the lid, about a few millimeters. We will also make a circle from the fabric, but this time it will be one and a half to two times larger than the lid.

Now we put the padding polyester on a piece of fabric, cover it with cardboard on top and sweep the fabric like a bag.

The outer side of the lid is covered with glue, and a fabric-synthetic polyester part is placed on top. We wait a little until it dries.

So that the unsightly edges of the pad and lid are not visible, we wrap it all with ribbon and either stitch it or glue it.

We attach a lace ribbon over the ribbon and also strengthen it with glue.
You can attach a beautiful ribbon bow, beads, decorative buttons or other decorations to the lid.
Your pincushion is ready, now all the needles are in place. You can make another interesting option from glass baby food jars. See the photo for the decor idea:

In open form:


Pincushion box
A very easy master class that even children five to seven years old can handle under adult supervision. Therefore, the idea of making such a wonderful pincushion, for example, as a gift for the eighth of March or for another holiday, can be adopted by teachers of senior kindergarten groups, primary school teachers and mothers who love to do needlework with their children.
To make a pincushion from a cream jar, we will need:
- cream jar or similar jar;
- a small piece of bright fabric;
- regular or lace ribbons;
- a piece of padding polyester;
- a piece of cardboard;
- thread and needle;
- transparent glue;
- scissors.

Let's get to work. For work, we can easily take any small transparent jar, a cream jar, a strong vitamin jar, or any other jar that does not have a very narrow lid. When you have all the ingredients at hand, take strong cardboard and cut a circle from it to the shape of the lid.

When the cardboard circle is ready, we move on to working with the fabric.

We place the lid on top of the fabric, step back from the edges of the jar about two centimeters or a little more and outline the circle using a pen or marker.
We cut the fabric according to the markings.

Now we sweep the edges of the part to get a bag that is not tight.

We tighten the thread.

Fill the bag with padding polyester.


When there is enough padding polyester and the bag is elastic enough, we insert a cardboard piece on top. We tighten the thread and fasten it for better fixation along the edges.

We cover the outer part of the lid with glue and attach a padding pad to it with the cardboard side down.

In order to hide the seam, we attach a ribbon or lace along the edge using glue.

Add decorative elements to your taste.

The pincushion box is ready. The soft part can be used to conveniently store needles, and the lower part under the lid can be used to store buttons, beads and other small items.

Coffee can option
For work we will need:
- glass jar with a wide lid;
- lace ribbon;
- transparent glue or glue gun;
- not very thin cardboard;
- acetone;
- synthetic fluff;
- piece of cotton.
Let's get to work. Soak our jar in warm soapy water so that the label comes off well. If there is any glue left on the jar, we remove it with acetone. After these manipulations, rinse the jar well in running clean water and wipe until completely dry.

Draw the lid on the cardboard and cut out the resulting circle.


We take a piece of synthetic fluff, put it in the fabric and cover it with a cardboard form on top.


The excess fabric is cut off, and the rest of the fabric is formed into a pad and stitched with thread to secure the result.

This is what you should get:

The lid is covered with glue from a glue gun.

The synthetic polyester mold is glued to the lid with the cardboard side down.

To hide the edge of the lid, cover it with glue and wrap it with a piece of fabric.


When the excess material is trimmed, the seam of the fabric is lightly coated with transparent glue to prevent the threads from unraveling.

We wrap the edge of the lid with a lace ribbon and secure it with glue or thread.

The top too.

Now we wrap the jar with fabric, cut off the unnecessary fabric and secure the material to the jar with glue.

Glue the bottom of the fabric to the bottom of the jar, and our needle bed is ready.


Video on the topic of the article
For even more interesting things, watch the video:
Every home has a corner where sewing supplies are stored: needles, threads, pins. It's so great that the simplest pincushion can also act as an art object, combining functionality and aesthetic appeal! The most important thing is that all this can be done at home - a clear example of this, and the process will be both pleasant and fast!
Here are just a few models of similar pincushion jars for your inspiration:
We collect the necessary materials
Agree, it is very inconvenient to control the location of needles and pins, which tend to “scatter” into intricate corners, and yes, the organization of the workplace plays an important role. So, we are faced with the task of creating such a nice pincushion:

To get started, just prepare some simple “ingredients”:
- Any available jar with a lid from which it will be made DIY pincushion from a jar.
- Glue.
- Cardboard.
- Sintepon, padding polyester or even cotton wool, as a last resort.
- Optional fabric and lace for decoration.
Be sure to wash the jar thoroughly before creating the pincushion, and then dry it. If there is a label on it, it would also be better to remove it in advance.
One-two, your DIY pincushion is ready
Our master class continues and the next step is to create the base for the pincushion. It will be made from the simplest cardboard, on which we cut out a circle, tracing with a pencil the lid of the jar involved in the process: 
On a cardboard circle to form an area for storing needles/pins, place a “good portion” of padding polyester (or any other filler), then tightly wrap a piece of fabric around the top:

We trim off the excess fabric and gather the remaining edges with thread. The latter is pulled together and secured on the back side of the lid so that on the front side you get a neat, even “pad”!

We take glue and apply it directly to the lid to glue the resulting pillow to it.

By and large, the main task has been completed, we have received a jar in which we can store all sorts of necessary little things, as well as a full-fledged pincushion, however, the most interesting thing is the opportunity to feel like a designer and decorate the product to your liking, turning it into a work of art.
We decorate a pincushion with buttons from a jar with our own hands
There can be no ready-made recipes here, however, we can give some “sketches”:
- The edges of the lid will look much more presentable if you cover them with fabric or paper with a nice pattern:

- You can also add lace to the lid (as many layers as you want):

- The jar itself can also be refined in some way, and here all the reins of power are in your hands. If you want, it could be fabric, if you want, rhinestones and sequins, buttons... In a word, experiment, the main thing is that it brings you pleasure.