Download schemes and templates for quilling. quilling
This is an exciting activity for anyone who loves to create something. With the help of paper-rolling quilling, you can create various interesting compositions - both flat and voluminous. These crafts are always very beautiful, even for beginners, since twisting paper stripes is a fairly simple task. One has only to start making them carefully and patiently, and the manifestation of fantasy in new amazing images will immediately capture you. And you can always find quilling patterns on this site.
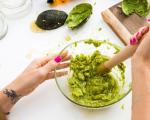
For this case, you will need:
- colored double-sided paper, it is cut into strips of 1.5-9 mm (or you can purchase specially cut paper);
- stationery knife with a ruler and scissors (for cutting fringed edges and other details);
- a special rod to wind paper (it can be replaced with any stick, awl or toothpick, bifurcating one end);
- stencil with round holes;
- preferably tweezers so as not to smear your hands when applying glue;
- quick-drying glue;
- compass;
- pencil.
Get to work:
1. First, sketch with a simple pencil and a compass the sketch you want for future production.


2. The main element in quilling is the roll element, from which you can further make a variety of flower shapes from it. It comes out if you roll paper strips tightly enough into rolls. To do this, they hook the desired piece with the tip of the bifurcated rod (if there is such a special one), and begin to screw it more tightly to the base. Then they give him a little to open up in a circle in a stencil. Here are the round parts and ready.

3. Easily now, by flattening with your two fingers, you can begin to create various shapes from your roll. You can flatten one end of it by the edges or several sides, then you get a lot of all sorts of elements for creativity.

4. Everything is fastened with glue, for example, PVA. Apply it while supporting the part with tweezers.

See what unique works you can create with this technique.

These colorful flower pictures will be good to decorate greeting cards for loved ones for the holiday.


Thanks to quilling, you will make a lot of interesting things. For example, here are some pictures.

Unique compositions will easily come out from under your hands.


This is real art created by you.

If you find an error, please highlight a piece of text and click Ctrl+Enter.
How to quickly cut a lot of paper strips and where to store them!When I started my acquaintance with quilling, the first question that worried me was
- "Where can I get the strips?"
After wandering around the site, I realized that most craftswomen cut them by hand. The second question was: "How is it possible to cut many narrow strips by hand?" To be honest, I thought that this was where my acquaintance with this technique would end.
But after reviewing several MKs that are on the network, I decided to cut them. But either I'm too lazy, or due to lack of time, this cutting was very difficult for me. I started looking for a better way.
I am not discovering America here. I am sure that a lot of craftswomen use this method. But for beginners, this method will be useful to explain.

We will need:
Knife for drywall (I buy at a hardware store, inexpensive, but durable), by the way, a clerical knife will not cope with this task;
- replaceable blades for it (each blade is divided into sections, also inexpensive);
- metal ruler;
- templates (I'll talk about them later);
and, in fact,
The paper itself, which we will cut.
I take at least 30 sheets at a time (35 in this case).

I put the paper on plywood (I tried to cut it on drywall - it deteriorates quickly, but you can). I do not advise on glass - the blades quickly deteriorate.
On top I apply a template made in Word and printed on a printer, and on top a ruler along the line (but I have a strip width of 2 mm).

Here are the first stripes. There are 35 of them. All one to one.
At one time the knife cuts through about 4-5 sheets. We spent several times - and there is a handful. I don’t use the top white strip, because it has the printer’s ink on it (you can see it later). I think for the sake of 35 - one strip can be donated.

I have already said that such blades are divided into sections. When you feel that the blade is dull (I cut about 15 piles of 35 strips), carefully break off the edge section (holding it with pliers). The knife is very sharp again. So you can break to the end of the entire blade.

Here I changed the template, because I needed 8 mm stripes.

In less than an hour - I am the owner of two piles of strips (a quillingist's dream came true). It remains for little - to seat the sons, so that they can be sorted by colors, and placed in the "storage"

This is the "vault" for my strips.
I divided each file with a stapler into three sections and put it in a large folder. Let it be for now.
In the future, I plan to sew pockets similar to files from thick oilcloth on a sewing machine (the files are too soft).

And two more tips so that the ruler does not move out when cutting paper:
1. Try to stick strips of an ordinary fabric medical adhesive plaster on the back of the ruler (in Soviet times, it was the only one). I have almost all the rulers glued on the back - this significantly reduces slipping!
2. Cut strips only while standing, then the ruler does not move out!
You can also make great strips with a noodle machine.
My machine gives strips with a width of 5 mm and 3 mm, what you need! When starting to master the quilling technique with children, it is good to have ready-made strips so as not to disappoint and turn away children with such a routine difficult job as cutting strips. And when the children get involved in the work, they will be able to prepare the strips themselves using this method.

A friend of mine uses a document shredder to cut strips.
This article provides an overview of a popular hobby, creativity using paper - quilling for beginners schemes and the tips given in this article will help you try your hand at creating jewelry items, amazingly beautiful postcards and relief paintings on your own.
Traditionally, we accompany the story with colorful illustrations. We have also prepared instructions for professionals and enthusiasts on how to create details and complete paper compositions of higher complexity, but also of greater beauty.


As in other areas, in order to implement your creative ideas, you need to get a base, elementary knowledge in this topic. In quilling, before creating beautiful compositions, you need to remember (and it’s useful to practice) how to twist the basic shapes for quilling. It should be noted that in different manuals quilling forms are called by different terms, but the meaning of application and twisting skills are the same. If you already learn how to twist various forms, then you will be able to perform any schemes.
Quilling Basics for Beginners
The quilling scheme always consists of the outline of a certain pattern and the elements that fill it. To fill in the scheme of the future work, either basic forms or additional elements are used, which are details derived from basic forms.
At the first stages of working with quilling, the most difficult part of the formation of compositions is the arrangement of forms strictly within the pattern and along its contours. Therefore, at first, a quilling composition scheme of a simpler plan is recommended in order to practice. The difference between such schemes is the detailing: in addition to the general drawing, they show in detail the location of the basic forms on the composition.
In addition, such schemes often contain a list of basic shapes, the required sizes and their number. This allows you to prepare all the elements in advance, and then assemble the composition as a constructor. This approach is convenient for beginners and allows even children to practice quilling.

When the elementary basics are mastered, simplified schemes are already suitable for people with a developed spatial imagination and good taste, in which drawings or ornaments are represented only by a contour. In addition, compositions can be drawn by hand according to your imagination, on your own, then plan where the rolls and basic shapes will be placed in the drawing.

This method of constructing schemes gives people involved in quilling maximum scope for creativity and eliminates all the limitations of standard schemes (except for the personal time and imagination of the master) when immersed in their favorite business. Admittedly, this does not work for everyone. But ready-made schemes for beginners, combined with patience and perseverance, will allow everyone even with little experience into the world of paper art.

To tell you as much as possible about this art, we will list all forms of quilling for you. This list, in the future, will be able to serve as a guide or hint for independent creative work.
In fact, if we analyze the basic forms, they are grouped into two main varieties (each of which is represented by many options):

Free rolls in all their varieties are obtained by initial twisting with a special tool with the strip tension loosening at the end of twisting. This allows you to give the figure the desired shape and fix it with glue.

Tight rolls are obtained by winding the paper tape very tightly around the tool and fixing the shape with glue.

As a rule, in quilling, tight rolls are in the center and form the basis of the composition. Sometimes separate sections of the work are selected using tight rolls, which, due to tightly wound strips, have a more pronounced color.
To make the work look more interesting, encourage you to study all the details in detail, you should harmoniously combine empty, compact and full rolls.

Very interesting color transitions and a special charm of the composition can be achieved by using several colors in one roll. This is done by twisting two multi-colored stripes, laying them on top of each other - a striped roll will come out or a two-color roll is made with a sharp color transition: the ends of two different-colored strips are glued into one and twisted like that.
Especially such color transitions are useful for compiling images of flowers in a quilling work.
In order to manage the rolls during the quilling process, to give them exactly the right size and shape, many different tools have been developed. These tools will make the job of twisting quilling shapes fun and easy, and the creative process itself will be much easier.

Everything you need to help you create with pleasure when you decide to do quilling is given in the following list:
- The main quilling tool is a forked awl (or knitting needle, toothpick, orange or bamboo stick with a slot);
- Scissors;
- Tweezers;
- A special template for quilling (it can be replaced by a ruler with various geometric shapes);
- PVA glue;
- Thick paper for the base, serving as the background of the composition;
- Quilling paper, special or homemade (self-cut colored paper into strips);
- Dummy knife;
- A rug on which strips are cut;
- Curly scissors;
- safety pins;
Toothed comb, with the help of which special decorative elements are created (weaving strips in a given order between the teeth of the comb).

Basic forms of quilling
If the basic forms of quilling no longer resist twisting and everything is clear with them, you can start creating beautiful compositions using this technique, when quilling for beginners is mastered, the schemes will help you decide, choose what you want to do now. You can choose a detailed scheme for yourself or just a specific motive for which you will create. For inspiration, you can look at examples of finished compositions or choose something to your liking from the schemes.

Many people, having “fallen ill” with quilling, having tried a little, begin to deal with it seriously, spend a lot of time and, having achieved mastery, even take part in exhibitions or make postcards, souvenirs, jewelry in this technique for sale. Many enthusiasts, having reached high levels of perfection, not only show their works, but also share their experience, describe the process, talk about the nuances of creating their works.

A variety of flowers and compositions with their participation are distinguished by special beauty in quilling. When making flowers using this technique, do not forget about proportions, but remember that in life flowers are diverse and uniquely beautiful. This means that in quilling you can use a wide variety of paper colors and techniques for combining different colors in a composition.

Seeing the work of quilling specialists for the first time, many cannot believe that such beautiful things were created by a man with his own hands, all this unearthly beauty of openwork elements. But it is very interesting that, as it turned out in practice, children create in quilling no worse than adults and are even able to create unique masterpieces and papers, especially when they get carried away with the creative process.

Quilling is generally ideal for children's creativity, it is easily accessible in terms of materials and technology, there are an infinite number of options in it, and a small creator develops very useful qualities thanks to this technique of working with paper: artistic taste and perseverance. Yes, and fine motor skills of the fingers develop very well. Especially kids like voluminous quilling: toys, magnets, voluminous bouquets and other attractive works, presented in many on our website.
A popular material in quilling are corrugated cardboard strips, which are used both as a frame for flat compositions and simply to create volume. By combining different materials, quilling works are more interesting. For example, if the outline of a flower is formed from corrugated cardboard according to the pattern, and inside it is filled with forms folded from colored paper, such a composition will be very expressive. Such cardboard is also convenient in the manufacture of caskets or vases, since the frame made of corrugated cardboard strips perfectly maintains the shape of the volumetric composition.

Experienced quillers are well aware of the tools for pleating plain paper sold in specialized stores. It’s enough for you to try yourself in this type of creativity from paper once to make sure that everyone can create openwork works from paper strips on their own, and everyone can do quilling tightly.
We study quilling schemes on our own
Finished works in quilling technique enchant with their originality It is known that "twisting paper" began in the 15th century in Europe. During this period, the monks made beautiful jewelry by hand, by twisting the edges of bird feathers with gilded edges. To date, museums do not have similar works made at that time, due to the rapid wear of paper, but documents with descriptions remain. This is a technique for making compositions of various shapes from narrow paper strips of various lengths pre-rolled in a spiral, which are then glued together. Quilling is based on a form, which is a narrow paper strip, twisted in the form of a spiral, using a separate tool. Finished parts in the form of spirals are glued or attached to various bases, together forming various beautiful ornaments. Also, decorative items can be decorated with this technique: a cup with a saucer, home vases, pictures, etc.
We select patterns for quilling ornaments
Before creating this beauty with your own hands, you will need materials.
Need to purchase:
- Sets of paper strips for quilling;
- A ruler template made of plastic, which serves to make spirals of the required size;
- Aluminum device with a comfortable handle and divorced tips for twisting paper strips;
- Tweezers for accurately sticking spirals on a uniform base;
- Glue for fixing twisted blanks, gluing together, and fastening to the base.
Templates for the manufacture of central and symmetrical components in the quilling technique have a size of 125x190 mm. The template is lined with a fine grid with the application of rays indicating the radii and lines at the required angles.
 For quilling technique it is very convenient to use templates
In this craft, it is desirable to use glue that does not leave stains, so as not to spoil the aesthetic appearance of the creation.
Using the template, you can carefully, observing symmetry, create various ornaments: balls, flowers of various shapes, grapes, butterflies, snowflakes, tiger, cat, fan, snowman, Santa Claus and other figures. With the help of convenient markup, you can make patterns consisting of several elements, symmetrically arrange simple details along the lines. With this template, creating compositions of varying complexity with a lot of different details becomes a simple and very exciting experience. After all, simple drawings can also become a template.
We wind strips of quilling paper onto the tool. The resulting rolls, if necessary, lay out in a stencil frame and glue, after which we give the desired shape. During the assembly of the finished composition, pins will come in handy, with which you can fasten the parts on the template in advance and, after checking their placement, glue them together.
Various schemes for quilling shapes
Most of the work begins with the twisting of the spiral. You need to take a pre-prepared paper quilling strip, or cut it out from a standard sheet of writing or xerox paper, for example, A4 size, whose width is approximately 3 to 5 mm. Fix the end of this strip in the gap between the antennae of a specially designed tool for twisting paper strips.
For left-handers, you need to do the above steps, swapping the names of the hands.
After twisting the spiral, applying a small amount of glue to the end of the tape, we attach it to the spiral. This is done so that the twisted spiral does not straighten out, and looks neat.
 The main figures in the quilling technique are closed and open
The main figures of quilling are:
- Bent drop and ordinary drop;
- coil;
- Tightly twisted and loose spiral;
- leaf;
- Eye;
- Crescent;
- Semicircle;
- Horns;
- Bird's foot;
- Arrow;
- Square;
- Triangle;
- Heart.
So, one of the main parts of quilling is ready. The majority of masters take this element as a basis.
Choosing stencils for quilling by type
However, there are several types of stencils for this type of creativity.
Namely:
- Working stencil board;
- Stencil ruler;
- Stencils for panels, postcards and pictures of directed subjects.
Working stencil boards are usually cork, rubber, or made of other non-rigid materials into which one or more needles can be stuck and fixed. If the board is made of a hard material, such as plastic, then it must have holes for installing needles. This board has many different niches of various shapes in the form of circles, squares, triangles, semicircles, drops, ovals, hearts, etc. All these elements are printed on the board in various sizes, and sometimes repeated.
Stencil rulers are rulers with separate shapes, which often have many circles of the same shape with special markings.
 The use of quilling stencils greatly simplifies the work of the needlewoman
It also has measures of length and degrees, as on a regular or officer's ruler.
Creating stencils of a directed theme, the master embodies his thoughts in these unpretentious patterns. They come in such a form as a bouquet of flowers, a set of various fruit compositions, a deer, a parrot, butterflies, a snowflake, they even come in the form of a person. These patterns draw letters and even whole words.
When the time comes to extract the spiral, it must be pryed from the center with a sharp object and carefully removed, pressing the workpiece with your finger. Loosen it a bit so it loosens up a little. The free spiral is ready.
How to print quilling patterns at home
The schemes differ only in the forms that can be given to a spiral of one size or another. Quilling workshops are held in many cities.
A detail such as a "loose spiral" is made from the resulting tightly wound spiral. It is only required to remove the twisted spiral from the tip of the needle, and wait until it weakens. There is another option - without opening your fingers, start slowly rotating them until the spiral unwinds to the right extent.
If you need a "coil", then leave the end of the spiral not glued. To make a “drop”, you need to pinch one side of the “free spiral” and hold it for a couple of seconds. By bending the corner of the resulting drop, a “bent drop” is obtained. And in turn, it will turn into a cat, well, or fish.
The element in the form of an "eye" is made simply. The free spiral is clamped on both sides and adheres a little. An element such as a “leaf” is obtained by bending the corners of the eye in opposite directions. To get a "semicircle", the spiral is compressed so that the top remains round and the bottom is flat.
 Schemes for quilling differ only in forms
Making an "arrow" is also not difficult. We press with our fingers on three sides to make a triangle, then we press one side of the triangle so that the 2 ends are connected. Let's go, we're done.
With one specific combination of elements, you get a beautiful angel, and with another, you can get an image of various birds, such as a dove, bullfinch, eagle, etc.
The “heart” element is made in a similar way, only the right and left halves of the strip are twisted inside the bend of the tape. At the junction, walk with a needle dipped in glue.
If there is a desire to make a complex composition of spirals, for example, several bouquets of flowers, then the essentials will be:
- Quilling tool;
- Stencil;
- pins;
- Glue;
- Quilling paper.
Simple schemes for quilling (video)
Starting to engage in this type of creativity, in the future, a lot of interesting novelty awaits. Open spaces for the realization of creative imagination and the embodiment of the idea.
Similar content


Quilling is a great activity for both children and adults, thanks to which leisure is spent with interest. The technique of creating compositions from thin twisted strips is not only entertaining, but also useful, as you can decorate your house on your own and make an original gift for a loved one.
Story
The art is believed to have originated in medieval Europe, where monks made medallions, book covers, and icon frames. To do this, they wound paper strips with pre-gilded edges around the tip of the pen, which created an imitation of a gold miniature. In the XV-XVI centuries, quilling was called art, in the XIX it became a ladies' entertainment, and for most of the XX it was completely forgotten. Only at the end of the last century did such an occupation return again and interest many.
Paper

Double-sided colored strips can be purchased at the store or you can make your own at home to save money. The chosen material depends on the master and on his preferences. Many professionals like to make raw materials with their own hands, as this allows them to put more energy into their work. The width of the quilling strips can be 2, 3, 5 and 10 mm.
Quality paper must meet certain characteristics and properties.
1. It must be not very light, but not heavy either, just wind up, and then open evenly, while maintaining the intended shape.
2. A light-resistant material is chosen so that the products hold for a long time. When storing, the quilling strips should be well packed, since direct sunlight can still slightly distort the color gamut of future masterpieces.
3. Raw materials must be of high quality so that the master, if desired, can cover the ribbons with golden and silver aerosols or varnishes. To do this, you need to distribute the material well and fix it on several sides, and then apply decorative elements, then wait for it to dry completely.
4. For more delicate and refined works, parchment is often purchased, as it has a pastel color.
Cutting accessories

In order to make do-it-yourself quilling strips, you need special tools. The cutting process will become much easier if you buy a ready-made kit for creativity. But you can dream up and make it yourself from improvised materials that can be found in any home. However, there is such an inventory that it will be difficult to replace with anything. First of all, it is a self-healing mat, which is very comfortable to use. Thanks to him, furniture does not deteriorate and each time you do not need to look for a place where quilling strips will be cut. Another very handy tool is a round or stationery knife, which makes it easy to cut a prepared sheet of paper.
Scissors are also used, but it will take much longer, and the effect will be slightly worse, as they break the ends. Be sure to need a ruler to measure and draw a line at the right distance.
Slicing technique

If you want to do tape art, then you need to know how to make quilling strips yourself. There are several ways to make them:
1. It is necessary to prepare a sheet on which the distance of the future tape is marked on both sides. Then take a 20-30 cm iron ruler and attach it to the points, and then draw a line with a sharp paper knife. This is best done on a self-healing mat, but if you don't have one, a surface that you don't mind cutting is fine. The blade is drawn from top to bottom, so it is necessary to continue until the end of the sheet. This method is considered one of the fastest and easiest.
2. If it is possible to use a personal or office shredder to destroy documents, then a lot of tapes can be made in a short time. The main disadvantage of this technique is that the strips of quilling paper will always be the same size. The advantage of this method is the ability to quickly cut any chocolate or candy wrappers and unnecessary leaves, all this is used as improvised material for creativity. It is a rather original idea, as the product always turns out to be interesting and unusual.
3. You can also prepare the material with a cutter. The advantage is the ability to manufacture tapes of any size. The negative aspects include the high cost of the tool, as well as the need for certain skills. You need a confident, steady hand and a good eye.
Microsoft Word
There is a method that does not require you to draw A4 sheets yourself in order to cut them into quilling strips. The template is very often used for such work, and it can be made using a computer program. To do this, in Word you need to draw a table and set the number of columns in it, depending on the width of the required tape. And also in the program the thickness of the lines is selected. To set all the necessary parameters, you need to select the desired fragment and right-click on it, find the "Table Properties" tab, in this section all criteria are set. After the task is completed, a template is printed on specially selected paper, and then the sheet is cut into ribbons of the desired size.
What can be made from stripes

As mentioned above, quilling is an art through which real masterpieces appear. But first you need to figure out what forms can be useful for creating the simplest crafts.
Closed:
- "Arrow". The winding is collected in a triangle, the middle of which is pressed inward.
- "Drop". Obtained by moving the center of the spiral to the side to form a twisted tip.
- "Leaf". The spiral is compressed, and then it descends from both sides.
- "Semicircle". The tape is twisted and pinched along the edges, and the resulting space is aligned with one of the parts.
- "Triangle". This is the same "drop", but with a rounded and flattened part.
- "Crescent". This is a slightly extruded middle of the previous element.
It is important to know that all forms must be fixed with glue.
Open (they are created without winding the spiral):
- "Heart." Two strips of paper are folded in half, and then the ends are folded inward.
- "Curl". The edges of the ribbons are twisted in various directions.
- "Horns". The parts are joined together, and then folded to different edges with scissors.
- "Twigs". Both sides are fastened in a ratio of 1: 2, and then they are wound simultaneously in two parts along one line.
Quilling tools

A device for winding ribbons can be purchased at specialized stores that sell art supplies. It is not very expensive and quite convenient to use. It is a long handle, on which there is a bifurcated metal tip.
Such a device can be made with your own hands, with the help of it it will be very convenient to wind strips for quilling. It is necessary to take a toothpick and cut it on both sides so as to remove the sharp ends. Then, using a knife, it is required to make a longitudinal incision of 1 cm.
When preparing the tool, you can use another option. For it, you need to saw off the tip of the needle from the side of the ear so that you get a forked “fork”, and stick it with a sharp end into a cork or into a simple brush, after removing the bristles from it. Such a device is perfect for any size strips for quilling.
But still a professional device is more convenient and easy to use.
Assembly

To connect twisted tapes, it is necessary to use glue, PVA is most often used. Those who do large jobs, like paintings, can purchase a liter jar and pour it into smaller containers for ease and convenience.
And also many professionals use a glue gun, with which they fix quilling strips. Its composition does not require time to solidify, you can immediately begin further work after completion, without fear of a shift in the elements.