Shibori decoration technique for beginners. We dye fabric and clothes in the Japanese technique of shibori
Shibori jewelry, even made by beginners, not only transforms the image, but also makes it truly original and unique. This term, sounding in the original "shibori", means nodular staining. A well-thought-out scheme of knots allows you to get bizarre ornaments and intricate color transitions on fabrics.
Emerald shibori earrings
But to create voluminous scarves, blankets and sweaters, the Japanese knitting technique of shibori is used.
The name "Japanese shibori technique" is not entirely correct, since the origin of this art took place in India and China.
In Japan, this technique began to be mastered in the eighth century AD. Initially, it was used in batik, allowing you to get unique patterns every time. But felting shibori was used in the manufacture of three-dimensional figures.
Until the 21st century, craftsmen dyed only natural silk fabrics. Genuine nodular staining was done in indigo, obtained from azurite.
But now much has changed, and with the help of the shibori technique, you can create chic jewelry with your own hands, in which silk and other fabrics dyed in various shades are embroidered with beads, rhinestones, shells, beads and even semi-precious stones.
Jewelery features
Works made in shibori are quite massive pieces of jewelry, which include bracelets, necklaces, earrings, hairpins and pendants.
As a basis for dyed fabric is used:
- Genuine Leather;
- felt;
- suede;
- interlining;
- velvet.
These fabrics are dense enough to hold the shape of the products, but at the same time it is easy to attach shibori ribbons and other decorative elements to them.
Some designers offer to decorate wardrobe items with such products. To do this, you can use the lapels of a jacket or coat, felt hats, etc. Such techniques beyond recognition will transform already familiar things and the whole appearance of their owner.
Shibori-style jewelry is easy to recognize by the presence of:
- colored ribbons;
- multi-colored stones;
- scattering of beads;
- pearls;
- ceramic and metal inserts.
All this creates a bright picture in which the oriental style is clearly visible.

Decorative elements add extra luxury to the decoration.
Nowadays, making shibori jewelry for beginners at home can be simplified. Those who find it difficult to use the batik technique can attach pieces of draped fabric to jewelry items, and then paint with spray paints.
To make such items yourself is quite simple. However, for those who want to observe the classical canons, you should take a master class and learn the technique of batik, felting or making jewelry from shibori ribbons yourself.
Shibori Ribbon Technique
Using the nodular dyeing technique, before making batik, the fabric must be tied, twisted, crumpled in a certain way and dipped in a dye solution. You can sequentially immerse it in solutions with different colors to create a bright motif.
First you need to prepare the following materials:
- silk;
- wooden stick;
- coloring agent;
- iron;
- paint tools.
Before dyeing ordinary silk fabric, it must be pleated. To do this, place it in a solution of vinegar (200 ml of water is taken 5 ml of vinegar) and hold for 20 minutes. Then the matter must be pulled out, wrung out, folded in a certain way on a clean cloth and ironed through a gauze napkin. You can replace this time-consuming process by purchasing already pleated silk.

Tools needed for the job
- Moisten the material and fold it into a ribbon.
- Pass the thread along the bends.
- Wind silk on a wooden stick.
- Dye the fabric along the bend with a foam sponge or brush.
- Allow the tape to dry naturally during the day.
- Iron the dry tape along the fold lines with an iron.
- To fix the paint, it is necessary to fold the silk into a plastic bag and heat it in a steam bath.
- Iron again.
The resulting batik can be used in the manufacture of all kinds of jewelry, attaching decorative elements to it.
Anastasia Sergeeva
What is shibori? Master class on creating unusual jewelry
The art of shibori today is gaining unprecedented popularity even among a sophisticated audience of needlewomen and lovers of such hand-made jewelry that looks original and expensive. Therefore, we decided to tell our readers about the popular form of this Japanese dyeing technique, and show an easy shibori master class that will allow you to repeat the creation of stylish earrings.
What is shibori?
Shibori, or shibori, is an ancient Japanese art of dyeing fabric that dates back to the 7th century. The term "shibori" comes from the Japanese verb 絞る (shiboru), which means "squeeze", "squeeze", "squeeze", "fold". Traditionally, Japanese shibori was made from cotton fabric by dyeing it with a beautiful indigo color. The transformed product is twisted, compressed, folded or fixed in the desired position with threads, elastic bands, paper clips, etc., and then painted with paint. At the same time, those areas that were twisted are protected from ink on them, and as a result, due to the contrast and difference in colors, an unusual pattern remains on the fabric.
The art of shibori is divided into many different techniques, with which the product can be folded, twisted, squeezed and stitched to get different patterns. However, although each type of shibori is intended to obtain a specific type of pattern, it depends not only on what processing the product needs to be subjected to in order to achieve the desired result, but also on the type of fabric used and its properties. The most interesting thing is that the same staining technique repeated over and over again will give completely different results each time.

Such types of shibori are known as kanoko, miura, kumo, nui, itachjime and arashi shibori. However, we decided to dedicate this shibori master class to one of the most popular techniques - arashi shibori, which is used to make unusual corrugated silk ribbons. And then they can be used to create amazing shibori jewelry.
How to make DIY Shibori Ribbon
Next, we will present a short master class on how to create a shibori ribbon with your own hands. Of course, they are also in the store, but, firstly, they are not sold everywhere: they are more likely to be found on the Internet, and not in needlework shops. And secondly, they are not cheap - an average of 150 rubles per 10-centimeter length, plus shipping, so the option with hand-made ribbons should not be ruled out.
We will need:
- a piece of silk;
- cylindrical stick, thick tube, made of wood or plastic;
- paint on fabric, you can take acrylic;
- threads;
- brush, sponge / wide bowl;
- water.
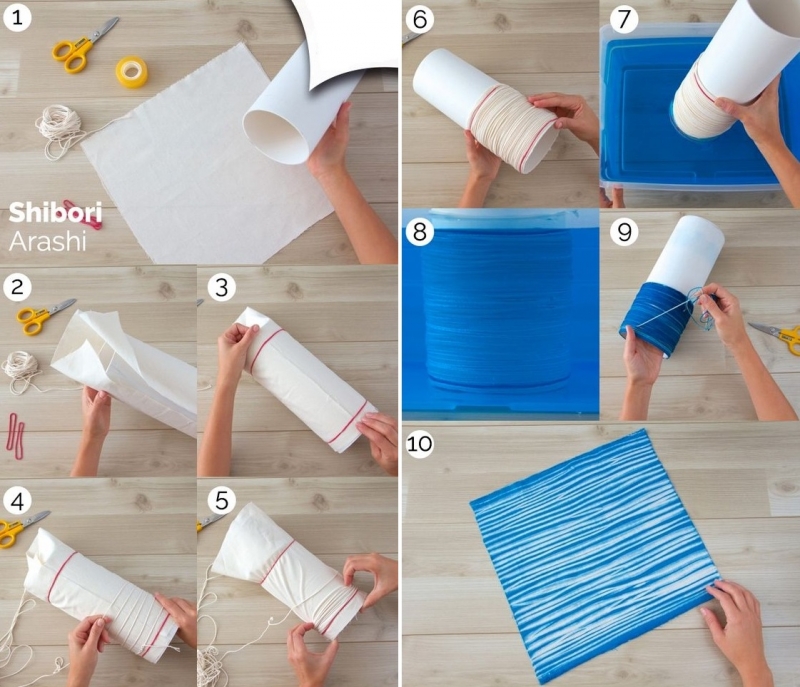
Getting Started:
- We wrap the silk fabric around the stick with a screw, as if diagonally, and then attach the ends with invisible tape, if necessary.
- We tie the stick with a thread along the entire height.
- We collect the fabric in the likeness of an accordion, moving the ends of the silk from above and below to the middle.
- We begin to arbitrarily dye the silk with paint using a brush / sponge, or lower the stick with the fabric into the dye solution. You can use multiple colors to make a gradient ribbon.
- After painting, let the tape dry completely - batteries and bright sun are excluded.
- We iron the corrugated tape along the fold line. Then we wrap it in a bag so that it is hermetically sealed, and keep it for 1-1.5 hours in a water bath. This procedure is needed to fix the paint and corrugation.
Shibori jewelry - master class
And now let's learn how to make shibori jewelry with our own hands - for example, elegant and beautiful earrings. By the same principle, you can create pendants for necklaces or bracelets. We will need the following materials and tools:
- shibori tape - 10 cm;
- piece of felt;
- a piece of artificial leather;
- threads;
- rivoli - small convex rhinestones;
- bicone beads;
- round and angular beads;
- good glue;
- scissors;
- thin nose pliers;
- needle;
- one-piece ring for jewelry;
- earrings for earrings.
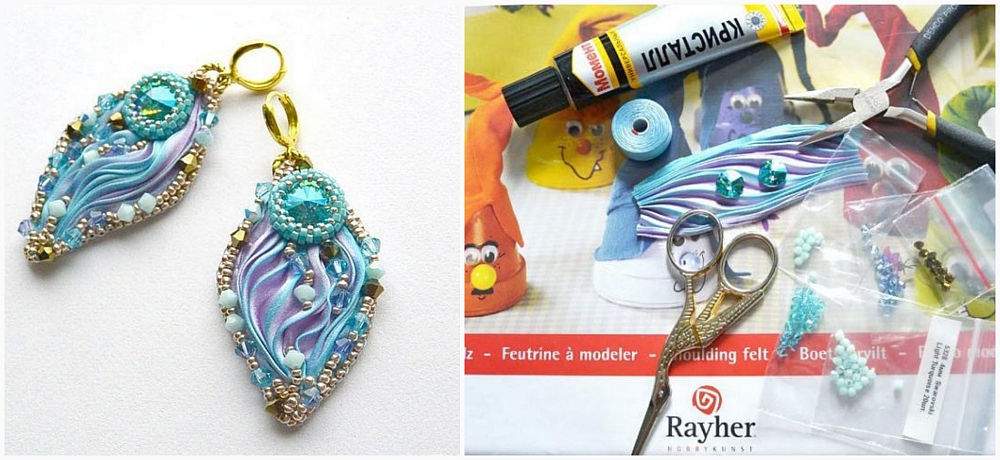
We have listed the materials that were used in this particular master class, but you can take other rhinestones, beads and beads, the color of the ribbon and even the shape of the earrings can also be any - show your imagination!
The first stage - braiding rhinestones

The second step is shaping the shibori ribbon.

The third stage - product design

Shibori decorations are ready!
But that's not all: we invite you to watch the following video and learn how to use one element to learn how to make other shibori jewelry - belts, necklaces and bracelets:
Take it, tell your friends!
Read also on our website:
show more
Designer jewelry is often a delight. Each of them has its own personality and style. There are many directions in creating jewelry, and one such direction is with the use of textiles. In turn, textile decorations can be very diverse. And if not simple textiles are used, but unique ones?

Then the decoration will be incredible. We are talking about shibori, or, as the name sounds more familiar to needleworkers who deal with special materials to create their masterpieces, shibori.
.jpg)
.jpg)
.jpg)
Shibori came from Japan, the word literally means “twisting”, “knot”, and for fabric it defines the method of dyeing it.
.jpg)
In Japan, using this dyeing method, fabrics were prepared for various kimonos. At first, these were fabrics for the poor, for those who had access to the most common and inexpensive indigo-type dyes. Then, when the canvases learned to dye, creating color transitions, shibori began to be made for wealthy customers. The dyeing itself took place as follows: the canvas was twisted, tied and dipped into the dye. As a result, the color turned out to be sectional, iridescent, completely individual for each painted canvas.
.jpg)
.jpg)
But back to decorations.
The jewelry is made using shibori ribbon, a silky band with iridescent colors, compressed by a pleat that allows it to drape and curve as you please while remaining visually superior.


.jpg)
Shibori decorations resemble the rich clothes of the sultan's favorite dancers or the luxurious decorations of the padishah's chambers, the feathers of birds of paradise, sand dunes illuminated by the rising sun, the sunset ripples of the ocean expanse or the smoothly spreading northern lights. Each such tape is made in a unique version, none of them will be similar to the other.
.jpg)
The ribbon is cut from sheets of natural silk, which has its own base color, sewn to a standard length, dyed and subjected to thermal or chemical pleating. Since the tape is cut obliquely, it does not bulge when bent, but lays down with smooth overflows.

.jpg)
The shibori tape goes on sale wound into coils, the small neat seams connecting the sections of the tape are practically invisible. In this case, the color is obtained with unusual color transitions, excitingly tender, not only juicy, but also luminous, as if penetrated by the rays of the sun.
.jpg)

.jpg)
.jpg)
The fabric itself is thin, almost weightless, but at the same time very dense, the cut edges do not crumble, it does not need to be singeed or hemmed.
.jpg)
.jpg)

Using shibori to create jewelry, it is combined with beads, pearls, Swarovski crystals, while obtaining luxury and originality.
.jpg)
.jpg)
From shibori, you can make almost any jewelry: necklaces, bracelets, earrings, pendants, brooches. In the manufacturing process, the tape is distributed over the prepared base, twisted, compressed or pushed apart by corrugated folds.
.jpg)

.jpg)
.jpg)
Joints, edges are decorated with beads, beads, which are used both in the form of weaving and in bulk.
Also, cabochons look luxuriously framed by shibori, both from natural and artificial stones, accompanied by beads.
.jpg)

.jpg)
Due to the shibori ribbon, the decoration acquires volume and juicy, as if lively colors. The decoration can be quite large, while being very light.

The wrong side of neck jewelry or earrings is made of felt or leather, the decorating part of the bracelets is also sewn onto felt, then fixed on a solid base.


There are practically no restrictions in the colors of shibori. Therefore, the decoration can be made for any outfit. Shibori tape is available for purchase, though the price may be somewhat confusing, but it is always an individual creation of the master.


Ribbon is easy to work with, and those who have beading skills will find it interesting to make such designer jewelry.
.jpg)
Do you need flowers to decorate your apartment? Compositions of artificial flowers will perfectly decorate your home for a long time. In addition, the price of such products is much lower than for fresh flowers.
Many interesting and unusual types of needlework come to us from other countries. for example, the shibori technique. Jewelry for beginner craftswomen and professionals in this area of creativity is very interesting and incredibly beautiful.
Charming confusion
Due to the fact that many unique types of needlework came to us from other countries and cultures, having gone through centuries of improvement and development, we often confuse their names, terms, and features. Now the same thing is happening with shibori. For modern needlewomen, shibori is the manufacture of jewelry using silk ribbons dyed in a certain technique, beads and beads. But in fact, shibori, or, if you still speak correctly, shibori, is precisely the technique of batik - a method of dyeing those ribbons made of natural silk, which are then used in the manufacture of jewelry. A little confusion in terms, but most needlewomen who are not in contact with the Japanese art of dyeing fabrics using the shibori method believe that shibori is the art of creating jewelry with ribbons.
What do you need for shibori jewelry?
There are many ways to create jewelry, and one of these areas is the shibori technique. Jewelry for beginner craftswomen who want to learn this type of creativity allows you to plunge into the world of shibori, as they say, with your head. After all, at first glance it seems that there is nothing complicated in such creativity - buy the material and create as you like. But you need to start with the fact that handmade shibori jewelry is the finest creation of silk ribbons and decorative elements for them, hand-assembled with a thread and a needle. Therefore, a lot of materials will be required for work:
- shibori ribbons;
- beads and beads;
- decorative elements - cabochons, medallions, pendants;
- accessories for jewelry - bails, earplugs, cuffs, settings and much more.
- genuine leather or suede as the wrong side;
- adhesive, transparent and reliable;
- threads in tone and a thin needle.
Another element that is often used in the creation of jewelry is soutache.

The price of creativity
Those who are truly engaged in creativity, any kind of needlework, striving for mastery and perfection, know how expensive it is. And it's not about time, but about the cost of all the materials and tools needed to create beauty. Any kind of needlework is an expensive occupation, and the shibori technique is no exception. Decorations for novice shiborist masters initially imply cash costs. After all, the silk ribbon itself is an expensive material. The finest natural silk, cut into thin strips, manually shirred with a special composition that allows the ribbon to keep its shape, then hand-dyed - this makes the shibori ribbon a truly semi-precious material. In addition, all fittings and decor are used high-quality, often with precious coating, cabochons - semi-precious or precious stones, beads, beads from reputable manufacturers at the appropriate price. Even for the inside of the jewelry, it is necessary to use genuine leather or suede, in extreme cases - high-quality artificial leather, which is also not cheap. So it's expensive - the Japanese technique of shibori. Jewelry for beginners is no exception.

The bigger, the more beautiful
The shibori technique, including decorations for beginner craftswomen, requires a scale. Why? All the beauty of the source material - the ribbon will be visible only if the ribbon itself is visible, dyed with shibori, corrugated into small folds, bordered with beads and beads, complemented by soutache tracks and cabochons. Therefore, this needlework - an ornament in the shibori technique - is quite large-scale compared to jewelry, for example. The manufacture of such products allows the imagination to unfold, because the shibori ribbon itself is a unique material that simply requires help to reveal its full amazing potential.

Where to begin?
Any creativity begins with an idea, every master will say this. Even if the idea changes direction in the course of work, the initial idea should be clear enough, best of all fixed on paper. A sketch is the basis of any kind of needlework. The shibori technique is no exception. Jewelry for beginners, made step by step from the very beginning, will be beautiful and unique, despite the inexperience of the master. And the beginning is a paper sketch. It is necessary to provide everything on it, if possible - the dimensions of all the main elements, their location relative to each other, the transitions and bends of the tape, its fastening and opening. Therefore, the sketch should be made in full size, directly on a sheet of paper, applying all the components of the future masterpiece. In addition, the sketch can be corrected if new ideas appear during the work, and in accordance with it it will be easier to make a beautiful work.

Small work - high-quality result
The whole process of creating jewelry using the "shibori" technique comes down to several main stages:
- sketch creation;
- placement and fixing on the basis of shibori ribbon, cabochons, basic decorative elements;
- filling the product field with soutache, beads and beads;
- ribbon decor (if necessary);
- the device of the wrong side and fasteners;
- decorating the edge of the decoration.
Any master class on making shibori jewelry will include these stages of work. Each of them requires accuracy, because the shibori ribbon, cabochons are expensive materials that are attached to the base either with glue or thread. But silk is a thin fabric, the puncture site on it will be noticeable if the thread is removed. And semi-precious cabochons should be glued in place, even if settings are used to attach them. What can we say about working with beads or soutache, when small stitches are the basis of a quality work. So the whole shibori technique is very thin and

Uniqueness is an advantage
Undoubtedly, each type of needlework allows you to create unique products. But some types of creativity make it possible to copy, for example, the same knitting or embroidery, but some do not. And it is to the latter that the creation of jewelry using the shibori technique belongs. The shibori ribbon itself is unique - the source material for this type of creativity. There are no two identical pieces of tape, dyed not only by hand, but even with the help of technology. If you look at the work of experienced shiborists who create jewelry, and not the silk fabrics themselves, then paired products will differ from each other, for example, earrings - they will be similar, but will never be completely identical. After all, this type of creativity does not tolerate copying, it is simply impossible a priori.

Shibori jewelery makes each owner feel their unique charm - the unique color of the ribbon and high-quality decorative elements make each piece a real masterpiece.
Shibori is an ancient Japanese fabric dyeing technique. Its characteristic feature is a special way of stitching, winding or tying sections of the fabric before painting. Another name for needlework is connected with this - nodular batik. Similar dyeing methods existed in India and African countries. Everyone can learn how to perform shibori with their own hands, thanks to detailed master classes and video lessons.
To achieve the desired result, the drawing of future work and the knot schemes are carefully thought out in advance. After applying the paint, the fabric is straightened, obtaining intricate ornaments and original color transitions.
Do-it-yourself shibori fabric dyeing workshop
There are quite a lot of variants of this technique and varieties of drawings. One of the varieties is komasu, which allows you to create original geometric patterns on silk fabric.
Materials needed for coloring:- White silk fabric.
- Template for the contours of the square shape.
- Simple pencil.
- Needle with thread.
- Dyes for fabric in desired colors.
Description of the stages of work:
A piece of silk must be folded in half. A square template can be made from scrap materials, such as CD packaging. On it you need to draw a line diagonally.
We mark the drawing in the form of triangles with a pencil and sew along the contour. The clarity of the pattern depends on the frequency of the stitches. For sharper outlines, the stitches are made frequent, and for a blurred outline, they are rare. There is no need to tie or cut the thread. It should look like in the photo:

We tighten the threads tightly, collecting the stitched triangles. The resulting "ears" are wrapped with the ends of the threads. The frequency of wrapping and the size of the non-overdrawn part also affect the amount of ink that gets inside the pattern.

Materials that will be needed for the tape: wooden stick; iron; dye; silk fabric; fabric dyes.

Wet the fabric and lay it out with a ribbon, passing the thread through the folds. We wind it on a wooden stick. We paint along the bend of the tape with a brush or sponge. After drying, you need to iron the tape with an iron.
To fix the paint, wrap everything in a film and heat it in a steam bath. For highlighting, you can use hydrogen peroxide.
Felting wool in the technique of shibori.In this master class, we will analyze the process of applying the shibori technique in felting using the example of a mirror. For work you will need: wool, mirror, mosquito net, film, towel and soap, as well as a needle.
We lay out the square into two dense layers of wool the size of two sides of our mirror. We start felting, but do not bring the process to readiness.
We embroider the pattern, collecting the wool into folds. You can make a labyrinth, a spiral, an insect, etc. You can put a small button or pebble in the center, from which lines will depart. Wool can also be placed in the grooves. We continue rolling.
From the wrong side we put a mirror and wrap it with a blank. We sheathe the perimeter at a distance of 1 cm from the edge. We tighten the thread and fasten it. Cut off uneven edges at a distance of about 5 mm.
Fill up the edges with a needle. We tear small pieces of six, mixing the fibers, lay them over the edge of the mirror and fill them up dry.
We apply the finished lump, bend it and roll it with a needle.
When this is done, you can fill up a little wet - so that there are no traces of the needle.

The shibori technique can be used in berets, scarves, bags, etc. How much fantasy is enough.
Shibori scarves
For this master class, you will need natural silk or thin cotton. In addition, you will need: silk paints, a cotton swab, a syringe or brush, rubber bands, containers for paint and water. Plastic bottles cut lengthwise are great for dyeing and drying.
Description of work on scarves
Pieces of fabric for scarves need to be folded or tied. The first scarf is folded in half twice.
The second is tied with knots. The third is wrapped around a jar wrapped in cellophane and tied with rubber bands (you can tighten it with threads).
The fourth scarf is knotted at the corners and in the middle.

Wet the blanks in water and squeeze. You can start coloring. Whatever coloring schemes you choose, the sequence of applying colors will always be the same - from lighter colors to darker tones.
- For the first scarf, paint of three colors is applied in layers - yellow, orange, brown.
- For the second scarf - yellow and green.
- For the third - yellow-green, turquoise and blue.
- For the fourth scarf - beige and brown.
Sprinkle the dyed batik with salt. Leave to dry without unfolding (about a day).
We iron the finished products with an iron. For fixing some paints, this is enough, others need to be fixed with steam.

Video on the topic of the article
For those who want to analyze the coloring process in more detail and get new ideas for creativity, we have prepared a selection of video tutorials:


