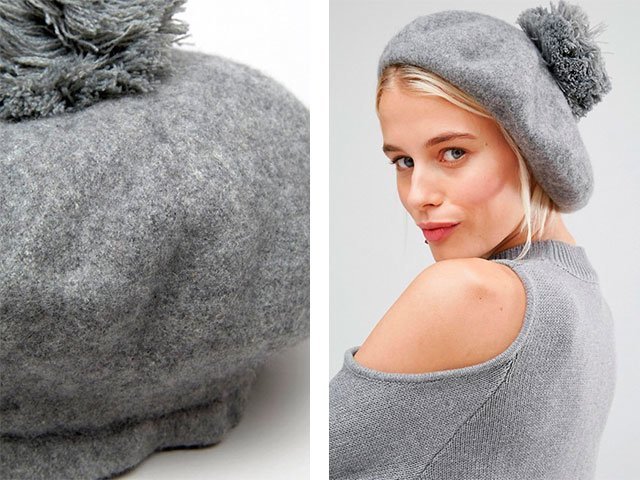
Openwork crochet: diagram and description. Openwork summer crochet
Openwork summer berets they look very pretty and feminine. And in this master class we will connect crochet. For knitting it is worth choosing a thinner yarn.
To knit a summer beret, we need:
- Yarn;
- Hook.
We knit an openwork summer crochet
First you need to make a sliding loop. And now we knit 24 st.s.n. into it.

The knitting pattern is as follows:

So we will knit our entire row. At the end, join the third air loop.

We knit a new row. We pass the connection. in an arch. And we perform three air.p. We knit two more st.s.n. And we do three air.p.
In the next arch we will knit three st.s.n. Then again three air.p. and move on to a new arch. So we knit the whole row.

Now over st.s.n. we will knit st.b.n. And in the arches we knit one st.b.n., we do fifteen air.p. and in the same arch we knit another st.b.n.
So the whole line.

We pass the connection. in the fourth loop of the arch of fifteen air.p. And we knit further in the arch seven st.s.n. Then we do three air.p. and here we knit another seven st.s.n.

We knit the same in the remaining arches.

Now the connection. Art. we pass into the arch of three air.p. From it we knit seven air.p. And we knit in the fourth loop of the base of the st.s.n.
Then we skip the six underlying columns and knit st.s.n. in the seventh st.s.n. the previous row.
We do seven air.p. and in an arch of three loops we knit st.b.n. Again we do seven air.p. and repeat knitting. Let's end the series like this. Let's make four air.p. and knit in an arch of three loops of the lower row of st.s.n.


Let's move on to a new row. We do five air.p. and knit st.b.n. into the third loop of the underlying air chain.
Again we perform five air.p. and knit st.b.n. in the third loop of the underlying chain.
And so we will knit arches of five air.p. throughout the row. In every third loop of the base we knit st.b.n.

The next rows will knit even easier. We also knit arches from five air sts. We knit five air.p. and st.b.n. in the middle of the underlying arch. Again five air.p. and st.b.n. to the middle of the next underlying arch.

And so we need to knit a bottom with a diameter of 30 cm.

We knit the next row the same as the previous one.
Then we knit a row of arches from three air sts. We will also knit two such rows. We knit three air.p. and st.b.n. in the middle of the arch of the bottom row. Etc.
And after that we knit a row of arches from two air.p. And the next row of arches from one air.p.

Now we will knit a circular row of st.b.n. And two rows in a circle st.s.n.

Summer crochet is ready!


Beret is a stylish headdress. It can be knitted independently using a knitting tool such as a crochet hook. This article offers many interesting patterns for knitting a beret with different techniques.
Crochet allows you to create products of incredible beauty. The hook is a tool of "small work" and therefore each loop connected by it is very skillful and accurate. crochet beret even beginner needleworkers can do it. To do this, it is enough to have yarn and a detailed knitting pattern.
To help master the art of crocheting, video master classes by experienced craftsmen, of which there are a lot on the Internet, will help.
Beret - very feminine hat, which will not only warm, but also decorate the head of its owner. A beret can be worn at any time of the year, even in summer, hiding your head from the sun's rays.

simple circuit
Summer crochet for a woman: scheme
Summer beret differs in that it is knitted from “light” threads, has a patterned coarse knit with many openwork elements and large holes. Such a beret is necessary not to warm the head, but to complement the image or protect the woman from ultraviolet rays.
You can knit a beret for the summer for an adult woman and for a child, you can decorate it with satin ribbon bows and crocheted flowers.

Summer beret scheme No. 1

Summer beret scheme No. 2
Takes a white openwork crochet: diagram and description
Fishnet takes very looks feminine and gentle on the head. It will complement the image of a sophisticated woman, will not spoil the styling and will warm the head in the cool season. Only hook can allow you to tie a beret with a beautiful openwork pattern.

scheme No. 1 of an openwork beret

scheme No. 2 of an openwork beret

scheme No. 3 of an openwork beret
Crochet: bead beret
Beret "bead" has an unusual and beautiful knitting. It looks magnificent on the head, successfully complements any outerwear: coats, jackets, fur coats. You can knit this style with a beret for the cool season, or for the summer.

Beret bead, diagram
Openwork crochet: diagram and description
The openwork beret is distinguished by curly or patterned knitting. You can knit such a headdress only with a hook. Only this tool is able to accurately knit each patterned loop and create a pattern.
Openwork beret:
- Summer fishnet beret will complement the image and protect from the sun.
- Spring fishnet beret keep your head out of the wind
- Autumn openwork beret It will protect your hair from precipitation and your head from coolness.
- Winter fishnet beret from heavy warm yarn will warm the head.

Scheme No. 1

Scheme No. 2

Scheme No. 3
Crochet for spring for women: diagram and description
In order to learn how to crochet, you first need to learn the technique of knitting and creating air loops, as well as loops with a crochet and without a crochet. You can do this with a tutorial video.

A simple crochet beret pattern
Video: Crochet is easy! Air loops and reading circuits "
Crochet for autumn for women: patterns
Autumn beret will be beautiful replacement for a knitted hat. On the head, it looks much more feminine and elegant. The beret will appeal to those who are not used to and do not like to wear a regular hat, because it does not spoil the styling and does not allow you to catch a cold head.

Simple knitting pattern No. 1

Simple knitting pattern No. 2

Simple knitting pattern No. 3
Beret with crochet visor: diagram and description
Beret with visor is a stylish headdress that can complement the image of a modern woman. You can knit such a beret from light or heavy yarn, decorate with various patterns and decorative elements (flowers, ribbons, brooch).

Scheme No. 1

Scheme No. 2

Scheme No. 3
Crochet a snowball: diagram and description
Beret "snowball" is voluminous headdress which will keep you warm during the cold season. Knitting it is not difficult, but the result is a “lush” product that can sit well on the head of any woman.
You can decorate the “snowball” beret with a bubo or any other decorative element.

Finished product example

Detailed scheme
Crochet winter berets: diagram and description
Beret - warm headwear, if worn correctly, it will cover the ears, the back of the head and the temples. Besides, he is so looks great on the head, which always successfully complements the image of a woman, adding elegance and sophistication to it.
Knitting a winter beret follows from large yarn, which contains a woolen thread.

Scheme No. 1
Scheme No. 2

Scheme No. 3
Crochet from thick yarn: diagram and description
A beret knitted from thick yarn will help keep your head warm in the cold season. Such a product looks very voluminous on the head. It is easy to knit, knitting does not take much time due to the creation of large loops.

Warm crochet: diagram and description
Warm beret can be tied from large or woolen yarn. Its knitting is distinguished by a rather dense arrangement of loops. You can also decorate a warm beret with figured knitting: braids, knobs, columns.

Scheme No. 1

Scheme No. 2

Scheme No. 3
Crocheted from sectional yarn: diagram and description
Sectional yarn is different in that one thread can have several colors, which are fundamentally different from each other. As a result, the product is bright, colorful and very effective.

Scheme No. 1

Scheme No. 2
Takes embossed crochet posts: diagram and description
Column knitting will help create a product that will sit tight on the head and look very voluminous. Column knitting is basic and not difficult for a beginner to master.

Column knitting

How to knit a column?

Embossed column, beret
White crochet: scheme
White takes skillfully adorns a woman's head. A white headdress can be combined with almost any wardrobe. You can knit a white beret from any thread for spring or winter.

Simple circuits

More complex openwork scheme
Takes crochet knobs: diagram and description
Knitting with "bumps" allows you to create a headdress that will look very voluminous and impressive. Mastering the knitting technique is not difficult, based on detailed diagrams.

Scheme No. 1

Scheme No. 2
Takes a simple classic crochet: diagram
The classic beret has the magical ability to make a sophisticated personality out of a woman. This beret is ideally combined with a coat, short coat, raincoat and jacket. It can be worn at any time of the year, combined with stoles or scarves around the neck.

Classic scheme
Bulk crochet: diagram and description
The voluminous beret will surely attract the attention of others, as it can, without crushing the styling, sit tight on the head and keep warm. You can knit a voluminous beret from large yarn and even from ordinary threads.

Volumetric bret, scheme
Takes a crochet star pattern: diagram and description
Star pattern- one of the most beautiful, with which you can also knit a beret. Such a product will be not only beautiful, but also original.

How to knit an asterisk pattern?


Beret pattern "asterisk"
Beret and snood crochet: diagram and description
Snood is a modern scarf that sits like a collar on the head. It harmonizes perfectly with the beret, creating a beautiful sophisticated look.

Snood beret scheme
Video: “Takes a classic crochet”
Crochet berets are a must for any woman or girl in the wardrobe. Moreover, not only in the cold season: in summer they will protect our hair from ultraviolet rays, and in autumn and winter this headdress will warm us from frost.
Crochet beret - a very exciting job, especially if you pick up beautiful yarn. Of course, it may take more time to complete it if you are new to this business. But, thanks to clear diagrams and a detailed description, any beginner will be able to knit the simplest beret in a couple of hours! Below you will find crochet berets for women with a description and patterns for free.
Crochet - description and diagram
Already on the street autumn but not yet so cold to put on nice winter hat, so we suggest you consider new models of knitted berets for this cool season. You don’t even need to take off to measure the girth of your head - crochet allows you to try on products while you work.
So, first you need to decide which one you want to take, and from what material. Can choose cotton or acrylic for this season. In general, the best material is cotton, because. it warms but allows the head to breathe. And this is a great choice for a child. In addition, it is possible to choose the color of the future product ( blue, red, black, yellow), model ( with pompom, regular, mesh, original rastaman), yarn ( thick, thin). For beginners, we suggest doing without decoration, our step-by-step description of knitting sag will help them with this.
We offer little master - a class on knitting a beret from a thin white thread
(cotton 100%). Such a white beret (from snowball yarn) will not leave anyone indifferent! It is very airy, it just fits in, you can finish the work within an hour if you read and understand the diagram with the description correctly. 


Beret: how to crochet?
Crocheting a beret for beginners has a detailed description. Knitting should be voluminous, and try on the size step by step. Take 100 grams of yarn in two colors: pink and gray. Next, pick up two hooks: No. 3.5 and No. 3. You can print out the diagram in advance if it is inconvenient for you to read it from the site. So the needlework can be marked on the sheet: which row you knit, how many cm are left, where and when to change the color of the thread. Crochet: scheme and description for beginners:

Summer, spring and autumn crochet berets
If you want to make women's berets: spring, classic summer and light autumn - you won't have to look for a long time, there are such products in our article! Be fashionable and beautiful all year round! The master class below will help you with this.
Crocheted for spring for women: 250 grams of angora, hook No. 4.5 - 5.

A new summer trend - a pink openwork beret for real fashionistas and their kids!
It is somewhat reminiscent of the "grid" pattern from the descriptions above. The diagram will tell you in detail how to properly tie such a work of art! The pattern of this model is very reminiscent of a star or a flower.
Crochet summer for a woman: scheme:
A long-awaited option for autumn from warmer yarn and tighter knitting, because. we will do it with a double thread and a large hook number 4.

How to crochet beret for beginners: video
Crocheted women's berets with patterns with a description: photo 2018
Waiting for you below crochet berets for women– the best and fashionable photo selection 2018. Buy or knit the most fashionable headwear models of this season! 


Crocheted berets with diagrams and descriptions: new warm models
It will take melange yarn for such a cute hat(the diagram can be downloaded for free) and hook number 3.5.
Dial chain 5 V.P. close in a ring. Knit S.S.N. in C / X in a circle up to a diameter of 22 cm. for this, make additions until this goal is achieved. Next - 19 cm straight knit. The last 6 R. - S.S.N. , and 7 R. - "crawl step".

Crochet hats and berets for beginners master class: video
Master class from Lilia Ulyanova - classic beret and hat:
Crochet for autumn 2018: scheme and description
In this MK the thread will alternate gray color And fuchsia. The beret is knitted to the size of the head - 56 centimeters.
We knit not like a regular beret - from the bottom edge- gum in a gray tint. We carry out a chain of 60 V.P. in the ring S.S. The serial number corresponds to the number of the circular row of the product.
- 1 V.P. lifting, 1 S.B.N. = 60 P.
- 60 P.
- 1 V.P., 1 S.B.N. in every S.T. to the end of R., finish S.S. = 60 P.
- 1 V.P., 1 S.B.N. in every S.T. to the end of R., finish S.S. = 60 P.
- 1 V.P., 1 S.B.N. in every S.T. to the end of R., finish S.S. = 60 P.
- Hook number 10 - fuchsia thread. 2 V.P., 1 half S.S.N. - skip, half S.S.N to the end of R., close S.S. in 2 P. lifting.
- Grey colour: repeat 6 R.
- fuchsia color: 2 V.P. lifting, 1 1 floor S.S.N. miss, semi s.s.n. (P.S.S.N.) in the next 12 S.T., (2 half S.T. with 1 vertex, 1 half S.S.N. in the next 13 S.T.) * 2, 2 semi S.S.N. with a common top, S.S. in 2 P. lifting.
- Grey: 2 V.P., 1 half S.S.N. skip, 11th floor of S.S.N., (2nd floor of S.S.N. with a common top, 12th floor of S.S.N.) * 2. 2 semi S.S.N. with a common top, S.S. on the second P. rise = 52 P.
- Fuchsia: 2 V.P. lifting, 1 floor S.S.N. skip, 1 half s.s.n. in every S.T. to the end of R., S.S. in the second P. rise.
- Grey: 2 V.P., 1 half S.S.N. skip, 10th floor of S.S.N., (2nd floor of S.S.N. from a common peak, 1 floor of S.S.N. in the next 11 S.T.) * 2. 2 semi S.S.N. with a common top, S.S. in the second P. rise.
- Fuchsia: 2 V.P., 1 P.S.S.N. skip, 5th floor S.S.N., (2 P.S.S.N. with a common top, 6 P.S.S.N.) * 4. 2 P.S.S.N. with a common top, S.S. in the 2nd P. rise.
- Grey colour: 2 V.P., 1 P.S.S.N. skip, 4 P.S.S.N., (2 P.S.S.N. with a common top, 5 P.S.S.N.) * 4. 2 P.S.S.N. with a common top, S.S. in the 2nd P. rise. = 36 P.
- Fuchsia: 2 V.P., 1 P.S.S.N. skip, 3 P.S.S.N., (2 P.S.S.N. with a common top, 4P.S.S.N.) * 4. 2 P.S.S.N. with a common top, S.S. in the 2nd P. rise. = 30 P.
- Grey colour: 2 V.P., 1 P.S.S.N. skip, 2 P.S.S.N., (2 P.S.S.N. with a common top, 3 P.S.S.N.) * 4. 2 P.S.S.N. with a common top, S.S. in the 2nd P. rise. = 24 P.
- Fuchsia: 2 V.P., 1 P.S.S.N. skip, 1st floor of S.S.N., (2nd floor of S.S.N. with a common top, 2nd floor of S.S.N.) * 4. 2 semi S.S.N. with a common top, S.S. in the 2nd P. rise. = 18 P.
- Grey colour: 2 V.P., 1 P.S.S.N. skip, (2 P.S.S.N. with a common top, 1 P.S.S.N.) * 4. 2 semi S.S.N. with a common top, S.S. in the 2nd P. rise. = 12 P.
- Fuchsia: 2 V.P., 1 P.S.S.N. skip, 11 P.S.S.N., 5 times 2 P.S.S.N. with a common top, skip 2 v.p. at the beginning of the circular R., S.S. in the first P.S.S.N. = 6 P.
Knitted beret is a great headwear and accessory. If you make it from cotton thread, then it is quite possible to wear it in the summer. At this time of the year, the beret will not only make the female image special, but also protect the head from sunlight. In this article, you will learn how to crochet a pattern and a description of summer.
Summer crochet beret from Fashion Magazine
Lightweight openwork knitted beret made of cotton thread is ideal for any outfit. You can make it from white yarn, or choose the color that prevails in your wardrobe.
We will need: 100 g of thin cotton thread, hook No. 1.5.
Beret size - 54-56
Description
We knit a chain of 6 air loops, and then close it into a ring with a connecting post. Next, you should continue knitting as indicated in the diagram, starting each row with 3 air loops for lifting.
Headdress knitting pattern
The finished product must be washed, and then starched. Then give the desired shape and let dry.
Openwork crochet beret with a flower
This beret model is suitable not only for summer days, but also for warm autumn. The execution of the headgear is simple. It will work even for beginners. Thanks to the flower, the headdress looks very elegant.
Before starting work we need to prepare yarn with a composition of 50% cotton, 50% acrylic, hook No. 2.5.
The size of the finished product is 54-56 cm.
Description
Please note that knitting will take place in 2 threads. We start with the crown. We fold the thread into a ring, then we tie it with 11 single crochets. Next, we pull on the non-working thread so that the ring contracts and closes it with a connecting column.
We start the second row with 3 lifting air loops, knit 2 double crochets in each loop of the previous row and complete it with a connecting loop.
The third row also starts with 3 air lifting loops, continue with * 1 double crochet into the next loop of the previous row and 2 more double crochets into the next loop of the previous row *. It turns out that in one base there will be 2 double crochets. Next, repeat from * to *, and finish each circular row with a connecting loop.
We start the fourth row with 3 lifting air loops.
Then work *1 double crochet in the next stitch of the previous row, 1 more double crochet in the next stitch of the previous row, and 2 more double crochets in the next stitch of the previous row*. Repeat knitting from * to *, and finish each circular row with a connecting loop.
We continue to knit according to the pattern until the beret becomes the desired diameter.
How to knit a women's beret - diagram
For a product diameter of 26 cm, 13 rows must be connected. Then 3 rows with a double crochet without increasing the loops, and then we begin to decrease the loops. To do this, you need to divide all the loops into 14 parts and knit * 9 double crochets, 2 double crochets together *. From * to * repeat 4 times.
We finish knitting with a relief elastic band, which we do in this way: * 1 double crochet, located before work, 1 double crochet, located at work.
When the work is ready, you can decorate it with an openwork flower.
Making a flower decoration
A knitted flower can decorate not only a headdress, but also a dress, jacket, bandage, etc. It can also be used as a hairband or necklace. Knitting a flower is easy even for beginners.
We need yarn the same as the main product, and with color, if desired, you can experiment.
Description
We knit a flower in two threads, like the main product. We collect 75 air loops, in which in the second row we knit 2 columns with a crochet. In the next row, first * skip 2 loops, and through the third we knit 7 double crochets, then skip 2 loops again and in the third we knit a single crochet *. Knitting from * to * repeat.
Crochet flower pattern
When the ribbon for the flower is ready, it must be folded in a spiral, and then secured with a thread on the back.
Crochet summer hat for women
Knitted hat for the summer with your own hands - what could be better. It will certainly set you apart from the crowd and attract many admiring glances. It will be in perfect harmony both with dresses and with a T-shirt and shorts.
To create it, we need 400 g of Tenderness yarn or another thread with a composition of 47% cotton, 53% viscose, as well as hook No. 2.
Description
Traditionally, we start knitting with air loops. This time you need to dial them 8. We close the finished chain into a ring and knit 24 double crochets into it. Next, we knit 8 wedges according to the scheme.
Finish knitting next to the "crustacean step".
The crayfish step is one of the finishing elements, which is performed from left to right along the front side.
One way to do it is to insert the hook under the loop, grab the working thread and stretch it so that there are 2 loops on the hook. Then you need to knit them from the working thread. Continue tying until the work is completed.
Gentle beret-cap for beginners
Summer peach beret for women, crochet
Another option for knitting a light headdress with an openwork pattern that will complement your look on hot summer days.
The size of the finished product is 55-56.
To create it need to cook 100 grams of peach cotton thread with hook number 2.
Description
We knit a chain of 5 air loops and close it in a ring. Then, we tie it, as diagram 1 shows, starting each row with three lifting air loops. In the course of knitting, from time to time, it is better to try on a beret to adjust the size. When the main part of the product is ready, you can proceed to the implementation of the side according to scheme 1a. Its width is 3 cm. Optionally, you can tie a decorative flower, as diagram 1b shows, and decorate a headdress with it.
Beret knitting patterns
Knitted crochet beret in the technique of Irish lace
It will take a long time to create such beauty, so we stock up on patience. But, on the other hand, the result will exceed all expectations. You can wear the product on cool summer evenings. It is also suitable for warm autumn.
We will need: 50 g of Iris yarn with hook No. 1.
Product size 56.
Description
First, we make a pattern in the shape of a circle, the diameter of which is 32-33 cm. Then we knit flowers according to scheme 1, and leaves according to scheme 1a.
Lay out the finished motifs on the pattern and secure with pins. When you get the desired composition, sew the elements with bobbin threads.
Next, we remove the pattern, and thread the ends of the threads into the elements. In order for the resulting canvas to take the form of a beret, its edge should be tied with arches of air loops and single crochets, and then gathered to a size equal to the circumference of the head. We finish knitting with a rim of single crochets and air loops. The width of the rim should be 3 cm.
Super light crochet beret
This headdress for women consists of cotton thread and very openwork knitting. Thanks to this, it can be worn even on the hottest summer days. The execution scheme is very simple and accessible even for beginner needlewomen.
For this work we will need: 100g of Yarn Art cotton yarn, hook No. 1.
Description
We knit first the crown with a diameter of 30 cm according to the scheme. Then we make several rows with arches of 6 air loops without adding. You should get a strip of about 4 cm. And after that we reduce the loops to the required girth of the head. We finish knitting with three circular rows without decreasing.
Knitting pattern for a light headdress
Knitted berets create a special style for a woman. She does not look like everyone else, while maintaining her individuality. It is especially pleasant to wear a beret made with your own hands. So inspiration and success in your work, dear needlewomen!
After the measurements are ready, we collect 5 air loops.
Next, we close the resulting chain of air loops into a ring using a connecting column. 
Now we knit the first row with double crochets, not forgetting at the very beginning of the row to make 3 air loops for lifting, and at the end of the row, complete the connecting column.

We knit the second row according to this pattern: 3 air loops for lifting, 3 more air loops (already for the pattern), 1 double crochet into the next loop, again 3 air loops, again 1 double crochet into the next loop. Repeat the pattern (except lifting loops) to the end of the row. We close the row with a connecting column.

The third row is knitted as follows: 3 air loops for lifting, 2 double crochets into the loop of the double crochet of the previous row, (3 double crochets into the loop of the next double crochet of the previous row).
Similarly, we knit a pattern in brackets to the end of the row, closing it with a connecting column. Row 4: Ch 3 to lift, 3 dc into 2nd dc fan st from previous row, (ch 1, dc 4 into 2nd dc fan st from previous round, 1 again air loop). Repeat the pattern in brackets to the end of the row. 
We knit the fifth row in the same way as the fourth, only add 1 double crochet to the “fan”, in the sixth row we make 3 loops between the “fans”, from the seventh to the ninth row - 4 loops each.

Now, so that the knitting does not curl, we need to add loops. Starting from the tenth row, we will add "fans" of double crochets into the air loops of the previous row. Tenth row: 3 chains to lift, 3 double crochets in the middle of the "fan" of the previous row, (2 chain loops, 5 double crochets in the third air loop of the previous row, again 2 chain loops, 5 double crochets in the third air loop previous row). Repeat the pattern to the end of the row. It will look like this:

We knit 3 rows in this way and in each subsequent row we add 1 air loop between the “fans”.

Similarly, we add "fans" until the knitting diameter reaches the desired size. In our case, the diameter is 32 cm.

Now we will gradually decrease the loops. To do this, we again knit 2 rows with exactly the same pattern, but we do not make air loops between the “fans”.

We knit the third one in the same way as the previous ones, but in this case we already do 4 double crochets in each “fan”.

We knit the next row like this: 1 “fan” in the middle of the “fan” of the previous row, and we knit the next “fan” THROUGH the “fan”, that is, we skip it.

Tighten the loop tightly, and then knit the pattern again THROUGH the "fan" of the previous row. And so on to the end of the row. Your knitting should curl up like this:

We knit the next two rows, as usual, without making air loops between the "fans".


We knit the second row of gum as follows: 3 air loops for lifting, 3 embossed columns (convex), 1 embossed column (purl), again 3 embossed convex columns and again 1 embossed column (purl). The embossed convex column is knitted in the same way as a regular double crochet, but in this case the hook is not inserted into the loop of the column of the previous row, but under the column itself from the front side of the knitting.

And then we knit a loop, like a regular double crochet.

The embossed purl stitch is knitted in the same way as a regular double crochet stitch, but here the hook is also inserted under the stitch itself, but from the wrong side of knitting.


We knit 5-6 rows in this way, after which we tear off the thread and carefully hide it on the wrong side of the knitting. Openwork crocheted for the summer for the girl is ready.


A master class for beginners in crocheting a beret was prepared by: Elena Sharygina