What can be done from dry autumn leaves. Variants of paintings from pressed flowers
September and October are not only "golden autumn", but also the time when it's time to make crafts from dry leaves. For children, this activity turns into a real entertainment. After all, using various gifts of autumn, you can create applications on various topics. Most often, children prefer crafts in the form of various animals - mice, squirrels, birds, deer, etc., as well as autumn pictures that depict yellowed trees, dry grass and the last sunny days. However, this is only a small part of what can be made from dried leaves.
Preparation of flowers and leaves for applications
Dry flowers and trees can be made not only in autumn, but also at any other time of the year. The main thing is to think about it in advance and “stock up” with the necessary natural materials. It is worth noting that you can start collecting flowers for crafts and applications even in the summer, when they are completely green. Then you will have more opportunities to create exactly the image that you wish. Leaves must be collected from a variety of trees and bushes - birch, mountain ash, oak, viburnum, willow, ash, cherry, apple, maple and much more. By the way, maple fruits, the so-called helicopters, can also be useful for autumn crafts.
In order to make it possible to make from dry leaves, the material must be prepared in a certain way. So, if there is enough time, it is best to use the old method of drying sheets - put them between the pages of a thick book and leave for several days or weeks. If the craft is planned to be made on the same day when the materials are collected, then the easiest way to dry is to iron the leaves inserted between two newspaper pages with an iron. After that, they become dry, however, a little brittle, so it is necessary to handle such material carefully.
Preparation of materials for work
The gifts of autumn are not the only thing you need in order to make interesting crafts from leaves (dry). For children, it is necessary to equip a comfortable one and also to purchase a number of other materials that may be needed in the course of work. For example, cardboard, colored paper, glue, a simple pencil, scissors, thread, brushes, teip tape, colored felt-tip pens or markers. You may also need toothpicks or wire.
It is most convenient to glue the necessary elements with an electric hot gun. However, if it is assumed that the child will do everything without the help of an adult, then it is safer to buy ordinary PVA glue for him.
Bouquet of roses from maple leaves
If there is a desire to make crafts from dry, but plastic, then a bouquet of roses can be an excellent option. First you need to make the middle for the future flower. To do this, you need to fold a large beautiful sheet across the central vein in half and twist it into a tube. Then the rest of the petals will be laid around the resulting center.
In the center of the sheet, it is necessary to lay the core made earlier so that the front side of the future rose petal is inside. Then we bend the leaf outward from the middle. It is important that this bend passes 1.5-2 cm above the core. Next, the side edges of the folded sheet should be wrapped around the middle. Subsequent rose petals are made similarly to the first. Remember that each maple leaf should be located opposite the previous one.
When the desired density of the rose flower is reached, in order for the bud not to crumble, it is necessary to tightly tighten all the leaves at the base with a thread. Similarly, you can make as many roses as you need for a beautiful bouquet. Ready-made flowers should be gathered together and decorated with bright ones, you can also add a sprig of viburnum or mountain ash to the composition.
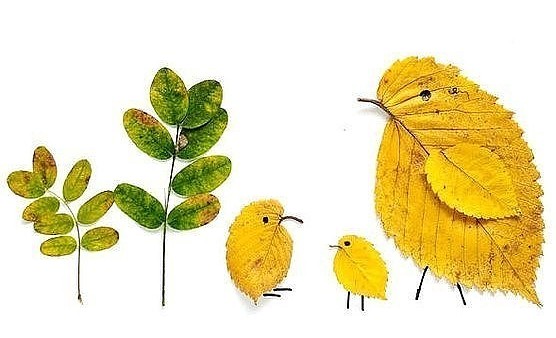
leaf birds
Birds are another interesting option for crafts made from leaves (dry). For children, the process of making such a creation will be a real holiday. Using dry leaves of various trees, you can make any kind of birds. The simplest and at the same time interesting application is a bird sitting on a branch. For its manufacture, you will need two ash leaves of different sizes, one birch, two mountain ash and a small twig.
First, glue a branch to the cardboard on which the future bird will sit. We fasten the body a little higher - a large ash leaf, and glue a birch leaf to it, turning the rounded end forward. A tail is made from two long leaves, and a wing is made from a small ash one. The eye and beak can be drawn with black paint, a marker, or cut out of cardboard and glued to the appropriate places.
Leaf frames
What child does not dream of having photographs or homemade pictures placed in an original frame in their nursery? And if we are talking about a do-it-yourself frame, then placing it on a work table or bedside table is doubly pleasant. It is worth noting that the manufacture of such a decor element does not require any special skills, you only need cardboard, leaves, glue and a little time.
A cardboard template is the first thing you need to make such crafts from leaves (dry). It will not be difficult for children to independently come up with the design of their frame. To make it, you will need to cut out two squares, one of which must be left intact, and in the second, make a hole inside so that it corresponds to the area of \u200b\u200bthe photograph or picture that is planned to be placed inside. Next, you need to glue these two blanks, having previously installed a photo between them.
It remains to decorate the frame with dry leaves and other elements. To do this, they need to be dipped in hot water and, smeared with glue, attached to cardboard. The edges of the leaves are recommended to wrap on the opposite side of the frame. In the course of work, it is important to carefully smooth out all the elements, giving them the most even surface. When the craft is completed, you need to press it down with a stack of books for better gluing. The finished frame can be installed in any corner of the room, it all depends on the desire of the child.
Helicopter - application from autumn leaves
All the boys really like to make various vehicles. These can be plasticine cars, constructor trains, origami airplanes, colored paper ships, and more. However, there is another craft that children may not be aware of. This is a dry leaf helicopter. For its manufacture, you will need leaves of various sizes and shapes.
In the center of the cardboard sheet, you need to glue a large pear-shaped sheet, which will become the body of the helicopter. To make the front of the base, you need to use scissors to give the sheet a rounded shape. Next, the propeller and tail of the helicopter should be made from narrow long leaves, gluing them to the appropriate places. On one application, you can depict several helicopters of different sizes. Such children's crafts from dry leaves will surely interest any boy, and soon he will make a new vehicle, showing his own imagination.
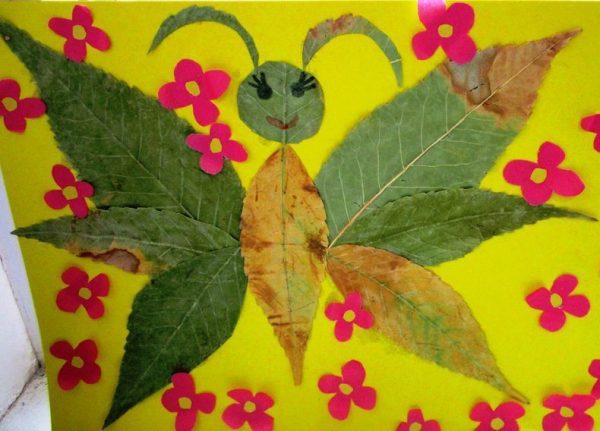
leaf animals
All from the same materials, but different in shape and size, you can get various charming crafts. From dry leaves, the application can be done in several ways - using whole sheets, cut out figures, or by laying them on top of each other in several layers.
Having collected a large collection of leaves, you can try to make an unusual exotic animal. However, the simplest figures are: mice, squirrels, turtles, moose, cats, and so on. So, to make a mouse, you need to stick an oblong leaf on cardboard - this will be the body, for the head you need to use a sheet as close as possible in shape to a circle, and make paws and ears from very small maple fruits. Similarly, any animal can be depicted on cardboard, choosing leaves of appropriate shapes for certain parts of the body. For example, for the horns of an elk and a tail, squirrels are suitable for a cat's tail and donkey ears - mountain ash or willow, for a mouse's head - birch, etc. The main thing is not to be afraid to show imagination, and then everything will work out!
Autumn, fallen leaves crunch underfoot ... What a pity for this yellow-red fading beauty, crumbling and trampling into the mud. Here is a birch leaf - gently yellow, serrated, here are alders - ribbed, but mountain ash - a family of long leaves on a thin stem. Let's take them home and make beautiful autumn crafts, appliqués. We will also need a piece of colored cardboard for the background and glue to stick the leaves.
How to make an application of autumn leaves
Autumn leaves that have dried on the street are not even and rather fragile, so first we dry the leaves ourselves. We find freshly fallen, bright and beautiful, undamaged leaves, and put them between the sheets of some thick book. We put the book under the press (under something heavy). After a week or even earlier, even autumn leaves for application are ready, they can be easily glued to paper or cardboard with PVA glue.
Sequencing
A real artist sees living images in nature, so we will dream up. Let us lay out before us all our harvested and dried wealth and see what it looks like. Take suitable leaves and lay them out on cardboard until you get a picture. You don’t need to glue it yet, at first just spread it out until everything starts to suit you.
When the picture is brought to the ideal, you can stick it. We take one leaf at a time, remembering where it lay, spread it on the back side, glue it in place. If the application is multi-layered, first glue the lower leaves, then a layer of the upper ones. The craft is ready! You can admire!
But what if, well, the ideas of application do not come to mind, and the leaves look only like leaves, and not at all like bunnies and chanterelles? Then use our ideas.
Leaf Craft Ideas
Applications with animals
Leaf Owl:


Red cat


Bird with chicks:

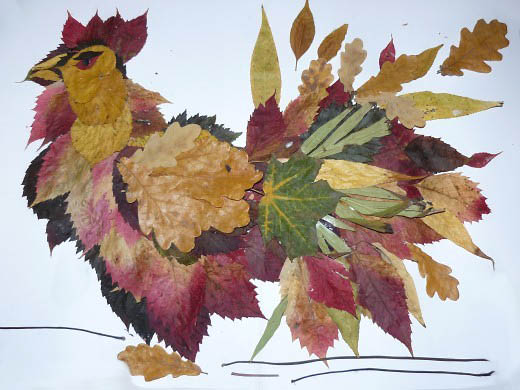
And even an eagle:

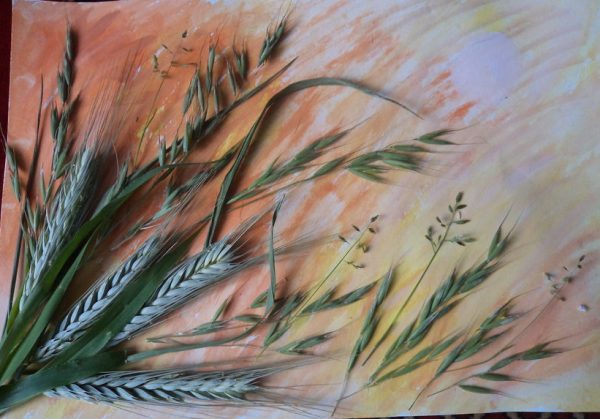
landscapes from the leaves
For a landscape, the background can be painted with watercolors.


still lifes

portraits


The finished application (if it is not voluminous) can be put under the press so that after drying it remains even. Store in a dry place, can be framed under glass.
Master Class Mary how to make a cute composition for home Bouquet of flowers from dry leaves". This craft can be done with your child.
Decorating rooms with natural materials has not been an innovation in interior design for a long time. Decorating walls and furniture with panels of dry leaves, topiaries or other crafts is within the power of anyone. Do-it-yourself decor elements perform important functions. First of all, they bring positive energy and pleasant memories. And, of course, enliven the interior.
We offer the idea of creating a bouquet of dried leaves. Samples for the herbarium were collected in autumn thanks to the biology teacher. The children at school did their homework according to the educational program. After the lesson, there was a beautiful collection and a lot of extra leaves. By the way, some of them fell off the house plant. Ficus Benjamin accidentally flooded with water. The flower shed its leaves in protest.
So, let's put the album with neatly designed herbarium specimens aside, and let's take care of the rest. Quantity and color allow you to make a bouquet with yellow flowers.
For crafts you will need:
- colorful leaves,
- thin tree branches
- petals of any flowers (if there are none, it's not scary),
- PVA glue,
- gouache or watercolor paints with a brush.
Additionally, for decorating a vase, you will need:
- glass jar,
- piece of fabric
- rubber,
- satin ribbon.
To create a flower, we prepare a dense base, for example, a piece of cardboard. We apply PVA glue on it and apply the selected leaves in a circle. First, we work with large specimens.
We do the next tier in the same way, only we put smaller petals between the leaves of the first row.
Again, we process the middle with a brush with PVA and glue real yellow flower petals. Such a move will immediately color the craft, make it bright. If there are no such petals, it doesn’t matter, without them the finished flower will look just as good.
It's time for the middle ground. There are several options for its design. You can glue a piece of black leather in the center or sprinkle the middle with semolina, and then paint it yellow with gouache. We decided to cut out the central circle from the fabric.
It turned out like this.
Let the flower dry for 30 minutes. We immediately begin to create two more similar samples.
Now let's think about how to make a stem with leaves. Let's choose suitable branches of trees, work on them with a brush with green gouache.
Put the finished stems on the windowsill. The bright sun will quickly dry the water. After 10-15 minutes, you can continue working with the workpiece. Using PVA glue, attach the green leaves to the branches.
As a result, we get approximately the following result.
Now you need to glue the dried ones to the finished stems. How do you like this beauty?
Oh yes! Forgot about the vase. We will also make it with our own hands. No wonder they collected jars, rubber bands and rags in the kitchen. A glass jar of baby puree is quite stable. It will perfectly hold the bouquet and will not tip over.
We put the jar in the center of the fabric cut. We wrap the ends of the satin flap in it.
With a thin elastic band we press the fabric to the neck. Not very tight.
We hide the ugly elastic band behind the yellow ribbon. The bow can be left in front of the vase, but we were afraid of the excessive fussiness of the craft.
I wanted to capture the flowers against the background of the finished vase.
Basically, the job is done. We carefully put the flowers from the leaves in a jar, looking for a place where we will leave this floral arrangement.
It turned out very nice. The photograph does not convey the naturalness of the materials. I think this is where the experiments with herbarium specimens are just beginning.
Like the product and want to order the same from the author? Write to us.
More interesting:
See also.
Autumn! How much warmth and beauty is contained in this wonderful time of the year! Countless variegated colors playing with magical shades in the sun, a variety of unique shapes and structures of fruits, grass cover, as well as tree leaves fluttering in the wind. Every day we look at this splendor and get inspired, enriched by magical energy, which further encourages us to our own work. Someone paints pictures, someone composes poetry and stories, and someone is engaged in home needlework. From properly selected and neat natural material, you can create beautiful DIY crafts for the New Year 2018 and other holidays, decorations for the room interior in the form of vases, flowers, baskets, topiary, panels, caskets and more. Also, children's works for a thematic exhibition in kindergarten and school in the form of various animals, birds, fairy-tale characters, wreaths, applications on the theme of autumn and much more come out well. Schoolchildren of grades 1-4 are especially interested in such skill. After all, children of this age look at the world in a completely different way, they notice all the subtleties of the luxury of natural decoration, which adults, in turn, do not always pay attention to. So, let's plunge a little into the world of art and grace through our prepared article. In it you will find 9 ideas for easy and beautiful DIY leaf crafts. Informative master classes with photo and video tutorials will aim you at your own right ideas and creations.
Bouquet of roses from maple leaves
You can make a very beautiful bouquet of roses from the leaves, which you can give to relatives and friends. Such an autumn bouquet will delight and surprise them, because it looks very impressive, and most importantly, it is made by hand. In order to make it easier for you to understand how to make such a bouquet, we described the craft in our master class with step-by-step instructions.
You will need:
- Maple leaves of various sizes (one flower takes 7 - 10 pieces),
- A thread.
Progress:
- We take natural material and bend it in half so that the sharp ends do not interfere with us.
- We twist the leaf into a tube with our own hands, perpendicular to the tail.
- We wrap the resulting tube in a similar way 3-4 more times. So we get the base of the rosebud.
- Next, we form a bud, applying new larger sheets to the workpiece, not forgetting to hide their sharp edges, folding it in half.
- After you have attached enough elements, spread the petals of our rose to make it more voluminous craft.
- We fix our construction with a rope from below, where we still have the tails of the natural material used.
- So we make 3 - 5 roses and begin to collect a bouquet.
- We fasten all the roses together with a rope so that they create a harmonious composition made by ourselves.
- We attach maple sheets around the roses so that they seem to hug the flowers from the outside.
- You can also add various other decorations to our bouquet - twigs with berries, or some green twigs to add brightness and contrast. In general, the idea of \u200b\u200bcrafts is quite interesting and uncomplicated, be sure to try to reproduce it at home.
Video: master class on creating roses from maple leaves
Wreath on the wall of autumn leaves
To decorate the house, you can make a very beautiful wreath of leaves with your own hands. Such a craft can be done even with a child of 3, 4, 5 years. How to create such a wreath, you can see below in the description with step-by-step instructions and a photo idea.
You will need:
- maple leaves,
- plastic plate,
- Stationery knife,
- Orange ribbon, 2 cm wide,
- burlap ribbon,
- stapler.
Progress:
- In order to make crafts from leaves with our own hands quickly and beautifully, we need to take a plate and cut the bottom out of it with a knife. We have the base for the wreath.
- We tear off the tails of the natural material used.
- We hold them with sharp corners up and begin to fold the edges to the center in the form of tubes, and fix them in this position with a stapler.
- We make about 23 such blanks.
- We fasten the blanks on the rim of the plate with a stapler, the leaves should be evenly spaced in a circle. We make 2 rows of these so that there are no gaps.
- From above we fasten even elements of a small size to close the corners.
- When all the component parts are attached, use a stapler to attach a burlap ribbon so that we get a beautiful spiral.
- On the reverse side, we cut off the extra corners so that the handicraft, created by our own hands, has a neat look.
- For decoration, we make a bow from an orange ribbon and attach it to the wreath in the part where you like it best. And we make a loop from the same ribbon on which you can hang our wreath.
Video: master class on making a wreath of autumn leaves
Application "Autumn tree"
From the leaves, you can make various applications with your own hands. In order to make an autumn tree, we made a master class with detailed instructions. Even a grade 1 student can easily cope with such creative work. Let's see how to make a beautiful craft from bright natural material yourself.
You will need:
- white paper,
- dry leaves,
- PVA glue,
- brown marker.
Progress:
- According to the idea provided by us in the photo, you need to bend the paper material in half and draw the outline of the tree with a felt-tip pen.
- Then you need to make a crown of dry autumn leaves with your own hands, gluing them with PVA glue. The crown should be made both from whole small elements, and with the help of tear-off technique, i.e. from fragments of large natural material.
- Next, using a brown felt-tip pen, you can paint the tree trunk, and you can also make it with paints. Here is such an original craft that will perfectly transform a children's room or become a worthy exhibit of a thematic autumn exhibition at a school or kindergarten.
Video: do-it-yourself applique master class
Autumn leaves hammered
You can invite the baby to make an original autumn craft. With his own hands, he will be able to create an imprint of various plants on the fabric, their leaves and flowers. Such creative work is perfect for children 3, 4, 5, 6 years old. How to make such a creative creation, you can see below in the description with detailed instructions.
You will need:
- light cotton fabric;
- plastic bag;
- small kitchen hammer.
Progress:
- For crafts, you need to put the fabric on a flat and hard surface, and then make an arrangement of leaves and flowers on it.
- We cover the fabric with polyethylene.
- In order for the autumn plants to release the juice and color the fabric with it, you need to lightly beat your composition over polyethylene with a hammer with a hammer.
- This fabric with prints can be used to decorate napkins, and it is also suitable as a decoration for a DIY postcard.
Lotto from leaves
Autumn is a time for fascinating herbarium preparation. And also, this is a great way to introduce the child to the plant world. A leaf bingo can be an alternative to a regular herbarium, and a toddler can help you make this DIY craft. This is a very educational game for children, which will give them maximum pleasure and benefit.
You will need:
- thin cardboard, A4 format - 6 pieces,
- dry leaves of various trees and shrubs, dried flowers and herbs,
- fruits of trees and shrubs (optional),
- scissors,
- pencil.
Progress:
- Initially, you need to draw cardboard, A4 format, into 6 identical parts.
- 3 lined parts will make up a lotto panel. It is on them that the child will put the cards. We will dedicate one panel to trees, the second to shrubs, and the third to flowers and grass. Now glue the appropriate material on each panel segment.
- The remaining 3 pieces of cardboard should be cut into sections. There will be 18 of them, these will be the cards for the future DIY crafts.
- Glue one leaf, flower or blade of grass from each of the plants to each card. Our educational game is ready, and you can already get carried away with it with your child.
You can collect dried fruits and other natural material in a small box. Alternatively, you can simply draw them on cards, but using natural material for a child will probably be more interesting. While playing, the task of the baby will be to arrange cards with flowers, foliage, fruits in certain sections that correspond to plants.
Autumn crown of leaves
The autumn foliage is very beautiful and colorful. From it you can make a charming crown for your princess. And most importantly, such a craft can be done with your child with your own hands, because it is designed for the age of 4, 5, 6, 7 years. Let's see our master class with a step by step description and a photo idea.
You will need:
- colorful autumn leaves,
- scissors,
- glue.
Progress:
- Walking in a park or square, collect the most beautiful autumn foliage. The more varied their colors and size, the more beautiful our crown will turn out.
- Cut off the end of the leg and fold each natural element in half.
- Leg of one material through the second element.
- In this way, continue to fasten the remaining leaves until the size is large enough for the crown to be worn on the head.
- Fasten the edges of the crown and glue on the front a handmade decoration made from the same natural material as the craft itself.
Video: home decoration ideas, do-it-yourself leaf hair
Maple leaf topiary
Despite the fact that topiary trees have recently come into vogue, they managed to quickly gain popularity. You can make this tree with your own hands from various improvised materials: flowers, leaves, fruits, coffee beans, ribbons, paper. In order to make it, you will need quite a bit of free time, in addition, you do not need special skills at all. It is worth noting that this charming craft can be a great gift for any holiday, as it brings joy and well-being.
You will need:
- small flower pot
- floristic sponge (as an alternative, you can use ordinary foam rubber),
- wooden stick,
- yellow leaves,
- mountain ash and other elements for decorating wood.
Progress:
- First of all, you need to fix the wooden stick in the pot with your own hands, as firmly as possible, otherwise the tree will lean or even fall along with the pot.
- Attach a ball made of sponge or foam rubber to the very top of the stick. All prepared elements should be evenly stuck into this ball: leaves, branches, bunches of mountain ash.
- The soil and tree trunk can be decorated with grass, beads or artificial flowers, vegetation. A great addition would be a small branch that will depict a small bush. You can complement the decoration with ribbons, beads, artificial twigs and flowers for decoration. Our DIY craft is ready! It will transform every corner of your home.
Craft "Owl" from leaves
To make a quick and beautiful children's craft from leaves with your own hands for a school or kindergarten, you need to take a closer look at our provided photo idea. It is simple in its execution, does not require expensive supernatural material, great skills and craftsmanship. Even a child of grades 1-4 can easily cope with the creative task assigned to him. So, an owl in elementary reproduction.
For work you will need:
- bright yellow, red, orange and green leaves;
- stationery glue;
- scissors;
- white landscape paper;
- colored paper;
- foil.
Manufacturing process:
- For our craft, you need to take paper and make an approximate sketch of a bird on it with a simple pencil.
- After that, it is necessary to select the most suitable and unusual leaves from different trees that fit into the image of an owl presented by us. We lay out our natural material along the marked lines with our own hands so that all the outlines and details are similar to the real ones. If necessary, we cut the edges of some constituent elements with scissors and fasten everything with clerical glue.
- We cut out the eyes and beak of an owl from foil and colored paper, attach it to the muzzle, as in the photo. We got such a simple and at the same time interesting craft, dear friends. In such a simple technique, you can create with your own hands many other animals, birds and even people, you just need to pick up beautiful leaves.
It is very sad to watch how autumn comes after a sunny summer: the leaves on the trees turn yellow, it almost always rains, it gets cold outside, you have to get warm clothes out of the closets.
Despite this, the autumn time can also become beautiful and full of colors during the onset of sunny days. Cheerful children run around the city parks, play, collect colorful bouquets from fallen leaves.
At home, I begin to collect a variety of crafts for school and kindergarten, sometimes just for myself. There are a huge number of exciting ideas, and our article will be about them.
Crafts from leaves for kindergarten
The child loves to take part in the creation of various crafts. Show him what can be made from the colorful leaves that fill all the streets of your yard, and he will be extremely happy to take part in this.
Creating crafts is not only entertainment, thanks to such activities, children can get wonderful exciting lessons on getting to know the world around them, develop thinking and creative abilities. The presented options for working in kindergarten will help you with this.
What you need for crafts from autumn leaves:
- Directly the leaves themselves, of different colors, sizes and types;
- Stationery (Glue, pencil, scissors, paper, white and colored cardboard);
- Threads;
- Wish.
Possible options for crafts from leaves
Application of autumn leaves
It is considered the simplest type of leaf crafts. You and your child can easily make an application in the form of animals or birds.
With the help of dry leaves, PVA glue and paper, you can count to create. In order to make the work more vivid, use leaves of various colors.
Crafts from leaves and cardboard
Making crafts from cardboard and leaves is not difficult. You just need to cut the base out of cardboard and glue dry leaves to it.
Herbarium
One of the most fascinating and common types of crafts for children is an amateur herbarium. You can collect many types of natural material, according to which your baby will be interested in exploring the variety of plants growing in your area. Use as many types of plants as possible to create a beautiful herbarium.
Garland of autumn leaves
Dry the leaves, then dip each of them in yellow paint to give the leaves a brighter color. Then we hang the leaves to dry in the form of an elegant garland.
It is necessary to take maple leaves of different sizes and colors, then cover them with a transparent varnish. After the leaves dry well, you need to hang them on strings, decorate with beads or beads and hang them. The resulting pendant will be a great decoration both on the street and in the house.
Bouquet of flowers from autumn leaves
Flowers created from maple leaves look very impressive.
Vase of leaves
You can use any leaves you like. For one vase, you can use several types of leaves, different in color and shape, or you can make them from the same ones.
Instructions on how to make crafts from leaves Application First you need to prepare all the necessary materials and shoot the table with oilcloth.
To create an overhead application, you should draw the picture itself on the cardboard, then put the leaves on the drawing, you do not need to cut the leaves, they are used entirely. Everything that is not enough can be finished with paints or made from other materials.
Silhouette application, created from cut leaves. The leaves are cut to embody with the help of them, the conceived pattern.
The most difficult way is to create a modular application. It is made from leaves of the same size. In this way, fish scales or bird feathers are made.
To obtain a symmetrical application, it is necessary to select paired leaves that are identical in all respects.
Note!
Tape - with its help create many details in one picture.
Herbarium
It is better to collect leaves for a herbarium in dry weather, as wet leaves require additional processing. Each detail of the herbarium must be straightened with a cold iron, before that, carefully remove all creases of the sheet.
If the street is constantly damp and there is no time to wait for dry weather, then they should be allowed to dry on their own. After the leaves have dried, they are ironed with a warm iron, placing them between two sheets of paper. It is not necessary to press the iron on the leaves, just press a little so as not to flatten them.
The prepared elements are placed on a sheet of paper, which will serve as a background and at the same time a frame. Fix the leaves with thread or glue.
Bouquet of flowers/rose
In order to get neat and beautiful flowers, the leaves must be even and clean. Place the paper directly in front of you, fold it in half. Then you need to twist half the leaf into a tube, but do not twist it very tightly, the flower should be voluminous.
It turned out the core of the flower, we make the petals from the rest of the leaves. Insert the core into the second maple leaf. In turn, wraps the edges of the sheet so that petals are obtained. The sheet can be fixed with a thread so that it does not fall apart later.
Note!
To make the flower voluminous, at least six or seven maple leaves should be twisted in this way, each of which is fixed with a thread. To create a bouquet, you need several of these flowers.
Vase
To make this craft you will need:
- PVA glue;
- Leaves of different colors;
- Regular balloon.
It is necessary to inflate the balloon to the desired size of the vase. Take glue diluted half and half with water. Lubricate one half of the ball with glue solution.
Each sheet must be properly glued and smeared on top with another layer of mortar so that the upper layers of the sheets hold just as well. When you have glued the top layer, then it should also be smeared with glue.
After that, remove the ball for a few days until completely solidified. When our fake is completely dry, it will be necessary to burst the balloon. A vase of leaves is usable. Making such a work is not difficult, but very interesting, so it is good to do it with children.