DIY paper machine (diagrams, templates). Sweet design birthday modeling design Mercedes-Gelendvagen description of the process how I do it corrugated paper cardboard food products soutache braid cord How to make a helik from paper
Every boy loves to play with cars; he will not soon assemble a metal structure on his own, but teaching a child to make paper models is very easy. Parents will need a little time, paper, glue and scissors. You can create such machines using the origami technique or 3D design; for each method there are the necessary materials, instructions and recommendations.
How to make a car from waste material?
The older the boy gets, the more interested he will be in complex models, including those made from paper. Parents can only suggest which creativity is more exciting, provide the necessary materials and a good mood to complete the task. For boys, among all the models, it is cars that enjoy great prestige, and buying different designs every day will cost parents a pretty penny. After a while, the child will lose all interest in these beautiful cars, so it is more interesting and useful to make the design yourself. It does not require large financial expenditures; all you need is desire and time.

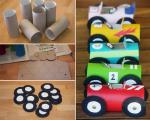
You can create cars not only using ready-made diagrams, but also using available materials, for example, cardboard and matches, wooden sticks and colored paper. For example, take several cardboard cylinders left over from toilet paper and cover each one with colored paper. After the fake has dried, it is necessary to cut a rectangular hole on the surface of the cylinder, leaving a little space on one side so that it can be bent and thus make a seat for the driver.
The design can also be decorated inside using felt-tip pens or a marker; to create a steering wheel, you should cut a circle out of white paper and glue it opposite the seat. The machine can be additionally decorated with applications made of colored paper, choosing different shades. If the car is a racing car, you can put a number on it, if it is an ambulance or fire model, then you can also cut out the corresponding signs or draw them. To secure the wheels, use small bolts or plastic bottle caps.
Volumetric 3D paper cars
To complete the work, you need to prepare a printer, a sheet of paper, scissors, cardboard material, as well as glue, colored pencils, paints or felt-tip pens.

The instructions are very simple; you can assemble a paper machine without any special skills or knowledge. First, you need to print out a model of the machine you like on paper, then glue the sheet onto cardboard to make the structure durable. The image is cut out along the contour; this is another advantage of this technique of creating a paper machine.
Important ! All the lines are already marked on the sheet, so it will be easy for the child to fold the model, just bend it along the contour and hide the remaining wings of the workpiece inside.
These white ends must be glued together so that the structure does not fall apart, and if the cardboard is strong enough, then you can use super glue rather than stationery PVA. After that, the most interesting thing for the boy is to decorate the car at his discretion.


A simple way to create a paper car
Paper cars are just as fun to play with as metal or plastic ones, you can arrange real races, and you can also build a garage by decorating all the structures with felt-tip pens, and use a toothpick to make a flag.


To create a paper machine you will need a square piece of paper; it should be folded in half, then unfold the edges and bend them in the opposite direction towards the middle of the sheet. Then, fold the edges again in the opposite direction and fold the sheet of paper in half. Draw the outline of the car onto the material; to do this, fold the top corners, then tuck them inward; two corners will peek out from below. They are also folded inside, after which you need to make wheels for the car.
Bend the lower corners back, rounding them a little, thus creating wheels; in front, to make headlights, the corners must be laid inward. Do the same on the back side of the car; all the details of the vehicle can be drawn, for example, wheels, headlights, doors or the driver behind the wheel. 15 minutes of time and a beautiful paper car is ready.
Origami machine
This is a unique art that involves the creation of unusual paper figures, including cars. To work, you just need to stock up on colored paper and patience, it’s very easy, so you not only can, but also need to involve children, together you can create a whole fleet of cars. Or you can make a car out of a banknote and give it as a gift to a friend.

To create, for example, a sports car, you need to take a rectangular sheet, as a rule, the aspect ratio should be 1:7. The work begins by bending the upper right and left corners, thus creating all the necessary folds. The next step is to fold the top of the sheet, along with the folded corners on the left and right. Small triangles will remain sticking out, which should also be folded towards the middle of the sheet of paper.
Next, you need to fold the sides of the leaf, fold the bottom part, follow the same algorithm that was performed when folding the top part of the paper. All that remains is to fold the structure in half, tuck in the triangles that are peeking out and that’s it, the machine is ready.
Mercedes Gelandewagen is probably the most popular jeep in the world today. Under the simple name there actually lies a real “beast” - a powerful SUV.
“Off-road vehicle” - this is how its name is literally translated from German. Using the materials in this article, you will learn how to draw a “Gelik”, also known as a Mercedes G-Class - Gelendvagen. Let's begin to study such a simple work.
How to draw a "helik" step by step?
Stage 1. First outline the outlines of the wheels and body of the car. All lines except the wheels must be straight. The lines that form the front of the SUV are displayed in parallel.
Stage 2. Outline the contours of the windows, headlights and outline the bumper. Between the headlights, draw a circle in the center - the place where the Mercedes logo will be depicted.

Stage 3. Add details - draw the rims and tires on the wheels, mark the side mirrors. Here, mark the location of the license plate and mark the approximate location of the doors.
Stage 4. Outline You previously drew a circle in the middle of this element, now it’s time to draw the famous logo inside it. Draw a circle with a thin border around the edges.

Step 5. Draw a straight line in the center of the lattice, and cover the space of the lattice with crosses. They should be thin and drawn without much pressure on the pencil.
Stage 6. Outline the headlights with rectangles with smoothed corners. Add volumetric turn signals at the top.
Stage 7. To correctly convey the shape of the headlights, draw a rectangle so that your circle is offset relative to it. Also draw a couple of edges to create an internal recess for the headlight.
Step 8. Draw a bumper under the upper radiator grille. Then draw the lower radiator grilles. Here, draw the panel for the license plate. Draw the fender slightly above the wheel.
Stage 9. Draw the side of the Mercedes. Use only smooth and straight lines. Here you can also display the windshield trim and add side mirrors.
Stage 10. Draw the outlines of the doors along the previously marked lines. Highlight the windows using light shading.
Stage 11. Steps for the driver and passengers are considered an integral part of the design of the SUV. This is true for such tall cars as the Mercedes G-Class. Sketch a flat and wide step, which is located between the wheels on the side.
Stage 12. Draw the wheels of the Mercedes. Draw the disks with curving and smooth lines, similar to stars. Don't forget to mark the inside of the wheel.
You should now have a drawing of a "Mercedes Gelendevagen". The work is simple and does not contain complex artistic techniques.
It is very difficult to depict without a step-by-step approach. A thoughtful execution sequence is required. You need to know where to start drawing and how to outline the details of the car. At the same time, do not miss important details:
- First you need to sketch out a sketch of the car.
- After this, carefully outline the body of the SUV. Remove construction lines that you don't need.
- Next, draw the wheels, car windows and other small parts of the car.
- You will need to outline the lines and minor elements. Remove excess construction lines using an eraser.
- Proceed to shade the drawing, showing the three-dimensionality of the image.
- If your Mercedes-Benz G is dark in color, then you need to tint the car. Highlights can be applied using a triangular eraser. If you don’t have this in stock, you can cut a simple one.
- Finally, use your eraser to go over the windows and body, making them lighter. Add the rest of the highlights on the Mercedes in the same way.

Required tools and materials
Before you start working and understand how to draw a “helik”, you will need to prepare your office:
● Simple pencil.
● A white sheet of paper.
● Eraser.
● Black and white pencils.
● Photo or image of a Mercedes.
And also desire and good mood.
The final stage
Having completed reading the provided article, you have learned how to draw a “helik” using a simple pencil quickly and realistically. The result of painstaking work is the knowledge of the way most cars are displayed. Feel free to start drawing new models and create your own collection.
Paper jeep
Hello to all glue lovers! Today we offer printable diagrams of the simplest models paper jeep. The difficulty level of gluing these paper cars is very low, so even preschoolers will find it interesting to glue them together.
The history of the appearance of "Jeeps"
The name "Jeep" appeared during World War II, as the American military vehicles Willys-MB and Ford GPW were called. The fact is that these cars fell into the “General Purpose” category (general purpose), abbreviated as JP.
Gluing a jeep out of paper
- In order to glue the paper car diagrams below, you will need to print them out, then cut them out and glue them together.
- It is better to print car diagrams on a color printer, then the crafts will turn out more beautiful. However, if you print the diagrams on a black and white printer, you can color them with colored markers or pencils.
- To make the jeep model more durable, it is advisable to use thin cardboard or sheets of whatman paper, cut to size in A-4 format, for printing.
- To cut out the parts of the jeep, use small nail scissors, with which you can carefully cut out all the small parts of the car.
- To ensure that the curves of the paper model are even, use a ruler and a non-writing pen. To do this, attach a ruler to the bend line, draw along it with slight pressure with a non-writing pen and bend the part.
- To glue the jeep model, use regular PVA glue or a dry glue stick. To make the parts stick together better, press the surfaces to be glued together for 20-30 seconds.
Paper jeep diagrams

Paper jeep 1

Paper jeep 2

Scheme - unwrapped paper jeep 3

Scheme - unwrapping of a jeep pickup made of paper

Diagram - paper development of a Cherokee Jeep

Scheme - development of a Willys jeep made of paper