Master class "New Year's crafts" Santa Claus and gifts. Do-it-yourself Good Santa Claus: a step-by-step master class
Olga Malafeeva
Material: ceiling tiles, building glue, knife, cotton wool, plastic yogurt bottle, old doll (baby doll, red cloth, drinking straw, tinsel, white yarn, cardboard box.


First, I come up with a plot. I make templates of the right size from paper and cut out details from the tile.

Glue with construction adhesive. You can use "titanium", but it dries for a long time.

I cut off the top of the box, leaving only the bottom with low sides,
I wrap with cotton. Here I use PVA glue.


Using building glue, I fix the figures on the base.

For grandfather frost I used an empty yogurt bottle, parts from an old baby doll (head, hands, red fabric, cotton wool, white yarn. For a staff, a drinking straw, tinsel, floral ribbon.
Now I'm creating a story. I install Grandfather frost, on a sleigh bag with gifts and decorate the Christmas tree with multi-colored beads.
Hush hush!
Grandfather Freezing is coming to us for the holidays.
He's lucky gifts who
Everyone, everyone, in the world!
Happy New Year, dear colleagues!
Related publications:
The New Year is getting closer, there are more and more worries, it is necessary to think over the design, and prepare for the holiday, and take care of the costumes. And here also.
I invite all colleagues and friends to the master class "Santa Claus" - origami technique, which Susanna will show you. For work, we need a colored sheet.
MASTER CLASS "FATHER FROST". Hello dear colleagues, parents and children. Soon the New Year, and of course everyone is waiting for a miracle and Santa Claus. Expensive.
MASTER CLASS "FATHER FROST FROM PALM" Prepared by: Maslova N.V. For work we need: Colored paper Glue White paper for cutting.
Doll "Santa Claus", made by hand, will bring a holiday to any home. And it doesn't matter if you believe or not in a magical grandfather with a bunch of gifts.
Soon, soon, a joyful New Year's holiday! Christmas tree, rain, tangerines and, of course, Santa Claus with gifts! Dear colleagues, I propose to you.
Decoration of the group: “Our beloved Santa Claus!”. Good day colleagues! The new year is coming soon. I would like to share with you how we are.
0 1336683
Photo gallery: Do-it-yourself Santa Claus - crafts made from paper, glasses, plastic bottles, nylon tights and other improvised materials. How to sew a suit and beard of Santa Claus: master classes with patterns
They say that the most unexpected miracles happen on New Year's Eve: Santa Claus comes to every house, fulfills the cherished dreams of all family members, makes them truly happy and joyful. Adults meet their love, enjoy family warmth, receive precious gifts. Every person has different dreams, so it can be difficult to please. Whether it's a matter of children, the New Year has a special meaning for them. Kids are anxiously waiting for a miracle, sweet treats, surprises from the long-awaited guest. Boys and girls cut out snowflakes from paper, write cherished letters with requests to the main wizard, dress up a lush spruce. So let's help our kids prepare for the celebration, fill their expectation with boundless happiness and joy. And let's start with the manufacture of bright New Year's decorations, toys and costumes at home from plastic bottles, nylon tights, glasses and other improvised materials. We will consider in more detail how to make Santa Claus crafts with our own hands in detailed master classes with photos and videos.
Magic Santa Claus made of fabric, nylon tights or felt with your own hands: a master class with a photo

Do you want to invite your favorite character from children's fairy tales to your house? Make Santa Claus with your own hands from nylon tights, fabric or felt. Let the magician with a red nose and a white fluffy beard give you joy and good mood throughout the winter holidays. If making such a grandfather seems too long and slightly boring to you, involve all family members in the creative process. More fun together! Who knows, maybe very soon a real home talisman will appear under your Christmas tree, fulfilling all desires.
Necessary materials for the master class, how to sew Santa Claus with your own hands
- colored cotton fabric for clothes
- red and white fleece
- piece of synthetic winterizer or holofiber
- foam rubber
- beige cotton face fabric
- felting needle and wool
- beads and buttons
- floss threads
- thick wire
- thin wire
- thick cardboard
- stationery knife
- glue gun
- pliers
- acrylic paints and brushes
Step-by-step instructions for making Santa Claus crafts with your own hands from improvised materials. patterns

How to make Santa Claus crafts from improvised materials with your own hands, a master class of children's crafts

To decorate the house in an original way for the New Year, it is not necessary to run around the shops in search of something interesting and unusual. At home, with the help of improvised materials, you can make an unusual decoration, for example, Santa Claus with your own hands. Moreover, a bright holiday craft can be presented to a dear person as a home amulet for the whole next year.
Necessary materials for a master class on children's New Year's crafts Santa Claus
- a sheet of white or beige cardboard
- colored felt
- copper wire
- glue gun
- pencil
- scissors
- blanks-eyes
- small pliers

Instructions for making Santa Claus with your own hands from improvised materials - step by step photos

Do-it-yourself Santa Claus from a plastic bottle: a quick step-by-step master class with a photo

In the pre-New Year's fuss, the least attention goes to the smallest family members. While mothers rush headlong between the kitchen, bathroom and elegant hall, the kids are left to their own devices. To color their expectation, you can quickly make Santa Claus from a plastic bottle with your own hands according to our step-by-step master class. Mom will have some more time to cook delicious meals, and the baby will have perhaps the most symbolic toy for the New Year.
Necessary materials for the master class on making Santa Claus
- plastic bottle for milk or kefir
- Super glue
- red paper
- red napkin
- black plasticine
- empty pill box

Instructions on how to make Santa Claus from a bottle with your own hands - step by step photos

Unusual Santa Claus from glasses and balls with your own hands: a master class on making toys with step by step photos

The most original Christmas decoration that perfectly complements both the interior of the house and the exterior is an unusual Santa Claus made of balloons and cups with your own hands, made according to our master class. To create such a product at home, you do not need special skills or complex tools. It is enough to stock up on balloons of traditional colors (white, red and black), and follow all the recommendations of our master class.
Necessary materials for New Year's children's crafts Santa Claus do-it-yourself
- simple ball pump
- big round red ball
- medium sized pink ball
- small round black balls
- long balls of different colors
- strong thread
- beads
- glasses
- universal glue
- Santa Claus hat

Do-it-yourself crafts Santa Claus from balls and glasses

We sew a New Year's costume of Santa Claus with our own hands: a master class with step-by-step photos and patterns

How to surprise children and adults at the New Year's holiday? You can buy original gifts, cook exotic dishes or hold some unexpected humorous contests. And you can invite the real Santa Claus to visit! Alas, on the night of December 31 to January 1, such a miracle will cost a lot of money. Therefore, it is better to sew a Santa Claus New Year's costume with your own hands according to a master class. In order to reincarnate in time as the most long-awaited guest at the holiday, and to give everything to dear and close people the warmest and most joyful emotions.
Necessary materials for sewing a Santa Claus costume with your own hands
- blue crepe satin - 1.8 m
- artificial fur - 0.8 m
- beads, sequins, rhinestones
- blue bias binding
- sewing machine
- scissors
- ruler
- pins
- thread with a needle
How to sew a Santa Claus costume with your own hands - patterns and instructions with photos step by step

Do-it-yourself Santa Claus from nylon tights, a plastic bottle, balls, cups and other improvised materials is the most traditional home interior decoration on the eve of the New Year holidays. Along with the costume of the winter wizard, crafts and toys by Moroz Ivanovich occupy a leading position among other thematic products. In addition, armed with successful master classes and a cheerful company, anyone can make them at home.
Good day everyone, today we will surprise you with new ideas for New Year's crafts in the form of Santa Claus. There will be a lot of non-standard New Year's resolutions - Santa Claus will appear before us in a variety of ways. We will see that New Year's Santa Claus is not only a paper craft, we will make it from wood, fabric, and boxes. You will definitely find a craft here that will inspire you to be creative, and you will want to make it yourself.
New Year's Santa Claus
WITH CANDY.
It is known to children of all countries that the main supplier of sweets on New Year's holidays is Santa Claus. We always expect sweet treats from him. And that means crafts with Santa Claus only when New Year's, when it smells of chocolate or tangerines.
Here is an idea for a sweet Christmas craft with Santa Claus. Santa Claus's belly is a sheet folded in half and in the front half of the fold we will cut a hole - a viewing hole where our candy will protrude.

The shape and design of the tummy can be different - triangular (as in the photo above) or round (as in the photo below). The main thing is the general principle - we bend the sheet in half and draw an oval for the hole in the front.
The two edges of the bent part are fixed along the upper edge with a stapler or tape or glue. And then New Year's Santa Claus gets a face, hat, beard, arms and legs.

Your craft with Santa Claus can hide the treat in another way. Here is another version of crafts with a pocket for sweets FLAT New Year's Santa Claus, made of cardboard.

Or here are options with a convex box, where Santa Claus can be poured a good handful of sweets. Such Santa Clauses are a great craft for kindergarten - it is very simple. We have a diagram of this craft and a master class on our website - here in this article

You can just lean against a flat craft with Santa Claus cut box of tea or biscuits- glue it with a colored appliqué imitating a brick pipe.

New Year's Santa Claus
FROM A GLASS.
Here is a beautiful and very simple craft for children at school or in kindergarten. We take a red plastic cup as a basis. From paper we cut out a face, a ford and a hat. Glue this to the top of the glass. You can use a stand behind Santa Claus's head, a support - which is glued to the bottom of the glass and leans against the back of Grandfather's head.

If you have white disposable cups and styrofoam balls, you can make a beautiful ANGEL craft. But if you don't have styrofoam balls, you can make them a SUBSTITUTE - from plasticine we roll a ball, a little more. We tear the white napkin into pieces. We smear the plasticine ball with PVA glue and put a napkin on it, layer by layer ... until all the plasticine is hidden and the ball turns white. Here you have the head of an angel - simple and fast enough. We are waiting for the napkin layer to dry and draw eyes on it or glue them from colored paper.

New Year's Santa Claus
in a pyramid box.
A triangular gift box can be designed in the form of Santa Claus. Such a box opens in its lower part - at the bottom. Or the box can open like a tulip bud - the triangular walls fall apart and we see the gift.


New Year's Santa Claus
FROM A SLEEVE-ROL.
From the used toilet paper there is a cardboard roll - the sleeve. From such bushings you can make beautiful New Year's crafts. Santa Clauses are overgrown with a cotton beard, they are covered with sparkles, or wrapped in felt clothes. For them, you can invent friends, also from bushings.


The bushings can be painted, or glued with colored paper. Decorate with rhinestones, buttons, wrap with elegant ribbons or ropes.

If the sleeve is shortened twice, cut it in half. That short cut of the roll can become a New Year's pendant with Santa Claus to decorate the Christmas tree.

Children's crafts
TO GARDEN AND SCHOOL
with New Year's Santa Claus.
If you need a beautiful bright craft for an exhibition in kindergarten, or a competitive work for school, then you can quickly and easily do New Year's wreath with Santa Claus from a cardboard ring.
We take a large piece of cardboard - a pizza lid, for example - put a round plate on it, circle it with a pencil. Cut out the resulting circle. We put a small plate on this circle - circle it and cut it out - we get a circle with a hole in the center - that is, a CARDBOARD RING.
We glue it with colored paper (to hide the letters from the pizza) and decorate it with a New Year's application - Santa Claus and flowers. Templates for this craft can be found in the article.

Suitable for kindergarten easy plate craft - New Year's Santa Claus with treats. Cookies and gingerbread on a plate may not be real, but cut out of cardboard or felt, but rather molded from salt dough.

Here is another quick craft where New Year's Santa Claus is made from a cone. In order for the craft to turn out to be high and large-scale, we take four sheets of paper and glue them together along the edge (with adhesive tape or glue stick). From such an enlarged sheet we fold the cul-cone - we level-cut off its lower edge. From the front of the cone at the top we glue the silhouette of the face of Santa Claus, a pompom on a hat, hands with cuffs. On a fur coat we draw buttons and snowflakes.

You can make a FLAT cardboard craft with Santa Claus and so that it stands VERTICALLY at the exhibition, Let's make a selection for it, a cardboard pyramid with a slit. The diagram below shows the principle of gluing such a support from a strip of cardboard.


Below in the photo we see a whole team of New Year's Santa Clauses on just such legs-collections, made according to the scheme above.

New Year's Santa Claus
FROM WOOD.
Very beautiful and strong crafts for the new year are made of wood. New Year's Santa Claus made of wood is a durable and elegant craft that will serve you, your children and your grandchildren. If you have boards, and you know how to saw and grind, then this is your craft. Let your New Year's Santa Claus be wooden, warm and pleasant to the touch. A tree always retains the living force of nature.

From wood, you can also cut out the silhouettes of Christmas trees, the silhouette of a snow-covered house and other elements of the winter landscape.

You can cut out Santa Claus, who is holding a sign with a New Year's wish in his hands.

You decide what the shape of Santa Claus will be - elongated high, or plump and low.

With wooden Santa Claus, you can make New Year's compositions by adding other wooden characters to it.


You can buy ready-made wooden figurines with Santa Claus and decorate New Year's compositions from them. Just create a piece of New Year's decorations - from spruce branches, artificial snow.

For such compositions, you can make Christmas trees - from cones cut off from an egg box.

You can fold paper Christmas trees as in the photo below. For this, in the New Year section, there is also a large article about DIY paper Christmas trees.

New Year's Santa Claus.
from bottles.
If you cover the wine bottles with red spray paint, you will get an excellent blank for crafting New Year's Santa Claus. Note: choose a color marked GLOSS because matte will look dull and you will need to varnish the craft.

If you are fond of thermomosaic crafts, then you can fold a craft for a Christmas tree from mosaic bugs.


Here is a beautiful panel in the form of Santa Claus. This elegant New Year's craft is made from a special decorative ribbon, which is assembled into wavy ruffles. But we can make a similar craft without a ribbon - just using the very idea of \u200b\u200bthe round design and fluffy decor. You can make an imitation of beard curls from ordinary office paper, from yarn, cotton wool. If you make crafts not large - but small from a plate, then it is good to make a beard from round cotton pads.

New Year's Santa Claus
ON PACKAGING for gifts.
From dense felt or flexible formiam, you can fold the gift wrapping yourself.

Below, I drew a figurative diagram of this New Year's box with Santa Claus - so you can see that everything is simple. There is a bottom (narrow rectangular) - there are rounded walls and sidewalls, with zones for gluing them to the front and back sides of the bag-box.

You can use this principle to create your own designs of boxes with Santa Claus. The pattern is the same, but the styles are different. In the photo below, THE SAME SCHEME ... but here the front and back walls already have a ready-made silhouette of Santa Claus. The diagram in the picture below is cropped - you need to continue it down (mirror from the top), and to the sides (lengthening the sidewalls).

But first, you will learn how to make simple rectangular boxes with straight walls and simply decorate them with an appliqué with New Year's Santa Claus.

Here is another beautiful craft, where New Year's Santa Claus is made from a lacy paper napkin, on which cakes are placed. The face of Santa Claus is cut out of white paper tinted in beige. Such an application can also decorate your New Year's gift box.

But examples and schemes of SQUARE BOXES with Santa Claus - New Year's designs can be very different.


New Year's Santa Claus
from thread and wool.
Beautifully look Santa Claus crocheted. Here you can fantasize as you like. Make them long, tall or round thick. You yourself set the shape of the figurine of red yarn - and then attach it to the face, beard and it becomes a typical Santa Claus.


You can felt New Year's Santa Claus from felt - combed wool. Felting is like modeling with plasticine, only with constant combing of your figures. we scratch with a needle until the lump is compacted under our hands.


Here are such beautiful ideas with New Year's Santa Claus you can implement this New Year. I wish you creative insights, happy coincidences, complaisance of working material and dexterous hands. May you succeed both with crafts and with life in this new year.
Olga Klishevskaya, especially for the site ""
If you like our site, you can support the enthusiasm of those who work for you.
Happy New Year to the author of this article, Olga Klishevskaya.
Toy Santa Claus with his own hands will bring a holiday to any home. Believe it or not in a magical old man with a bunch of gifts in a bag, but every interior is full of his images. But the children believe in him unconditionally, therefore, making crafts in the form of Santa Claus, they probably expect the real one, bringing them a whole mountain of long-awaited gifts. Give your children a real fairy tale and make with them a puppet, paper, plasticine - any Santa Claus that your imagination can only draw. And if our photos with interesting ideas add inspiration to create, then even better.
Grandfather Frost with his own hands
We will devote our entire article to how to make Santa Claus with our own hands. After all, in fact, crafts can be very diverse: sewing, felting, knitting, appliqué, painting and modeling. Well, let's start with decoupage.
This plate with the image of Santa Claus is made using decoupage technique. A beautiful napkin with a pattern needs to be divided into layers, you only need the top one, in fact, the one on which the pattern is applied.
If you are decorating a plate or any object whose surface you will not use, you can use PVA glue to work. But in this work, the reverse decoupage technique is used, that is, a transparent glass plate is taken and the napkin is glued on the reverse side, and from the front it will shine through.
So, on the back surface, degreased with alcohol, put a napkin and moisten it with water. Make sure that the napkin is well saturated, but does not disperse. Be sure to remove excess water with a cotton swab. While the paper is still damp, coat the surface of the napkin with a thin layer of acrylic varnish. It should be applied with a narrow brush, moving from the center. The varnish should dry for quite a long time, about twelve hours. If desired, you can apply another layer, also taking enough time to dry. Patterns and ornaments are applied to the clean surface of the plate with acrylic paint, you can paint over the entire surface of the plate with paint. Another layer of acrylic varnish will complete the craft.
Do-it-yourself Santa Claus from felt
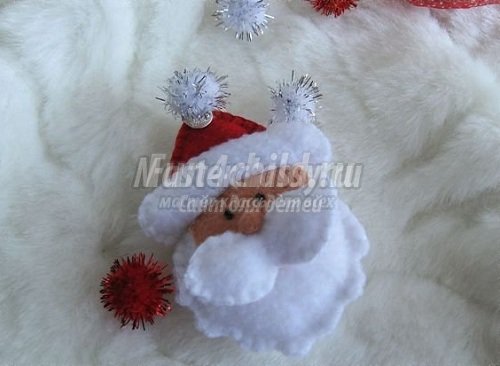
And such Santa Claus with his own hands can decorate your Christmas tree. It is made of felt, and you and I already know that it is completely simple to perform.
To sew the toy, you will need small pieces of white, beige and red felt. Of course, it’s a pity to buy large cuts to make such a crumb out of them, but you can make a lot of such Santa Clauses and give them to all your friends and acquaintances.
- On paper, draw a pattern for your craft, you will need five elements - a head and a beard, a face, an edge, a hat, a mustache.
- From beige felt we cut out one element - the face, from red two elements of the cap.
- From white we cut out two elements of the head with a beard, edges and mustaches.
- Now we create a mustache and a hat, we sew the elements together not completely, we fill them with filler.
- Glue a beige face onto one part of the head using Moment glue, sew the two parts of the head, fill them with silicone filler.
- We put the hat on the top of the head, fix the bottom with a pin, put the edge on the bottom and sew it with hand stitches. At the same time fixing the hat.
- You need to sew on the edge both from the front side and from the wrong side, but we cut out two elements with you.
- A voluminous mustache, bead-eyes and a nose made of felt rolled into a roll with silicone are sewn onto the beige felt.
- The end of the cap is crowned with an elegant bell with a braid for hanging the toy.
You can also make a simple felt card with Santa Claus. You don't even need a pattern - just show your imagination and creativity. For beginners, we recommend that you first make a paper sketch of the craft, and only then transfer it to felt fabric. Use glue to connect the pieces of fabric together.

Santa Claus from plywood do it yourself


Santa Claus do-it-yourself paper

New Year is a wonderful occasion to make an application on a greeting card. And who will decorate our application better than Santa Claus with his own hands made of paper? You can glue either simple pieces of colored paper, or strips folded using the quilling technique. In the second case, it will be more effective. If everything is more or less clear with the figure of Santa Claus, then we will tell you how to make a Christmas tree in more detail. You will need sheets of double-sided colored paper. Cut out strips from it, but not even, but with small sides two centimeters and a centimeter. Cut a fringe on one side of the strip with scissors and twist it into a roll with a wooden skewer, starting from the narrow edge. When you fold the entire strip, fix the even edge with glue, and gently straighten the fringe so that the element becomes as flat as possible. You need a lot of such patterns, you will need to lay them out and stick them on paper in the shape of a Christmas tree. Decorate the middle of the elements with rolled multi-colored stripes.

With the help of thick paper or cardboard, you can make other important attributes, for example, make Santa Claus's sleigh with your own hands. It can be, or you can use folded newspaper tubes for the base, and we suggest you make a sled based on an old car from which the body has already been removed. From cardboard, you need to cut out four elements - the sides of the sleigh, the back and the front. You can color the sleigh with pencils and paints, and rhinestones or shiny stickers will add a snowy winter texture. You can put not only Santa Claus and the Snow Maiden in your sleigh, but also put a bag or a box with a gift in them.
Sew Santa Claus with your own hands
With the help of fabric, you can make toys that you will never buy in a store. You can sew Santa Claus with your own hands and your child will be delighted with this toy. Santa Claus tilde has gained immense popularity.

A distinctive feature of these wonderful dolls is a cute facial expression, but at the same time very small facial features, as if just outlined, rosy cheeks, plump tummy shapes, long legs and arms, Natural, soft fabrics, which are always used for sewing tildes, are welcomed by all mothers, as the child will be pleased to play with such toys, and safe.

You can not only sew a figurine or a costume of Santa Claus with your own hands, but also knit it. A knitted figurine will be a favorite toy, and if it is not stuffed with filler, then such dolls can be used for a home-made puppet theater.
How to sew Santa Claus with your own hands

But Santa Claus can be not only a toy, but also a decoration for a bag of gifts. We will tell you how to sew Santa Claus with your own hands and place it on the packaging for New Year's souvenirs, which we can then give to our relatives or friends. You can embroider the face of Santa Claus with satin stitch or cross stitch, you can make a fabric one with glue, or you can make a crocheted element, which you will then sew onto the bag. It is done quite simply - the first row of loops is closed in a ring and tied with single crochets. When the circle is already of sufficient size, tie it with several circles of snow-white threads, then change the thread to red and knit a hat. Loop long white threads into the bottom row, and then trim the resulting beard with scissors. Also make a red nose, like a real Santa Claus, from threads tied in a circle. The resulting element is sewn to the finished bag quite tightly. Tie the top of the bag better with an elegant ribbon.

For the simplest Santa Claus, do-it-yourself patterns will also be the simplest. These are two large balls - one for the body, one for the head. Having cut out the circles, we fold each of them in half, we bast the thread at the bottom not to the end, and when we fill the fabric with padding polyester, we tighten the thread so that we get a ball. Santa Claus will also need an elegant hat with a pompom made from swatches of fabric. We connect all the elements together, sew eyes on the face, outline the mouth with red threads, make a nose from a small ball. We create a beard and mustache from a synthetic winterizer, from which we make an edge for a hat and a fur coat. Santa Claus for the New Year's composition is ready for you.
Making a real Santa Claus doll with your own hands will be more difficult, because this is a whole art. ? For such crafts, a combination of modeling and sewing is most often used. With the help of skillful stitches, you can “sculpt” a face for a toy, and a fur coat, hat, and boots are simply sewn from fabric. This combination is called sculptural textiles.

For Santa Claus using the technique of sculptural textiles, you need to create a frame. For these purposes, a small plastic bottle is suitable for us, into which a wire is inserted in a loop into the place where the head will be attached. The same loops will serve as hands; under mittens they will not be visible at all. We paint a face made of fabric, glue eyes, attach a beard made of artificial fiber. A fur coat, felt boots, an elegant sash - we do everything, even the staff of Santa Claus, with our own hands.

If you are familiar with the technique of felting wool, otherwise called felting, then you can make such a variation of the fairy-tale wizard. This technique is very difficult, but at the same time, dolls created using the felting technique always look original and complex. The base material is wool, which is repeatedly pierced with a special needle until the material becomes dense, the fibers do not tangle themselves, forming a dense structure. Since such a craft is hollow inside, it will not require you to spend a lot of material, but if you put such Santa Claus under your Christmas tree, then the delight of all your friends is simply guaranteed.
We hope that we have provided you with enough options on how to make Santa Claus with your own hands. Do not forget to please the New Year's old man by making his granddaughter - the Snow Maiden!
Key news tags: ,
Other news
Surely every person at least once in his life made something. It could be some kind of craft for a school assignment or a thing made on one's own initiative. And for some, such work was a burden, while for others, on the contrary, a joy. Many could even connect their lives with creativity. That is, do crafts not for yourself, but for sale.
However, only needlewomen with experience are able to independently come up with ideas for creativity. Although even they sometimes need hints or peculiar hints that can push the thought process in the right direction. Beginners do require step-by-step master classes.
New Year's grandfather from a bottle
Crafts look very unusual, the basis of which are vessels from alcohol-containing drinks - for adults, and bottles of lemonade - for kids. It is not difficult to do such a funny and interesting thing at home. You can start with an easy option, as in the photo above, but the one that we describe next is much more original. For him, you need to prepare the following tools and materials:
- corrugated or wrapping paper is best red;
- paper ribbons for decoration;
- sheet of white paper;
- felt-tip pens or colored pencils;
- ordinary cotton;
- PVA glue;
- scissors;
- a bottle - both empty and not yet opened will do.
How to make Santa Claus with your own hands? The algorithm of actions is as follows:
- First you need to cut a rectangle out of corrugated or wrapping paper. Its size should be determined by the bottle. The height should be equal to the distance from the bottom to the base of the neck, and the width should be equal to the girth of the bottle + ten additional centimeters.
- We will also need three more rectangles - fifteen by ten centimeters. Two of them are folded along the length and twisted, like candy. And the rest - in width. And twist only one side.
- Now we put a large rectangle on the bottle and, approximately in the middle, rewind it several times with a ribbon for decoration. You can even make the ends hang down. Then they should be twisted with scissors. To make Santa Claus made with his own hands look as impressive as possible.
- At the base of the neck, the paper must also be carefully collected and secured. But hide the ends. Attach a strip of cotton wool on top. After all, Grandfather wears a warm sheepskin coat with fur.
- Next, cut out an oval from white paper and draw the face of New Year's Grandfather on it. And it is important not to forget about rosy cheeks.
- After we glue the cotton wool, imitating a beard and attach Frost's face to the bottle with glue.
- We put on a hat, glue a cotton pom-pom on the tip.
- We attach the last hands - the previously made "sweets". They can also be decorated with cotton if desired.
And so we managed to make Santa Claus with our own hands!
Postcard "New Year's Grandfather"

Most of all, kids love to make various crafts. And it's very cool. After all, such tasks are very useful for them. Because the process itself is incredibly fun and exciting, besides, it has a beneficial effect on the fine motor skills of the child and, accordingly, on his intelligence. And, finally, when kids do something together with their parents, they get closer, begin to understand each other better, feel. And this is especially important for maintaining warmth in relations between two generations.
So, to make an unusual postcard with the image of Santa Claus with your own hands, you will need a very affordable set of tools and materials:
- colored paper in red and any contrasting color;
- scissors;
- PVA glue;
- a simple pencil if necessary;
- paints, gouache is best;
- artistic brush;
- plastic eyes - they can be purchased at any needlework store;
How to make an original postcard:
- The first step is to fold a sheet of colored paper of the complementary color in half. Moreover, it is important that the fold goes along the long side.
- Now the fun begins. Kids from the following manipulations will come to an indescribable delight. We dip the brush into white - white gouache and generously paint over the child's palm.
- After the child should attach it to the front side of the postcard so that the fingers look down.
- Then we let the paints dry, and we ourselves thoroughly wash and wipe our hands dry.
- Then it remains only to complete the image of Santa Claus. You can create a real masterpiece from paper with your own hands! So, we cut out a hat from colored red paper and glue it over the palm print, stepping back about four centimeters.
- Finally, we attach the eyes and a small circle cut out of paper - the nose.
- And then we take the paint again. The kid dips his finger in white paint and puts dots along the bottom edge of the cap, imitating fur, and along the top - a pompom.
- In the same way, it is necessary to outline pink cheeks and a mouth.
And the do-it-yourself postcard "Santa Claus from paper" is brilliant!
Mask "New Year's Grandfather"

Even children can cope with another elementary idea. But the process itself will take a little time, and will bring a lot of pleasure. So, let's talk about the necessary materials and tools:
- colored cardboard in red and white;
- simple pencil;
- scissors;
- PVA glue;
- thin sewing gum.
In addition, another important nuance should be noted. If the reader draws well, then he can independently sketch a sketch - the silhouette of the face of Santa Claus. Or you can print our template. But in this case, you need a printer. After the details, it will be cut out of cardboard, the printer can even be used in black and white.
So, how to make a Santa Claus mask from cardboard with your own hands:
- First you need to prepare the details - cut out from a printed or drawn template.
- Then transfer them to cardboard. It is important not to confuse, because the hat should be placed on a sheet of red cardboard, the pompom and the main part of the face on white. And be sure to add additional fields in the places of gluing.
- Now it remains a very simple job: cut out the cardboard parts and connect them in the correct order to each other. If the suggested template was used, then the pom-pom and mustache should be placed on top of other details.
- Finally, you just need to measure the elastic band of the desired length. To do this, you need to try on a mask.
- And then attach.
And the original mask "Santa Claus" made of cardboard with his own hands was made very well!
Sheet mask "New Year's Grandfather"
According to the principle described above, it is very easy to make a fabric mask. Its main advantage will be that its texture is much softer. So, wearing an interesting accessory will become more comfortable. In addition, the mask will fit much tighter. Then it can be used to create an original New Year's costume.
Christmas toy "Santa Claus"

What else can be done for the New Year is quite difficult to answer. Indeed, in this matter, everything is limited only by the imagination and desire of the performers. In the current paragraph, we propose to consider the option of a toy that can be hung on a festive tree.
In order to make it, you will need:
- colored paper packaging;
- one sheet of white paper;
- PVA glue;
- scissors;
- hole punch for paper;
- a pair of black beads or beads;
- spool of sewing thread.
So, we make a Christmas tree toy "Santa Claus" with our own hands. How to do everything right? Follow the instructions - and you will succeed!
- First you need to cut out an even circle from colored paper of a light shade - Grandfather's face.
- Then from red or blue - a semicircle of a similar size. This will be the hat.
- From a white sheet with a hole punch we make a lot of small balls - confetti.
- After we put the parts together: glue the head of Frost and the hat.
- We attach a pompom, sculpt a confetti beard along the edge.
- We complement the face with beaded eyes and a fastening rope.
Craft "Santa Claus with his own hands" is ready. It remains only to decorate the Christmas tree with it.
Paper figurine "Santa Claus"

This handicraft option will also appeal to young children. For its implementation you will need:
- red colored paper;
- white landscape sheet;
- simple pencil;
- compass;
- scissors;
- PVA glue;
- markers or colored pencils.
How to do:
- We draw a circle on colored paper, divide it in half and cut out only one part.
- We twist and glue, getting a cone.
- On the landscape sheet we draw an arbitrary blot.
- Closer to the edge, we outline a hole in the shape of a semicircle.
- We cut out the "blot" completely, and the hole, leaving one side intact.
- Now we draw the face of Santa Claus on the prepared part.
- We attach the “blot” to the cone, smearing with glue the uncut part of the hole, which must first be bent to the inside.
As you can see, making Santa Claus with your own hands out of paper is not difficult at all.
New Year's Grandfather in origami technique
A wonderful and rather unusual gift idea for the main holiday of the year will be the following idea. It is very easy to implement it. But let's not get ahead of ourselves. Let's talk about the material first. Because it is he who makes the idea presented in the current paragraph original.
Let's not beat around the bush, but let's say right away that we are talking about a bill. After all, kids can draw or glue an interesting thing with their own hands. Adults, for the most part, give money for the holidays. But they are arranged in an unusual way. And we would like to offer one of the creative options:
- To complete the craft, you will need a bill of any denomination.
- We fold it in half, and then follow the graphic instructions "How to make Santa Claus step by step with your own hands from improvised materials." The photo is presented below.

Painting depicting New Year's Grandfather
In honor of the most “tangerine” holiday, we are used to dressing up and decorating our house. A great idea, designed specifically for this occasion, would be a picture of Frosty Grandpa. It is very simple to make it, but you will have to rummage through the needlewoman’s cosmetic bag and find a lot of buttons there. Most of them should choose red. Their size may vary. However, it will be more convenient to handle those that do not have legs.
Moreover, it is interesting that, if desired, you can easily develop a picture template - the composition of the crafts "Santa Claus" - with your own hands. Or find the right option on the Internet. Well, then the matter is small. We take glue in our hands and stick the buttons in the order corresponding to the pattern.
Santa Claus from plasticine
The next master class is also very simple. And, by the way, it is worth noting that children can make New Year's Grandfather from plasticine. But adults, too, should not sit idly by. They can create an original and delicious mastic craft. Making it at home is very easy.
So, regardless of the chosen material, the performer must perform actions similar to those shown in detail in the next photo.

Pillow "Frosty Grandfather"
If our reader believes that almost everyone can make Santa Claus with their own hands out of paper, and therefore such an idea is not original, another version of the craft will suit him. For her, you need to prepare:
- the material is red or blue, you can even take a regular waffle towel;
- a piece of white fleece fabric;
- satin ribbon of a derived color;
- scissors;
- chalk or bar of soap - if necessary;
- a ball of white knitting thread;
- two small beads;
- half a glass of black tea;
- blush or red colored pencil;
- needle with thread.
How to do:
- We cut out two stars of the same size from a red cut.
- We cut out two parts from white: a beard, a mustache, one each: a face and a small circle - a nose.
- We need to soak the face and nose for fifteen minutes in tea leaves, and then dry it without rinsing.
- Now we sew the beard, mustache.
- Then we fasten both parts together.
- Then we sew the face and nose - we collect the circle according to the cut, stuff it with the remnants of the fabric and tighten it.
- Further instructions on the topic "How to make Santa Claus with your own hands" are quite simple. After all, the matter remains small. From the patches of red material we cut out a small semicircle - the mouth. We sew it and beads-eyes.
- Then we attach the muzzle to the body and mask the joints with a satin ribbon.
- We complete the original craft by adding a pompom made from knitting threads.

Santa Claus from a napkin
On the eve of New Year's Eve, a complete mess begins in every house, which brings incredible pleasure to the household. At this moment, the most delicious and unusual dishes and drinks are being prepared, the table is being decorated. Moreover, the last point of New Year's affairs is especially important. After all, if the hosts make their table too ordinary, the spirit of the holiday will disappear.
Therefore, we would like to offer the following version of New Year's serving. The process can be entrusted even to children.
So, to make the next Santa Claus with your own hands from improvised materials, you will need:
- packaging of red napkins;
- nail scissors;
- stencils "Face of Santa Claus".
How to do:
- We fold the napkin into a triangle, bending the right and left edges in the opposite direction. This is necessary in order to get a beautiful cone-shaped triangle.
- Carefully cut a semicircular hole in the stencil.
- After we put the head of the New Year's Grandfather on a napkin.
- If desired, white confetti can be attached to the tip of the hat to simulate a pompom.
We told how to make Santa Claus from improvised materials with our own hands. By a similar principle, as many original napkins should be made as planned for the celebration of guests.

New Year's Grandfather from cotton pads
The next original idea is suitable for small children. After all, it will be very interesting for them to make Santa Claus from materials that are usually used for other purposes.
So, for the execution of the master class, you will need to prepare:
- colored paper of red and any contrasting, as well as light color, preferably pale pink;
- two small buttons or beads;
- red paint, gouache is best;
- brush;
- PVA glue;
- scissors;
- compass;
- a simple pencil - if necessary.
It will be enough for creative and quick-witted readers to understand how to make Santa Claus with your own hands from improvised materials, a photo of the finished result. But just in case, we will describe in detail the necessary manipulations in order to bring specifics into the process. Let's get started:
- We take a sheet of colored paper in a contrasting shade and fold it in half. The fold should again go through the long side.
- We put the card in front of us so that the fold line is on the left hand.
- Now on the sheets of red and the selected light color we draw circles of the same size. It is important to note that both of them will then have to fit on the prepared postcard.
- Now divide the red circle in half and cut out all the details.
- Using glue, first attach a light circle to the postcard, and then half of the red one.
- We almost made such as in the photo below, Santa Claus. It’s not so difficult to make with your own hands, is it? It remains to glue cotton pads, imitating a beard and a pompom.
- Then add eyes.
- After cutting out a circle of a smaller diameter from a cotton pad, paint it with red paint and leave to dry completely.
- Finally, when the red circle was in its place, we can safely say that we managed to make Santa Claus with our own hands for the New Year.

New Year's grandfather at the window
What else can you make the character studied in the article from? For example, from ordinary white paper. Cutting out the silhouette of Santa Claus from it and decorating the window with it. If you supplement the picture with homemade snowflakes, serpentine, rain, colorful lights and other New Year's paraphernalia, you will be able to achieve an original result altogether. Which will be able to admire not only the household, but also passers-by.
So, let's start with what will help us make Santa Claus with our own hands. Pattern, or rather, even a pattern. And here, too, the range of ideas is limited only by one's own imagination. You can choose the option offered by us. It can be seen in the picture below.

Or come up with something of your own. More original and unique. Well, then the matter is small. We cut out the silhouette of the Grandfather and attach it to the glass with adhesive tape. We decorate at will.
This concludes our article. We hope that the proposed master classes will help even beginner needlewomen make Santa Clauses with their own hands.