Moving the dart into the armhole. Modeling the chest and shoulder darts of the back: modeling the basic dress pattern. Side breast dart
If you have not yet created a pattern for the base of the dress, we recommend using our
Moving the dart into the armhole.
To do this, copy the upper part of the shelf from the pattern of the base of the dress onto a sheet of paper.
We set aside approximately 1/3 of the length of the armhole from the side line and place point D.
Note: Dividing into 3 parts is just one of many options. Can be divided into 2 parts, you can select any point on the armhole line.
Let's continue. We connect point G7 with a straight line to point D and cut the bodice along this line.

We close the chest dart, thereby opening a new dart along the cut line G7D.

Do not forget to shorten the resulting dart by 1 - 2 cm to achieve smoothness when processing the bulge in the chest area. To do this, we shift the top of the dart from the center by 1 - 2 cm and connect this top with straight lines to the ends of the dart.

The construction is complete.

We have one more bodice style.
We will use this drawing of the bodice to transfer the bust dart to the neckline, but more on that in the next article.
The rights to this article belong exclusively to the author. Full or partial use of the materials of this article in electronic publications on the Internet is possible only if the following conditions are met:
Information about the author must be preserved. In the title or at the end of the published reprint the source must be indicated: www.site, the Internet resource "Sewing Crafts Master" with a direct, active, visible to the user, not blocked from indexing by search engines hyperlink to this article.
Republication of texts in newspapers, magazines or other replication outside the Internet is possible only with the written consent of the author.
Good afternoon, today’s article will be devoted to TRANSFER OF A DOTTER. We will move the dart from the place where it is on the pattern (that is, from the shoulder seam) to its classic place (on the side seam). All tailors perform a similar manipulation after constructing a basic pattern, unless, of course, this dart is transferred somewhere else, following the designer’s design intent. You may have questions... Why do you need to move this dart at all, is it necessary? Is it possible to immediately draw a chest dart on the side seam, so that you don’t have to move it there every time? I will be happy to answer.
First of all, we will need your basic dress pattern. Just in case, I remind you that you can easily create your basic dress pattern using our program: just enter your measurements into the form and click the “generate” button. The program itself will perform all the necessary constructions and calculations. Online generator of a basic dress pattern here:
Why move the dart?
The dart is moved to the side seam (5-7 cm below the armpit) so that it is not as noticeable as it would be if the designer had decided to leave it on the shoulder. If you open your closet with blouses and dresses, you will see that all the chest darts on classic models are located in this very side seam, where they, covered with a hand, do not catch the eye and do not interfere with the designer’s imagination.
Is it possible to immediately draw a dart where it should be - on the side seam?
The fact is that creating a pattern for a specific dress initially involves changing the Basic pattern IN STRICT ACCORDANCE WITH THE SILHOUETTE OF THE DRESS, ITS STYLE AND OTHER CUT ELEMENTS. The tuck is one of these very “cutting elements”. And in different dresses this undercut is moved to different places. Most often (in the classic version) its location is 5-7 cm below the armpit. But there are dresses (and we will sew them with you) where the chest dart is transferred to the waist, neckline, armhole, etc. In each specific case, when modeling a particular style of dress, we will each time move the dart to the place where it is provided for by the laws of cutting this particular dress.
In our article today we will look in detail at transferring the dart to the side seam, because... in the vast majority of dress styles our tuck that's where it's located. So let's get started...
How to transfer a dart to a side seam
This is a very simple process - and it will take you no more than 2-3 minutes.
This is what our pattern looks like with darts on the shoulder seam. (Have you already ordered your basic pattern on our service? Here: link) If you leave this dart here and close it, it will create the bulge we need for our chest, BUT on our dress there will be a not very attractive seam in the center of each shoulder. We don't need this, so we we will move the dart to a less accessible place - to the side seam.

Take a pencil and a ruler. On the pattern from the bottom edge of the armhole down measure 5-7 cm - put a dot in this place.

Now we find the top of our chest dart - here it is. And we draw a line connecting the top of the chest dart with the point that we measured on the side line of the pattern.

We take scissors and along this line make a cut WITHOUT REACHING 2 CM to the top of the dart.

now we manually close the dart on the shoulder and a new dart automatically opens in the very place where we just made the cut. That's all - all that remains is to seal the old dart with tape (so that it does not open back).

So we have a new dart on the side seam under the armpit. As you can see in the photo below, this new dart performs its function remarkably well - that is, exactly the same as the old one, it creates a voluminous bulge for your breasts.

And now you can continue cutting your dress, with full confidence that the new dart will fit perfectly into the shape of your bust, and the bodice of your dress will fit you well.
As you can see, the whole point of transferring a dart (no matter to what place) comes down to the following: we make a cut in the place where we want to move the dart, close the old dart, and we automatically create a new dart (by pushing apart the cut parts of the pattern). Using exactly the same principle, we will transfer the darts to any place planned by the cut. We will encounter the transfer of a dart more than once when modeling different styles of dresses, and each time I will tell you in detail and show you step by step the entire process of transferring a dart to a new place.
Happy sewing!
Vera Olkhovskaya
This lesson on cutting techniques is quite simple and can be recommended for beginner couturiers who have already learned how to take measurements and remember their letter designations.
Don't forget to use the table for taking measurements, which you can download for free on Vera Olkhovskaya's website. To do this, click on the table image and enlarge it, save it on your device.
To ensure that the pattern for the base of the back does not overlap the pattern for the base of the shelf, check the width of the paper sheet. It should be no less than the width of the back and shelf combined:
Sat + 4 cm
Back base
We start with vertical and horizontal lines.
 We will consider the left cut of the sheet of paper to be the middle line (vertical) of the back (Fig. 1).
Then we draw the initial (first, initial, upper) line, departing from the lower horizontal section of the sheet
Di + 3 cm
Of course, this horizontal and subsequent ones must be strictly parallel to each other and strictly perpendicular to the midline of the back.
We measure from the starting line down Ds and draw a waist line.
From waist up
D boch minus 1 cm
This is for the barrel height level.
From waist down 18 cm– hip level.
To determine the bottom line from the original down - Di or from the waist down Du, depending on what measurement you chose to take.
The horizontal backrest is finished.
 Next, set the width of the back at the level of the barrel (Fig. 2):
Shs + 1 cm,
for kinky figures -
Shs + 1.5 cm
There, measure the width of the back to the side seam:
1/2(Cr + 4) minus 2 cm
Width of the sprout - according to the original to the right
1/3Сш + 0.5 cm
The height of the sprout is down the midline of the back:
1/3 the width of the sprout
Shoulder cut. We need to draw two intersecting arcs.
The first arc is from the lateral point of the germ with a radius
Dp + vt
(in many cases, a dart is not needed and you can get by with a fit 1 cm)
The second arc is from the midpoint along the waist with a radius Military industrial complex. If there is a shoulder pad, add more 1 cm, that is, the radius will be
Vpk + 1 cm
 To design the armhole
From the back width point (red cross) – perpendicular 7-8 cm.
Set aside at hip level
1/2(Sat + Pb) minus 2 cm
Draw the side cut with a straight line.
Shelf
If you are building the base of the shelf on the same sheet, extend the horizontal lines of the waist, hips and bottom (Fig. 3). If on another sheet, copy the horizontal lines for the shelf pattern onto a new sheet.
Then take the measurement from the waist up DPT and draw the original horizontal line for the shelf.
 From the starting line of the shelf downwards, measure Vg and draw a line for the height of the chest, then again from the original down - the line for the height of the armhole.
To find the height of the armhole of the shelf, you need to measure the distance from the midpoint of the sprout to the level of the barrel using the back drawing. The resulting distance should be reduced in accordance with the shelf armhole reduction table.
And set the already reduced value, as was said, down from the original line of the shelf.
The next stage, which can roughly be called “width limitation,” is shown in Fig. 4. The most important vertical of the shelf pattern is the semi-skid - this vertical corresponds to the midline of the human torso, passing through the jugular cavity and the navel.
We start from the original line of the shelf - measure the width of the neck along it from the half-skid:
Neck width = sprout width
Neck depth = neck width + 1 cm
The depth of the neck is measured, as you guessed it, down the half-skid.
We connect the resulting neck points with a smooth curve.
At chest height from half-skid, measure Rtsg and mark the center of the chest bulge - we will need this point to construct the chest dart.
From the half-skid at the armhole level, set aside the width of the chest:
Shg 2 + 0.5 or 1 cm.
 From the resulting point upward, a perpendicular segment 4 – 5 cm. Its top is one of the points of the armhole and you can immediately make a bisector from the corner of the armhole (shaded in yellow) - 2 – 2.5 cm. We'll take care of the design later.
And again, from the half-skid at the armhole level, set aside the width of the front to the side seam:
1/2(Cr + Pb) + 2 cm
Measure at hip level
1/2(Sat + Pb) + 2 cm
Now, the shoulder section (Fig. 5).
We find the shoulder point at the intersection of two arcs:
The first arc is made from the side point of the neck with a radius Dp;
 The second - from the point of convexity of the chest with a radius Npp + 1 cm for the shoulder pad.
 We connect the resulting shoulder point with the side neck point already existing on the original line.
The armhole will be formed according to the existing shoulder points, “5” and “2”. The last point of the armhole should be shifted up and towards the half-skid 1 cm.
Connect the “unit” to the point marked at hip level. This will give a preliminary line for the side cut, without a bust dart for now.
Construction of a “side” dart (Fig. 6).
To determine the dart solution, we compare the length of the back barrel and the length of the shelf barrel, measuring them according to the drawing.
We start the top line of the dart by stepping back down the side cut from the “unit” by 5 cm.
Next we measure  tuck solution.
The top of the dart (Fig. 7) should not reach the center of the chest bulge on 2.5 cm– mark the point “2.5” and connect it with the points already existing on the side cut.
We align the sides of the dart along the longer side and build the missing section of the side seam (red dotted line).

All that remains is to draw out all the lines smoothly, lengthen the half-skid by 1 - 1.5 cm and add darts (see below and in Fig. 8).
If the dart is too large, then this base will not suit you.
But, of course, the waist dart of the front should be shifted from the center of the chest bulge to 2.5 cm to the side seam. This will place the waist dart underneath the top of the bust dart.
The finished pattern for the base with a side dart for the bust is shown in Fig. 9.
Patterns of dresses of popular styles this season in full size
|
Based on the basic pattern, you can create various models of shoulder products through modeling. And I will show you one of the modeling techniques - transferring a chest dart - in this article.
The pattern can be cut from the constructed drawing, but I recommend making patterns. And the drawing will still be needed for many other models, we are not going to stop there!
To make a pattern, we will need to transfer all the contours using a cutter, carbon paper or tracing paper onto paper.
We translate the contours exactly along the lines. We translate everything that is in the drawing: structural horizontal and vertical lines, darts.
The patterns are ready, you can start modeling.
Today I'll show you six ways to move a dart from its original position to a new position. Why do we need this? In order to create a new product dictated by fashion.
Modeling
- After we have transferred the pattern of the base of the bodice front with the chest shoulder dart from the drawing to another sheet, we mark the top of the dart with point A.
- Draw a new line for the position of the dart and connect it to point A.
- We cut the dart along a new line, while closing the opening of the chest dart, aligning its sides.
- We got a new tuck, in a different direction.
Options for transferring a chest dart
1. Transfer of the shoulder dart to the armhole line
From point A to the armhole we will draw a new dart line. It is marked in red in the figure. Then we cut the pattern along the intended line (you may not need to cut 2-3 mm) and close the opening of the chest dart from the shoulder seam. Thus, we got a new dart coming from the armhole line.
2. Transferring the shoulder dart to the side cut
In this case, we draw a new dart line from point A to the side cut. We cut it in the same way, closing the chest dart from the shoulder seam.
Similarly, we transfer the dart to the side seam at the level of the waist line, to the waist line itself, to the middle of the front, to the neck line.
3. Transfer the shoulder dart to the side seam at the waist line
4. Transferring the shoulder dart to the waistline
You will notice that the new dart line is almost identical to the waistline side of the original dart. In this case of transferring the chest dart from the shoulder seam, we seem to combine two darts.
5. Moving the shoulder dart to the middle front
6. Transferring the shoulder dart to the neck line
Using modeling techniques, we can create patterns for any clothing model you like.
Did you like our site? Join or subscribe (you will receive notifications about new topics by email) to our channel in MirTesen!

Transfer of chest dart
Hello, my dear blog readers! Now we will look at several ways translation of the chest dart, because you will probably want to hide this large dart on the base pattern of the dress “from view.” If you have not yet made a base pattern for yourself, follow the link (there you will find a step-by-step process pattern making - basics for beginners).
Methods for converting a chest dart will open up an incredible variety of models for you. That is, you can feel like a fashion designer and come up with a dress for yourself.
The tuck can be transferred in several directions: to the side seam, to the armhole, to the neckline, to the yoke, to the drapery. And this will result in a huge variety of models. The main rule is that the center of the dart is always directed towards the center of the chest. (Tsg, see more details here (“how to take measurements correctly”)).
To begin, transfer onto tracing paper the part of the pattern on which you will transfer the dart (the front or back of the bodice).
- to achieve smooth lines, the dart should not reach the center of the chest (in my drawing this is point G6) by 2 cm (if its ends look UP), and by 3-4 cm (if its ends look DOWN). Then the fabric will not become a cone on the chest.
Transferring the dart to the side seam
This is the most common way to transfer a dart. You choose for yourself - at what distance from the armhole will the dart be located? It can lie horizontally, or it can be lowered slightly (set aside 3-6 cm from the bottom of the armhole on the side, and connect this point to the point of the center of the chest).
The ends of the dart look down, so from the center of the chest we shorten the dart by 3-4 cm. Cut along this line and close the dart at the top.
Transferring the bust dart to the armhole line
Most often, point P6 is used to transfer to the armhole line with basic pattern drawing.
The ends of the dart point upward, so we shorten the length of the dart by 2 cm.
Transferring the chest dart to the shoulder line
Select any point on the shoulder line for the new direction of the dart. Shorten the undercut by 2 cm.
This way the dart will also remain on the shoulder, only its direction will change slightly.
You can convert the dart into two soft folds. (as in the picture below)
Transferring the chest dart to the neckline
Mark the transfer line to the side of the neck. Shorten the undercut by 2 cm.
Transferring the bust dart to the center line
Do not forget to reduce the length of the dart by 3 cm. (The photo also shows the transfer of the dart to the center)
Transferring the chest dart to the waist line
Design the sides of the dart taking into account the convexity of the chest. Lower the corner of the groove by 3 cm.
Relief - another version of the chest dart
The relief is the line that combines the chest and waist darts.
The relief can be from the shoulder line, from the armhole, from the neckline, from the center.
In tight-fitting silhouettes (read about silhouettes and body types here), the relief is located on the most convex points of the chest and shoulder blades.
Relief from the armhole
Relief from the armhole
Shoulder relief
Relief from the neck
First we move the chest dart to the center. And then we close the center dart, and it will open near the relief.
Front part with a fold (how to cut it out)
Remember, when constructing the drawing of the front of the pattern-basis of the dress, we made a fit in the chest area (half-skid). So: in order for us to cut out the front part of the bodice with a fold, we need to ensure that the front fold line is vertical and straight. And the half-skid creates curvature on the future fold line (see drawing below, the place of the half-skid is marked in pink)
Therefore, in order to make the fold line straight, we move the selected segment (in white in the figure below), forming a straight fold line in the center of the front part. This will increase the chest dart slightly. The white sector will lie on the drawing with a slight overlap below the center line of the chest (this is how it should be).
All! This way you will get a bodice detail with a fold in the center, which is convenient when converting the chest dart into relief.
Interesting options for transferring a chest dart
I bring to your attention various additional options for transferring a breast dart, maybe they will inspire you to create a BEAUTIFUL one!
This is where I will end this long review of the bust dart translation! I hope you can choose the option that suits you and inspires you! I wish you good luck and sew with me! See you soon on the blog pages!

Dart transfer method
A tuck is a constructive technique with the help of which a three-dimensional shape of a product is achieved and a uniform fit of a flat material of a complex body configuration is achieved. The main structural darts on the product correspond to certain convex areas of the figure. The upper dart of the shelf reveals the volume of the mammary gland and is located from the edge of the part towards the protruding point of the chest (determined on the pattern by the measurements Cg and Bg). The dart from the waist up on the front pattern is also directed to the same point. The chest dart is always directed to the center of the chest and can be moved to the armhole, side cut, mid-front line, waist, neckline, and can be replaced with tucks and gathers. To develop the design of models of complex shapes, they usually use a basic bodice base with set-in sleeves, in which darts are located from the shoulder sections of the back and front, from the side sections and from the waist line.
Transferring the bust dart to the waistline.
To move the chest dart to the waist line, mark its new position, then cut the pattern along this line and, having closed (laid) the main dart, open it in a new place (Fig. 1). Fig.1. To achieve smoothness when processing a bulge on the chest, the dart should not reach the center of the chest by 1-2cm. The dart can be sewn in completely or partially, leaving softness under the bust line. Instead of a dart along the cut of the waistline, you can design an gather. In this case, the bodice is usually lengthened by 3-5 cm to create an overlap. A soft, voluminous bodice is recommended for figures who need to hide excessive thinness. A wide tuck opening can be distributed into several shallow folds - tucks.
Moving the chest dart to the side cut.
To do this, draw the line of the intended dart on the front part from the side cut to the center of the chest and cut along the intended line. The chest dart from the shoulder seam is closed by aligning the cuts (Fig. 2, a).
The dart obtained in this way, to achieve smoothness during processing, is not brought to the center of the chest by 3-4 cm. Using the line drawn from the side cut, you can model a cut flank, the contours of which form a rectangular relief line running through the center of the chest from the side cut to the waist line (Fig. 2, b). The vertical part of the relief is led along the dart of the waist line. The relief is decorated with decorative stitching and piping for expressiveness. If the product is made of striped or checkered fabric, the barrel can be cut at an angle of 45° to the warp thread.
Moving the dart to the neckline.
The dart into the neckline is designed in the same way as darts from the armhole, from the side cut, etc., i.e., the desired direction of the new dart is outlined, cut, closing the dart from the shoulder seam.
Fig.3. In this case, the chest dart is distributed between the dart from the side cut and from the neck. The waistline is formed by gathering (Fig. 3). The open dart from the neckline is connected to the dart from the armhole, and the upper side part of the bodice is cut off. The resulting relief can be decorated with decorative stitching, piping, lace, finishing buttons, snaps, and embroidery on the cutting part. The neckline dart can be replaced by two opposing folds located in front at its center. The drawing is developed according to the same rules for moving the dart into the neck. In this case, determine the position of the counter fold on the neckline, for which 2.5 cm is set aside from the mid-front line along the neckline. Draw a cutting line from the neck line to the center of the chest, cut it, chopping off the chest dart from the shoulder section with pins (Fig. 4).
The resulting pattern for the front (front) of the bodice is transferred to paper again, marking an opposite fold in the dart solution. The neck line is marked and cut with the fold closed to obtain an accurate cut. The finished pattern is traced onto the fabric, adding seam allowances. The neckline is marked and cut only when the darts are inserted. The resulting configuration is reproduced on the fabric by adding seam allowances along the sections. Finished darts can be stitched from the reverse side, stitched along the front side of the product completely or partially, leaving a soft shape above the bust line. Instead of darts, the neckline can be decorated with gathering.
Moving the chest dart into soft folds at the widened neckline.
This cut can be used for dresses and blouses made of light silk or cotton fabric. Instead of folds, the neckline is also decorated with ruffles. The model is suitable for young and slender people. To make a pattern on the basic basis of a bodice with set-in sleeves, mark a new neckline. Next, from the line of the middle front on the widened neck, lay two 3 cm. The resulting points (and the central point of the neck) are connected by straight lines to the center of the chest (Fig. 6, a).
On the side cut line, set aside 3 cm from the armhole and draw a straight line from this point to the center of the chest. Clip off the chest dart and cut the pattern along the marked lines. The tuck solution is distributed evenly into the folds (Fig. 6, b).
Replacing the chest dart with puffs or pleats from the shoulder section.
The locations of the folds are marked on the shoulder cut line. The position of the first fold is 4-4.5 cm from the neckline. Then the chest line is drawn on the pattern. The position of the folds is also noted on it: for two folds, 2.5 cm are set aside from the center of the dart to the right, for three - 2.5-4 cm to the left and right. The shoulder cut points are connected to the resulting points along the chest line. The chest dart solution is distributed into the number of folds provided for by the model (Fig. 7).
The folds may be soft or partially stitched. This cut is recommended for smaller busted figures to create the desired volume. In this case, folds can be replaced by gathering and puffs. For figures with large breasts, this cut (with partially stitched folds) can also be recommended, but with the aim of hiding excessive volume
Replacing a bust dart with a fold at the armhole line.
Mark a fold line parallel to the armhole to the level of the chest line and then from the armhole to the center the line of the bust dart. The pattern is cut along the marked lines, simultaneously closing the chest dart. The shoulder cut is made with the resulting fold closed at the armhole (Fig. 8).
The edge of the fold can run at a distance of 1-2cm from the armhole or exactly along the armhole line. In this case, a seam allowance is added to the pattern along the armhole, and a cut is made along the intended seam for setting in the sleeve. Folds at the armhole are usually made in straight, free-form products. If the dress has a cut-off waistline, then gathers or soft folds can be placed along the shoulder section of the bodice.
Moving the bodice darts to the mid-front line.
On the bodice of the base, mark the desired direction of the dart. To do this, draw a straight line from a point located 1-2 cm below the chest line to the mid-front line at an angle. The centers of the chest and waist darts are connected. The bodice is cut along the marked lines, aligning and pinning the warp darts. The resulting tuck solution is laid towards the waist line and in this form the line of the middle front is aligned (Fig. 9).
This bodice cut is interesting for making products from striped fabrics. The mid-front line is placed on the fabric along the grain thread (and therefore along the strip). And after the dart is ground off, the strip lies on the product at an angle, along the line of the dart, connecting along the line of the middle front of the bodice in a herringbone pattern. The direction angle of the dart depends on the size of the mammary glands and the size of the waist. Therefore, when developing a bodice pattern, the direction of the dart can be found using a dummy method by pinning a fabric or paper pattern, marked with a strip, onto the figure.
Moving the bust dart to the undercut from the armhole.
At the level of 1/3 of the height of the armhole, a cutting line is marked on the base pattern. The length of the undercut should not reach 1cm from the width of the neckline. Cut the front along the intended line and close the chest dart above the undercut line, after which the dart from the armhole side will open, and the lower edge of the undercut will lengthen to form gathers (Fig. 10).
To get more gathers on the shelf, you can cut the pattern from the hem down and spread it apart on the fabric to the desired amount. Using the same principle, you can make a pattern with any shape of undercut. The location of the undercut (above or below) is determined on the figure, observing the general proportions of the product. When moving the shelf from the undercut to the side, folds can be designed in this area (Fig. 11).
Changing the silhouette of a product by transferring darts.
By moving the darts, you can change the shape and silhouette of the product. So, when transferring the shoulder dart to the waist or hip line, we get a pattern for a product with a flared silhouette (Fig. 9).
When creating a flared pattern in this way, along the side seam line you need to give an allowance in the amount of 1/2-1/4 of the allowance obtained as a result of transferring the dart.
The length of the darts is determined depending on the shape of the convexity, but it is always less than the distance from the contour of the part to the center of movement. The upper (chest) dart of the front is made 2-3 cm shorter than the distance from the shoulder to the center of the chest. The back shoulder dart is usually 7-9cm long. The length and shape of the darts are specified during fitting.

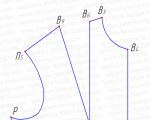
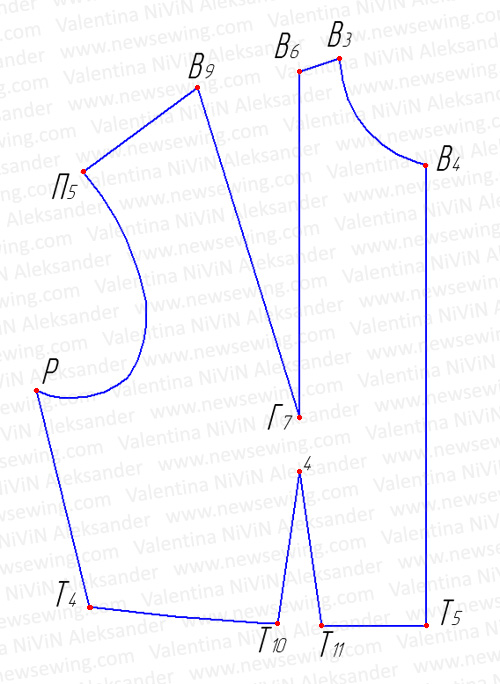
Transferring the dart to the armhole
When creating a new style and using the technique of moving the dart, you must always remember the following: in all positions and types of the chest dart, its top should always be directed to the center of the bulge of the chest.
And one more important information. To achieve smoothness in the chest area, the dart is shortened by 1 - 3 cm if its sides are directed towards the shoulder seam, towards the neckline and into the armhole. And by 2 - 4 cm, if its sides are directed to the side seam, to the waist line and to the center of the front.
If you have not yet created a pattern for the base of the dress, we recommend using our step-by-step instructions.
Moving the dart into the armhole.
To do this, copy the upper part of the shelf from the pattern of the base of the dress onto a sheet of paper.
We set aside approximately 1/3 of the length of the armhole from the side line and place point D.
Note: Dividing into 3 parts is just one of many options. Can be divided into 2 parts, you can select any point on the armhole line.
Let's continue. We connect point G7 with a straight line to point D and cut the bodice along this line.
We close the chest dart, thereby opening a new dart along the cut line G7D.
Do not forget to shorten the resulting dart by 1 - 2 cm to achieve smoothness when processing the bulge in the chest area. To do this, we shift the top of the dart from the center by 1 - 2 cm and connect this top with straight lines to the ends of the dart.
We have one more bodice style.
We will use this drawing of the bodice to transfer the bust dart to the neckline, but more on that in the next article.
Methods for transferring a chest dart to a neckline
The dart along the bust line can be transferred to the neckline in various ways, each time getting a new style. But in principle, all transfer methods come down to three main ones: transformation into folds, gathers or darts that start from the neckline.
You will need a pattern for the base of the bodice with comfortable increases for you (loose fit), which you have already sewed on and got a good result. We do the modeling on one half of the front, the other half is identical. All numbers in the drawings below are tied to a specific figure and are given for guidance; in your case they may differ slightly.
Easy transfer of bust dart to neckline
We draw a model line on the pattern - this is the segment connecting the neck and the VTG. The new chest dart will be located along this line. Cut the pattern along the model line and one side of the chest dart. We close the tuck opening and fasten its sides with tape. A new bust dart will open in the neckline, which can be sewn up or folded.
Uniform gathers along the neckline
To transform the chest dart into a uniform gathering along the neckline, draw an auxiliary arc (in red in the drawing). We draw model lines on the drawing: we divide the neck into several equal segments and from each division point we lower the segment until it intersects with the auxiliary line. We connect the ends of the segments with the VTG. We cut the pattern along the model lines, close the chest dart, revealing several small equal openings in the neck, fastening the cut parts with tape.
Pros advise
In practice, quite often, for a beautiful fluffy gather or deep folds, the solution of only one chest dart is not enough. In this case, professionals advise including a dart along the waistline in the modeling. The drawing shows that by closing it, we will get a 6cm increase in the solution without increasing the chest girth, which is very important if we do not want to get excess fabric around the bust. This modeling is only possible with a cut-off waistline.
Neck pleats
As a rule, 2 to 4 folds look good on the front neckline. A larger quantity will look like an assembly - the folds will not be clearly expressed.
We draw model lines on the pattern, as shown in the drawing below. We cut the pattern along them, close the chest dart, revealing three identical solutions in the neck.
Pros advise
When transferring the dart to the neckline, the total fold solution may be insufficient. What if the model does not have a seam waist?
We draw model lines on the drawing (in blue in the drawing) and cut the pattern along them. We close the waist dart as shown in the drawing. Align the side cut with a smooth arc.
After cutting, we pull the side cut in the area of the waist line, and iron it along the hip line using a WTO.
Important! With such a transfer of the waist dart to the neckline, the fabric should lend itself well to WTO (wet heat treatment).
We create folds and gathers along the neckline
We make folds along the neck line as in the drawing. For uniform assembly, simply round off the neck line.
Don’t forget to align the side cut line with a smooth arc.
Maximum increase in dart opening along the neckline
If you want to make sure that there is enough dart solution transferred to the neckline, make a tester from calico for one half of the front.
But, if you want to further increase the opening of the folds or the pomp of the neckline, the pros advise using the armhole. This modeling can be done with both folds and gathers.
We apply model lines to the base pattern, some of which end in the armhole. We close the waist and chest darts. The additional solution will increase by 15 cm. Then distribute the solutions evenly.
Let's compare the previously done modeling with what happened with additional modeling due to the armhole. Important! The maximum possible increase in the solution can be obtained only with a cut-off waist line.
If the model is not cut at the waist, the modeling will be similar, but the waist dart is not involved. In this case, the increase in the solution will not be so significant, but suddenly it was precisely what was missing for the harmonious distribution of the assembly or folds.
Important! If your model is planned to have a yoke or an increase in the neckline, they are applied to the base pattern before modeling begins!
The article was prepared specifically for the Season website.
More than 6,000 types of fabrics in the Season online store. The prices will pleasantly surprise you - they are lower than in a real store. By clicking on the preview with the sample, you will be taken to the desired section.
Selection according to the database: Network method of project management.docx, Assignments and methodological recommendations for completing the test, Course methodology.doc, GDP research methods.pptx, Methodological recommendations from the discipline Philosophy and methodology of science, Fundamentals of methods of independent physical exercise, Kolbanov V. IN. Methodology for the formation of a healthy lifestyle in, Scheme for writing a medical history with examination methods.pdf, 5.1. SELF-MANAGEMENT. FUNDAMENTALS AND METHODS OF TIME PLANNING, etc., Tickets Methodology for teaching teachers.docx-Baymakova G-2018.docx.Dart transfer method
A tuck is a constructive technique with the help of which a three-dimensional shape of a product is achieved and a uniform fit of a flat material of a complex body configuration is achieved. The main structural darts on the product correspond to certain convex areas of the figure. The upper dart of the shelf reveals the volume of the mammary gland and is located from the edge of the part towards the protruding point of the chest (determined on the pattern by the measurements Cg and Bg). The dart from the waist up on the front pattern is also directed to the same point.
The chest dart is always directed towards the center of the chest and can be moved to the armhole, side cut, mid-front line, waist, neckline, and can be replaced with tucks and gathers.
To develop the design of models of complex shapes, they usually use a basic bodice base with set-in sleeves, in which darts are located from the shoulder sections of the back and front, from the side sections and from the waist line.
Transferring the chest dart to the waistline.
To move the chest dart to the waist line, mark its new position, then cut the pattern along this line and, having closed (laid) the main dart, open it in a new place (Fig. 1).  Fig.1.
To achieve smoothness when processing a bulge on the chest, the dart should not reach the center of the chest by 1-2cm.
The dart can be sewn in completely or partially, leaving softness under the bust line. Instead of a dart along the cut of the waistline, you can design an gather. In this case, the bodice is usually lengthened by 3-5 cm to create an overlap. A soft, voluminous bodice is recommended for figures who need to hide excessive thinness. A wide tuck opening can be distributed into several shallow folds - tucks.
Moving the chest dart to the side cut.
To do this, draw the line of the intended dart on the front part from the side cut to the center of the chest and cut along the intended line. The chest dart from the shoulder seam is closed by aligning the cuts (Fig. 2, a).
 Fig.2.
The dart obtained in this way, to achieve smoothness during processing, is not brought to the center of the chest by 3-4 cm.
Using the line drawn from the side cut, you can model a cut flank, the contours of which form a rectangular relief line running through the center of the chest from the side cut to the waist line (Fig. 2, b). The vertical part of the relief is led along the dart of the waist line. The relief is decorated with decorative stitching and piping for expressiveness. If the product is made of striped or checkered fabric, the barrel can be cut at an angle of 45° to the warp thread.
Moving the dart to the neckline .
The dart into the neckline is designed in the same way as darts from the armhole, from the side cut, etc., i.e., the desired direction of the new dart is outlined, cut, closing the dart from the shoulder seam.

Fig.3.
In this case, the chest dart is distributed between the dart from the side cut and from the neck. The waistline is formed by gathering (Fig. 3). The open dart from the neckline is connected to the dart from the armhole, and the upper side part of the bodice is cut off. The resulting relief can be decorated with decorative stitching, piping, lace, finishing buttons, snaps, and embroidery on the cutting part.
The neckline dart can be replaced by two opposing folds located in front at its center. The drawing is developed according to the same rules for moving the dart into the neck. In this case, determine the position of the counter fold on the neckline, for which 2.5 cm is set aside from the mid-front line along the neckline. Draw a cutting line from the neck line to the center of the chest, cut it, chopping off the chest dart from the shoulder section with pins (Fig. 4).
 Fig.4.
The resulting pattern for the front (front) of the bodice is transferred to paper again, marking an opposite fold in the dart solution. The neck line is marked and cut with the fold closed to obtain an accurate cut. The finished pattern is traced onto the fabric, adding seam allowances.
The neckline is marked and cut only when the darts are inserted. The resulting configuration is reproduced on the fabric by adding seam allowances along the sections.
Finished darts can be stitched from the reverse side, stitched along the front side of the product completely or partially, leaving a soft shape above the bust line. Instead of darts, the neckline can be decorated with gathering.  Fig.5.
Moving the chest dart into soft folds at the widened neckline.
This cut can be used for dresses and blouses made of light silk or cotton fabric. Instead of folds, the neckline is also decorated with ruffles. The model is suitable for young and slender people.
To make a pattern on the basic basis of a bodice with set-in sleeves, mark a new neckline. Next, from the line of the middle front on the widened neck, lay two 3 cm. The resulting points (and the central point of the neck) are connected by straight lines to the center of the chest (Fig. 6, a).  Fig.6.
On the side cut line, set aside 3 cm from the armhole and draw a straight line from this point to the center of the chest. Clip off the chest dart and cut the pattern along the marked lines. The tuck solution is distributed evenly into the folds (Fig. 6, b).
Replacing the chest dart with puffs or pleats from the shoulder section.
The locations of the folds are marked on the shoulder cut line. The position of the first fold is 4-4.5 cm from the neckline. Then the chest line is drawn on the pattern. The position of the folds is also noted on it: for two folds, 2.5 cm are set aside from the center of the dart to the right, for three - 2.5-4 cm to the left and right. The shoulder cut points are connected to the resulting points along the chest line. The chest dart solution is distributed into the number of folds provided for by the model (Fig. 7).  Fig.7.
The folds may be soft or partially stitched. This cut is recommended for smaller busted figures to create the desired volume. In this case, folds can be replaced by gathering and puffs. For figures with large breasts, this cut (with partially stitched folds) can also be recommended, but with the aim of hiding excessive volume
Replacing the bust dart with a fold at the armhole line.
Mark a fold line parallel to the armhole to the level of the chest line and then from the armhole to the center the line of the bust dart. The pattern is cut along the marked lines, simultaneously closing the chest dart. The shoulder cut is made with the resulting fold closed at the armhole (Fig. 8).  Fig.8.
The edge of the fold can run at a distance of 1-2cm from the armhole or exactly along the armhole line. In this case, a seam allowance is added to the pattern along the armhole, and a cut is made along the intended seam for setting in the sleeve. Folds at the armhole are usually made in straight, free-form products. If the dress has a cut-off waistline, then gathers or soft folds can be placed along the shoulder section of the bodice.
Moving the bodice darts to the mid-front line.
On the bodice of the base, mark the desired direction of the dart. To do this, draw a straight line from a point located 1-2 cm below the chest line to the mid-front line at an angle. The centers of the chest and waist darts are connected. The bodice is cut along the marked lines, aligning and pinning the warp darts. The resulting tuck solution is laid towards the waist line and in this form the line of the middle front is aligned (Fig. 9). 
This bodice cut is interesting for making products from striped fabrics. The mid-front line is placed on the fabric along the grain thread (and therefore along the strip). And after the dart is ground off, the strip lies on the product at an angle, along the line of the dart, connecting along the line of the middle front of the bodice in a herringbone pattern. The direction angle of the dart depends on the size of the mammary glands and the size of the waist. Therefore, when developing a bodice pattern, the direction of the dart can be found using a dummy method by pinning a fabric or paper pattern, marked with a strip, onto the figure.
Moving the bust dart to the undercut from the armhole.
At the level of 1/3 of the height of the armhole, a cutting line is marked on the base pattern. The length of the undercut should not reach 1cm from the width of the neckline. Cut the front along the intended line and close the chest dart above the undercut line, after which the dart from the armhole side will open, and the lower edge of the undercut will lengthen to form gathers (Fig. 10).  Fig. 10.
To get more gathers on the shelf, you can cut the pattern from the hem down and spread it apart on the fabric to the desired amount.
Using the same principle, you can make a pattern with any shape of undercut. The location of the undercut (above or below) is determined on the figure, observing the general proportions of the product.
When moving the shelf from the undercut to the side, folds can be designed in this area (Fig. 11).
 Fig. 11.
Changing the silhouette of a product by transferring darts.
By moving the darts, you can change the shape and silhouette of the product. So, when transferring the shoulder dart to the waist or hip line, we get a pattern for a product with a flared silhouette (Fig. 9).
 Fig. 12.
When creating a flared pattern in this way, along the side seam line you need to give an allowance in the amount of 1/2-1/4 of the allowance obtained as a result of transferring the dart.
The length of the darts is determined depending on the shape of the convexity, but it is always less than the distance from the contour of the part to the center of movement. The upper (chest) dart of the front is made 2-3 cm shorter than the distance from the shoulder to the center of the chest. The back shoulder dart is usually 7-9cm long. The length and shape of the darts are specified during fitting.
Options for transferring chest darts
 Fig. 13.
  Fig. 14.
  Fig. 15.
 Fig. 16.
 Fig. 17.
  Fig. 18.
  Fig. 19.
  Fig.20.
 Fig.21.
 Fig.22.
  Fig.23.
  Fig.24.
 Fig.25.
  Fig.26.
Converting darts to undercuts
An undercut is a straight or shaped cut from the edge into the part to obtain three-dimensional shapes and decorative designs with assemblies.
Bodice with a cut in the middle of the front .
In the middle of the front of the main pattern, mark a hemline 2-3 cm above the chest line and draw it to the dart. Then, from this line up on the dart line, another 4 cm is set aside and an undercut is made to this point (Fig. 27, a). Cut the pattern, close the chest dart, which will open in the undercut. Add 5-6 cm to the middle of the front for gathering, and above the undercut line - 2 cm for the fastener (Fig. 27, b).  Fig.27.
Along the cutting line, instead of assembling, you can make puffs or a series of small finishing folds.
Bodice with undercuts from the side seams .
Along the line of the side cut from the waist line upward, 6 cm is set aside - this is the beginning of the undercut (Fig. 28, a).  Fig.28.
The inner end of the undercut is found at a distance of 6 cm from the mid-front line and 10 cm from the waist line. Mark a cutting line, connecting the resulting points with a convex or concave line (depending on the model). The inner end of the undercut is connected to a point on the shoulder section, located 1-2 cm from the chest dart. The pattern is cut along the drawn lines and the chest and waist darts are closed (Fig. 28, b). To obtain folds when cutting, the pattern must be cut and spread along the vertical lines marked from the cutting line upwards.
Additionally, the bodice from the hem line can be decorated with pleats, tucks or lace. To sew in lace (frill) when cutting, the pattern is also spread along vertical lines by 4 cm for seam allowances.
3. Bodice with cuts from the highest point of the shoulder cut to the center of the chest.
This cut can be offered for elegant, feminine dresses made of silk, velvet, and knitted fabrics. The drapery at the hem will look more expressive if the entire cut of the dress is tight-fitting, which means it assumes a proportional figure with a pronounced waistline.
On the pattern of the base of the bodice with set-in sleeves, mark a cutting line from the highest point of the shoulder section of the front to the center of the chest (Fig. 29, a).
 Fig.29.
At a distance of 17-18cm from the same highest point of the shoulder cut and 12-14cm from the center of the neckline, mark points and connect them with a straight line. Parallel to them, three more lines are drawn at a distance of 2 cm from one another. The cutting line is cut and the darts of the shelf are pinned. Along the cutting line, the shelf opens to the size of the opening of two darts. Then a part of the front is cut from the middle of the front to the resulting undercut, thus obtaining the shape of the neckline. To get drapery at the hem, cut the front along the three previously outlined lines from the hem line to the mid-front line, not reaching this line by 1-2mm. The shelf is pulled apart along the cuts. The extended cut of the undercut is decorated with a smooth line (Fig. 29, b). The amount of drapery depends on personal taste, and therefore on the amount of sliding of the middle part of the shelf along the intended lines.
4.
Bodice with pleat in open neckline.
The pattern is developed on the basic basis of the bodice with set-in sleeves. Along the line of the middle front, a segment equal to 8-10 cm is laid down. From the found point, a perpendicular is restored, on which a segment equal to 6-7 cm is laid (Fig. 30, a).  Fig.30.
To determine the line of the neckline and hem, the highest point of the shoulder cut is connected by a smooth line to the chest line through the point at the end of the set aside segment. The shelf is cut along the marked cutting lines, determining the shape of the neckline.
The chest dart of the bodice is closed, resulting in a small dart opening in the corner of the neckline, which is ground down and ironed towards the armhole. The neck sections are processed with facings until the dart is sewn down (Fig. 30, b).
The pattern can be used to make an elegant dress from silk fabric, as well as for cotton products. In the second case, the bodice may be sleeveless.
It is best to decorate the bodice with embroidery using the appliqué technique, located asymmetrically at the shoulder section, or with a bouquet of decorative flowers.
Bodice draping method
For a conditionally proportional figure, you can use a ready-made pattern, but be sure to clarify it and fit it to the figure, taking into account the actual measurement. For a better fit of the product, it is necessary to create a pattern according to the measurements taken.
Transfer the contours of the details of the constructed pattern (back, front, sleeves) with a pencil onto transparent paper or using a cutter onto a sheet of paper placed under the pattern. Apply control marks along the side cuts at the waist, hips and armholes to accurately connect the parts to each other. On each pattern piece, mark the direction of the grain with an arrow.
Bodice with asymmetrical drapery.
The cut is intended for dresses and blouses of an elegant nature, as well as for evening dresses made of fabric with a rich design - velvet, knitted fabrics with lurex or other interesting finishing effects. This cut can also be used for wool crepe weave.
The pattern is developed on the basic basis of the bodice with set-in sleeves. Due to the fact that the drapery is asymmetrical, the undercut with drapery is marked on the entire bodice in an unfolded form (Fig. 31, a).  Fig.31.
First, determine the cutting line. It is taken out from the middle of the armhole at a distance of 3-5 cm from the center of the chest (on the left side of the front) and connected to the dart from the waist line with a smooth line. Then you need to spread the middle of the bodice for drapery. For this purpose, two parallel lines are drawn, extending from the centers of the two chest and waist darts until they intersect with the undercut line at a right angle (Fig. 31, b). The amount of drapery is determined individually.
Bodice with drapery along the middle front.
The cut is usually used in dresses with a V-shaped neckline. To do this, connect the highest point of the shoulder cut with a straight or oval line to a point on the line of the middle front, taking into account the depth of the desired neckline and the capabilities of the figure. The development of the bodice involves moving the darts to the mid-front line. In this case, a seam is made in the middle. Select the starting points of the darts on the line of the middle front and mark cut lines from them to the center of the shoulder and waist darts (Fig. 32, a).  Fig.32.
The shelf is cut along the intended lines and the old darts are closed, the size of the solutions of which is distributed into the cuts. To increase the number of gathers, the pattern is additionally cut from the center of the opened dart to the armhole and moved apart by another 1-3 cm (Fig. 32, b). The line of the middle front is drawn with a smooth line (Fig. 32, c).
Bodice with asymmetrical yoke draping.
A bodice with such drapery is used for cut-off versions of dresses of an elegant romantic nature. The pattern is developed on the unfolded bodice front pattern. To apply the yoke line, the chest dart from the side of the desired location of the yoke is chipped and cut off (Fig. 33, a).  Fig.33.
On the remaining part of the bodice, a line is drawn connecting the center of the breast dart opposite the yoke with the cut of the yoke at a point 3-4 cm from the neckline (Fig. 33, b). The bodice is cut along the intended line and along the lines connecting the centers of the chest and waist darts. After chopping off one breast and two waist darts, the bodice is pulled apart to form drapery. The section of the bodice, designed for drapery, is decorated with a smooth line (Fig. 33, c).
Bodice with a wraparound draped shelf.
The pattern of the bodice shelves is developed on the unfolded pattern of the front of the bodice. First, determine the position of the half-skid line of the shelf. It will pass from the shoulder section (the point is determined by the width of the desired neckline) through the center of the waist dart on the other half of the bodice and to the waist line (Fig. 34, a).  Fig.34.
The contours of the shelf up to the half-skid are transferred to a clean sheet of paper and then cut lines are drawn on it, parallel to the cut of the half-skid, to extend the shelf onto the drapery. The cuts should be at equal distances; to do this, first divide the waist line into equal parts in the area from the end of the half-skid to the mid-front line. When drawing the lines, they are transferred to the centers of the darts from the shoulder section and the waist line on the half of the front opposite from the end of the wrap (Fig. 34, b).
The left half of the front is left smooth, transferring the dart from the shoulder section to the dart at the waist line.
A method for changing the position of seams and cuts of clothing components.
This technique is usually used in combination with transferring darts. By changing the position of the seams, introducing new lines and cuts, the structural darts are combined with them, moving them to a new position. On the pattern, the details mark the new position of the relief seam line, yoke (Fig. 35, a, b). The pattern is cut along the intended lines, the old darts are closed, and their new position is drawn up (Fig. 35, c, d, e, f, g). Fig.35.
This technique is used to create new contours of the shoulder cut, reliefs with varying degrees of fit of the product, yokes, etc.
1. Yoke- decorative cut-off parts of the upper part of various types of clothing (dresses, skirts, trousers, coats), which have a constructive meaning. The shape and arrangement of yokes are very diverse and depend on fashion and style (Fig. 36).
 Fig.36.
As a rule, if there are yokes, darts are not made on the details of the product, transferring them to the line of the yoke. If the yoke line runs close to the center of movement of the darts or the dart is small, its entire solution is usually transferred to the cutting line (Fig. 37).
 Fig.37.
If the dart opening is large or the yoke line runs far from the center of movement, part of the dart opening is left and decorated with a small dart, gathers, pleats or ironed (Fig. 38).
 Fig.38.
If the yoke is large and its length is greater than the distance from the top of the part to the center of movement, the dart is not moved and left in the same place (Fig. 39).
 Fig.39.
2.Reliefs- structural lines that are decorative elements of the product. The relief line divides the main pattern into separate parts and usually replaces the darts, since their solution is transferred to the cut line. The arrangement of the reliefs can be any at the request of the author of the model (Fig. 40).
 Fig.40.
The nature of the item and its style largely depend on the shape and location of the reliefs and the method of their processing. There are several traditional ways of arranging relief lines that allow you to create products with basic silhouette shapes. As a rule, these lines connect the chest dart and the shoulder dart of the back with the waist darts and pass close to the center of movement of the darts. In products of loose and semi-fitting silhouettes, they can be significantly shifted away from their usual position.
The relief can be decorated with straight or smooth curved lines. A relief line is drawn on the base pattern and the pattern is cut along this line. On the received parts, the darts are closed, transferring them into relief. If the entire tuck solution cannot be transferred into the relief due to the fact that the line runs far from the center of movement, then it is connected to the closest section of the relief, an incision is made along this line and the tuck is transferred into it. This dart can be stitched or ironed if its depth is small (Fig. 41).
 Fig.41.
Waist darts, when transferred to the relief line, are shifted, distributing the solution either on both sides of the cut line, or only on the side.
If the designed relief provides for downward expansion, to create a more voluminous shape of the product, the allowance along the bottom line should be the same on both sides of the relief and side cuts.
Using this technique, you can create various sleeve shapes, such as raglan, semi-raglan, shirt, with a square armhole.
Method of breeding parts of clothing components
This technique is used to change the volumetric shape of a product. Using parallel separation of parts of the pattern parts, various types of folds are simulated. Modeling begins by determining their location on the pattern. Then the pattern is cut along the marked lines, and the parts are moved apart parallel to each other in a direction perpendicular to the fold line.
Folds, the sides of which must be ironed or stitched, are placed along the grain of the material, otherwise they will lie poorly, wrinkle, and sag. Soft folds fixed in the seams - pintucks, the sides of which are not ironed, can be positioned regardless of the direction of the grain of the fabric.
The depth of the fold depends on its type, method of execution and fashion. When modeling one-sided folds, which are sewn along the entire length on the front side of the product, the pattern is cut along the intended lines and the parts are moved apart in parallel to a distance twice the width of the fold in the finished form. If there are darts on the part, try to align them with the outer folds (Fig. 42).
 Fig.42.
When modeling counter (or bow) folds, the cut parts of the pattern are spread to a width that is four times the depth of one side of the fold (Fig. 43).  Fig.43.
When modeling folds, you need to take into account which direction they are laid; the shape of the cut of the part of the part where the folds are located depends on this (Fig. 44).  Fig.44.
The resulting pattern is checked for accuracy. Laying folds and aligning with the original base. The contours of both patterns must match.
Method of forming a new cut
If you do not have a constructive basis for a model of a new shape (for example, with raglan or one-piece sleeves), you can model a new cut for you using the basics you already have. This is achieved by combining the parts of the base and outlining a new outline of the pattern.
To obtain a bodice design with one-piece sleeves, you need to use a two-seam sleeve pattern with front and back parts (halves). By combining the back half of the sleeve with the back of the product, a new shape for the pattern of the back of the bodice is outlined (Fig. 45).  Fig.45.
If the model provides a yoke or reliefs, their lines are drawn by transferring darts into them. To obtain a pattern for the front of the bodice, connect the front to the front of the sleeve and outline a new contour. By connecting the cut parts of the front and back of the bodice along the line of the yoke along the line of the shoulder seam, a combined yoke is obtained.
By combining different patterns, you can get a variety of models (Fig. 46).
 Fig.46.
But in order to successfully use this technique, you need to have some experience in design and modeling.
Patterns obtained using this modeling method need to check the accuracy of the cut on the layout. It is usually not possible to obtain an exact design immediately. This technique is like a transition from a simple structural basis to a new form of the product.
Top in 30 minutes
For the top you will need 80 cm of well-draped knitwear with a width of 110-140 cm.
1.Fold the cut in half widthwise, face to face. The top for thin figures can be reduced by 10cm. Get a trapezoid shape. The upper side of the trapezoid is 70 cm, the lower side is 80 cm. 

2. Sew 10cm on the left (1, top collar of the top) and 20cm on the right (2, bottom of the top).
3. Finish the seam allowance or use a cover stitch machine.
4. Finish the edges (4 and 5).
5. Put it on like a trumpet (put your hands through 3), carefully place the “swing” on your chest and wear it with a smile. You can tie a belt with a bow at the waistline.
Greek style dress


This dress is made of elastic material, so there is no need to make a zipper. The strap of the dress is cut separately, 8 cm wide (4 cm in finished form) and 16-18 cm long (the length of the strap must be adjusted directly when trying on the dress.