Stylish DIY decorations for the New Year. Garlands and beads
Useful tips
To decorate your home, office or another room, you don’t have to buy a lot of decorations.
Try usingsome useful tips, how to make certain decorations and you will have an unforgettable holiday.
It will be much more pleasant to use your imagination and help friends/children/relatives to create beautiful decorations for any interior.
On our website you will also find:
- DIY New Year gifts
- How to make a Christmas tree with your own hands
- DIY New Year cards
- DIY New Year's decorations
- DIY New Year's compositions
Decorations for the New Year,handmadenot that hard to do, you just need to have a few necessary materials and imagination.
New Year's decorations for the home. Felt ornament.

You will need:
Felt (preferably 3mm thick)
Ruler
Stationery knife
Scissors
Simple pencil
Glue, needle and thread or stapler
1. Using scissors, cut a square of 15x15 cm from a piece of felt.

2. Using a simple pencil, mark several lines parallel to the sides of the square, leaving about 2 cm between them - you should get 3 parallel lines. Also draw a diagonal dividing the square into 2 equal parts.

3. Place the square in front of you so that the diagonal line runs vertically. Using a ruler and a utility knife, make cuts on the left and right along the marked parallel lines, not reaching the diagonal (central) line by about 6-7 mm.
* Take your time to avoid ruining the felt.

4. Start folding the ends of the formed squares in opposite directions, securing them with glue, a needle and thread or a stapler (see picture).

4.1 Roll the shortest ends first and secure them.
4.2 Turn the shape over and secure the middle ends.

4.3 Turn the shape over again (backwards) and bend and secure the large ends.

5. Once you have the shape shown in the image, cut a piece of thread and thread it through the shape. If desired, you can add felt balls or small pompoms.

* You can make several of these shapes and thread a thread through them to create a long Christmas decoration that can be hung in any room.
* Try experimenting with different sizes of squares as well as different amounts cuts.
Decoration of the New Year tree. Balls made of wire and beads.

You will need:
Small balloons
Flower wire
Beads
Nippers (for wire)
1. Inflate a balloon of small diameter, leaving a small tail.
2. Thread a few beads onto the wire.
3. Start wrapping the wire with beads around the ball, adjusting the beads if necessary so that they lie evenly and look beautiful. As you pass through the tail of the ball, twist the wire and continue.

* There is no need to wrap the balloon too tightly to prevent it from bursting.
4. When you have wrapped the ball, do not immediately cut the wire, leave a tail of 80 to 100 cm without beads and start wrapping again to secure the structure.

5. At the end you need to make a hook from the wire (see picture).

6. Now you can burst the ball and pull it out.
The decoration is ready and you can hang it on the Christmas tree or somewhere indoors.


Christmas tree decorations. Garland of buttons.


IN in this example there were used buttons in pale colors, but you can choose bright colors to make the garland look more beautiful wherever you hang it.
You can use old unnecessary buttons or buy buttons in the store of the size, color and shape you need.
You will need:
Buttons
Thread or braid
It's quite simple. Take a look at the pictures - you need to thread the thread through the holes in each button.


If you wish, you can add a few other details: pom-poms, paper flowers and/or snowflakes, etc.
* For this craft you will need a lot of buttons (about a hundred or more, depending on the length of the desired garland).
* Feel free to involve children in the work, they will enjoy doing this simple, but original decoration.


New Year decoration from paper. Garland chain.

Similar New Year's garland You can make it with your children and decorate your home or office with it. It looks not only beautiful, but also very fashionable.
You will need:
Golden scrap paper, size 30x30 cm (enough for a garland about 1 meter long)
Light green acrylic paint
Small container for paint
Paint brush
Pencil or pen
Ruler
Masking tape (width 2.5-3 cm)
Stationery knife
Glue gun or PVA glue and glue stick
1. Completely cover the non-golden part of the scrap paper with light green acrylic paint.
2. On opposite ends of the paper, make marks of 2.5-3 cm. Using a ruler and pencil, draw parallel lines, connecting marks.
3. Prepare a stationery knife, make cuts, but do not cut off the strips completely - leave enough space so that you can easily tear them off later.


4. Turn the sheet over and bend it slightly where the cuts are to make them more visible.
5. Apply masking tape to the shiny side of the paper. The pieces of tape should be placed directly over the cuts (see picture).


6. Paint the part of the paper not covered with tape with light green paint and leave to dry.
7. Carefully remove the tape.
8. Carefully tear off the paper in places where you left some space (see step 3). Start making chain links. First, make one ring by connecting the ends of one strip, and then thread the strips through the finished ring and glue the ends.

You should end up with a beautiful chain.
How to make New Year's decorations. Garland of snowflakes.

You will need:
A4 paper
Snowflake pattern template
Pencil
Scissors or utility knife
Glue stick
Twine (thick thread)
Buttons, optional.
1. First you need to fold the paper in a certain way. Here are photos and video instructions on how to do this:
2. Pay attention to the snowflake pattern, make the same one on a piece of paper you folded.

3. Scissors or stationery knife cut out this template.

4. Unfold the paper. You should end up with a pattern like this:

5. Connect the ends: 1+5, 2+6, 3+7, 4+8.
6. Now you can start stringing the blanks onto the thread, and attach buttons to the ends of the garland to paper patterns didn't fall.
DIY Christmas decorations photo. Garland of stars.

You will need:
Paper (plain or colored, thick or printable)
Shaped hole punch (in in this case hole punch makes a star shape)
* Instead of a hole punch, you can use a star template, a pencil and scissors.
* It is not necessary to make asterisks. You can choose any shape you like.


New Year's toys decorations. Pigeons on a tree.


You will need:
White felt
Pencil or pen
Pins
Pearl beads
Glue (PVA, moment, glue gun)
Silver tulle
White decorative (or real) feathers
Silver thread
1. First you need to draw a template for the dove on paper. Using Yandex or Google you can find a simple picture and draw it. Or you can use your imagination.
It is worth noting that the pigeon has 3 parts - the body, wings and lower part.


2. Cut out the drawn dove template and place it on the felt, attaching it with pins. You need to make two halves of the body, two wings and one bottom. You also need two tulle wings.


3. Once you have all the pieces ready, start sewing the two halves of the dove's body together. Fill the body with cotton wool or leftover felt.
4. Add wings. Place tulle on top of the felt, if desired. Sew the wings to the body.
5. For eyes use pearl beads by gluing them.
6. Prepare decorative feather and cut a part from it to the length you need. Insert the feather into the dove. You can secure the feather with glue.


With the onset of the holiday season, many are wondering how to make New Year's decorations with their own hands. Most crafts do not require special materials or skills, but at the same time they look impressive and enliven the interior.
Paper snowflakes
Laconic but original decoration for New Year with your own hands
The simplest but most varied decor is snowflakes made of white or colored paper. Patterned figures can be glued to windows and walls, creating a composition with drawings or thematic stickers. Snowflakes are used to make vertical and horizontal garlands that decorate windows, doors, lampshades, and ceilings. To paper craft was brighter, it can be painted or decorated with sparkles.
Step-by-step instruction

Pattern examples
To work you will need square sheet paper or A4 sheet, scissors, pencil. Next, you need to follow the steps one by one:
1. Make from rectangular sheet square. To do this, you need to bend it diagonally, getting an isosceles triangle. Cut off the excess. If the paper is initially square, it must be folded diagonally;
2. The ends of the resulting triangle should be folded towards each other, creating another one, but smaller in size;
3. Connect the ends to each other again. In order for the snowflake to have the shape of a star, you should draw a straight line from the top of the triangle, which will divide it in half, and cut off the excess part without bending;
4. Draw a pattern on the triangle with the seam using a pencil. You can use straight geometric or smooth arbitrary lines for it;
5. Cut out the pattern, open the snowflake and straighten it using a heavy book or iron.
Snow village

Paper figures look beautiful and authentic
Non-standard, but atmospheric and exciting idea DIY New Year's decoration for the home - a winter mini-town. The exhibition may consist of one house or an entire settlement. They are placed in one place, for example, on a cabinet or coffee table, or placed throughout the apartment. To make the city look festive, you can decorate it with mini-crafts, tinsel, garlands and themed figures - fences, benches, snowmen, people, cars.
How to make houses?

Ready-made Christmas house diagram
For this craft you will need white or colored thick paper or thin cardboard, a pencil, a ruler, and scissors.
You should start by drawing or transferring ready-made scheme house in expanded form. It shows all the walls, roof, base, as well as places of bending and gluing. Then all that remains is to cut out the model, fold it and fasten the valves using PVA glue, a glue stick or double-sided tape.
A city can be created from identical buildings or unique ones by experimenting with schemes. To make the shapes brighter and more varied, you should decorate the scan using stickers, scrapbooking paper, glitter, and paints.
Christmas tree made from pine cones

Christmas tree - main symbol New Year
A miniature pine cone tree can take a central place in a paper city. Also, such crafts can be placed on window sills, shelves, a desktop, or made as a garland on windows and walls. For the main thing New Year's symbol you need to do the following:
- clean the cone from dirt and debris;
- dry and wait for it to take its final shape;
- insert it into a small flower pot, glass jar. If the containers are too large, they can be filled with earth, cotton wool, grain, and decorated with artificial snow on top, decorative stones, tinsel.
How to decorate a cone?

Photos of decor for the New Year with your own hands. Catchy and simple
To make the craft look more elegant, it should be painted. This can be done using nail polish, aerosol car or furniture sprays, as well as acrylic paints. White, green and blue shades and metallic colors - silver, gold. You can paint the pine cone completely by dipping it into a jar of paint, or just the ends using a brush or sponge.
Suitable decorations include beads, large glitters, small sparkles, and wool balls for felting. To glue them, just apply PVA glue or varnish to the pine cone with a brush.
Artificial snow

An easy way to create a fairy tale
The final touch that will complete the composition, make it harmonious and unite all objects in a plot is snow. It can be glued to cones or roofs of houses, poured into snowdrifts, or made a thin cover over the place where the city is located.
The most affordable and universal remedy to create artificial snow at home - regular shaving foam. It should be mixed with two packs of cornstarch or a pack of soda. You can add small sparkles to the resulting snow-white mass, which will give the snow more shine.
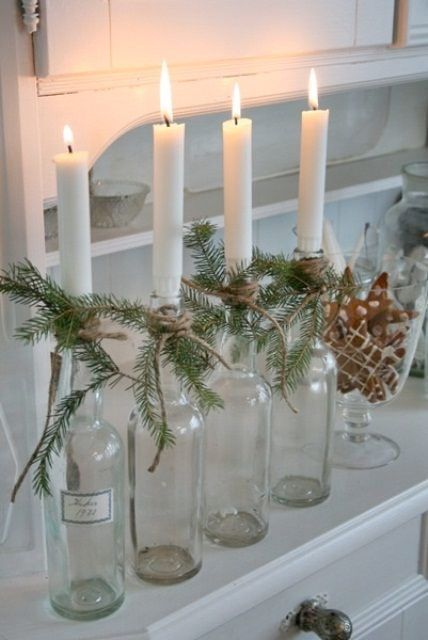
Compositions in glass

Simple, but beautiful decoration for tables and cabinets
Using ordinary one-and-a-half or liter jars, glass vases and deep plates or transparent bottles you can create a laconic decor for your home. Large containers can be completely filled with plastic Christmas balls or a base can be made using garlands of beads, artificial snow or cereal. Then place on the substrate themed toys and figurines, candles, lay out tangerines, pine cones or Christmas tree branches. If you fill bottles and small jars with battery-powered garlands, you will get original lamps.
You can decorate not only the container, but also the glass itself by gluing paper applications and snowflakes, artificial snow by painting snow patterns with paints. Lace or satin ribbons, tied with a bow.
Christmas tree made of sticks

Attracts attention and saves space
Non-standard Christmas trees are very popular, for example, those made from pine cones, paper using the cutting technique, garlands and threads. Original idea New Year's decor with your own hands - a composition of sticks on the wall. For such a craft, you need to collect twigs and branches that are approximately the same in color and shape. After cleaning and drying, they should be laid out in a pyramid from the smallest at the top to the largest at the bottom. To connect the branches, you can use twine, ropes, and ribbons. The distance between the sticks should depend on the size of the area allocated for the tree. To attach the craft to the wall, just a few nails are enough.
An unusual Christmas tree needs to be decorated to make it look more festive. Garlands, Christmas tree balls and toys, pine cones, themed figures, “rain” and tinsel are suitable for this.
Is New Year's home decor the only thing you want to do from morning to night? So don't deny yourself this pleasure! If every day, starting today, you do a little bit, then on New Year's Eve 2019 you will find yourself in a fairy tale, and not just in your house or apartment)
“Cross” offers you DIY New Year’s decor ideas that are absolutely possible to bring to life without unnecessary time and money costs. Even if you work all day at work and don’t plan to spend a fortune on New Year’s decorations, you can still decorate your home for the long-awaited holiday!
Door of a house or apartment: entrance to a fairy tale
Just by looking at the decorated front door and the porch of a country house creates the feeling that the holiday is already close. Therefore, it is quite justified to first decorate the front door, hallway, terrace, veranda or porch, in other words, the entrance to the house.
As you can see, nothing complicated: and other containers, fir branches, cones and balls will do their job:


You can make such a simple but effective composition (it’s better to buy decorative apples):

If there are logs in the yard of your house or dacha, then give them the opportunity to participate in the New Year’s decor :)

All these ideas can be implemented for residents of city apartments.
Decorate the hallway, not the entrance group

If there is not enough space in the hallway for such large compositions, then you can always make them more miniature. Or decorate the windows! When you return home, be filled with festive mood, looking at the cozy windows :)
Catch the idea! Miniature logs can also be placed on the windowsill

You can add to branches fir cones, attached to barbecue skewers, as well as twigs with red berries (viburnum, rosehip, elderberry, wild apple):
Very soon, decorative twigs with red berries will appear on sale, which are ideal for composing:
Channel CULINARY IDEAS shares ideas for home decor with twigs and berries:
As soon as Christmas trees are installed in the courtyards of apartment buildings, hurry to collect broken spruce branches. And don’t let the puzzled looks bother you, your task is to collect twigs for soulful New Year’s compositions!
If you have the opportunity to have a branch with cones, the bouquet will turn out even more beautiful:
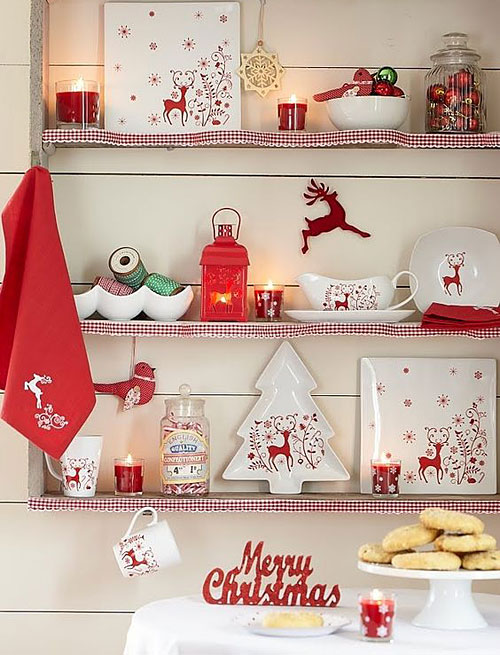
Festive tableware and textiles for the kitchen
The kitchen is the place where the whole family spends most of the pre-holiday and holidays. If you have dishes with New Year's decor, then slowly begin to take them out of the cabinets and place them on open shelves:
Buying a New Year's service is not a cheap pleasure, but it does not have to be done at once. Most stores sell dishes from the same series PER PIECES. Build your collection gradually.
By the way, the dishes can be quite everyday, but if you add just a few themed plates or mugs, the mood will immediately change to exciting and playful:
And even if you prefer dishes neutral colors(not red), it may well become part of the New Year’s decoration - put New Year’s figurines, a Christmas tree, and festive textiles on the shelves:
MASTER CLASS ON THE TOPIC
How to decorate corners in the form of neat envelopes, see the free master class Tatiana Maksimenko
As soon as you beautifully arrange at least part of the New Year's decorations, your kitchen will immediately be transformed, and you will want to continue decorating the house :)
Bed linen, pajamas and pillows, pillows, pillows...
Have you ever thought that you can literally immerse yourself in the holiday atmosphere with the help of bed linen? I didn't think about it either...
... but now, imagining how the children will rejoice bed linen with snowmen, Christmas trees and snowflakes, I seriously thought that I should buy one)
New Year home textiles Of course, there is also one for adults:
If buying several new sets of underwear at once was not part of your plans, then you can start small - buy only one. If you liked this idea, then next year you will plan in advance to purchase the missing kits.
And don't forget your pajamas! Or buy only pajamas - it will be cheaper, but no less atmospheric!
Blankets are also an alternative to bed linen. If you have not yet acquired your own, but have been wanting to do so for a long time, then start with one or two this year and continue in subsequent years.
Traditional New Year's colors: red, white, green.
Prints: all kinds of checkered patterns, New Year's ornaments.
Fabrics: cotton, linen, artificial fur, knitted fabric
You can make your home blanket more festive using braid with balls if you sew it around the perimeter of the blanket. A wonderful idea, you must agree!)
Oh, what! New Year's compositions with candles
The cuts can be not only round, but also oval. In addition to them, a straight board or even driftwood is suitable as a base:
In the video Vekoria Handmade as a base - a piece of tree bark:
You can supplement the composition with dried flowers, animal figurines, and all kinds of natural materials:
I want to creative ideas DIY New Year's decor? Please!
How to assemble more complex compositions, see the video on the channel Tsvoric:
Charming! New Year's garlands
Garlands have been associated with the New Year since kindergarten. And this means that the presence of New Year’s garlands in the house will only enhance pleasant feeling upcoming holiday. Besides the abundance electric garlands, found on sale, you can complement the New Year's decor with garlands made by yourself:
How to dry oranges, watch the video from the channel AmyFamily DIY:
Not everyone would think of using wooden cuts as the basis for a garland. But now will you take this idea into account?)
You can use anything as pendants for a garland: textile toys( , ), bells and bells, and , spruce branches, the same wooden cuts, and much more:
Easy to create channel garland Ideas for creativity:
Collect a collection of bullfinches and waxwings. Just imagine what a magical atmosphere your home will be filled with during the long winter!
If you have a suitable curtain, then you can make such a wonderful home decoration for the New Year:
Christmas wreaths, easy to make
It is impossible to imagine foreign homes without an abundance of Christmas wreaths. Of course, we would also like to decorate the front door with a wreath, but it’s a pity to give wasted money or time and our efforts to those who like to take what is “badly” lying around. Therefore it is safer.
From simple options, which do not require special materials and skills, there are these:
Simple wreath with paper star decoration
Wreath as a base for a mobile and a miniature wreath pendant
Tatiana Abramenkova shows how to make a wreath from the same flat piece of wood as in the photo above (you can also use thick cardboard):
Embroidery hoop - why not the basis for a Christmas wreath!?)
After seeing this photo, you will look at skis from a different angle :)
Christmas stockings and how to hang them
Not everyone is ready to hang Christmas stockings around the house yet. Having seen enough beautiful pictures from foreign sites, many people think that socks definitely need a real fireplace. But this is not true at all. Just look at how many ways you can hang them!
Hang your socks on a hanger in the hallway, or on the stairs, or next to it:
If you want to hang it by the fireplace (but there isn’t one), then make an improvised one:
Absolutely any hanger with hooks, a strong rope or just a thick branch will be suitable for socks:
It is not necessary to embroider socks, and then also sew them (not everyone likes or knows how to do this). You can knit socks and even buy regular ones, but with New Year’s prints.
Great idea with photos!
Another way non-standard applications skis)
Socks can be any shape, size and color
You can knit not only socks, but also mittens!
Socks hung on a rope
Socks on a branch - minimalism in its purest form
A real “discovery” for me was the homemade decorative fences on which resourceful needlewomen hang knitted or sewn socks:
MASTER CLASS ON THE TOPIC
But if you want embroidered socks, then a master class will help you
Decorative post or holder for New Year's socks- this is an incredibly cool thing!
The holder blank can be ordered from a carpentry workshop:
And if you don't want to bother with various kinds hangings, then knit/sew a giant sock for gifts and hide it under the Christmas tree:
Wow! Creative Christmas trees
What can they not think of? creative people(I consider it my duty to show you these finds)! Maybe among the readers of Krestik there will be those who want to place the same creative Christmas tree in their home?)
Christmas tree made from old boards
Christmas tree made from vintage rulers
Christmas tree made from the spines of vintage books
Christmas tree made of retro reels
Christmas tree made of wooden plinths
A Christmas tree can also be made from foam baseboards
The tree is clearly for a man)
“I made her out of what was...”
Different New Year's decor ideas worthy of attention
Ease of execution and excellent result— these are the ideas that underlie most of Krestik’s articles. We want you not to “suffer” creating this or that craft, and so that in the end you get really cool products self made. So catch a few more ideas worthy of attention!
Homemade thread lollipop
(3 free master classes)
Have a wonderful holiday, dear readers!


Do you like to do handicrafts? Then you will enjoy doing Christmas decorations with your own hands! It's nice and exciting activity for the whole family, which will not leave anyone indifferent - you will spend several evenings with pleasure making Christmas tree decorations with your own hands.
What do we use for the material?
What do you need to make your own New Year's decorations? You can use almost anything you can get your hands on. If you want, you can buy special supplies (sold in craft stores), or you can use what you have in any home. So what to prepare:- plain paper (good for making patterns);
- pencils and markers;
- regular cardboard, white and colored (you can use velvet);
- sharp scissors and a breadboard knife;
- glue (PVA or glue gun with sticks);
- threads and needles;
- yarn of different shades;
- various decorative materials- these can be sparkles, sequins, confetti, multi-colored foil, stickers and much more.
Simple crafts from scrap materials
Of course, you've probably seen how New Year's balls are made from thread and glue with your own hands, but why not expand the range? We make different Christmas decorations with your own hands.From yarn
This is a simple and at the same time spectacular Christmas tree decoration that can decorate any Christmas tree.
For production you will need:
- yarn;
- tailor's pins;
- plate or bowl;
- porous material (for example, a disposable tray);
- cutting paper;
- marker.

The template needs to be attached with pins (or ordinary toothpicks) to the porous material, and the design you need should be laid out on top - first the outline is laid out, then the interior decor. You should not cross the threads too often; the toy should be fairly flat. Once you are finished, dry the item and remove it from the pins and tie a loop in the eye. If desired, you can decorate with sparkles or rain.

From wire
How to make New Year's toys with your own hands in just a couple of minutes? Use wire!
To make toys you will need:
- two types of wire - thick and thin (thin wire can be replaced with bright threads, for example, floss. Pure white strong threads look very beautiful);
- beads, beads;
- colored tape;
- pliers.
The ends of the thick wire need to be twisted. You need to string beads and seed beads mixed together on a thin wire, tie the end of the thin wire to the future Christmas tree decoration, and wrap it randomly.

When the toy is evenly wrapped, you need to wrap the free tail of the wire around the toy and tie a ribbon in the shape of a bow - your toy is ready.
Another original idea:

Made from ribbon and beads
Who said that making New Year's toys with your own hands must take a long time and painstakingly? Not at all. In just five minutes you can, which will decorate and Christmas tree, and interior.
You will need:
- beads;
- narrow tape;
- yellow, golden or silver cardboard;
- glue "Second";
- needle and thread.

Interior decor made in this way looks very attractive.
From cardboard - in a couple of minutes
Some New Year's toys made of paper or cardboard take a lot of time to make, but not in this case - here you really only need a couple of minutes to make an elegant hand-made New Year's decoration.So, you will need:
- ordinary cardboard;
- a little twine or thick yarn;
- glue;
- paints and brushes;
- napkin or cloth;
- varied decor.

Using a loose tail of twine, wrap the tree in different directions. After some kind of thread pattern appears on the tree, you can start gluing it with a napkin. You can tear the napkin into pieces, coat the tree well with glue, and seal it tightly with the napkin. This will give a nice texture to the future toy.

After the toy has dried, you can start painting - paint the Christmas tree in green color.

After the paint layer has dried, shade the texture of the toy using a dry, hard brush and white paint, and then decorate it to your taste.

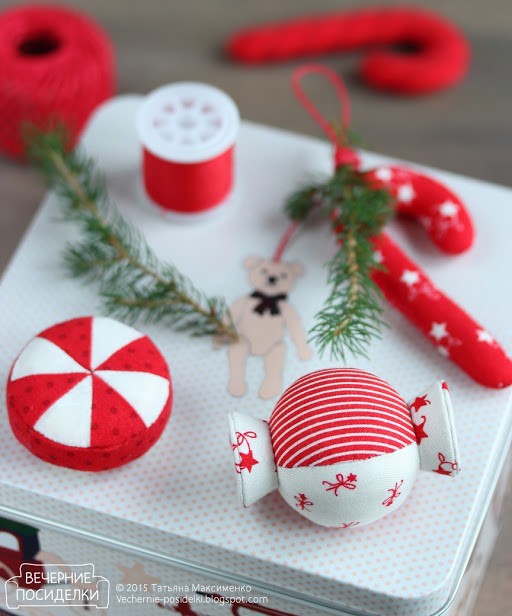
From bright shreds
Here you will need sewing machine, but at special wish you can cope without it. This The best way make New Year's toys from cotton wool and fabric - just choose a fabric with a Christmas ornament, or use what you have on hand.
Prepare several paper patterns - for example, deer, stars, gingerbread men, bears, letters and hearts. Cut out fabric blanks with your own hands, sew them in pairs, leaving a small gap (for stuffing), and through this small hole, tightly stuff the toys with cotton wool or padding polyester. It is most convenient to fill with a pencil.
Patterns can be downloaded here:


By the way, don’t forget - we sew on a machine from the inside, but if you decide to make toys from thick fabric, then it is better to sew it with a decorative seam over the edge - a do-it-yourself toy will look simply charming and will be suitable even for homemade Christmas tree, even for a kindergarten - usually for kindergarten Christmas trees, children make decorations themselves.
Made from twine and cardboard
New Year's toys made of paper and cardboard will be much more interesting if you add a couple more to them simple materials. To make such a toy you will need ordinary cardboard, simple paper or natural twine, a little felt or any other fabric, as well as ordinary paper, a pencil and ruler, and a drop of glue.
The star template can be downloaded here:

First make a pattern on plain paper, and then transfer it to cardboard. Don't forget that the star must be double. You shouldn’t make the star too thin; it’s better to make it a centimeter or more. The tail of the twine is glued to the cardboard, then you need to gradually wrap the entire workpiece.

Place the thread as tightly as possible so that there are no gaps. To decorate the star, make a couple of leaves and berries from fabric and decorate one of the rays. Your decoration is ready.

From yarn and cardboard
Do you want to make original and at the same time charming Christmas tree decorations with your own hands? Then it's time to make small gift hats with your own hands from scrap materials. This is wonderful New Year's gift, which looks cute and will keep you warm all winter long!
To make Christmas tree decorations in the form of hats, you will need:
- a couple of bushings from toilet paper(you can just glue cardboard rings together);
- remnants of colored yarn;
- beads and sequins for decoration.

The threads need to be cut into pieces of approximately 20-22 centimeters. We fold each piece in half, pass the loop through the cardboard ring, and pull the free edges of the threads through the loop. It is necessary that the thread is firmly fixed to the cardboard base. This needs to be repeated until the cardboard base is hidden under the threads.

All the thread tails need to be pulled through the ring so that our hat has a “lapel”.

Now we pull the loose tails tightly with thread and cut them into a pom-pom shape - the hat is ready! All that remains is to make a loop and decorate your Christmas tree toy with sequins and sparkles.

From beads
Making a New Year's toy in a minimalist style is easy and simple - you will need wire, beads and seed beads, a ribbon and a coin (can be replaced with a small candy, but it looks much more impressive with a coin). Try to make this Christmas tree toy with your own hands, the master class is very simple.
Make a loop on the wire and string green beads mixed with large beads on it - they will play the role of New Year's balls on our Christmas tree. Once the wire is filled, give it a herringbone shape by folding it in a spiral.
When your tree takes shape, bend it free edge in a loop.

We cut off a piece of ribbon, form a loop from it for hanging and pull it through the Christmas tree, and decorate the free tail with a coin (the easiest way is to glue it with double-sided tape). We tie a decorative bow on the hanging loop - your decor is ready!

Christmas balls
How to do New Year's ball from threads? It’s as simple as shelling pears, watch our master class on spectacular lace balls to the Christmas tree.Required:
- several balloons;
- cotton threads;
- PVA, water and sugar;
- scissors;
- polymer glue;
- spray paint;
- decor.

First you need to inflate the balloon - not completely, but according to the size of the future decoration. Mix two tablespoons of water, two teaspoons of sugar and PVA glue (50 ml), and soak the thread in this mixture so that the thread is saturated. Then you need to wrap the ball with thread randomly. The balls need to be dried for several hours. After the glue has completely dried, you need to deflate the ball and take it out, and carefully paint the ball of thread with spray paint and decorate it with sequins and sparkles.
DIY thread Christmas balls will turn out to be very, very impressive if you make them in different tones - for example, red, silver and gold. Try making Christmas balls with your own hands in different techniques- you can sew or knit balls, make them out of cotton wool with your own hands, or, for example, sew them out of felt - you can never have too many of these toys.
From paper
New Year's paper decorations are enjoyed great love both big and small fans New Year's miracle- try to make paper ones Christmas balls with your own hands.
A DIY paper Christmas toy is made like this: 
There is no additional need to decorate such a toy; it is already expressive.

Another ball option:

Or you can make a ball like this according to the master class:


From felt
DIY felt Christmas toys look very warm and cozy, and they are very, very easy to make. To make your own charming felt Christmas tree decorations you will need:- red, white and green felt;
- red, white and green threads;
- Crystal glue;
- scissors and needles;
- cardboard;
- a little satin ribbon;
- soft filler (cotton wool, holofiber, padding polyester).

First, make sketches for your future toys. It can be anything. Once the patterns are ready, transfer them to felt and cut them out. What is good about this material is that it does not crumble, you will not need to additionally process the edge of each workpiece.
Make the same ones decorative elements- for example, sprigs of holly (by the way, did you know that this is a symbol of joy and Christmas reconciliation?). The berries need to be glued to the leaf using glue, and then a decorative knot should be made - this will give the berries volume.
We sew each piece together in pairs. By the way, it is best to sew it with contrasting threads; it will be fun and elegant. How to make New Year's decorations voluminous? Stuff them with holofiber before sewing them up completely! Straighten the product well, so the Christmas tree toy will be filled more evenly. You can use the back of a pencil for stuffing.
Sew on decorative elements and your New Year's toy ready!


Try sewing felt decorations not only for New Year's tree, but also for the home - for example, a Christmas wreath decorated felt toys, looks very stylish. Look at the selection of DIY New Year's decorations, photos of master classes - and you will understand how many interesting things can be made from ordinary felt of two or three colors.

Master class on how to make a Christmas garland with your own hands from felt:

Below you can download templates and patterns different Christmas trees for felt crafts.
New Year decorations: snowman
You will need:
Large and small foam balls
Toothpicks
PVA glue
Styrene foam (you can use salt or other small white granules)
Pins

1. Take a small ball and insert a toothpick into it.
2. Cover the ball with glue.
3. Dip the ball into a container of styrene foam or salt and leave to dry.
4. Insert two pins that will act as eyes.
5. Repeat steps 1-3 for the large ball.
6. Paste into big ball three red pins. Which will play the role of buttons.
7. Use a toothpick to connect the balls.
8. You can use a ribbon to tie a scarf for the snowman.
How to make a decoration for the New Year: fawn

You will need:
Brown yarn
Any red berry or button (for the nose)
Small twigs from a tree or bush
Felt pieces (white and brown)
Decorative light bulbs or other decorations for toys
PVA glue or hot glue
Pins
Styrofoam ball or small ball(tennis)

1. Tie a ball or small ball with brown yarn.

2. Glue a red berry or button to the place where you want to make the nose.

3. Glue two small branches to the ball, which will act as horns.

4. Cut out circles from white and brown felt - large white and small brown.
5. Glue white circles in place of the eyes, and brown circles on top of white ones in place of the pupils.

6. Wrap the toy in decorative garland or tinsel. You can secure the decoration by tying it to the horns.
Decoration ideas for the New Year: New Year's ball made of beads and beads

You will need:
Styrofoam ball
Beads and beads
Wire cutters
Thin wire or pins
PVA glue

1. Place a large bead on a piece of wire or a pin, and a small bead on top of it.
*The length of the free part of the pin after this should be sufficient to insert the pin into the ball and it will hold firmly.
2. Before inserting the pin into the ball, apply a little glue to the tip of the pin.

3. Cover the ball with similar blanks and you will have a beautiful New Year’s decoration.

4. You can add a ribbon that can be secured with a pin passed through it - this will allow you to hang the toy on the Christmas tree.

Christmas tree decoration: Christmas ball decorated with handprints

You will need:
Simple New Year's ball(no picture) - glass or plastic
White acrylic paint
Brush
Markers (felt-tip pens)
Decorations to taste (glitter, tinsel, etc.)


1. Carefully paint your children's hands with white acrylic paint.
2. Let the children carefully pick up the balls with colored hands. Do not move your fingers so as not to smudge the print.

3. Use markers to complete the drawing. Add a scarf, hat, buttons, nose, handles.

4. Write the child's name and age on each balloon.
Now the toy can be hung on the Christmas tree.
Decorations for the New Year (photo): snowflake made of cardboard and rhinestones

You will need:
Cardboard cylinder for toilet paper or paper towels
PVA glue or superglue
Hole puncher
Decorations (rhinestones, sparkles, etc.)
1. Click on cardboard cylinder to make it flatter and cut several rings of the same width.
* It is better if you measure the distance between future strips with a ruler before cutting.


2. Arrange the rings the way you want them to look and start gluing them to each other one at a time.


3. Add your desired decorations to make the snowflake even more beautiful.

4. Make a hole anywhere in the snowflake and thread a ribbon through it so that the toy can be hung on the Christmas tree.

New Year's decorations made of paper: snowflake from old cards

You will need:
Old postcards
Scissors
Stapler
PVA glue
Decorations

1. Collect all your old ones New Year cards and cut them into equal strips (the same length and width) to make the snowflake symmetrical.
* The number of stripes depends on the snowflake you want to make - you can even number or odd. In this example there are 16 of them.

2. Divide the strips into groups, depending on the color scheme.
3. Connect the ends of each strip and secure them with a stapler. In the image you can see that the red stripes are bent in three places - in the middle, left and right at a distance of 1-2 cm. This is a little more difficult to do, but the snowflake will have more varied rays.

* You can first connect several strips into one group (in this example there are 4) and then connect all the groups (since the example uses 16 strips, 4 in a group, which means there will be 4 groups). Then simply connect all 4 groups with glue.

4. You can decorate the snowflake with rhinestones by adding a little glue and placing the decoration on it.

5. Add some ribbon so the snowflake can be hung on the tree.


DIY New Year's ball and its decoration

You will need:
Glass or plastic Christmas ball without a pattern
Scissors
Rhinestones (if desired)
PVA glue
1. Cut a sheet of felt into thin strips.
2. Stuff the strips into the ball.
3. If you wish, you can glue the rhinestone to the ball.
4. Tie another ribbon around the ball (you can secure it to the ball with glue) and tie a bow.

5. For a felt hat you need to make a small cone. Visit our article:How to make a cone- Using the same principle, a cone can be made from felt. You can also glue the hat to the ball.

DIY Christmas tree decorations: New Year's deer made from wine corks

You will need:
Some wine corks(can be purchased separately)
Toothpicks
PVA glue or superglue
Toy (plastic) eyes
Brown thin pipe cleaners or thin wire
Wire cutters
Pom-poms, plasticine or crumpled threads
Jewelry (bell, button)
1. Prepare the corks. The four pieces that will serve as the deer’s paws need to be cut on the sides so that they are narrower. It is worth noting that these plugs are sold separately and different sizes- so you don't have to trim them.
2. Use one cork as the body and glue four narrow corks to it.

3. Take another plug. You can also reduce it a little in diameter (but not necessarily) - this will be the head of a deer.
4. Use a toothpick to connect the head and body. If necessary, you can shorten the toothpick so that the neck is not too long.
* You may need to use a separate toothpick to make holes in the corks in advance and only then connect the head and body.

*If you don't want to make holes in the plugs, you can use superglue and a match - break off about 3/4 of the match and apply it to it Superglue the ends, then glue the match to the head and body of the fawn.
5. From small pompom you can make a nose and glue it. Instead of a pompom, you can use plasticine or crumpled thread.
6. Glue on the toy eyes.

7. Make horns from a thin brown pipe cleaner or wire - to do this, use wire cutters to cut them into several pieces of the same length. Use superglue to glue the horns to the head.

8. Add decorations - hang a bell or button.
9. You can add ribbon to hang the toy on the Christmas tree, for example.

New Year's decoration for kindergarten: bright Christmas tree decorations made of foil

You will need:
Felt pens (markers)
PVA glue
Glue stick
Thread or braid (to hang the toy)
1. Cut out the shape of the future Christmas tree decoration from cardboard.
2. Prepare a sheet of foil and fold it into one thin strip. Secure the strip with glue.
3. Make several of these stripes.

4. Using markers, color the stripes in different colors and leave to dry.
5. Cut each strip into small squares.

6. Start gluing the squares to the cardboard form.
* Make several toys of different shapes.
7. Glue some ribbon or string to hang the toys on the tree.