DIY kanzashi brooch with round and sharp petals. Kanzashi brooches as a fashion accessory
The kanzashi technique is complicated only at first glance, but it’s worth watching a few instructional videos, as it turns out that there is nothing easier than making an original decoration with your own hands. In this technique, a lot of women's jewelry is made - flowers for a headband for a hairstyle, elegant multi-colored bows with an elastic band, wedding boutonnieres, elegant tie clips.
One of the most popular pieces of jewelry are kanzashi style brooches.
An elegant colored brooch can decorate an evening dress, and if you make an ornament in a simple style, it will perfectly complement a business suit.
Brooch leaf of satin ribbons, kanzashi Mk
Do-it-yourself decorative leaf made of narrow ribbons, kanzashi Mk brooch / DIY brooch
Boutonniere for wedding guests, kanzashi ribbon brooch, master class / Boutonniere for wedding
Brooch made of satin ribbons, kanzashi Mk
Boutonniere for wedding guests, kanzashi ribbon brooch, Mk / Boutonniere for wedding
Kanzashi for beginners - Satin ribbon brooch
Ribbon brooch 2.5cm, kanzashi, MK Lerita
Brooch made of satin ribbons, kanzashi MK.
Tie brooch from rep ribbons Master class
DIY brooch made of satin ribbons, kanzashi Mk / diy brooch
Handmade satin ribbon brooch. Brooch kanzashi. // Brooch kanzashi.
Necessary materials:
- satin ribbon or satin of the selected color;
- sharp scissors and a lighter for cutting sections;
- transparent glue for fabric;
- needle with thread;
- tweezers for the convenience of decorating the petals;
- a round blank made of felt according to the size of the brooch and a pin for it;
- any decorations for the finished product.
How to create a kanzashi brooch: video tutorials
Video tutorial No. 1 on creating a do-it-yourself kanzashi brooch from satin ribbons for beginners
Video tutorial number 2 on creating a do-it-yourself kanzashi brooch from a St. George ribbon
Video tutorial number 3 on creating a butterfly brooch
How to make a kanzashi brooch: making petals

The easiest way for a beginner craftswoman is to make round or sharp petals. Square blanks 4 by 4 or 5 by 5 cm in size are cut from the atlas. The number and size of the blanks vary depending on your idea.
For an ordinary flower, 6-9 petals are enough.
Each square is folded diagonally 3 times. The corners are scorched by fire and connected to each other. I got a petal. If you cut off the tip, burn the edges and connect again, then the petal will take a different shape.
Flower decoration

You can connect the petals in different ways, as it is more convenient for you.
For example, collect the petals on a thread, piercing them with a needle closer to the scorched edge, and pull them into a finished flower. Or carefully glue them together at the side edges. Step-by-step instructions for making petals can be viewed in the training photos.
Brooch formation

We apply glue on a circle of felt and glue the assembled flower to it with the wrong side. We form the core of the flower from a large shiny bead or a beautiful button in a contrasting color. Two or three leaves can be made from green satin using a similar technique and glued under the main flower. The idea of \u200b\u200bdesigning the finished product will be prompted by a training master class on this technique.
The finished brooch can be decorated with sequins, beads, beads, as fantasy tells.
So just with your own hands to make an unusual and original accessory, as in the photo, for yourself or your loved ones. If something doesn’t work out the first time, you can always watch an understandable and uncomplicated MK for making kanzashi.
Kanzashi is a technique for creating jewelry from small pieces of fabric and ribbons folded in a special way. With flowers created from scraps in this way, geisha decorated their kimonos and hairstyles. Kanzashi hair accessories and brooches are often worn with national costumes, but they can add elegance to any look and transform even the most ordinary outfit.
Material for kanzashi technique
Patchwork flowers are used to create hairpins, headbands, rings, bracelets. Such accessories can be made independently using ordinary satin ribbons. Some needlewomen create products from leather and vinyl. Let's try to make an unusual brooch together. It is best to use not too dense material for work, it will be easier to fold it. Silk and starched cotton will do.
What you need to create jewelry
We prepare the necessary materials. It:
- a small piece of fabric, about 5 cm wide and 25 cm long;
- thick threads;
- quality sewing needles;
- scissors;
- beads and beads;
- a small piece of felt;
- glue gun;
- fastening for a brooch;
- pins.
How to make a kanzashi brooch out of fabric: a master class
We cut the flap of fabric so that five squares of the same size are obtained. It will be optimal to cut shreds 5x5 cm in size.
Take one of the squares and fold it in half to make a triangle. The fold should be on the right. Lightly press the material with your finger, smoothing the line. Fold one of the halves again, creating a smaller triangle.
We bend the second corner back: on each side there are now triangles of fabric. We have the first petal. We cut off a few millimeters from the open edge and stab it with a pin. To secure the patch, you can use stealth, patchwork clips, or sew the workpiece with a few stitches. This will make the middle of the flower neater and prevent the triangles from opening up.
Repeat all steps until we get 5 petals.
We collect the flower by sewing the leaves to each other. First we make them in one line, then we sew the extreme patches. We try to pierce the material with a needle as close as possible to the cut off corner. The process itself is a bit like stringing beads on a string.
Having finished sewing the petals, turn the workpiece over and overcast the edges of the flower so that it keeps its shape. Do not worry if the stitches are not too even, the felt blank will cover them later.
Now you need to spread the petals. To do this, we turn the fold in the middle of each leaf, pushing the fabric inward. The middle should “fail”, and the edges should remain vertical. We continue to form the petals until all 5 are straightened. We got a blank for a kanzashi brooch in the form of a plum flower. It remains to decorate it with beads and make a mount at the back.
It is not necessary to decorate the center of the flower, but the accessory will look more attractive if you highlight its details. You can sew a bead into the middle or add rhinestones by attaching them with a glue gun.
We turn the brooch over and apply glue to the corners to strengthen them. Then we cut out a pentagon from felt and attach a holder to it.
Now the product is ready. You can wear the resulting kanzashi brooch with pride, as it was created with your own hands.

Satin Ribbon Brooch: Creation Tools
Accessory does not have to be so simple. If you add sharp petals, make curls, combine several types of fabrics and textures, you get an interesting piece of jewelry that can be worn not only in everyday life, but also at festive events. Before you make a kanzashi brooch from ribbons, you need to prepare the material for work.
We will need:

Ribbon brooch making process
We cut the tape into shreds 4x4 cm. We will make the petals double. To do this, we fold one square of satin and brocade ribbon diagonally and fix the tip with a lighter. We put pieces of tape on top of each other, connect with a lighter on one side and fold in half. We bend one end, and cut the other a little with scissors. Bend the cut corner outward and collect the tips. Once again, cut off the edge and singe with a lighter so that the petal does not fall apart. Now you need to take out the tip of the tape from the center. This is easier to do with tweezers.

We cut off the edge, drip a little glue on the tip of the patch and bend it inside the workpiece with tweezers. You should get a petal with a curl. We press it down and cut off the back diagonally, set fire to the edge with a lighter. We make 6-7 such details. Additionally, the same number of simple triangular petals are made. Then we stick a piece of tape on the base so that the leaves hold better. Let's start assembling the kanzashi brooch. We apply glue to the base and form a flower: first we attach a layer with curled petals, add triangular leaves along the edges. We decorate the middle with stamens, collecting them in two pieces, glue a bead in the center. A kanzashi brooch for a dress or any other costume is ready!
Still, our craftswomen cannot simply stupidly fold the petals into flowers. We are constantly surprised by the flight of fantasy of our women. We invite you to familiarize yourself with an unusual master class on making brooches using the kanzashi technique from Olga Kurylenko.
To make a kanzashi brooch, you will need:
Tape 5 cm wide;
Glue (pictured is glue made in Kyiv, it is completely transparent and practically odorless, in terms of quality it is not worse than Moment, the advantage is that it costs 2 times cheaper);
Scissors, lighter, tweezers.

Brooch kanzashi step by step:
Make sharp petals (squares are 5 by 5 cm). It is necessary to pay attention to how the petals are folded for the right and left halves. It is important that the petals are symmetrical!

Finished petals need to be glued together. Smear glue all over the bottom base, the glue grabs instantly. In this photo you can clearly see how the petals are folded! The work itself is more aesthetically pleasing, everything must be perfect!!! And in order to glue small elements and not accidentally stick your hands together - try applying glue with a toothpick (but it depends on the glue used).

Glue a petal with a half bead to the two halves. The very top consists of two petals - in a sharp petal there is a round one. First you make a round one, and then you fold the sharp one, put the round one in it and solder them together.

Connect the elements of the brooch and decorate as you wish. In this case, it's roses. Roses are very easy to make, first you make a tube, then you collect a ribbon on a thread, making folds in some places!
The interest of modern designers in Eastern culture is difficult to overestimate. This is especially true of the land of the rising sun - Japan. It is she who is the birthplace of the kanzashi technique that is popular today. It creates unique flowers that adorn blouses, dresses, lapels of jackets and jackets, headbands and.
What do kanzashi brooches look like?
The history of this thing has several centuries. The first kanzashi brooches appeared in the 17th century. They were created by Japanese geisha and decorated with their high, intricate hairstyles. The very name "kanzashi" in translation means "hairpin". They were made from shreds of silk fabric or satin ribbons. The manufacturing technique is very similar to origami, that is, folding amazing paper figures without the use of scissors and glue. If you master this skill to perfection, then kanzashi brooches turn out to be unusually beautiful.
Flowers have always been the main motif of products. Their petals can be varied - pointed, round, elongated, terry. Kanzashi rose brooches are traditionally popular. Now they are decorated with additional details - beads, sequins, rhinestones or glass beads. This makes them look even more elegant.
What to wear?It is absolutely not necessary to wear a kanzashi brooch with a kimono or with other things in the Japanese style. They look best with the following wardrobe items:
- Plain cotton shirts or blouses. A bright detail can transform a fairly simple thing, make it original and unusual. At university or in the office, you will stand out from the crowd if you put on a similar brooch.
- . In the hot season, you don’t want to wear beads or necklaces, so it’s better to attach decorative details directly to your clothes. A kanzashi style brooch is perfect for this.
- >With knitted jackets a la "handmade". They harmonize well with each other, forming a successful ensemble for everyday outings, walks or dates.
 |
 |
 |
 |
There is a beautiful technique for making brooches, it is called kanzashi. The technology goes back to ancient Japanese art, which originated about 400 years ago. Kanzashi are meant to decorate the hair on the head. They can be made from silk, gold, tortoiseshell or silver. Such products emphasize the beauty of a woman, as well as her dignity and social status.
Do-it-yourself kanzashi brooches can be made using small silk squares, which are folded and fastened together in a special way, thereby forming flower petals. A special glue is used to attach each part to each other. Typically, this technique uses a round or sharp petal.
petal manufacturing technology
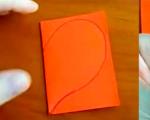
To make a do-it-yourself kanzashi brooch with round petals, you can use a simple, but at the same time very effective technique. To do this, you need to take a wide ribbon, which should be satin, as well as colored polyester fabric. These two materials are cut into squares, and the fabric parts are made slightly larger relative to the width of the tape. This is necessary so that the manufactured petals are of different sizes. Then, each square is taken and folded diagonally. Then, in the resulting part, the upper corners are bent to the lower. In the future, it is necessary to turn the workpiece over and direct the resulting side corners to the center of the part. The last action will be that the workpiece will once again be served in half and the corners are obtained inside. The resulting two ends are fastened, for example, with a needle and thread. All made petals are assembled into a flower, the middle of which can be decorated. For this, any suitable material is used, for example, a button. It is covered with satin fabric and decorated with beads. The resulting brooch, on the other hand, can be sewn on with a pin so that it can be secured.
 In order to make a do-it-yourself kanzashi brooch with sharp petals, you need to cut the ribbon into squares. After that, each piece is folded diagonally once. The result of such actions will be a triangle, we also add it in the middle. With the resulting triangular part, we do the same, that is, we add it again. It is necessary to take a thread with a needle and fasten the edges. Then they take scissors, and with their help cut off the edge where the threads were framed. Then, using the same sewing tool, it is necessary to cut a right corner of the workpiece so that the cut line is almost parallel to the other side of the triangle. The resulting edges must be melted with an open fire, matches or a lighter are suitable for this. The result is a sharp petal, which is even easier to make than a round one.
 To make such a brooch, you will need quite a bit of free time and a minimum of material. It turns out light, airy and very reliable. Any woman can thus make unusual and exquisite jewelry for herself or as a gift.