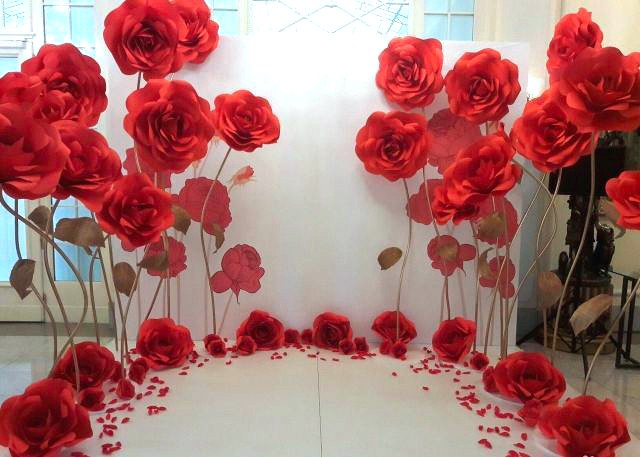
Flowers in full growth. Giant growth flowers from foamiran: interior rose
- a modern trend that has spread to the design of premises for celebrations. The growth flowers will help you create a fairy tale in the style of "Alice from Wonderland" or be transported to the royal garden. Let's take a closer look at the process and try to create large flowers from isolon with our own hands.
Getting to know the material and tools
First you need to figure out what isolon is, what it is and its properties.

Before you make large flowers, you need to go to the hardware store for a universal insulating material - polyethylene foam. According to the method of production, it happens:
- uncrosslinked - this is polyethylene foam without additional processing, so the price of such a material is affordable;
- physically cross-linked (PPE 500) is a modified PPE that has improved properties, its service life is longer, but the price is higher.
Isolon is made in rolls and sheets with a thickness of 0.2 mm to 1 cm - 2–3 mm material is suitable for creating flowers. There are options for foil, colored isolon, so your flowers can be not only white.

In order to come up with a flower shape, you need to understand what you can do with the source material. So, the properties of isolon and possible manipulations with it:
- Thin sheets are easily cut with scissors or a mounting knife - due to the softness of the material, growth flowers from isolon look natural.
- Doesn't burn, but melts. This property is used to shape the petals - when heated, they bend, and by raising the temperature, it is possible to “glue” the sheets pointwise.
- Relative tensile strength. The porous structure allows it to withstand small tensile loads without breaking, while waves are formed that can become a petal decoration.
- It is connected only with hot glue, a stapler or threads.
However, the craftsmen found a couple more ways: the cut parts can be glued together with hot air from a hair dryer and a soldering iron
- Ordinary paints do not stick to it. You can take colored sheets or use special ones.
- Scars form on the folds, so when making and storing flowers, you must be careful not to spoil the work.
- Not afraid of moisture, but turns yellow in the sun. Large flowers are great for outdoor decor, but white ones are best used in the shade.
Based on this, we understand that we will need additional tools and fixtures:
- tailor's scissors or assembly knife;
- hair dryer - building or household, but always with two heating modes;
- glue gun with temperature switch;
- stapler, thread;
- acrylic, rubber paints or from a spray can;
And you will also need - wire, masking tape, flower pots, metal-plastic pipes and even cement. But first things first…
Basic techniques and secrets of creating flowers from isolon
The principle of formation is radically different - the flower is gathered around the stem, and the petals are glued in a special way. The process is shown in detail in the master class:


Framed photo - a spectacular technique

However, it is possible to create not only growth flowers or large-scale compositions from isolon, lamps will look quite organic from it - on a stand or as a replacement for traditional sconces.


Bra or - big flower from isolon will take center stage in the decor of the room
The process of creating a lamp is described in detail in the master class of the craftswoman Marusya DIY.
Part 1. Preparation of electricians.
Part 2. Assembly of the lamp.
Although a lot of time will pass from mastering the technique to creating a masterpiece and more than one sheet of isolon will be spent - this is not a reason to stop, because handmade decor is more soulful, and each work is unique.
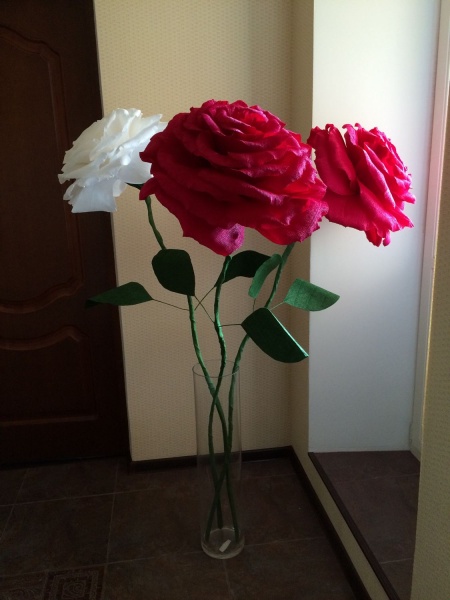
Today at the master class we will grow a giant flower from foamiran, namely a tea rose. The diameter of the rose was 65 cm. The height of the stem of the rose is 180-200 cm. Giants use such flowers to decorate the interior, photo sessions, and for decoration. festive halls and scenes. I made an open rose, but if you wish, you can reduce the pattern, increase the number of petals and fix them closer friend to friend. I must say right away that it takes a lot of material and time, so it’s better to practice assembly on a small rose, and only then proceed to manufacture giant flower from foamiran.
Here is such a giant growth rose should turn out.
To create a growth giant tea rose from foamiran, you will need:
- 0.5 sheets of green foamiran;
- 4 sheets of pink foamiran;
- 3 meters of metal-plastic pipe;
- glue second and hot gun;
- green teip tape;
- a piece of tape;
- green corrugated paper;
- cardboard;
- stapler;
- 6-7 tubes from newspapers or cardboard.
Rose Flower Templates

We take one sheet of foamiran and fold it in half 2 times, cut it into 4 squares 35 * 30 cm in size, we need 6 pieces. Therefore, we cut out 2 more squares from the second sheet.

Pieces 35 * 30 are folded in half and cut out of them petals.
 Here are the petals we cut out.

We cut off 5 cm from the rest of the second sheet of foamiran and cut it in half, we got 2 squares 30 * 30 cm. We need 6 such squares. Therefore, 4 is cut out from the third sheet of foamiran.

From these squares we cut out the petals, the same shape as the largest ones, these petals are 5 cm smaller.

We take 4 sheets of foamiran, from the side of 60 cm we divide into three parts, we get rectangles 20 * 70 cm, along the side of 70 cm we measure twice 26 cm and cut it off. We got rectangles 20 * 26 cm. 6 pieces and cut out petals of the same shape as the large ones.

These are the petal sizes we cut out.

This is how rose petals from foamiran look in a straightened form.
Assembling a giant flower from foamiran: step by step photo

We begin to stretch the edges of the rose petals, as if making small waves. The largest petals, we retreat from the lower edge of the petals 10 cm, then we begin to stretch the petals.

So we process all prepared three sizes of rose petals.

We take a square of cardboard 20 * 20 cm. For the base of a growth giant tea rose.

Then we round the edges of the square.

We take the petals and form folds in the lower part, fix them with a stapler. But of course you can use glue. I think we use a stapler for speed of formation.

Three folds form the petals of the large petals of the first two rows.

On the petals of the third row we make two folds.

Stepping back five centimeters from the edge of the circle, we begin to glue the largest petals. Glue the petals in a circle overlap.

So we glued the largest petals of a growth tea rose.

We glue the second row of petals overlapping in a circle, in a checkerboard pattern with respect to the petals of the first row.

Then glue the third row of petals.

From the remains of foamiran we cut out petals 12 * 15 cm in size, also 6 pieces.

We process the petals, as well as large ones and make one fold at a time.

Glue the fourth row of petals.

From the scraps remaining during the formation of large petals, we cut out the 5th row of petals of the smallest 6 pieces. I got small ones 8 * 10 cm in size.

We process small petals on an iron at a temperature of silk-wool, fold them like an accordion and rub them between fingers, straighten them and make a depression. Then we heat the edges of the petal on the edge of the iron and make waves.

Glue the fifth row of petals in a circle overlap.

From the remnants of foamiran we form the middle, twisting with a funnel.

Glue the middle of the rose. The giant tea rose is ready. You can make a mount on the base of the rose and seal the base of the cardboard with sepals and hang the rose on the wall. But I will make a tea growing rose on a stem.

We twist the tubes from paper or newspaper.

We take 6-7 pieces of twisted tubes from newspapers and insert their metal-plastic pipe. And we make a mark on how many tubes entered the pipe.

According to the mark of the tube, we coat it well with glue.

Then we glue the prepared mount to the base of the rose, coat it well.

We put on a metal-plastic tube on the glued mount. If you want the rose to be removable, leave it. If we do not remove the rose from the stem, then we coat the tube with glue.

We take half a sheet of green foamiran to form a sepal.

Cut out 6-8 sepal petals. We make notches, fold with an accordion and grind between the fingers.

Glue the sepal petals in a circle, covering the base of the rose.

After the sepals have been formed, we proceed to the processing of the stem. To process the stem, I will use green corrugated paper at the beginning, to save teip tape. Since the stem is white, it will take a lot of tape to process it, so that the stem does not shine through, we will process the first row with corrugated paper.

Then we process the stem with green teip tape.

Here we have such a growth giant tea rose.
Content
Have you just celebrated a friend's birthday, is it already a colleague's anniversary at work? Celebrated the anniversary, you need to go to congratulate the boss? The boss was congratulated, no idea how to surprise a picky aunt / grandmother / mother-in-law / mother's friend / neighbor? Come on, come up with a gift for someone who has everything. You just need to surprise this person with your skill and a gift made with your own hands from the heart! And for this, large paper flowers are suitable. By the way, if you still have a gift, then the box in which it probably lies can be decorated with paper flowers instead of the usual packaging.
corrugated flowers
Large, voluminous flower installations with your own hands can be done very quickly and with minimal cost. Corrugated paper is not very expensive, it is sold in rolls and is enough for many products. So get ready:
- paper;
- glue gun;
- scissors;
- a skein of thread;
- wire.
To make large flowers, we need a petal template. It can be cut out of cardboard and attached to corrugated paper.
Now you need to think about the core: it may consist of many small petals or you will need to prepare the stamens. Also, before assembling, consider whether the flower is meant to be wall-mounted or whether it will be on a stem. If the latter, then wrap the wire with green paper and start assembling the flower from the middle, i.e. from the smallest petals, using glue in the form of a gun.
The core can also always be a delicious chocolate candy. It is attached to the wire and only then decorated with petals. It turns out a very original and useful bouquet.
In a similar way, using a stencil, you can create large interior roses that are placed in glass vases. There may be several such vases in the apartment.
giant peonies
how to make big peony flowers corrugated paper? In the interior, they look just gorgeous. By the way, you can even make a very interesting headdress, so take the following:
- several rolls of corrugated or crepe paper in suitable colors;
- glue;
- thread and needle;
- a balloon the size of a head;
- newspaper for papier-mâché.
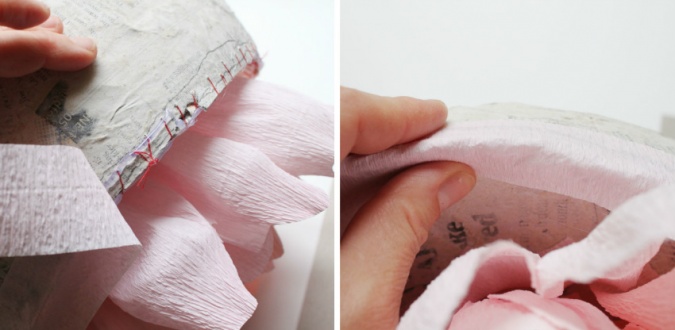
First you need to make a base from a newspaper and a papier-mâché ball. On the ball you need to stick squares or strips from newspapers. There should be a lot of layers so that the base is dense. Leave the base for 24 hours until it dries, then gently deflate the balloon and cut the base.
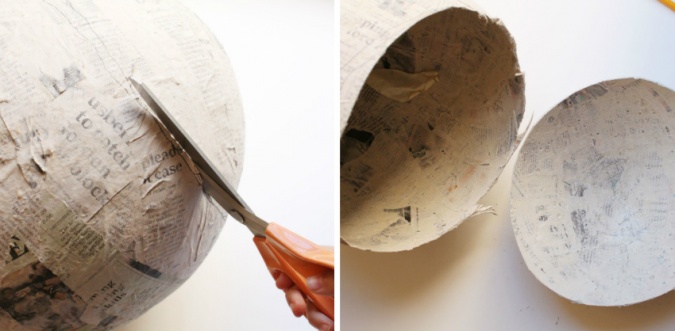
Now you need to put one half into the other and sew them along the edge. It is also desirable to glue the edge of the halves.

Now let's start making petals. They should be different shapes, prepare a stencil so that it is convenient to cut them out.

There should be really a lot of petals and they should be diverse.

Each petal must be cut in an amount of at least 10 pieces. Now each petal needs to be well stretched, and the base bent a little to the side so that you can later glue it to the base. Petals should be voluminous, this main point in the question of how to make high-quality large flowers from corrugated paper.
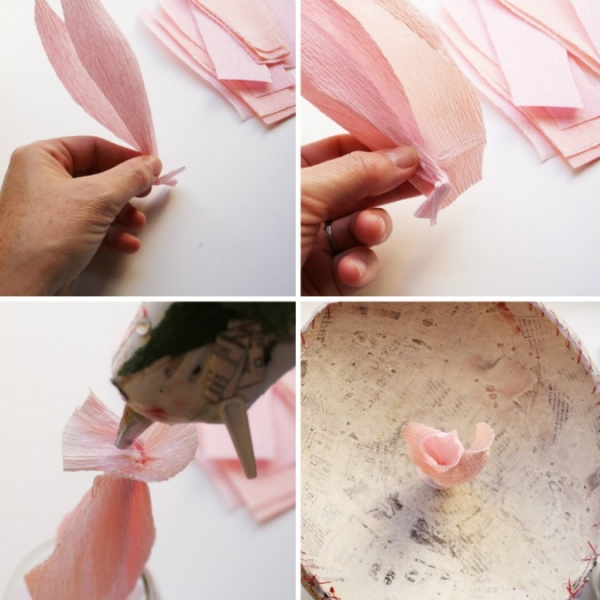
The thinnest petals go to the center, place a little more petals around the core, there may be a small distance between the rows. The edge of the workpiece also needs to be pasted over with paper of the same color.
Continue to fill the space with petals. Take your time before gluing, attach the petal, see how it will look.
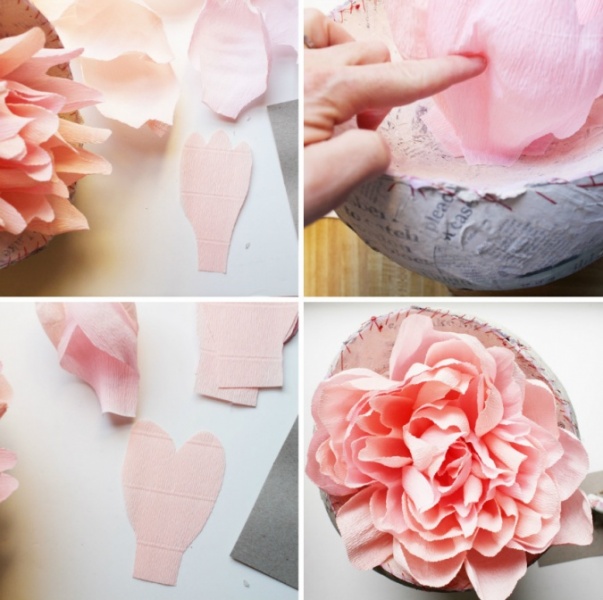
Now you will need to prepare several very large petals, which will go to the external design of the workpiece.

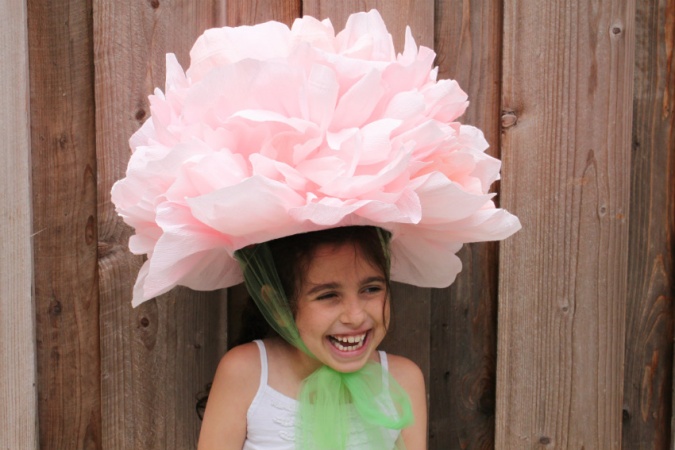
As a result, you should get something like this chic peony, which can be used as a headdress for the holiday.

You can present such a flower as a birthday gift to a child. The birthday girl has never had such a charming gift.
In addition, such flowers can be used to decorate a wedding venue.
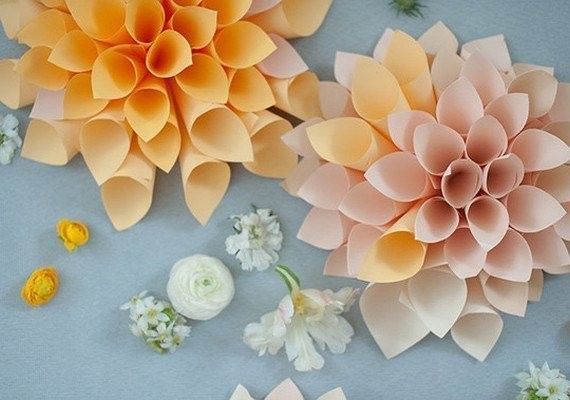
The master class of large paper flowers continues, the giant dahlia is next in line.
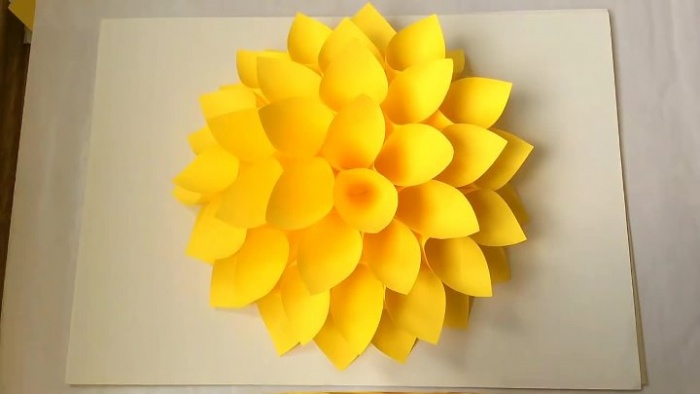
Such a flower can be made using finished pattern, and it is possible from a variety of details-petals. So we will do. These do-it-yourself paper flowers are very easy to make. What do we need?
- thick double-sided colored paper;
- PVA glue;
- scissors.
Cut out a circle for the base from the same paper. Then you need to cut a lot of squares for future petals, the larger the square, the larger the flower will turn out. Then each klaptik needs to be folded into a paper envelope, rolled up in the shape of a horn.
After that, all the horns need to be glued to our base, following the order, so that you get such a beautiful flower made by your own hands.
growth flowers
Large crepe paper flowers can be made even easier, with little to no stencil and lots of detail. Using this method, you can make growth flowers. These decorations are perfect for decorating festive interior and become the focus of photographers.
To do this, you need to cut out a lot of circles from corrugated paper, they must be of different sizes: from huge to the smallest. The edge of the workpiece can be slightly processed with scissors - cut off with a wavy line. After that, all the blanks must be folded one into one, fastening the layers with glue.
In general, on our website you will find a lot of interesting workshops on large paper flowers, including full-length flowers.

Growing volumetric flower installations can be made by hand very quickly and at minimal cost. For example, peonies are very beautiful flowers.
In China, this plant has long symbolized prosperity and prosperity. Large paper flowers for decor or a photo zone seem to be transferred to real life from magical garden. Large decorations look very elegant and elegant, and delight kids and adults.
Installation materials in the form of giant peonies
Prepare materials:
- corrugated paper (with a density of 180) 5 colors: yellow, green, coral, red, burgundy;
- scissors;
- three plastic bottles 1.5 liters;
- two plastic bottles of 0.5 liters;
- stationery knife;
- pieces of a metal-plastic pipe (diameter 16 mm) of 1.5 m, 1.5 m, 2 m for the floor base;
- glue gun;
- scotch;
- wire;
- ruler.
The procedure for making a composition from a large inflorescence
1. From 1.5 liter bottles, make blanks for the base of large peonies. From small bottles (0.5 l), prepare two bases for buds. Cut the bottles and fasten the necessary parts with tape. Such blanks are ideally mounted on a metal-plastic pipe and are very mobile.

2. Prepare multi-colored material for different types of petals. The following is the calculation for one large peony. Make a template for yellow petals (peony core) measuring 4 x 6 cm. There should be 10 pieces. For coral petals, make a template 6 x 8 cm, for red - 8 x 10 cm, for burgundy - 10 x 12 cm. You need to prepare 24 petals of each color. From green corrugated paper, cut out petals 10 x 4 cm.

3. Gently (so as not to tear) stretch each petal, and bend the base slightly to the side. Details should turn out "airy" and voluminous.

4. Paste the base of the bottles with a square yellow paper, turn it upside down.

5. Start gluing the tiers of petals: yellow in the middle, then coral, red and burgundy. The final tiers will be green petals. There may be a small distance between rows.

6. Glue a yellow fringe from a 3 x 10 cm strip into the middle of the bud.

7. Paste the rest of the bottle (bottom of the flower) with green segments, wrapping the tips inside the hole. Make small buds in the same way.

8. Make leaves from green paper 15 x 10 cm (8-10 pieces) and wire. Cut the rectangles diagonally, fold them together, carefully glue the wire in the middle and cut the corners.

9. Curve the pipe pieces making a circle at the bottom to stabilize the installation. Tape the green leaf wire to the base.

10. Place the peony heads on the pipe. Cut green strips 3 cm wide and glue them over the curved metal-plastic base.

The finished exposure can be slightly adjusted by bending the tubes and straightening the flowers.


Video “Giant growth flowers. Peony" from youtube channel Obustroeno Com
You might also be interested in:
 A couple of ways to make peony flowers from ...
On the eve of the holiday, everyone tries to decorate the room in which it will be held. solemn event. Unusual and at the same time beautiful decoration, are large growth flowers made of corrugated paper, which are easy to make with your own hands. From afar, such crafts look like they are alive. The technology for making large flowers from corrugated paper with your own hands is quite simple, and the process itself will not take much time. The main thing is to stock up on the necessary material.
Advantages of corrugated paper for making flowers
Why do they try to make most of the paper flowers that they make with their own hands from corrugated paper? The fact is that many advantages of such material are known, so it is perfect for fakes. Corrugated paper is pleasant to the touch, it is a pleasure to work with it.
In addition, the benefits are:
- availability - it is not difficult to buy corrugated paper for flowers, it is sold in the store stationery at an affordable price;
- does not require special conditions for storage - the material is packed in rolls, it can be stored in a closet or other dry place;
- ease of use - to make a bouquet of flowers from corrugated paper with your own hands, you will need scissors and glue, sometimes they are used Additional materials and tools, depending on the type of forgery;
- the ability to quickly eliminate errors - corrugated paper is easy to use, if it was not possible to correctly complete any part, you can make new blanks;
- a wide range of textures and colors - thanks to a large assortment colors, you can create bright and memorable color patterns.
As corrugated paper is used, craftsmen realize how much this seemingly fragile material can give. It stimulates the imagination, which is great for fakes. From corrugated paper with your own hands, you can also make huge growth flowers in floor vase, and small beautiful flowers for gift wrapping. Corrugated paper can be used to make not only volumetric, but also flat flowers to make beautiful postcards.
Corrugated paper roses - step by step instructions with photos
There are several ways to make large voluminous or small elegant flowers from corrugated paper with your own hands. Depending on the idea, completely different compositions are obtained, which are easy to use to fake or decorate a voluminous bouquet.
To make a beautiful crepe paper rose - huge or completely little flower- need the following materials and tools:
- corrugated paper in pink and green;
- wire;
- PVA glue;
- scissors;
- cardboard;
- simple pencil.
The process of creating a rose from corrugated paper is quite complicated, it takes time and perseverance. The master class consists of the following:
- Draw flower petals of different sizes on cardboard. It is advisable to use at least 3 templates. The more options for petals, the more voluminous and beautiful the rose will turn out.
- Cut out blanks with scissors.
- Fold crepe paper Pink colour in several layers, attach each blank to it different size, trace the outlines and cut out the petals. The result should be several groups of figures of different sizes.
- It is necessary to pre-prepare each rose petal for the upcoming assembly. To do this, corrugated paper figures need to be slightly stretched from rounded corners. In the center you need to make a small notch with your fingers.
- According to a similar scheme, make leaves for the future flower from green corrugated paper with your own hands. However, there is no need to stretch them, since they do not participate in the manufacture of the bud. You also need to prepare the wire that will be used instead of the stem.
- Cut the wire into several pieces various lengths. Wrap them in pairs with green tape or a special tape used for making flower bouquets as tight as possible. Bend one end with pliers. A rosebud will be attached from this edge.
- Take the smallest petal and wrap it around the bent end of the wire. Must be fixed in advance lower part a flower petal made of corrugated paper, made by hand, using glue, as in the photo.
- Gradually form a rosebud, attaching the petals in accordance with the dimensions. In the center of the bud should be small petals, along the edges - the largest.
- Cut out a Christmas tree from green corrugated paper, as in the photo. Wrap this detail around the bud at the base of the flower.
- Secure the sepals with floral tape. Wrap the stem with green corrugated paper, tightly, cut off at the bottom and fix with glue. In certain places of the stem, glue the leaves.
- At the end, it is enough to spread the petals so that the rose acquires an attractive appearance.
You can make several beautiful roses from paper and put in a vase. The result will be interesting bouquet, which at first glance will look like a living one. In addition, if you make a lot of roses, you can put them in a basket. If only buds are needed, the stems are easily cut off, leaving a small margin (about 2 cm).
On a note! Using the above master class, you can make huge floor flowers from corrugated paper with your own hands. To do this, you will have to make a lot of petals. bigger size and fix the bud on a long wire. In order for the tall stem to stand steadily on the floor, you can roll it into a ring from below.
Master class: a simple do-it-yourself paper rose
This master class is much simpler than the previous one, but it also helps to gradually make easy-to-perform, but quite beautiful do-it-yourself crepe paper flowers. IN this case we make one bud, without a leg. To do this, you will have to use a long strip of red corrugated paper. The length of the material is selected depending on how much it is planned to make a rose.
Step by step instructions for making simple flower from corrugated paper do it yourself:

When the bud is ready, all that remains is to fix the edge of the paper with glue so that the rose does not fall apart. In addition, you can make a green sepal, as in the previous master class, which will also serve as a fixative. Such large and small flowers, made by hand from corrugated paper, are in demand when decorating rooms with numbers or creating other compositions.
Making large peonies from crepe paper
Peonies are beautiful flowers that are loved by many. Not surprisingly, workshops on making these paper flowers are a success. Beautiful bouquets from paper peonies will delight loved ones and become nice gift to the celebration.
To make flowers from thin corrugated paper with your own hands, you will need the following materials and tools:
- corrugated paper of different colors;
- wire;
- scissors;
- stationery clip;
- thin thread.
Master class on making large peonies from corrugated paper:
- Cut a piece of the same size from each roll of corrugated paper.
- Fold each piece of corrugated paper into an accordion shape. Fasten with a clerical clip so that it does not fall apart.
- Mark each paper accordion from smaller to more. Cut off as pictured. The difference between the length of one piece and the next strip should be approximately 3 cm.
- Fasten each segment strictly in the center with a clerical clip. Cut corners on everyone.