How to make a paper tank with your own hands. How to make a paper tank with your own hands: simple instructions
We will show you and describe step by step how to make a paper tank with your own hands. This tank model is the most popular. For their manufacture of a paper tank with their own hands All you need is a sheet of A4 paper and scissors.
Instructions for making a paper tank with your own hands.
First, let's prepare everything you need for origami, namely two pieces of paper first A4 format 30x21 centimeters, the second 5x3 cm and scissors. You can also use colored paper. In this case, your origami will immediately take on a unique look.
1. Place a large sheet of paper in front of you as shown in the photo.

2.
Fold in half along the long side. 
3.
Bend and then straighten one corner first. 
4.
Then do the same with the second corner. 
5.
On the second side of our sheet, do the same (points 3-4) 
6.
Next, we need to carefully fold both sides so that the center point formed from the two diagonal lines is on the fold line. For clarity, you can see the photo. 
7.
Fold the corners inward along the fold lines. There are 8 corners in total. 
8.
We place the figure in front of us and bend down the upper corner on each side. 
9.
We fold the top of the workpiece until it touches the center line. 
10.
We fold the same strip in half, bending the bottom edge up. 
11.
After we bend the corners to the other side, so that for now they do not interfere with us. We do the same as described in paragraphs 9, 10. 
12.
Unfold the corners in different directions, as they were originally made. 
13.
Place the figure on the table as in the picture. Fold the top corners in half. 
14.
Flip the tank model over to the other side. 
15.
We fold the layout with a ring. Our figure should be fixed, and large angles should be on top. 
16.
We make the tower of our tank. We fill, large upper corners in the folds of the triangles located below. 
17.
As a result, we will get just such a model of a paper tank, only without a gun. 
18.
Now it's the turn of a small piece of paper, which we prepared at the very beginning of the master class. We make a tube out of it. 
19.
We install the gun in the hole in front. We unfold the folds on both sides at the base, thereby obtaining caterpillars. 
20. Congratulations, you made a paper tank with your own hands.
How to make a paper tank video.
Do not be discouraged if the craft did not work out for you the first time. In this case, try again to do all the steps of assembling origami. Now you know how to make a paper tank.
Don't forget, we take criticism well, if you didn't like the description of any step to describe origami, leave your feedback in the comments.
Creating paper tanks may be of interest not only to boys, but also to girls. Firstly, such figures will be great toys for them. Secondly, the very process of creating a figurine arouses unprecedented interest in children, develops motor skills. And thirdly, many parents, during the process of forming such figures, tell their children about the great wars and their features, involving the kids in the history of their state. So, how to make a tank out of paper?
Creating paper tanks may be of interest not only to boys, but also to girls
The T 34 paper tank corresponding to the real car can be glued together using ready-made reamers. To do this, you first need to print the necessary scan on thick paper. Then you should cut out all the drawn details.

 To make T 34 from a sweep, you must follow the instructions:
- Fold lines should be found on the cut elements. A ruler is applied to each of them, and then the free edge of the paper is lifted and ironed. This results in an even fold.
- After all the folds are marked, you can proceed to gluing the model.
- The first step is to glue the main body of the tank. To do this, it is advisable to use transparent acrylic glue or quick-drying PVA.
- Then all secondary parts are glued to the body.
- Next, you can move on to the gun. First of all, its base is glued together, and only after that the gun is supplemented with secondary elements. The finished model is glued to the main body of the combat vehicle.
- After that, the caterpillars are assembled. First, the inner circles are made, and only after that they are framed by a single caterpillar strip. Finished caterpillars are attached to the sides of the hull.


It is worth considering that there are various scans of the T 34 tank, which may differ from each other in color and conventionality. If you can only print a black and white version of the car, you should paint it using acrylic paints before assembling it. Such processing of cardboard will allow the future toy to acquire the appearance of a tank with a natural coating.
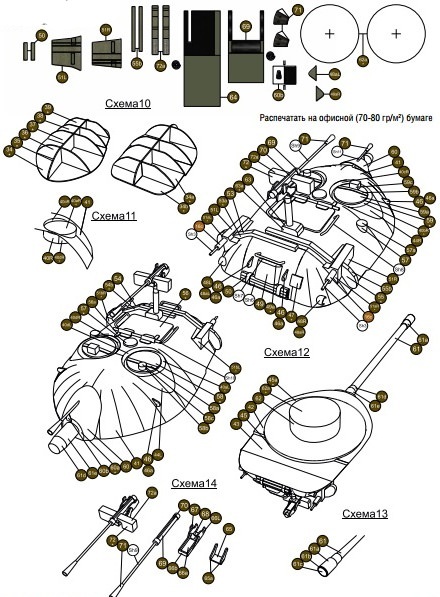
Gallery: paper tank (25 photos)


Tank IS 7 made of paper
To make this tank, you should also use the finished scan.


- All elements of the sweep are cut with a clerical knife.
- Next, using a ruler, folds are made at all places marked for this purpose.
- A support structure for the body is being prepared. It is made of two rectangles installed parallel to each other and fixed with 3 transverse strips located at an equal distance from each other.
- A body with a circle cut out in it is glued onto the resulting base.
- The body is glued on the sides, niches for the caterpillar are formed. The tank bottom is being formed.
- The basis for the cannon installation is being made. It is done in the same way as for the case. A manufactured tower is installed on the hull. A machine gun and additional elements are glued to the tower.
- Next, tracks are made: middle ones are smooth, rear tracks are with teeth.
- Tracks are glued to the bottom of the main body, fastened with a caterpillar track.
This model has a rather high assembly complexity, therefore, when creating it with children, it is necessary to provide them with extensive assistance. When assembling it with children, you can abandon several small parts, thereby simplifying the gluing process.
How to make a T 90 tank out of paper?
T 90 can be made using the origami technique. To do this, you only need paper: an A4 sheet and a small piece of paper for notes.

T 90 can be made using the origami technique
How to do:
- First, an A4 sheet is folded. First of all, he bends in half lengthwise.
- The perpendicular sides of the sheet are bent, connecting with each other. First, the short side is applied to the bottom long, and then to the top. Similar manipulations should be performed on both sides of the sheet.
- The sheet is turned over. The corners of the short side are bent to the ends of the crosses formed from the fold line.
- The sheet is turned over and folded along the lines obtained, forming the basic shape of a double triangle.
- The long sides are folded towards the middle so that the resulting double triangles are on top of them. The result is a double arrow.
- The newly folded edges are folded over to the outer sides of the rectangle.
- The side corners of one of the triangles are bent to the top.
- The workpiece is turned over and conditionally divided into 3 parts so that, as a result, the top of the folded triangle touches the middle of the base of the opened one.
- The free corners of the triangle bend inward.
- The "ears" from the previously bent triangle are set into the resulting pockets.
- The result is a tower.
- A small sheet of paper is folded into a cylindrical barrel using a knitting needle or a culinary skewer.
- The barrel is inserted into the hole in the tower and glued.
The figure assembled in this way can be decorated using thick paints, felt-tip pens or pencils.
How to make a tank from origami modules?
To create tanks, you can use the assembly scheme, which offers a modular origami. To begin with, the assembler will need to prepare 1688 triangular modules.
How to assemble:
- The first thing is going to the tower. Her first and second row are closed in a circle. Each row consists of 30 modules.
- The workpiece is turned inside out, supplemented by a third layer consisting of a similar number of elements. In this way, the tower is built up to 8 layers.
- The ninth row is assembled from 30 modules, but they should be installed backwards.
- Next, you need to proceed to the tracks. A chain of 4 rows is made, each of which has 50 modules.
- On the fifth row, 46 elements are used. The reduction should be carried out in places where the caterpillar is bent.
- 7 row consists of 46 elements installed back to front.
- The same scheme is used to create the second caterpillar.
- For each caterpillar, 3 wheels are made. To do this, a circle is made of 2 rows, each of which involves 10 modules. The figure is turned inside out and completed with 5 rows.
- The wheels are placed inside the caterpillar. These elements are connected by a middle bar made of 34 rows: 1 - 5 modules, 2 - 4 elements. Then the rows alternate.
- A slightly bent part is inserted between the tracks.
- A tower is placed on top.
- The cannon is made of 20 rows, the width of which alternates: 1 row - 2 elements, 2 row - 1. The last three rows increase to 4, 3 and 4 elements.
- The machine gun is inserted into the tower.

Creating a tank from modules is painstaking work
It is worth considering that such a figure is decorative and not suitable for playing. This is due to the fact that the assembly takes place without the use of glue.
How to make modules?
To make a tank you will need:
- 106 sheets of xerox green paper;
- scissors.
To make modules for assembling a tank, you must follow the following instructions:
- 16 rectangles are cut from each sheet.
- Each rectangle is folded in half lengthwise.
- Then the resulting narrow rectangle is bent across in half.
- The upper (non-opening) parts of the rectangle are applied to the resulting middle.
- The figure is turned over, and its free ends are bent up.
- The protruding corner hides inside the figure.
- The workpiece is folded in half.
The module is ready, it remains only to assemble a tank figure from them.
DIY paper tank (video)
Assembling a tank out of paper is quite difficult. However, this process can be facilitated by following all the recommendations given in the instructions for it. As a result of this approach, you can get as close as possible to the real tank.
With the help of this article, you will learn how to make a tank out of paper with your own hands. This instruction includes 2 options for making such crafts. They vary in complexity and technique. The first master class is quite simple and is quite suitable for beginners. The second is laborious and complex. If you don't have any experience with origami, try an easier job first.
A paper tank sounds serious enough. It seems that it is very difficult to make such a craft. And this is not so at all! With free time and some patience, you can easily create it. Read on and you will learn how to make a paper tank with your own hands. 
Materials and tools:
- paper plain or color A4;
- gray pencil;
- a thin metal ruler;
- PVA glue or stationery;
- scissors.
How to make a simple tank out of paper
This craft is easy to make and perfect for beginners. To make it, you will need one sheet of A4 colored paper, a small piece of paper in a contrasting color, scissors and a pencil. 
Production time - 20 minutes
Difficulty level is easy.

Step 1: make folds
Take a standard sheet of A4 paper. 
Fold it in half lengthwise. 
Wrap the upper left corner to the bottom edge. Iron the folds well and unfold. 
In the same way, fold the bottom left corner to the top edge. Expand. 
You should get cruciform folds. 
Step 2: Form the Flaps
Lay the craft vertically. Fold the right corner down. 
Divide the bottom side into 2 equal parts. 
Leave the first part in place, and wrap the second to the lower right corner. 
Repeat on the left side. 
At the top in the foreground, you should get a regular triangle. 
Repeat on the other side. 
Step 3: Taper the Middle
Fold the bottom side up to the center line. 
Fold the paper exactly in the middle and turn it back to the bottom edge. 

Iron all the folds with an iron ruler so that they are even and neat. 
Step 4: form the tower
Fold the bottom corner of one of the triangles up. 
Raise the right one as well. 
Twist the craft into a cylinder with all the formed elements up. 
Insert the "arrow" inside the square. 
Fold the other two corners of the “arrow” into the bottom pockets so that you get the following (see photo below). 

Step 5: Add a Muzzle
Take a small rectangle of a contrasting shade. 
Roll it into a thin tube. 
Insert the tube inside the tower. Ready! 
You can also make this tank by watching the following video.
How to make a paper tank with a rotating turret
To create this origami you will need:
- 1 sheet of A4 paper,
- scissors,
- pencil,
- iron ruler,
- glue,
- a thin object for smoothing small wrinkles.


Production time - 1 hour
Difficulty: medium
Step 1: Shape the Undercarriage
Take a piece of A4 paper. 
Fold it in half, and then quadruple. Cut the sheet into 2 equal parts in the middle, that is, into 2 long strips (in the photo, these strips are doubled in width). 
Take one of the strips and divide it into 2 parts in width, that is, in fact, you should have 2 quarters of an A4 sheet in your hands. Set aside one quarter, and work with the second.
Fold the quarter sheet in half. 
Expand. Fold the bottom side up to the center line. 
Bend the right side to the center as well. 
Roll the craft into a cylinder. 
Push this cylinder down. 
Bend all the corners of the resulting figure by about 0.5 cm. 
Fold all the corners inside the shape. 

Iron the folds with a metal ruler to make them more pronounced. 
Wrap the top flap towards the center of the figure. 
Repeat on the other side. 
Slightly lift the right semicircular pocket at the bottom. Make it longer. 

Repeat this on all 4 sides. 
Tuck the extreme flaps on both sides to the top point. 
Flip the piece. Fold the corners up about 0.5 cm. 
Repeat on all 4 sides. 
Pull the folded corners back down. 
Place the side elements perpendicular to the axis. 
On the previously folded folds, bend up the craft around its perimeter. 

Chassis is ready. 

Step 2: Protect the undercarriage
Take the second quarter from an A4 sheet. 
Fold the top edge about 0.6 cm, then fold it over again. You need to wrap the paper in one direction 2 times. When folding, it is convenient to use a metal ruler. 

Repeat on the opposite side. 
Place protection on the undercarriage. The width of the first should be approximately 0.1-0.2 cm longer than the second. 
Bend the extreme corners along the folds on one side by about 0.5 cm. 
Fold the corners inward along the curved lines. 

Iron the folds with a ruler. 
Turn the end element up so that the “horns” stick out to the side. 
Turn the craft over and insert the chassis into it. The latter should fit comfortably and tightly in the protection. 
Mark a line with a pencil for the second edge of the protection. 
Fold the paper inward at the marked point. 
Wrap the corners on the second side of the protection by about 0.5 cm. Fold the corners inward along the marked folds. 

Tuck the rear flaps down, reducing their width by approximately 2 times. Make them longer. 
Repeat on the other side. 
Take protection and chassis. Put the first on the second and check how they fit together. If necessary, correct minor flaws by lengthening or shortening the protection accordingly. 

Step 3: Make the Fixing Element
At this stage, you need to make a fixing element for running gear and protection, on which you will put the tower. Also, with its help, the tower will be able to spin in different directions.
Take the second half from sheet A4. 
Fold the right edge to the center line. Unbend. 
Cut a quarter of this piece along the folded line. 
Fold the paper in half lengthwise and mark the folds along the edges. 
Fold both edges towards the center along the marked folds. 
Fold the corner down to the right. 
On the opposite side, also bend the corner so that you get a triangle in the foreground. 
Expand. You should get cruciform folds. 
Fold the side flaps inward along the marked folds so that a triangle comes out in the foreground. 

Fold the left corner up from the bottom side. 
Repeat on the other side. You should have the following figure. 
Wrap the bottom side to the center line. 
Fold the top side towards the center as well. 
Place the craft on the chassis so that the square element is exactly in the center. 
Next, you begin to bend around the figure around the chassis. Make sure that it repeats all the contours of the element placed inside. 
Wrap the craft around the chassis completely. Cut off excess length. 

Insert one edge of the element into the other so that the square is located at the top in the center point. 

————————————————-
Disconnect the mount.

Place the guard on top of the chassis.

Wrap the indicated parts again with an element with a square at the top. Some actions will be difficult enough to perform, but do not rush, act carefully and you will succeed.

The lower part of the tank is ready!

Step 4: Make the Tower
Cut out a square with a side of approximately 6-7 cm. Bend it along both diagonals.

Fold the paper in half.

Fold the corners down to form a perfect triangle.

Flip the shape.

Fold the left corner up to the top.

Repeat on the other side.

Rotate the piece. Bend the side corners to the center line so that they are slightly shifted up.

Insert the lower flap on the right side into the pocket located at the bottom of the side flap.

Insert the right flap into the pocket as well. You should end up like this.

Flip the piece.

Pull the inside pockets up slightly.

Turn the pocket inside out slightly.

Repeat on the other side.

Fold the top corner down. You have made the basis for the tower.

Step 5: Make the Tower Guard and Muzzle
Cut out a piece of paper measuring 8 cm x 6 cm. For this work, you can use the same shade of paper that you previously used or use a contrasting color. We used a different shade and it really looks pretty! If you use different shades of paper for each element, it will look original and fresh!

Fold the piece in half across the width. Next, you need to wrap this paper three times along the points indicated by the arrows in the photo below.

Here the paper is already folded into thirds.

Open one spread. Wrap the lower left corner from bottom to top. In the same way, symmetrically wrap the right corner to the top. Pull the middle up and fold the craft in half. Pull the inner valve gently up.

Expand the piece.

Decorate the third part on the other side of the craft in the same way.

Make sure that the internal valves are placed symmetrically.

Take your tower.

Insert one edge of the green guard into the inside pocket at the top of the tower.


From the underside, insert the guard into the inside pocket at the bottom of the turret. Trim off any excess length.

Tuck the cut corner in the middle.

Place the protection on the tower and fix both elements. Use some glue if needed.

Cut out a small rectangle along the circumference of the tower.

Roll it into a thin strip.

Bend one end of the strip perpendicularly and fold it in half to form a small triangle at the top.

Insert this end in between the green guard and the tower.

Wrap the strip around the tower. Insert its second end on the other side of the protection. If necessary, secure the work with glue.

From a thin piece of paper, twist the tube and fix it with glue. It will be a doo.

Put the tower on the chassis. To do this, insert the square located at the top of the undercarriage into the inner pockets at the bottom of the tower.
Place the muzzle inside the turret and fix it with glue.


Work is ready!
We tried to tell and show you the technique of making this tank in as much detail as possible. But if you still have questions and you don’t fully understand how to make this paper tank correctly, watch the following video.
Boys from an early age are interested in the topic of the army and technology. Drawings, crafts, toys are most often associated with just such a direction. It is especially interesting for a child to create their own crafts, color sets with thematic drawings, glue plastic models. Parents need to be prepared for such interests, because information on how to make a paper tank with your own hands will not be superfluous.
There are many step by step instructions. It all depends on the amount of free time and skills in needlework. Of course, it is best to involve a child in the process of creating crafts. That is why it is necessary to choose layouts that do not require a very long time to implement. Otherwise, the child will quickly lose interest. Besides, it is necessary to consider the availability of all materials.

Such a set of tools will be more than enough to create even the most complex tank model. All additional materials depend only on the imagination of the author. You can use small decorative buttons to decorate the tower or create realistic wheels on the tracks, paint the model with watercolors, which will make the camouflage as realistic as possible.
The best craft options
There are many options for creating a tank model. Some methods offer origami in its purest form, in which you can get a craft from a single sheet (or several sheets) of paper. The implementation of other layouts will require gluing and cutting, but the craft is most often more realistic.
Regardless of the method, it is necessary to approach the process creatively, think over different color schemes.
Volumetric paper tank
To create a volumetric tank, you will need scissors, glue, colored paper, a ruler and a pencil. The step by step process is as follows:


Since making a paper tank with your own hands in this way is not at all difficult, you can spend extra time decorating and coloring. For example, you can cut a small five-pointed army star from a sheet of red paper and place it in any place you like. Camouflage is chosen depending on taste preferences.
Model using origami
Using the origami technique implies a minimum number of auxiliary tools and an increased concentration of attention. In this case, you will have to carefully follow the instructions. It is far from always possible to get a beautiful and neat craft the first time, therefore, before starting the creation process with a child, it is worth practicing on your own. From materials and tools you will need a sheet of A4 paper and scissors. Any color can be chosen.

To simplify the work as much as possible, it is worth purchasing good quality sheets. The material should not be very dense or too thin.
Use of corrugated board
One of the most unusual ways to create a tank model is the use of corrugated cardboard. The unique method allows you to get a stunning effect. Crafts are very realistic and voluminous. Using a combination of different colors, you can bring the craft as close as possible to the original. To create a tank, you will need corrugated cardboard, glue and scissors. All work is done quickly enough and takes very little time:

Detailed instructions on how to make a tank with your own hands from corrugated cardboard may be subject to change. During work, it is worth considering the wishes of the baby.
The benefits of self-employment
Creation of tank models has not only an entertaining component. From such hobbies, you can derive very specific benefits for the child and the whole family as a whole:
- development of hand motor skills while working with various parts;
- increasing the level of concentration of attention, which is achieved due to the need to follow the instructions;
- improving intelligence, as some crafts require spatial thinking;
- family cohesion: it is very important for a child when crafts are made in a warm, family atmosphere.
When making models, you need to constantly talk with the young craftsman, find out his wishes, ask what color or shape of the details would be preferable. At the initial stage, it is best to give the baby easy assignments that he can handle without much difficulty. Time costs should also be taken into account. It is difficult for a child to sit in one place for an hour, so it is better to use layouts where you can get a visible result in a short period of time.
The article talks about how to make an origami tank model.
One of the most favorite games of little and big boys at all times was the game of war. You can arrange a tank battle at home not only with the help of purchased toys, but also with models of tanks made using the origami technique. Both children and adults enthusiastically engage in this wonderful kind of arts and crafts, which helps develop spatial imagination, fantasy, memory, patience, accuracy, dexterity of fingers. And it's just nice to play with crafts made by yourself.
The benefits of origami can hardly be overestimated. Origami classes are used in the practice of speech therapists, they are used in the correction of disorders of the musculoskeletal system and mental disorders in children. The beauty of skillfully made paper models - animals, birds, geometric figures, ships, planes - allows you to decorate shop windows and walls of houses, decorate city holidays, and use them in commercials.
The art of origami originated in Japan. Paper models originally had a symbolic meaning, served as elements of religious ceremonies, later they were given to each other by representatives of the social elite, used at weddings. Once in Europe and America in the twentieth century, origami has gained many fans. The creation by the Japanese master of a system of conventional icons for the schematic recording of various models allowed this art to spread everywhere.
There are several varieties of origami: simple for beginners and the most difficult for masters.
Classical origami does not take much time and is accessible to beginners, while a modular origami paper tank will require much more effort and some skill.

History of tanks
Boys love to play war games: they play them on the computer and with models. And what is a war without weapons?
Tanks are one of the most modern tools for ground combat - real enemy fighters. This powerful technique gives superiority in the process of military conflicts. Most major battles have been won through its use.
The history of tank technology dates back to the beginning of the 20th century, with the creation of the first copies of the latest weapons, which the opponents appreciated pretty soon. There is a version that the first tank, invented by Leonardo da Vinci, was a wooden box on wheels with holes for firing. During this time, the design features of tanks and their capabilities have changed. The prototype of the military machine appeared in Great Britain on the eve of the First World War. Caterpillars provided high cross-country ability for armored vehicles. The creation of the T-34 tank, which the famous German Tigers could not resist, influenced the outcome of the Second World War and the further improvement of technical characteristics.
An origami paper tank created according to the scheme will look like this famous fighting vehicle.

In order to fulfill the desire of the boys to command an entire tank army, they first need to work with their hands and head, learn a lot, spend time and energy. After all, it will be necessary to make several dozen models of tanks. But the spectacle of tank battles on the floor of the house will look impressive and unforgettable.
How to make an origami paper tank?
There is a manual and a fairly large number of schemes for creating origami paper tanks. All of them are quite simple and accessible for beginners, for example, models such as the Is-7 or T-80. Many schemes will allow you to diversify the models of tanks and this will support the child's interest in the game. Even if the child is small and cannot cope with the tank model by himself, he will be fascinated to watch the wonderful transformation of the sheet in the hands of the parent. And then it will also be possible to color the resulting toy, if you didn’t immediately take khaki or just green paper.
Tank Assembly Principles
To make a paper tank with your own hands, you need to take a sheet from which the hull and tower will be assembled. Another smaller sheet will be required for the trunk. There is no need to glue anything, so the glue from the carpet and floor does not have to be washed. Most importantly, the safety of the child in this game is guaranteed.
In order to make an origami paper tank, there is a step-by-step instruction. The model of the tank is three-dimensional, includes two modules connected using the origami technique. The hull is carried out in stages together with the turret, the muzzle is attached separately. Particular attention should be paid to the folding of the tracks.
It takes ingenuity and a sense of proportion to select the necessary and sufficient barrel length. The opinions of little heroes on this matter are different. In some cases, you have to use tools to shorten the muzzle.

Tank installation
- At the initial stage of assembly, the sheet should be folded in half.
- Then you need to outline the fold lines indicated in the diagram, and fold the workpiece along the intended folds.
- Similarly, folding is performed step by step from the symmetrical side.
- Next, you need to bend the sides towards the center.
- The next stage is the manufacture of the front part, for which you need to bend the corners of the front section into the recess in the back.
- The edges of the sheet just bent to the middle must be bent again, only in the opposite direction - to the outer sides.
- After that, you should smooth out the craft, and bend the corners of one resulting triangle to the top.
- Then the layout is turned over and divided into three fragments, folding in the places of breakdown. At this stage, you can already see the looming tower.
- The remaining not bent corners must be folded in the opposite direction - inward.
- In order to get a tower, the corners that were obtained at the previous stage of work must be connected with the opposite corners, threading them into pockets.
The turret has been completed and the tank itself is almost ready.

The hardest part of the job is done. All that remains is to make the body of the tank voluminous, make the barrel and attach it to the layout.
The final stage of work
- To get a neat cylindrical muzzle, you can use some auxiliary tool: a pencil, a knitting needle or a toothpick. Paper is wrapped around this object, then unfolded and twisted again from the opposite end. This will turn out a neat trunk that will not unwind.
- It remains to straighten the caterpillars, and on each of the connected triangular figures lay another fold and insert the barrel into the tank cabin.
The finished modular tank, if it was not made of colored paper, can be painted in camouflage, giving a natural war paint. And if you improve the real picture of the battle and place the tank army on the ground with trees, also made in the origami technique, the child will be delighted and will gradually join the ancient art.


