How to make your own paper snowflakes. #3 Shiny snowflake
Perfectly convey the winter fairy-tale atmosphere of snowflakes. To make them look spectacular, make them voluminous. In this article we will look at: how to make voluminous paper snowflakes with your own hands.
You will need: shiny cardboard in blue and purple, stationery knife, glue gun, ruler, pencil, toothpick.

Master Class

A shiny volumetric snowflake is ready!
exquisite snowflake

You will need: 6 blue square sheets, 6 white square sheets, blue paper circle, pva glue, rhinestone.
Master Class

Exquisite voluminous paper snowflake is ready! I recommend watching this video!
beautiful snowflake

You will need: 2 square sheets of blue paper, scissors, glue stick, pencil, rhinestone.
Master Class

A beautiful voluminous paper snowflake is ready! I recommend watching this video!
3D snowflake with Christmas trees

You will need: 6 green sheets 8x8 cm in size, scissors, a simple pencil, glue stick, rhinestone.
Master Class

original snowflake

You will need: 2 sheets of yellow A4 paper, scissors, a simple pencil, white thread, glue stick.
Master Class

The original voluminous paper snowflake is ready! I recommend watching this video!
Volumetric snowflake

You will need: white and blue paper, scissors, ruler, glue stick, decoration elements - sequins, beads, flowers ...
Master Class


You will need: 2 sheets of colored paper, scissors, glue stick.
Master Class

Volumetric snowflake from components
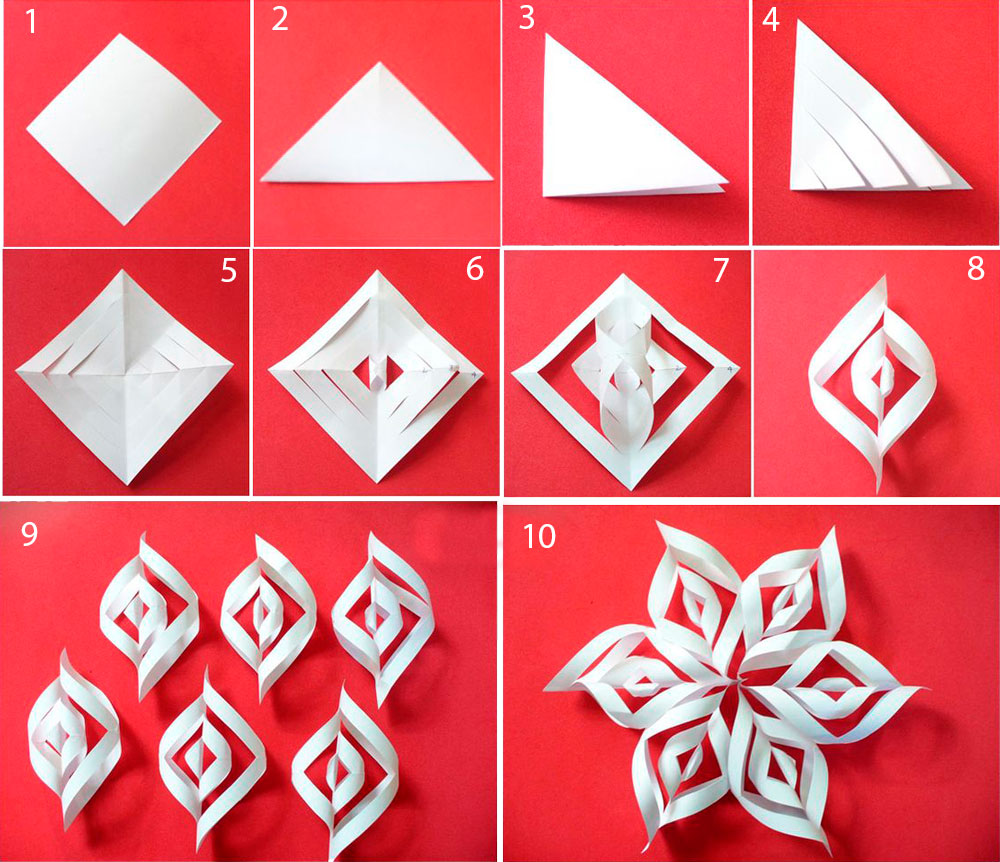
You will need: 6 square sheets of paper, scissors, glue.
Master Class
- Take a piece of paper and fold it diagonally, then in half.
- Make 3 cuts and unfold the workpiece.
- Glue the ends of the smallest strips, then glue the others through one strip on each side.
- Connect the remaining strips on the other side in the same way.
- Repeat this process with the rest of the sheets, then assemble the snowflake by gluing 6 blanks together.

You will need: paper. scissors, ruler, glue.
Master Class

The paper strip snowflake is ready!I recommend watching this video!

You will need: sheets of paper, circle template, glue, pencil, thread, needle, ruler.
Master Class
- Cut out 8 identical circles from paper.
- Divide the circle into 8 equal parts and make cuts.
- Twist each part of the circle into a cone using a pencil, fixing with glue.
- Repeat this process with the rest of the blanks.
- String the blanks on a thread with a needle, fasten and form a ball.

Modular origami is considered more difficult than ordinary origami. Fold the first module according to the photo scheme, make a huge number of them and start assembling according to the photo master class. Creating such a masterpiece requires a lot of time and patience. There are also huge advantages - you develop fine motor skills of your hands and will be able to surprise others with such a chic snowflake.

Master Class
- Start assembly from the middle by forming the center of 12 modules.
- Insert the edges of the module into the pocket of the other modules.
- Attach the modules in a checkerboard pattern from one edge, a chain of two fastened rows should form - the outer row of 6 modules, and the outer 5.
- Unscrew the remaining module and connect the ends of the chain with it, forming a ring.
- Increase the length of the beams by attaching modules.
- Add a module of a different color to each beam and continue building with the main one.
- Add modules until the snowflake is the desired size.


Snowflake in the technique of modular origami is ready! I recommend watching this video!
Snowflakes are always pleasing to the eye and uplifting. Make the best, original volumetric snowflakes and present them as a gift. Then your loved ones will feel a fairy tale at home, remembering you.
So, how to make a snowflake out of paper and master classes.
1. How to make a paper snowflake for grade 1 - the easiest variation
In order to make the simplest paper snowflake, we will need the following tools and materials:
A sheet of white square paper;
Simple pencil;
Scissors.
How to make a paper snowflake step by step.
Stage one. In order for our snowflake to turn out beautiful, openwork, similar to a real one, it is necessary first of all to fold a piece of paper correctly, which in the future we will have to cut out in places. To do this, take a piece of white square paper and carefully fold it in half horizontally.
Stage two. Next, we fold the resulting rectangular part in half again, this time vertically, smooth the fold line and again unfold the part to its original position and get a clear mark in the middle of the part.
Stage three. Then we take the left side of the workpiece from the marked mark and bend it obliquely so that the new bend, together with the previously marked central vertical line, forms an acute angle (see diagram below).
Stage four. We also bend the opposite edge of the part, forming an acute angle.
Stage five. As a result of additions, we got a detail similar in shape to a triangle in the upper part with two protruding corners from below.
Stage six. We fold this part vertically so that the fold line divides it exactly in half.
Stage eight. After that, using a simple pencil, draw a diagram of the future snowflake on the resulting paper blank by hand. It can be done arbitrarily, showing all your imagination, or redrawn using our sketches offered to you below.


Stage nine. Then we take scissors and carefully cut out the part along the outlined contour of the snowflake sketch, it is important to cut it exactly along the contour, and not step a millimeter to the side, otherwise the snowflake may be damaged, cut into separate parts, deformed, etc.
Stage ten. We carefully unfold the finished, cut-out part along all previously folded fold lines and get a finished openwork paper snowflake.
If, based on our description and the proposed schemes, the technique for making a snowflake is not very clear to you, it can help you understand the issue, how to make a paper snowflake with your own hands, video, which you can easily find on the internet.
Beautiful paper snowflakes can decorate the windows in your house, make it festive, and also become decorative elements on New Year's crafts, compositions, clothes, etc.
2. How to make a do-it-yourself paper snowflake
For the first time, looking at a beautiful voluminous paper snowflake, it may seem that making it is quite difficult and not everyone can do it, but in fact this is far from the case and you can verify this by carefully studying the following master class.
For work we need:
Several sheets of white or colored paper;
Ruler;
Simple pencil;
Scissors;
Glue for paper;
Stationery stapler.
How to make a paper snowflake instruction by stages.
Stage one. To make a snowflake, we first need to prepare the original parts, for this we cut out six identical square-shaped parts from paper with sides of twenty centimeters.
Stage two. Then we carefully fold each part in half diagonally and get a blank in the form of an isosceles rectangle with a right upper angle.
Stage three. Then we take a ruler, a simple pencil and, stepping back from one of the sides of the triangle, approximately one centimeter, we draw a line parallel to the side, not reaching the top by about one and a half centimeters.
Stage four. Departing from the first line drawn by one centimeter, we draw a second parallel line, which is shorter than the first by about eight to ten millimeters.
Stage five. After the second line, retreating another centimeter, we draw the third last line, which is also shorter than the previous one by eight to ten millimeters.
Stage six. Similar three parallel lines of different lengths are drawn from the opposite side of the triangle.
How to make a voluminous paper snowflake - photo seventh stage

Stage eight. After all the cuts along the lines are made, carefully unfold the workpiece and get a square with slots around the perimeter.
Stage nine. We turn our square with one of the corners up, so that the previously marked fold line is in a horizontal position.
Stage ten. Starting from the very center of the part, we connect two opposite corners of the cut small square, put them one on one and glue them with ordinary paper glue, as indicated in the photo below.

Stage eleven. Then we turn the resulting part with the back side, placing it on the table also, with one corner up and with the fold line horizontal, take the opposite side corners of the next square, also connect them, overlap each other and glue.
Stage eleven. Again we turn the part to the front side and glue the next pair of corners, after which we connect the remaining two corners from the back side and get a three-dimensional part that looks like an openwork rhombus.

Stage twelve. Using the technology described above, we make five more of the same identical parts, in total, six pieces are needed to create one snowflake.
Stage fourteen. We glue the side parts of the three parts in the same places with each other with glue and get half of the future volumetric snowflake.

Stage fifteen. In exactly the same way, we connect with a stapler and glue the three remaining three-dimensional parts, as a result of which we get the other half of the snowflake.
Stage sixteen. We connect both halves together in the center, fixing them with another bracket, a stapler and glue the remaining sides. Very beautiful, openwork, voluminous snowflake - ready!

It remains only to tie a loop of strong thread or fishing line to it and hang the craft on a chandelier, Christmas tree or in any other suitable place.
3. How to make a beautiful paper snowflake
In the previous tutorial, we told you how to make a big paper snowflake voluminous, this master class will also teach you how to create voluminous snowflakes, but smaller.
For work, we need the following tools and materials:
Colored or white paper;
Ruler;
Simple pencil;
Scissors;
Stationery stapler;
Glue for paper;
Coil threads.
How to make a small paper snowflake - step by step instructions.
Stage one. Our snowflake will consist of many identical paper strips, for this we take sheets of colored or white paper and draw them into identical strips, approximately two centimeters wide and twenty-five to thirty centimeters long. In total, to make one snowflake, we need eight strips.
Stage two. Cut out our drawn strips with scissors.

Stage four. After that, we begin to form our snowflake. We take the edge of the first strip and bend it into a loop towards the central paper clip, fasten the resulting loop with a drop of paper glue.
Stage five. Then we take the edge of the same strip on the opposite side of the bracket and also form a loop out of it. We glue it, as well as both obtained loops together.
Stage six. Using the same principle, we form loops from the second, third and fourth strips, as a result of which we get a half of a three-dimensional snowflake with eight rays.

Stage seven. We create the second half of a voluminous small snowflake in the same way as the first.
Stage eight. We glue both halves together with the flat sides and get the finished snowflake.

Stage nine. We thread a thread into one of the loops of the snowflake, tie it and hang our beauty, along with others made for the New Year's beauty.
4. How to make a paper snowflake - game with kids
Helps to talk about how to make paper snowflake video or our detailed master class, thanks to which you will not only make a beautiful Christmas decoration, but also have fun in your free time with your kids in a playful way.
For work, we need the following tools and materials:
Sheets of white paper;
Simple pencil;
Scissors;
Stationery stapler;
Glue for paper;
Coil threads.
How to make a beautiful snowflake out of paper - a master class with a step-by-step description of the work.
Stage one. To make one snowflake, we need to cut out two identical rectangular blanks ten centimeters wide and eighteen centimeters long.
Stage two. Then we take the first blank and bend it, stepping back from the bottom edge horizontally one centimeter up. We smooth the fold line well.
Stage four. Again we turn the workpiece to the opposite side and perform another bend, one centimeter wide. We continue to perform similar bending to the end of the sheet of paper, as a result of which we get a part that looks like a folded accordion.

Stage five. After that, we take a stationery stapler and fasten our folded accordion in the center with one bracket, be sure to capture all layers of paper.
Stage six. Using a simple pencil, draw the same pattern on both edges of the upper part of the accordion with curly teeth based on your imagination or using our example and carefully cut everything along the marked lines with sharp scissors.
Stage seven. After that, we take both curly edges of the upper layer at the same time and connect them, as if unfolding the accordion in a semicircle.
Stage eight. We glue the edges together with paper glue and get the first half of our future snowflake.
Stage nine. In the same way, we make the second half of the snowflake from the second blank and glue them together with glue with flat sides to each other.

Stage ten. The snowflake is ready, at the end we thread a thread through one of the openwork holes and form a loop, thanks to which our paper snowflake can be hung and decorate any room. Even similar snowflakes can be used to create, for example, make a beautiful big crown for the Snow Queen or sew on the Snowflake's dress.

We hope you liked our selection of workshops on creating a wide variety of paper snowflakes with your own hands, and you will definitely use it for the New Year's decor of your home, creating interesting New Year's crafts, carnival costumes, etc.
5Happy child 11.12.2017

Dear readers, a magical time is approaching, full of fairy tales, magic, warmth and comfort. And, of course, I want to create such a New Year's mood on my blog, as well as awaken in you the desire to create beauty with your own hands.
Today, together with the decorator Anna Pavlovskikh, we will learn how to make beautiful paper snowflakes of different types and in different ways. Such snowflakes have always been used to decorate houses and premises before the New Year, and, you see, they always create a joyful winter mood. Anya will show and tell you how to make not only the simplest snowflakes, but also more complex and original ones that will serve as a real decoration for any space. To do this, we will use special templates and schemes. I give Anna the floor.
As a decorator, I can say that decorating the space of a house, shop, office, you always rejoice at how people react to the beauty you have created. It turns out a special energy exchange between you and those around you, sometimes imperceptible at first glance. Just by decorating the window with carved New Year's images, you get an incredible feeling of happiness, you feel how with the kind looks of people passing by, all the best gets into your house!
In my today's master class, I want to show you how to make paper snowflakes with your own hands. Such snowflakes can be hung from a chandelier or on a Christmas tree, they can be pasted over a window or house walls. Let's consider different types of such snowflakes, we will analyze all the subtleties of their manufacture.
Of course, many people know that in nature there are only six-ray snowflakes - this is due to a variety of both physical and chemical processes. But I always want people to show imagination, to allow themselves to do something that is not in nature, that is different from the ordinary. Create, it always inspires and makes life more fulfilling. And it is for this reason that today we will make such different four-, five-, six- and eight-ray snowflakes! And also get acquainted with the unusual technique of creating flat snowflakes - kirigami. So how do you make paper snowflakes?
Paper snowflakes - folding methods and cutting patterns
Materials:
- White paper;
- colored paper;
- stationery and manicure scissors;
- pencil;
- eraser;
- glue stick.
At the beginning of the master class, I bring to your attention the paper snowflake templates that we use to cut snowflakes out of paper.


Such schemes of paper snowflakes can be used on all types of folding. It is most convenient to simply redraw them with a simple pencil. Now many print out such templates and simply translate, but personally this method seems to me not the most interesting, since the very process of creativity disappears, which is so important when you do something with your own hands. On the contrary, when redrawing with a pencil, everyone will definitely add something of themselves.
The photos of paper snowflakes that you will see below were taken by students of the Center for Children's Creativity in the city of Izhevsk, there are very young children among them, and cutting complex patterns for them is quite problematic, but still each snowflake turned out to be very beautiful and unique. And all because the main secret lies precisely in the folding methods. So, let's get to know them in more detail.
Quadruple paper snowflakes
This is one of the easiest ways to make a flat paper snowflake. Just take and fold the square sheet five times. Fold the sheet in half the first four times, and diagonally the fifth time. This method is very well suited for the first children's snowflakes. For cutting complex and more decorative snowflakes, there are other ways to fold the paper.

Five- and ten-ray paper snowflakes
Fold the paper square diagonally. Bend the resulting triangle in half again. Pull this fold back. Bend the upper corner of the triangle down so that the top coincides with the bottom point, then straighten the corner back. Now bend the corner again, but up to the fold line obtained during the previous bend.
We take the right corner of the triangle and bend it so that the side line coincides with the intersection point of the side face of the triangle and the previous fold. We do the same with the left corner of the triangle, but we bend it to the opposite side. Now we bend the left side to the right so that the two edges coincide. We repeat everything again, but only bend the right side back.
We draw the scheme of a paper snowflake that we like on a folded blank. This is best done with a pencil, as it can be easily erased with an eraser. In a similar way, you can get a snowflake with ten rays, for this, at the last stage, you just need to fold the workpiece in half again.


In order for the finished snowflake to be neat and beautiful, and also for the paper to be easily cut during operation, it is necessary to carefully iron all the folds during folding - this can be done with the blunt side of the scissors.
Six-beam snowflakes
Prepare a square sheet of paper and fold it in half diagonally. Bend the resulting triangle in half again. Take a protractor and divide the angle of this triangle equal to 90˚ into 3 parts of 30˚.
Bend the edges along the outlined lines, first the left side, and then the right. The resulting triangular ears should be on the same level. They will need to be cut straight along the line. On the resulting blank, apply a pattern according to the template and cut out a snowflake.


Eight-beam snowflakes
A square of paper must be folded diagonally. Fold the resulting triangle in half, then in half again and again. You will get a narrow triangular blank, a small triangle in which protrudes beyond the edge of the main part. Cut off this triangle, aligning all sides and getting an isosceles triangle.
I think that now you don’t have to use templates for cutting out - after making the previous snowflakes, your imagination has probably activated, and now you yourself will be very creative with this task. As a result, you should get a very beautiful, original, original snowflake.


Flat paper kirigami snowflake
To make such a beautiful paper snowflake, it is better to use paper that has a different color on each side. Or you can glue two different colors together before starting work. In this case, snowflakes made using this technique will look more interesting and decorative.
First, prepare squares of colored paper. The size of these squares can be different. Fold the resulting square in half lengthwise, and then again across. Fold the resulting small square in half again diagonally.
The beveled corner of the workpiece must be cut so that it has the shape of an isosceles triangle. Cut out the outer side of the triangle in the shape of a check mark. On the workpiece on the sides, cut out two identical triangles.
Make cuts along the bottom of the workpiece, as in the photo. Now straighten the snowflake and bend its inner corners to the outside. Sharp inner corners can be bent in different ways, alternated, the final appearance of snowflakes will depend on this.
Such snowflakes can be made in different colors and diameters, and by laying them on top of each other you get a real masterpiece for home decor or for making a New Year's greeting card.


Today we saw how to make paper snowflakes with your own hands. These snowflakes are flat, they can be used to decorate walls, windows, and also decorate a Christmas tree with them. I hope you will decorate your house with such snowflakes, fill it with a fabulous atmosphere and comfort.
It is impossible to imagine the New Year without snow and a beautifully decorated house. And not only at home. On New Year's Eve, the whole city dresses up and lights up. I propose to make beautiful paper snowflakes and decorate your home with them. And children can take such snowflakes to school (or kindergarten) and decorate their classroom. And carving snowflakes is a pleasure: it is always nice to realize that you are doing something beautiful!
Beautiful simple paper snowflakes (10 patterns)
Snowflakes made in this way are very beautiful. And there are an unlimited number of patterns by which you can cut. You can come up with a scheme yourself and bring it to life. I will show you some options for making beautiful, openwork paper snowflakes. Snowflakes made in this way are six-rayed, like real ones.
For even more ways to make very beautiful snowflakes, see this article.
How to fold a piece of paper correctly
First you need to properly fold the paper. For all the snowflakes that I will show next, the paper is folded in the same way. The only difference is the pattern on which you will need to cut. The main thing is to carefully repeat each step to make a snowflake.
In order to make a snowflake, you need a square piece of paper. By the way, origami paper is now sold (in bookstores, stationery stores), it is immediately square, multi-colored, with patterns. In general, you can choose any to your taste. And origami paper is thinner than standard A4 printer paper. Accordingly, it is easier to cut out of it.
To make a square out of plain A4 paper, you need to fold it, as shown in the photo.

You have a square folded diagonally (triangle).
Next, this triangle needs to be folded in half again. The fold will determine where the center of the snowflake is (I mark the fold with a dotted line). Folded up and put back together. Before you will be just a square, folded once diagonally.
To make the snowflake perfect, you need a protractor. Measure from the center of the snowflake an angle of 60 degrees to the left and right sides. It is along these lines that you will need to bend the paper.

Fold the left corner first, then the right. Bend carefully as shown in the photo below.

Now turn your workpiece over and bend it in half lengthwise. Cut off all unnecessary elements from the resulting figure, leaving a triangle.

That's all! Everything is quite simple, the main thing is to first carefully read the instructions and repeat everything. And you will succeed. Now on the resulting triangle you need to draw any pattern and cut it out.
Some patterns of openwork paper snowflakes
The first option: a snowflake with hearts. With a simple pencil, draw a pattern as shown below and cut it out. Better to have sharp scissors. It was convenient for me to cut out with nail scissors, especially elements where there are smooth, curved lines.

Here is such a beautiful snowflake turned out according to this scheme.

Another diagram for an example of a six-pointed snowflake. This is a snowflake flower.

And here is the result. Like? Write in the comments which snowflake you liked the most. Or maybe you got a very beautiful snowflake according to your invented scheme?

The third pattern is for you! It's simple: folded, painted, cut out, got beauty!

This snowflake turns out to be very openwork, straight lacy.

The fourth scheme of a simple paper snowflake.

And the end result is in front of you.

Such snowflakes will decorate the house, Christmas tree, windows in the New Year's Eve. And if you dream up a little more, then you can decorate them with sparkles. Make a snowflake out of white paper and color it with colored markers. As you noticed, I made these snowflakes large, from a whole sheet of A4. But snowflakes can be made from a square of any size. Only too small snowflakes will be more difficult to cut and draw a figured pattern on them.
And now the bonus! 6 more patterns for cutting simple paper snowflakes.

Volumetric "fluffy" paper snowflake
This snowflake is very beautiful, fluffy. Such a paper snowflake will cheer you up and make it truly New Year's. Be sure to see other options for beautiful voluminous paper snowflakes! The more different snowflakes, the more beauty.
This option is made from an eight-ray snowflake. The workpiece is not folded in the same way as in the previous, six-beam version. But first you need a square. Take an A4 sheet and make a square out of it. Do not throw away the cut rectangle, you will later make small snowflakes from it.
The resulting square is already folded diagonally, it turned out to be a triangle. Next, this triangle must be folded in half again to get a smaller triangle.

And fold the resulting triangle in half again. It turns out that the square will be folded three times. The output will be a small triangle.

Now take this triangle by the fold line and fold it to the longest side. The result will be a figure, as in the first photo below. Now you need to cut off the excess part of the workpiece. Cut off along the conditional line, which is shown in the photo, and you get a ready-made blank from which a snowflake will be cut.

Take the blank with the center of the snowflake up. The bottom of the snowflake needs to be cut, to make something like a fringe, which will make the snowflake lush. Cuts should be made about 4 mm wide. The more cuts you make, the more magnificent the result will be.
Now carefully unfold the snowflake. It is important not to rush here so as not to tear the “fringe”. This turned out to be the lower part of the bulk snowflake. Now you need to make 2 more (or maybe 3) the same snowflakes, only smaller. Parts of different colors will look beautiful.
That is, if this snowflake was made from a 20 × 20 cm square, then do the next one in exactly the same way, only the square should be 15 × 15 cm. The third snowflake will be even smaller - from a 10 × 10 cm square.

Lay the smaller snowflake on top of the larger one so that the rays do not match. Glue them in the center. In the same way, put the third, smallest snowflake, glue it too. If desired, sequins, beads can be glued to the center or otherwise decorate your creation. Having made several of these snowflakes in different colors, you can very beautifully decorate an apartment, house or class at school.

I wish you all a Happy New Year! And let your snowflakes be the most beautiful!


