How to make paper crafts military equipment. Military equipment
Ships are included in the mandatory set of toys. Nowadays, children are used to receiving purchased cars as a gift, with which the child will play a little, and then throw it under the sofa or in a box with toys, and forget about it for a long time. Parents are very disappointed, because the toy is expensive, and the baby's interest in the new product disappears very quickly.
Yes, and this is normal, the baby is developing, he wants something new all the time. And that's good, actually. For parents, there is a way out: you need to make military equipment with your own hands from improvised materials.
The value of crafts
Creative work is of great importance for the development of children. In the Netherlands, the manufacture of crafts from waste material is so developed that there are a number of shops where you can buy the necessary waste material: bottle caps, old buttons, foam pieces, foam rubber bands, etc.
In fact, such work develops thinking, imagination. The child along the way acquires knowledge about the qualities and properties of various materials. Yes, and the completed one will be more appreciated by the baby, since he invested a piece of his soul and a lot of work in its manufacture.
Another important point is the joint activity of an adult and a child. Parents of the current generation are heavily loaded at work, devote little time to their children, but the joint production of military equipment with their own hands from improvised materials will unite the family at the same table. Common activities always bring together. Consider several options for crafts.
foam tank
The easiest option for crafts that children can do on their own, for example, in kindergarten or elementary school, as gifts for dads on May 9 or February 23. technique" as a gift will fit perfectly.

To work, you will need two household sponges, cocktail tubes, scissors, PVA glue, colored cardboard. Leave the lower sponge in its original form and put the grater down. If desired, the edges of the tank hull can be rounded with scissors.
Carefully remove the grater from the second sponge and cut out 6 identical circles from it, sticking them on the ends of the lower sponge, 3 on each side. It remains only to cut the stars out of cardboard and insert the tubes. Instead of a die on a tank cannon, you can cut out a flame from a red or orange sponge. For this, the edges need to be sharpened. It was very simple to get a model of military equipment with your own hands - a tank.
When the glue sets, the toy is quite strong, so you can play with it perfectly, even in water. It will be interesting for children to watch how the sponge fills with water and the tank sinks.
Airplane
Let's consider how to make it from improvised materials: a green plastic bottle, thick cardboard, colored paper. You will also need a knife, scissors, PVA glue, a pencil, a black felt-tip pen for work.

In order to make an airplane, you need to cut two identical holes for the wings of the airplane in the middle part of the bottle. Then work continues with paper. On thick cardboard you need to draw a wing, portholes, tail, screw, stars. You can use self-adhesive for small parts.
Then the assembly of military equipment with their own hands begins. Crafts will be beautiful if you choose the following colors: khaki, dark green, light green, sand. First, large parts are attached: the wing is inserted, the tail of the aircraft is assembled and glued. Then, after unscrewing the cap of the bottle, a screw is inserted, cut out according to the diameter of the neck.
The last stage of work will be small details: portholes, stars. Sometimes terrifying shark teeth are painted on military aircraft. You can offer the child such an idea. He will like it. The toy turns out to be strong, it can even be thrown into the air, landing on the water.
wooden plane
To complete such a craft, you need to take a few ice cream sticks and a wooden clothespin, PVA glue, if desired, the model can be painted in the colors of military equipment. A preschooler will make such an airplane with his own hands from improvised materials.
Two sticks are glued to the clothespin in parallel, like the wings of a maize. For the tail, you will need two thinner sticks. From one, two small rounded pieces of wood are cut out, and possibly sawed off, which are glued to the edge of the clothespin. For a short shank, you need to cut off the very edge from the second stick. It is glued to the end.

You can paint such an aircraft in different colors. Such a toy is suitable for younger students, it is easy to hide it in a backpack and get it at breaks for games. If desired, you can glue the wheels from an old broken car.
Tank in quilling technique
The most complex example of do-it-yourself military equipment from improvised materials is a tracked tank. There are many details here that are made by twisting quilling ribbons. After making a row of wheels, they are glued together and glued with a strip. The result was a tank caterpillar. After completing a similar second part, a platform in the form of a square is glued, on which a tower is made separately from a thicker strip of paper.

A strip of paper is also wound around the tube from both ends and glued like a cannon to the side of the tower. Small details are added as desired: star, flag, hatch, etc.
The men's holiday is approaching and I want to please the stronger sex with pleasant surprises and gifts. Crafts for February 23 is an opportunity to show imagination and please loved ones. Involve a child in creativity, make a gift for dad, grandfather with your own hands. Any father will be pleased with a touching craft or a children's card from his son or daughter.
DIY crafts
Todrinking a gift in the store on February 23 is not a big problem. In each store before the holidays, the corresponding goods are laid out. It seems to us that a handmade gift will be much more pleasant and memorable than just a purchase. And your men, whether it be dad, husband, brother, will definitely like your and your child's efforts.
It's a good idea to make a photo frame for dad as a gift on February 23rd. Only one child can not cope with this work. If you take part in creativity, he will succeed.
For work you will need:
- Colored cardboard.
- Thicker cardboard (you can take any color).
- Colored paper for application or colored cardboard.
- Scissors.
- PVA glue.
- Ruler.
Take green cardboard, stepping back from the edge 4-5 cm with a ruler and draw a frame for the photo with a pencil. First, we figure out which photo will fit here, all our calculations depend on it. Drawn and attached photo. If everything works out, carefully cut out the frame.

We cut out the details for the design of the frame, drawing them by hand or printing them out on a printer.

We glue the colored appliqué to the frame and start making the frame itself. We cut out a rectangle from thick cardboard, equal in area to the frame, we get the back of the product. We glue the two parts of the cardboard and glue the leg for stability. The gift is ready.

You can decorate the frame by gluing a shell, a beaded fish, an anchor, a steering wheel - on the theme of the sea.
If you don’t know what to give a young man on February 23, there is a good option, here is such a tank:

It is assembled from corrugated paper, double-sided tape or glue.

It turns out such an interesting gift:

Another tank, but with a different "content".

The same materials are used, only there is more sweetness.

Received an original gift:

Salt dough crafts made with your child on February 23 can be presented at home and at work, at school and in kindergarten. These gifts do not require large expenses, but they will delight you with care and attention.

Salt dough is easy to make. From the dough you can make a figurine, a key chain, a fridge magnet.
One of the many recipes for salt dough:
- Flour - 300 grams.
- Salt ordinary, large - 300 grams.
- Water - 200 grams.
- Vegetable oil - 1 tbsp. a spoon.
Knead the dough by adding water gradually. When it is ready, roll it out on the table and squeeze out the details with molds. Even small children can cope with such simple work. We dry the blanks in the oven. You can paint with either food grade paints or acrylic paints. It is up to you whether you give for food or for beauty.


Our next craft for February 23 is a salt dough keychain. We make for dads, grandfathers, brothers and mothers (after all, there are mothers in the military).

We collect every little thing: coins, nuts, buttons, screws, cloves - all this will come in handy for us to work with the dough.

Cut out letters from cardboard: "P", "M" or the initial letter of the name, for example, Sasha. We make a hole in the corner with a hole punch or scissors.


We spread the “sausage” from the dough on cardboard, evenly distributing it over the surface of the letter.

We make a through hole for the ring with an awl or scissors.


We paint the keychain in any color, best of all with acrylic paints. If the paint is not waterproof, cover the top of the keychain with varnish (you can use nail polish).

Leave to dry or dry in the oven. When it dries, we pass the ring through the hole and you can give it.
We got an original steampunk keychain. What is "steampunk"? Science fiction and mechanics, very interesting style.

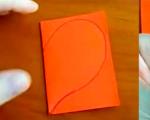
First, let's come up with the design of our paper postcard. It will be simple to perform or complex - you decide. The main thing is that it should be a beautiful congratulation on February 23.

Volumetric postcards in kindergarten and at school:
Let's start with the original postcard, on which we will write congratulations and wishes. We will make postcards in different techniques. You can make such a postcard using the origami technique. For a postcard, you will need a rectangular sheet of colored paper. Take A4 paper for testing, fold according to the instructions, you will understand which sheet size is more suitable.

Fold the rectangle in half along the sheet. The paper folds like a book, there is nothing difficult to work with.

We unfold the sheet and fold it again, from the sides to the center.

We got a rectangle: on one side there is a sheet, and on the other - a vest.

The photo shows that you need to bend inward, this is a mistake. Bend the corners outward so that the corners protrude slightly beyond the fold. We made “sleeves”, turn the work over and bend it 2 cm in the opposite direction.


This is how the “collar” turns out, we will send a square of the shirt to the corners of the collar.


A tie or bow tie can be cut out and glued onto the “shirt”, or you can make a tie, as in the video.

Do not forget to write congratulations and wishes inside the sheet. We hope that your man will be satisfied. And if you add a small gift (for his hobby), it will be just wonderful.
Here is such an interesting postcard you can make with your child. A very interesting technique that requires only perseverance and patience.

For work you will need:
- A set of paper ribbons (you can cut it yourself).
- Cardboard.
- PVA glue.
- Tweezers.
- Scissors.
Special tool for twisting ribbons (you can do it yourself).
How to make a twisting tool: stick a needle with a large eye into a wooden stick (pencil, stick from an art brush) and bite the eye in half.

The scheme of work on the postcard:

Cut out the base from cardboard, cut thin strips, winding them around the tool, fix the edges, and then glue onto the base.
Even for postcards, any CDs are suitable. For this postcard, we cut out a star from red cardboard, paste a CD-ROM over the star and inscriptions and clippings from magazines or drawings.

Modular origami on a military theme
Modular origami - the ability to create a voluminous and realistic paper figure. The technique differs from ordinary origami, since all the figures are not made up of one sheet of paper, but of the same modules. In this article, you will learn how to make crafts on a military theme, using the modular origami method: an airplane and a ship, which can be used as a visual aid in history lessons or presented as a do-it-yourself gift to grandfather and father.
Materials:
- origami paper;
- scissors;
- Ruler and pencil.
1. A4 sheet can be cut in two ways, depending on which rectangles are obtained with a size of 53 × 74 mm or 37 × 53 mm. The first method is to divide the length and width into 4 equal parts, and in the second, divide the width into 4 parts, and the length into 8.
2. Cut the sheet along the marked lines and proceed to folding each part. To do this, fold the rectangle in half, turn it over and in half again. After that, unfold once to get a visible fold line.


4. Lift the edges of the triangle up and bend their corners through a large triangle.

5. After that, straighten and fold these corners into triangles along the marked lines.


To assemble this airplane, you need to make 89 modules according to the scheme described above. To make the product more original, use paper of different colors, for example, you can make 18 blue and 71 yellow modules. Starting with 2 blue modules, add yellow and blue again. You can watch a more detailed master class in the video.

Another aircraft model requires more modules. You will need 1142 pieces of different colors: 40 gray, 242 black, 166 white, 694 red. You can choose the color yourself. A detailed master class will help you assemble an airplane, even without special skills, watch the video.

1. Make the first row of 47 modules and in the same way add 47 more modules for two rows.
2. In the fourth row of models there should be 51, since four additional modules need to be fixed on the sides of the bow and stern of the future vessel.

3. In rows five through seven, you need to attach 55 modules each, and do not forget to give the craft the shape of a ship. Lightly squeeze the sides so that the sailboat does not come out round, but slightly flat.
4. Then attach 55 modules, while shaping the nose of the ship so that it is a little sharp. In the ninth row, elements of a different color are put on with short sides so that the ship's structure is strong.

5. There should be 8 modules on the side parts of the sailboat in the 10th row, they are inserted between adjacent modules (the long side is inside, and the pockets are outside).
6. On the stern, you need to make a rim of a different color. To do this, insert the modules in the usual way, not as in paragraph 5.
7. In order to decorate the bow, put on symmetrically modular blanks in the extreme part. It turns out 9 modules in the 11th row, 6 modules will be in the 12th row and 3 in the thirteenth.
8. For the bottom you will need about 140 modular triangles. Start with three modules and add one in each row until you have 8 modules, but don't forget to try on the bottom of the ship. After that, you will need to make 9 rows without increasing, alternating 7 and 8 modular rows. Starting from the 17th row, reduce the number of modules from seven to one.
9. To make a sail, take 252 modules, while you can choose the color and ornament yourself. The first row should consist of 17 modules, in the next ten you need to alternate 16-17 modules, and starting from 12, reduce the number of modules (minus one for each side). You get 16 rows, but in the last one, fasten the modules on the contrary and slightly bend the sail.
10. Take a wooden kebab stick 20-25 cm long and glue it with colored paper. It will act as a mast, so fix it in the center of the ship and attach the sail to it.
11. Collect the flag, and also make portholes.
We hope you liked our article Crafts on a military theme with your own hands origami. Also go to other sections of the site, there you can find many interesting master classes.
Hi all! On the agenda today are crafts that everyone will soon have to do with their children, because February 23 is such a holiday that is celebrated in every family. Of course, our beloved men should be very tasty to feed a gala dinner, make hot and, of course, salads. But what about gifts, you can’t do without them, so take ideas and implement them.
Even if it is a very small and modest souvenir, it will be made by hand, which will surely win over your dad or grandfather. Therefore, sit back and look, choose, and then get to work).
I remember when I was at school, we made key chains from artificial leather at labor lessons, now you can make them from felt or foamiran.
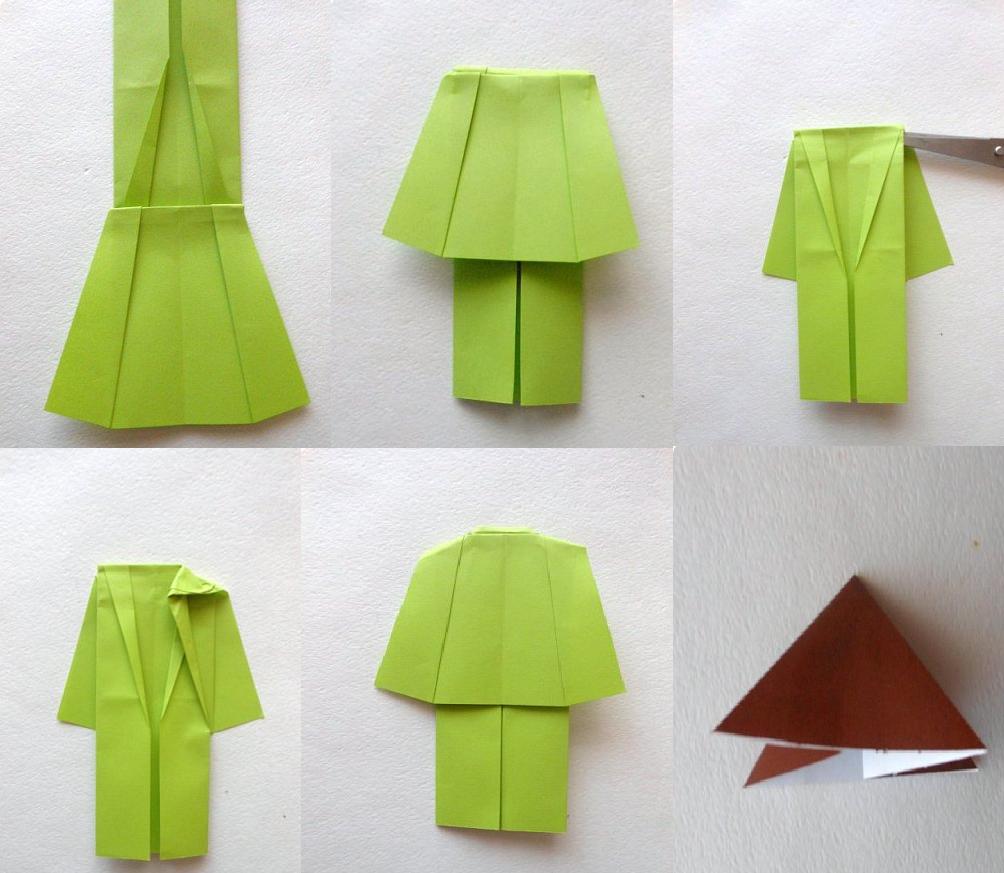
There is nothing easier than to take a piece of paper and make amusing and funny people out of it. This is me and such a famous technique as origami, such creative work is suitable for the senior or preparatory group of the garden, look at this diagram and repeat all the steps. It turned out not something like a rocket, and your dad is sitting in it))).

You can also cut out a cardboard rocket with the children, and then glue the windows, you get a simple application, children of the middle or younger group can handle it.

All men love tea and coffee, so why don't we take advantage of it.

But, as a teacher, you will have to make blanks from thick cardboard. Moreover, one part of the mug should be slightly smaller.

Fold in half using the accordion method.

Attach the tea bag tag to the string.

And then decorate by gluing the stripes that symbolize our flag.

It came out easy and beautiful.
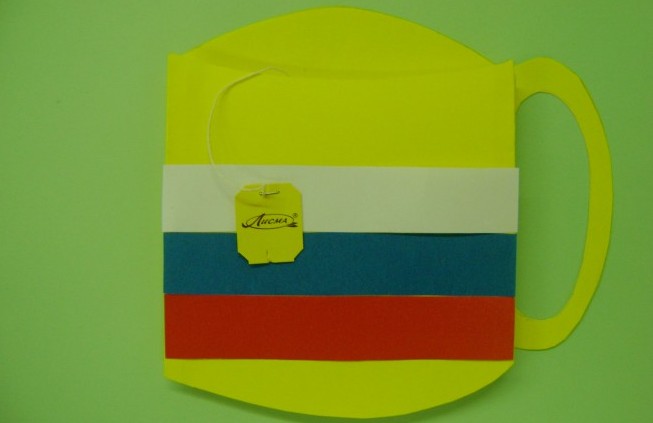
And most importantly, the children liked it and gave them great pleasure.

An interesting option would be a craft in the form of a train.


We make gifts with schoolchildren to dads
Of course, there will be congratulations and wishes on this day, so I suggest that elementary school students make a postcard out of paper, using interesting material. For example, you can tastefully decorate a disposable paper plate.


Or create a real masterpiece card from very unusual materials in the style of plasticine.

We will need:
- white paper A4 - 1 pc.
- printed text in the form of poetry
- pencil, ruler, plasticine
- cocktail tubes
- fireworks or sparkles
- PVA glue

Stages of work:
1. Fold a piece of white paper in half. Draw like this, a vertical line.

2. Then cut along its contour with special decorative scissors.


4. Lay out a flag from plasticine and decorate the numbers.

5. Then cut the tubes of different colors finely and stick them into the plasticine. Glue the salute, and then let the glue dry. Here is such a wonderful postcard, you can say the souvenir turned out, it remains only to put congratulatory wishes.

You can also, if you did not like the previous version, use the art of quilling for high school students.

Crafts from discs, the most ordinary CDs with holiday symbols, look very bright and impressive.

Impressive, simple and quite creative looking.

You can resort to this method, it is more suitable for children from 5-10 years old, you will need glue, paper and scissors. This is the well-known shirt and tie.


You can complicate the task a little and make an origami-style tie.

A popular school children's craft can be a boat made of cardboard and paper.

A photo frame will be an original present, and you need to cut a rim from an ordinary hard box, and then use woolen threads to decorate and ennoble with stars. You can use stickers, rhinestones and scrapbooking materials.

Can grandfathers make a medal from plasticine balls.

Paper soldier master class for the little ones
Plasticine crafts are considered the simplest and easiest. You can find a lot of variations, because the symbols of the upcoming men's holiday will be all kinds of cars and road transport.
In the first place, as always, is the tank, the majority make it, I don’t know why, but it happened by tradition, probably this is one of the symbols of victory.

You can make it exclusively from modeling dough or plasticine, as well as using matchboxes.

There is another option, use all sorts of things like nuts, dowels and other working charms.

The second place is occupied by airplanes.

If you have never done them, then here is a step-by-step instruction for you.

Or build a helicopter, just don't fly away).

For older children, you can make a gang of soldiers.

Do you want to know the features of their production? Then look further at all the step-by-step steps and repeat all the paper folding and folding steps.
Here's the set you'll need to get started:

Now, with regards to actions, move from right to left, and then everything will work out for you.


In general, then you can make a wall newspaper and decorate a group or class. Looks fun and funny, doesn't it?

Learning to make gifts for dad on Defenders of the Fatherland Day
The first option that students use is the trimming method, when squares are cut out of corrugated paper, then they are wound on a stick or pencil and glued to a sheet.


Or a real picture, well, here of course you have to tinker longer.

For younger children, the ball rolling technique is well suited.

Well, the most difficult option is a photo frame, with your own hands from a special material, like ball plasticine.

If your children are still very young, then you can invite them to make such a boat out of a dish sponge and a stick, this is completely for kids).

In addition to everything, you can learn a poem.

Master class of crafts with preschoolers

We will need:
- ice cream sticks - 8 pcs.
- straw for juice - 1 pc.
- PVA glue
- gouache and brush
- scissors
Stages of work:
1. Make a base, so to speak, a rod on which the wings will be held. Take 5 sticks and glue them together with PVA glue.

2. Then glue one stick perpendicularly, but step back a little from the edge, as shown in this picture.

3. After that, glue the pieces of tubes on the sides.

4. Approximately the following should turn out. If you have too, proceed to the next step.

5. At this stage, you need to glue the second one parallel to the first stick, you will get a wing.

6. Make the tail of the plane from another stick, just cut it in half.

7. The most long-awaited moment is the design, take brushes and gouache and paint the body.

8. And here it is such a funny and super-duper airplane. By the way, you still need a propeller, do not forget to glue it together with a button or bead.

Or you can do almost the same thing from clothespins.

I also really liked the option of a regular plastic bottle and straws.

If you also liked this work, take note of it, here are its steps.

We make toys from different improvised means
In most cases, men like all kinds of equipment, including military ones, so the following can be done from paper napkins and matchboxes, a tank:

Or an ordinary car.

Using sponges for washing dishes, fold a small tank.

Or arrange a delicious gift using a mountain of chocolates that you can ask for from mom.

Or you can make an application.

In general, surprise your loved ones and relatives with something, I gave you ideas for reflection, so think and recreate. Good luck.

If among your friends there are people who are fond of hunting, for example, grandfather, then you can give him such a junk souvenir in the form of deer horns from a plastic bottle and caps.

You can use your Lego constructor and make a stand for pencils and pens, stationery.

You can build a racer from a toilet paper roll, take a little man from the designer.

Of course, they also make papier-mâché toys, but it's a bit complicated.

Or here is such a small masterpiece from cotton pads - a postcard.

And this is all I have. I wish you success in everything you have planned, patience and perseverance, as well as inspiration and creative ideas. Until then, see you all!
Sincerely, Ekaterina Mantsurova
Both in schools and in preschool institutions, teachers try to make crafts with children for all holidays as gifts to parents or simply for the purpose of implementing creative ideas. On Victory Day or February 23, military equipment most often becomes the object of creativity. Crafts are made from a variety of materials, exhibitions and competitions for the best product are organized. When such a task is given at home, parents are at a loss as to how to help the child, not to blunder and cope with the task perfectly.
The article gives several different options for making simple do-it-yourself military equipment crafts. The description of the work and the attached photos will help you quickly understand the principle of the product. Examples are given of the manufacture of tanks and aircraft, helicopters and machines made of paper and corrugated cardboard, waste material and origami folding. We hope that this material will help schoolchildren and parents of toddlers to fulfill the task of the teacher and get positive feedback at the exhibition.
cardboard plane
For such a simple craft of military equipment, you will need a sheet of colored thick cardboard, PVA glue, scissors and an empty box of matches. Two identical rectangles the width of a matchbox are cut along the length of the A4 sheet. These will be the wings of the aircraft. The corners are rounded off with scissors. The screw is glued crosswise from two thin, equal in length rounded strips. We glue the boxes with glue and attach the wings with the central parts. You can leave it like that, you get a maize, or you can, as in the photo below, fasten the wings along the edges.
The body is also assembled from 2 strips, and the tail has a loop on top, glued on the edges. The box can be wrapped with colored paper. If you make a craft out of green cardboard and attach red stars to the edges of the wings, you will get a craft of military equipment. Can be taken to an exhibition.
junk aircraft
To perform the next version of the aircraft, you will need two rounded wooden sticks that were left after eating ice cream or examining the throat with a disposable instrument from the doctor. For the body, take a wooden clothespin, and for the tail - a smaller stick, for example, for stirring coffee in the machine. If it's too long, cut it off and round off the edges (you can get your dad to do this too).

Attach the parts to each other either with transparent superglue "Crystal" or with a glue gun. After drying, they paint the crafts of military equipment with gouache, then you can additionally cover the surface with acrylic varnish.
plastic helicopter
In order to create a plastic helicopter, prepare one small container for juice or water with a wide screw cap, three cocktail tubes with an "accordion" for bending the top, a ball that fits the size of the bottle, a bead, scissors, an awl, stapler with paper clips and good glue (preferably a glue gun).

The photo above clearly shows the step-by-step production of military equipment crafts with your own hands. In kindergarten, such a helicopter can be given to a child even to play with friends. Having made such an aircraft together with their parents, the child will treat it more carefully, as he made efforts to create it.
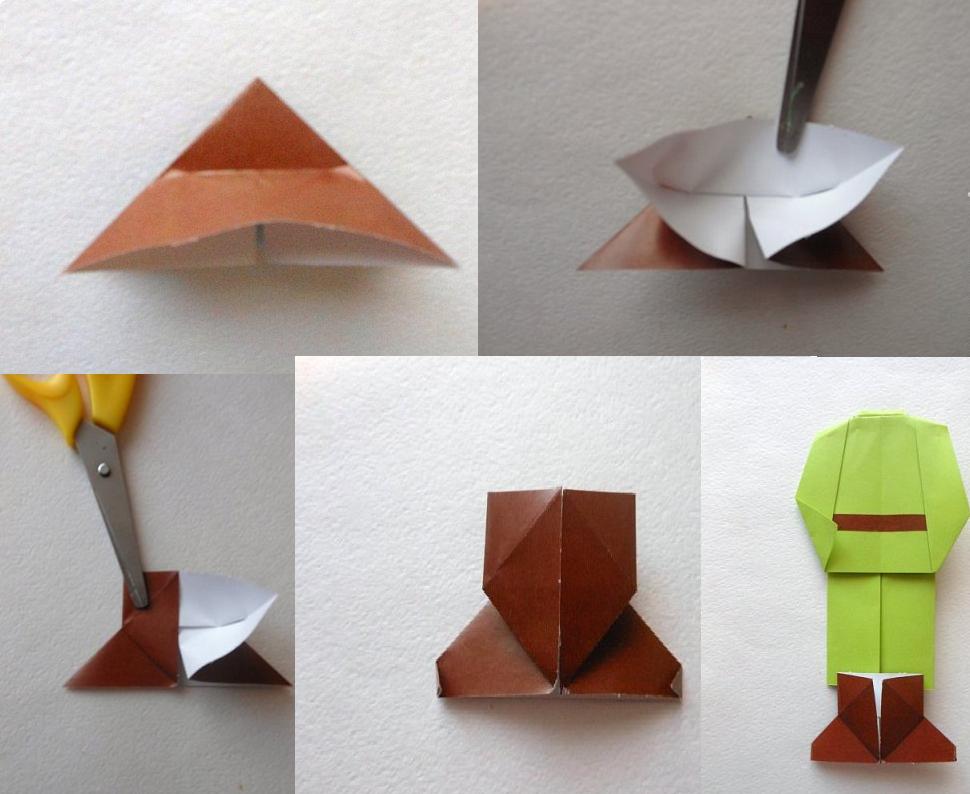
Paper commander's jeep
By folding paper in the origami way, you can make an option for crafting military equipment in the garden. Following the step-by-step drawing, you need to act in the order of the numbers. To work, take a sheet of A4 paper and folding one of the corners diagonally form an even square. The excess strip on the side is cut off with scissors.

To assemble the original figure shown in Figure 1, you need to bend the square in half from top to bottom and from left to right, then repeat the procedure again, only doing diagonal folds. It remains to bend the triangles formed on the sides inward on both sides. The resulting figure will be the initial when folding origami. Then they act clearly according to the picture above.
After manufacturing, the jeep is painted with pencils, wax crayons or paints. It is better to do the craft together with the older preschooler, as it requires constant monitoring. The folds must be carefully ironed so that the work looks neat.
How to make a crepe paper tank
An excellent piece of military equipment for kindergarten will be a tank made of thick corrugated paper. If you are familiar with the quilling technique, then you can easily cope with such a simple task. Novice masters can be reassured, they will succeed the first time too. We take any three colors of wavy paper, you can use the data on the sample below, it is interesting to choose the colors of a military tank - green, marsh, sand. The caterpillars of the machine are in any case made black.

To twist the hanks of paper, you need to use some kind of rod for convenience. It can be either a special quilling hook with a slot at the end for inserting paper, or any substitute, such as a toothpick, a ballpoint pen refill, or a wooden skewer. Wheels of different sizes are wound, reducing the diameter towards the edges of the caterpillar. The edge is attached to the PVA to the last turn. The created parts are fastened together and wrapped with two layers of black corrugated paper. In order for both tracks to have a base, it is necessary to place a cylinder twisted from a wide strip in the center between them, on which the tower with the gun will subsequently be located.
To attach a long muzzle, it is best to use a glue gun or insert a rod, such as a piece of wire or a toothpick, sticking it into the body of the tower. The tank performs only the function of crafts, it is inconvenient to play with it, since the wheels do not rotate, and children prefer mobile toys.
Plane from a plastic bottle
With packing cardboard, green plastic bottles and a glue gun, you can make another craft for an exhibition in a kindergarten or elementary school. In the absence of toys, such an airplane can be made within a few minutes in nature or in the country.

Two oval holes are cut out in the container on opposite sides, corrugated cardboard folded into a tube is inserted there. These will be the wings. For the tail, three files are made in the neck. The nose of the aircraft can be made from the remaining cover by gluing it to the bottom with a glue gun.
The article gives the simplest options for crafts of equipment that can be decorated like military vehicles by adding emblems, stars, painting in suitable colors. Happy creations!