Cord weaving patterns. An ancient type of needlework - rope weaving with the modern name "macrame"
Weaving a bracelet out of lace will be easy. What is good about this type of needlework is that it does not cost much, and it does not take much time. In addition, the source material can be very diverse. The color range is also huge in its diversity.


How to start weaving bracelets from laces
First of all, you need to decide on the color of the product and the material from which you plan to weave the bracelet.
Weaving "knots":

Simple weaving, with which light and thin bracelets are created:


In addition to simple weaving, beads are woven into lace bracelets, the product looks even more chic. Yes, and there are no difficulties in execution. Here are some ideas:

2. You need a regular cord and beads. Weave an ordinary pigtail and weave beads into it. Everything is simple.


3. And here is another example of weaving a bracelet made of laces and beads, the already well-known "Shambhala".
a) Cut off 50 cm of the cord (the best option is a waxed cord, because it is strong enough). We put on the cord the number of beads you need as they will be located in the finished bracelet.

b) Now you need to stretch the base with beads to its full length and fasten it so that it is more convenient to continue working.

c) The base is fixed, and now you can start knitting knots. To do this, you need a waxed cord 1 m long. We tie a regular knot, but so that the interlacing of the ropes is under the base from the wrong side.

d) Now you need to make another knot, right, but close to the main one (already done). As it shown on the picture.

e) We make one more of the same knot, but already the left one.

f) Now move the first bead and under it you need to make a combination of knots right left.

g) We move the next bead, but the combination of nodes under it is reversed, i.e. left-right. We continue to do the same with all the other beads, changing the combination of knots after each.
h) When the last bead remains, then under it weave a combination right-left-right.

i) Fastening cords. It is necessary to turn the bracelet over to the wrong side and pull the cord that has become left into the loop on the right side (Fig. 2). Before tightening the cord, you need to drop a drop of glue in the place where the threads fit, after tightening, cut the cord as close to the knot as possible. Here we drip more glue, and press the right cord already. Then we cut.

So, the bracelet itself is ready. It remains to make a castle for him. Untie a knot at one end of the bracelet cord. Now you need to thread both ends of the base towards each other through any bead that will be in the center of the castle.


Now weave as many knots as you need for the castle. Nodules need to be alternated (right with left). The bead that was in the middle of the castle should be woven. (But you can not add anything to the castle at all). Fasten the ends of the lock threads, as in the bracelet. That's all! The bracelet is ready.
There is also a video that shows in detail how to weave Shambhala.
Weaving bracelets from laces for men
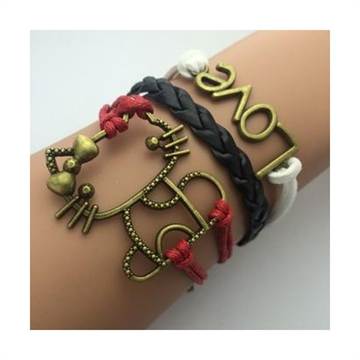
Not only do we need jewelry, men are also not averse to wearing them. It goes without saying that men's bracelets should be made in a more restrained range, and the material for manufacturing should be special. In this case, leather laces are perfect. A bracelet made of such material will not only add uniqueness to the image, but also emphasize masculinity.
Weaving bracelets from leather laces is almost the same as options where any other materials are used. This can be verified by examples.
The first video is in English, but the translation is absolutely not needed, everything is very simple:
Another video in English, but easy to understand:
There are many options for weaving leather cord bracelets. These bracelets are suitable not only for men, but also for women. So turn on your imagination and forward to new masterpieces!
Baubles are a beautiful decoration that both women and men love to wear. The modern accessories industry offers us all kinds of bracelets made of precious materials. However, modern fashion dictates a return to unpretentious elegant simplicity. Therefore, this material is devoted to how to weave bracelets from laces. It may not be clear to you how the decoration is made from such a nondescript material that is used for lacing shoes? This article will dispel these stereotypes by teaching you how to weave original baubles.
Step-by-step instructions and patterns for weaving lace bracelets
Lace is a very convenient material for creating all kinds of DIY crafts: it can be used to decorate clothes, jewelry, shoes, interior items, hanging toys, and bracelets. The last use of this material is considered the most popular among young people. Most young guys and girls are happy to decorate themselves with such accessories, especially during the holidays.
There are a lot of ways to weave bracelets from laces. Modern jewelry is original, unique due to the possibility of using additional fittings. You may need buttons, beads, pebbles and other items. This helps to transform even the simplest thread, a single cord without weaving. You can buy such decor items in needlework stores. When you master the weaving of laces according to the instructions below, you will be able to create designer jewelry with a little imagination and skill.
Weaving a bracelet with beads
Jewelry with beads is an original accessory. Such a bauble can even be masculine, if you choose accessories of strict, dark shades. There are no secrets and difficulties in manufacturing, as you will see from the given master class. By alternating different colors of beads, other accessories, you can get a lot of different jewelry. The finished accessory is suitable for different types, styles of clothing, depending on the shades used. Creating jewelry with your own hands, you can pick up those details, elements that harmoniously complement your image. Step-by-step instruction:
- Prepare for work three satin cords 1 m long, metal beads, a carabiner, trailers, connecting rings, pliers, round nose pliers.

- We apply a little super-glue inside the limit switch, glue all three segments there, clamp it with pliers.
- On the other edge of the segments we string an equal number of metal beads, tie knots.

- First weave 5-6 cm pigtails.
- We pull the bead to the left extreme segment, weave it into a pigtail, wrap it with an empty segment. Again add a bead to the left edge, braid. This method should include everything.

- Again we make a pigtail 5-6 cm, we make out the edge, as at the beginning of the product, gluing it into the end cap.
- We add a lock: we open a small connecting ring, we string a carabiner loop on it, we attach it to the limit switch, we close the ring. We connect the second connector with a small ring, fasten it to the carabiner clasp.

How to weave a bracelet for men

The weaving of such men's bracelets comes out multi-layered, voluminous. The scheme of such a product is not difficult, and according to the master class below with visual photos and video instructions, you can weave it without difficulty. Remember that during work it is important to monitor the uniform tension of the threads so that the finished bauble is even along the entire length. Also, do not be lazy to singe the laces, otherwise they will quickly fray and will look untidy. Technique step by step:
- We measure 60 cm of green, and black - 4 times more than the volume of the wrist. Fold the green in half. We tie.
- We raise the green on one side, we put the black one in, weave it like a regular knot. We make the same knot on the other side.

- We continue the product, braiding the usual knots from one and the second edge.
- At the end, tighten the knot tightly, cut off, singe the edges of the dark cord. We tie a knot at the end of the green, cut off the excess, singe. This knot will enter the loop at the beginning of the product, closing the bracelet.

How to make a leather cord bracelet

The use of leather makes the accessory noble, solid. You can wear it on the wrist, ankle, above the elbow. Leather braid can have a different texture and color, so choose the one that suits you best. Interesting options come out as a result if you use different textures. The finished product only wins in terms of visual perception when combining materials. Instruction step by step:
- Prepare embroidery thread, thin leather cord, thick waxed rope, scissors for work. Cut 25 cm of rope, make a loop at the end.
- We make a knot on the loop, cut off the excess from one edge, leaving 0.5 cm of the tip.

- We place the end of the thin leather near the knot, as in the photo.
- We wrap the leather waxed rope in a circle until the tip left 0.5 cm disappears from view.

- We make one more turn, stretch the end into the resulting loop, tighten until a tight knot is formed.
- We take the thread for embroidery, attach its end to the rope and cord.

- We wrap the rope in a circle with a thread for such a distance as you want. After we fix the thread, as in step 5.
- We continue weaving, alternating wrapping the waxed thread with a leather strip and embroidery threads. It will look nice if these sections are the same in length.

- At the end of each section, do not forget to secure the material with a knot, as in step 5.
- We make a knot at the end of the cord so that it fits inside the loop at the beginning of the product. Cut off excess ends.

Video tutorials for beginners on weaving lace bracelets
In ancient times, laces were made elegant by interweaving a variety of threads, which at the same time gave the material strength. Such decorations were called galloons and were used to decorate festive, everyday clothes. Later, during the heyday of the hippie culture, beautiful crafts began to be made from simple materials, because the children of flowers rejected precious stones and metals. So there were bracelets woven with laces. Additionally, rubber bands, feathers and other decorative items were woven into the accessories, which made the decoration very original and unique.
You can comprehend the creation of bracelets from laces in the video tutorials below, which clearly demonstrate the schemes of various baubles with which you will decorate your wrist. Previously, a deep meaning was laid in hand-made products: the work was done only with positive emotions, which charged the craft, different colors were used, stones that had a special meaning and properties. Thus, a real amulet was born. And you can make not an ordinary bracelet, but charged with positive and good energy. This decoration will always make you happy.
Weave a bracelet of two thin laces
Bracelet "Shambhala" in the technique of macrame from cords for weaving
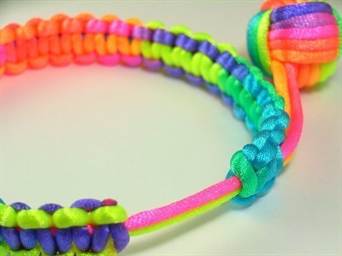
How to make a colorful bauble bracelet for kids
Paracord bracelet weaving tutorial
For one heart you will need:
- 2 pairs of shoelaces (white and red or white and blue) 1-1.2 m long;
- transparent glue "Moment" and a toothpick;
- a ring or chain for a keychain.
First, a little theory for those who are not familiar with this technique.
Round or square weaving is carried out with 2 cords (preferably of a different color), which at the beginning of work are cross-crossed, resulting in 4 ends.
Round weaving of 4 cords (is carried out in a circle alternately by each of the ends).
1
. Lay two long cords on top of each other crosswise. Bring the upper end of the cord (A) down to the right end (B), forming a loop.
2
. Move the right end of the cord (B) to the left, to the lower end (C).
3
. Move the lower end of the cord (C) up to the left end (D).
4
. Shift the left end of the cord (D) to the right and thread it into the loop formed by the upper end (A) - the cords are fixed in the “lock”.
5
. Tighten all four ends tightly and repeat steps 1-5 to desired length. The result is a round plexus with alternating colors in a spiral.

Square weaving of 4 cords (first with two cords of the same color, then with two cords of another color).

1
. Lay the cords crosswise. Place the top end of the cord (A) down, forming a loop.
2
. Pull the lower end of the cord (B) up, forming a loop.
3
. Move the right end of the cord (C) to the left and thread it through the loop formed by end B.
4
. Shift the left end of the cord (G) to the right and thread it into the loop formed by end A - the cords are fixed in the “lock”.
5
. Tighten all four ends tightly and repeat steps 1-5 to desired length. The result is a square-shaped plexus with faces alternating in color.

To get started, you can practice weaving in this way by completing these cute key chains. Before starting braiding, do elementary node With loop for suspension.

1
. Fold the cords in half.
2
. Lay one cord around the other and make a knot.
3
. Tighten the knot tightly - the result is a loop for hanging.
4
. Now turn the piece with the loop upside down and, placing the 4 ends of the cords crosswise, continue weaving in a round or square way.
After completing the last row, close up ends cords in one of the following ways.
Keychain with a tassel: without tightening the cords of the last row, pass each end in a circle under the next cord in the center of the braid. Then tighten all ends well.

Keychain with a blunt end: tighten the last row tightly and cut the ends of the braid with nail scissors. Carefully melt the ends of the cords or grease with a toothpick with transparent Moment glue and hide inside the braid. For plastic cords, the ends do not need to be melted.

In the same way, you can learn to weave from 3 cords (6 ends).
Round weaving of 6 cords perform according to the same principle as round weaving of 4 cords: alternately transfer one cord to another, and the last one is threaded into the loop formed by the initial cord. Thus, all ends of the cords are fixed in a "lock". Tighten all six ends tightly. Repeat according to this scheme until the desired length of the product.

Rectangular weaving of 6 cords- this is an expanded square weave of 4 cords:

1
. Place the upper ends of the 2 cords (A and B) down so that they lie to the left of the corresponding lower ends (C and D).
2
. Move the lower ends up so that they lie to the right of the folded ends of the cords.
3
4
. Thread the left end in the same way (E).
5
. Tighten all six ends firmly. Follow the next cell in the same way, starting from the bottom ends. Repeat steps 1-5 (alternating the beginning of weaving with the upper and lower ends until the desired length of the product.

In addition, an additional number of ends allows you to perform spiral weaving(it looks like a round one, but it also twists in a spiral).

1
. Place the upper ends of the 2 cords (A and B) down so that they lie to the right of the corresponding lower ends (C and D).
2
. Move the lower ends up so that they lie to the left of the folded ends of the cords.
3
. Pass the right end (D) over the 1st loop into the 2nd loop. Then, skipping over the 3rd loop, pass through the 4th.
4
. Pass the left end in the same way (E)
5
. Tighten all six ends firmly. Repeat steps 1-5 (switching the top ends to the right all the time). The result is a twisted plexus with color alternating in a spiral.

So, if these difficulties did not scare you away and you mastered the principles of weaving, then let's return to our souvenirs. Briefly, the execution sequence of the heart will be as follows:
1) first, with a square weave of 4 cords, we will complete the sharp tip of the heart;
2) then weave each half separately with a square or round weave of 4 cords;
3) after that we will connect the ends, bending them in the shape of a heart, and weave them together with a square weave.
And now in more detail:
1-2 . The beginning of the heart (both blue and red) is performed in the same way: first you need to weave 2 cells with a square weave of 4 cords.

2-3 . Now at the bottom of the heart should expand and split into 2 halves. To expand the weave in the middle, put an additional lace and braid the ends with a square weave.

4 . And then tighten.

5-8. Braid the resulting 6 ends together (rectangular weaving):
Alternately shift the upper ends down, and the lower ends up;
Interlace them with the right and left ends;
Tighten the entire weave.

And once again these actions in the picture, so as not to return to the beginning of the text:

9-11. Since each half needs to be woven with 4 ends, and we only have 6 so far, add another lace of a different color in the same way and braid the cell with a rectangular weave.
Needlework called kumihimo came from Japan. This is the weaving of cords using a simple device. Such cords were used by warriors to fasten armor, and by women to fasten a bow on their belts.
Where narrow strips of leather were used in medieval Europe, silk braided cords were used in Japan.
For weaving such products in Japan, relatively large wooden looms were used, but now they use small plastic discs.
Discs can be made by yourself from thick cardboard.
On the edge of the disk you need to make triangular notches.
Usually they make 32. But the choice of quantity is up to you.
Download book :)
Art of kumihimo.rar
In English. The diagrams are clear.
http://files.gameworld.kz/va57yxmh3y.html
Jacqul Carey Creatibe Kumihimo - Making kumihimo
Description: A guide to weaving cords and belts in the Japanese kumihimo technique, allowing you to work at a professional level.
More than 40 weaving patterns on 8 and 16 cords.
Full layout of patterns for color matching.
Ideas and advice.
http://files.gameworld.kz/5vyfprxnkv.html
Monkey Fist Knot
Knot
It was invented in the time of pirates, when a ship in distress had to throw a lifeline from another ship.
Pirates used a cannonball as a weighting agent.
In order to secure the core, this knot was developed.
It was also used as a melee weapon. A metal ball was woven inside the "fist".
As a weapon, it is still used to this day in various variations.
Eight strand cord
Two types of cord can be woven on 8 threads.
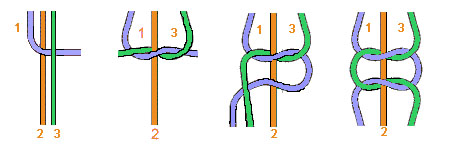
In the middle of 4 threads, a torsional knot is woven, 8 ends are obtained (Fig. 23).
Weaving starts from left to right: the 1st thread is laid on the 2nd, the 2nd on the 3rd, etc., the last - the 8th is pulled into the loop formed between the 1st and 2nd threads.
Repeating this weaving in one direction, weave a round gaitan cord. Alternating Direction:
one circle clockwise,
the other is against - you can weave an octagonal cord.
The second type of cord of 8 ends is woven on the basis of a thick rope.
4 threads are folded in half, tied with a knot "through the hand" and fixed at the upper end of the base, -
it turns out 8 ends of the threads.
The threads are divided into 2 groups: 1 - 4th on the left, 5 - 8th thread on the right (Fig. 24).
The extreme thread on the left (1st) is wound up as a warp, brought under the threads 8th and 7th, then superimposed on the 6th and 5th. The extreme thread on the right (8th) is wound up as a warp, brought under the 2nd and 3rd and superimposed on the 4th and 1st threads.
So, alternating weaving techniques, the cord is weaved to the desired length.
Cord "lotus"
Lay 2 crosswise, fix them in place.
You now have 4 ends:
lower (1st and 2nd),
upper (3rd and 4th).
Place the 1st end with a loop on the 2nd.
2nd end - on the 1st and 3rd.
3rd end - on the 2nd and 4th.
4th end - on the 3rd and skip under the 1st in the loop.
Tighten the knot by pulling on all ends at the same time.
Continue weaving in the same direction
(right to left, counterclockwise) and you will have a round twisting cord.
Knots can be tied both clockwise and counterclockwise.
If you alternate these directions, you get a cord not with a round, but with a square section.
You can weave a "lotus" cord from threads of 4 different colors.
mystic knot
In Chinese, "Pan Chang" means "endless".
One of the eight Buddhist symbols, "Pan Chang" symbolizes the secrets of the universe and is also known as the "Mystic Knot".
It is believed that it brings good luck.
The knot is quite complicated, so study the diagram before you start weaving.
1. Take a thread 3m long. Pin it on the pillow in the middle, form a loop with each end (see Fig. 1, vertical loops), pin it.
2. Take the right end of the thread, make a long loop out of it and thread it through all the vertical loops that were formed in the previous step. The loop will pass through each of them according to the scheme "under the thread-above the thread" (see the same Fig. 1). Stab. Now make another long loop from the same thread, pass it through the vertical loops, like the first, pin it up.
3. Now we take the left end and lead it along the upper part of the knot, wrapping around all the vertically running threads, except for the rightmost eye loop. In this case, the thread will pass first over the loops, and then under them (see Fig. 2). We stab. Once again we start the same thread to the right (in this case, a loop is formed on the left) and repeat the same at the bottom of the knot.
4. Now you need to additionally walk the left end of the thread along the vertical of the knot (see Fig. 3).
The main principle to keep in mind is:
when the thread goes up, it goes under 1 thread, over 3, again under 1, and again over 3 threads,
and when the thread goes down, it goes under 2, over 1, under 3, over 1 and under 1 thread.
Remember this sequence for yourself ("under one-over three-under one-over three-
and down-under two-over one-under three-over-under"), this will simplify matters.
1 - 3 - 1 - 3 - 2 - 1 - 3 - 1 - 1
5. Gently pull the knot over the outer loops and risers. It remains only to equalize the size of the petals, pulling up the corresponding sections of the thread (go from the middle of the knot in turn in different directions).
Wicker products, not only bracelets, but also belts for clothes, collars and cuffs, necklaces and bandages for the neck, scarves and stoles, bags and clutches, covers for phones and chair seats and much more, consist of knots, the tying technique of which can be easily found in such needlework as macrame. Macrame has its roots in Ancient Egypt, Greece, Iran, Peru and China. People of those times tied stone axes with similar knots and knitted mats. To this day, macrame is popular with both the female and male half of humanity. You will find patterns for weaving bracelets from laces below in the material.
Men, of course, do not wear jewelry, but they can wear a minimalistic stylish bracelet made of knitted or leather laces. Women's jewelry is more diverse and you have to have a large number of them in a woman's wardrobe, choosing them for each of your outfits, but in order not to spend your entire budget on beautiful little things, you can weave an original bracelet yourself. For a woven bracelet, various materials are taken: threads of different composition, incl. and floss, beads, satin and leather ribbons, fabric, knitted and leather laces, and to make the bracelet more attractive, it is recommended to add beads of various sizes and colors.
Selection of schemes
The selection presents below the patterns of weaving bracelets from laces.
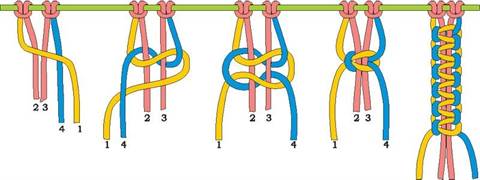
1) The most common knot in braided bracelets is the double flat knot.


2) The next weaving option is Tatting knots with pico air loops along the weave. Tatting knots are also called left and right loop knots.


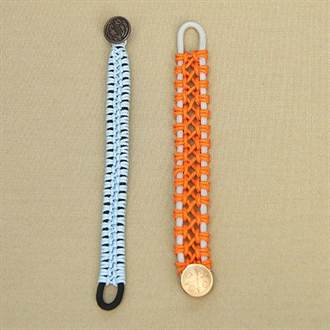
Here, tatting knots are woven not on one knotted cord, but on two.
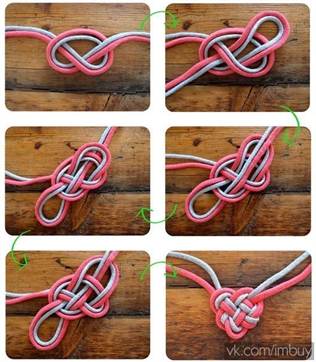
3) The Josephine knot (another name for the bow knot) is another way to weave a lovely bracelet.


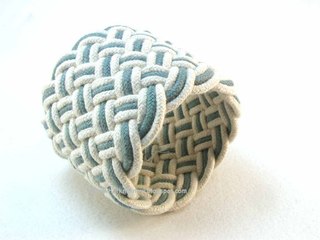
4) The Turkish knot or also called the Turkish head knot is very popular among lovers of bracelets with interesting patterns.


5) Weaving a variety of braids from 3, 4, 5 and 6 laces does not cause difficulties for beginner craftswomen.


6) Celtic knot ("Heart" knot) can be woven one for the whole bracelet and just tie the ends of the laces.

Cord and bead bracelet
In the following example, you can consider the step-by-step weaving of a bracelet made of laces and beads.

You must first measure the size of your wrist with a centimeter and buy a cord 4 times longer than your wrist size, because. you need a margin for knots, you will also need 9 large beads of different colors and 2 smaller beads for ties.
The color of the cord does not have to be black, the choice depends on desire.
The knot with which this bracelet is woven is called a double flat knot.
First of all, you need to cut the cord into three cords of different lengths: one will be short, equal to the length of the wrist, an increase in fit and size of beads, and bracelet ties; two other long ones, with which knots will be woven and beads will be braided. Next, the cords are fixed on the tablet or on the pillow with a pin, retreating a few (7-8) centimeters to the tie, and weaving begins. Arrange the laces as follows: two long ones along the edges from a short one.
1) The knots come first, they need to be made 1 or 2, double flat. You need to tie the knot like this: first, the left single flat knot is woven, then the right single flat knot under it, so you get a double flat knot, so that the knots look even and neat, you need a short cord that goes inside the knot, so to speak, the base, regularly tighten. The photo shows the sequence of weaving the knot:
2) Next, you need to put one large bead on the central lace, and the two extreme long laces wrap around the bead on the sides and again weave 1.5 double flat knots, one full double flat knot and one left or right single flat knot, depending on whether where was the beginning of the double knot. And again, the bead is put on the central cord, and also tied around.
3) So work continues until all the beads are woven or until the desired length of the bracelet (wrist size) is reached.
4) At the ends of the ties of the bracelet, one small bead is put on any cord on each side.
In order not to suffer every time with tying a bracelet, you can weave a braid for ties with the same double flat knots. While putting on the bracelet, the ties move apart inside this braid and then tighten again to fit the hand.
Leather bracelets
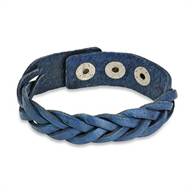
Bracelets can be woven from thin or wide leather laces (strips), depending on their color, they can be divided into men's and women's. For example, men prefer black, brown, gray, blue leather laces, but if you add more feminine openwork elements to the weave, then women can wear such a bracelet.
You can see the men's bracelet made of leather laces below:


But by adding any elements or colors, you can get women's bracelets: