Christmas tree made from coffee beans with your own hands. Herringbone coffee topiary
The New Year traditionally smells of tangerines and a Christmas tree. However, you can add variety and add a little coffee, cinnamon and vanilla. Christmas trees made of coffee beans in the interior delight with their appearance, as well as the aroma of warmth and comfort.

Making a Christmas tree from coffee beans is very close to the topiary technique, but it has its own nuances.

To create a New Year's decor with your own hands, we need:
- foam cone
- small glass jar
- wire
- alabaster + water
- glue gun for needlework + 3-5 sticks of glue
- jute twine
- coffee beans
- dried citrus fruits
- moss floral
- sackcloth
- decorative elements

How to make a Christmas tree from coffee beans
We connect the glue gun for needlework, since we will work first of all with it, but while it heats up, we are engaged in the base for the Christmas tree.

We take a foam cone and wire. We make a hole in the cone, carefully insert the wire into it.

We take jute twine and wrap it around the base for the Christmas tree.

We fix the twine with a glue gun. To make it look neat, we do it pointwise.

As a result, we get such a Christmas tree.

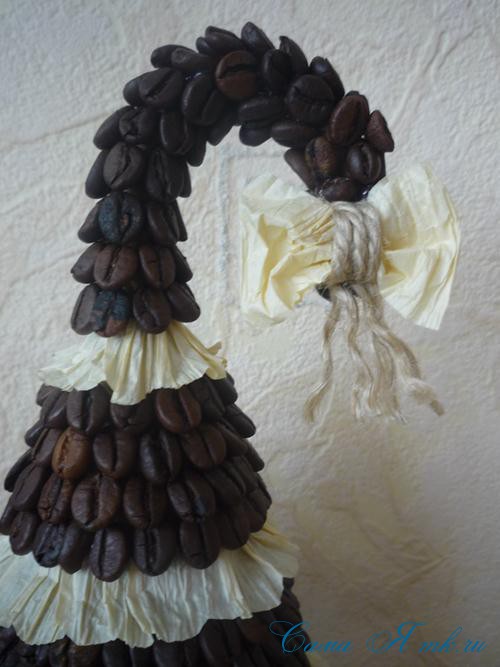
We take a thin wire. Fold it in half and twist it together.

We thread the twine into the "eye" that we got, and tie a knot, then we wrap the wire with jute along the entire length.


We insert the wire into the base of the Christmas tree. We have a playful ponytail, which we fix with a glue gun.

The leg of the Christmas tree should also be wrapped with twine.

Let's get started with coffee beans.

On the basis of our Christmas tree, we glue coffee beans one by one.

We start with a sharp edge at the base of the Christmas tree.

Then we close the bottom with grains ...

And the whole tree.
We try to place the grains as close as possible.
We make a pot for the Christmas tree.

We take a glass jar and burlap.

We make a jar in a bag (according to the diagram in the figure).
To prevent the bag from turning around, we fix it from the inside with glue.

We “plant” our Christmas tree using any method available to you (we have alabaster) and make a “green meadow” from moss.

We decorate our Christmas tree with threads, ropes, an orange and a bronze pendant.

Our Christmas tree is ready.

If you do not have moss - it does not matter, you can replace it with the same coffee beans.

Happy upcoming holidays everyone!
Topiary "Herringbone" - a unique New Year's souvenir that creates an upbeat festive mood. This decorative tree can be decorated in accordance with the symbols of the coming year, which will make the gift even more relevant.
Topiary-Christmas tree, made by hand, can be decorated with a variety of materials. Suitable tangerines, sweets, Christmas decorations, sisal, fir cones. The widest scope for imagination! You can use the technique of combining different materials in one composition, and she will only benefit from this. But for a beginner in this exciting business, it still makes sense to follow the proposed step-by-step instructions.
Options for creating a herringbone topiary
Elena 11/22/2016
The children and I made a bright Christmas tree like in the first picture of the balls. Bought plastic balls. We made a cone out of paper to focus on this shape. We connected the balls with instant glue, you only need a drop of it and it holds well. It turned out incredible beauty. Unusual and bright. Now we are on fire with the idea of making a big Christmas tree like this, but here you can’t get by with a couple of sets of balls)
Ekaterina 11/27/2016In kindergarten, there was a task to make crafts for the New Year. I do it every year and my imagination has already dried up a little. After thinking for a long time, I decided to make a three-dimensional Christmas tree. I got it 30 centimeters high. I made the base from whatman paper, used old beads to decorate Christmas trees. I also glued the entire cone with pine needles. Thin tinsel and rain braided the entire base. We made Christmas tree decorations with our daughter from colored paper and also glued them to our Christmas tree.
Rimma 14.08.2017
I want to make such an original topiary for the New Year, I like to do all kinds of crafts with my own hands and then decorate my home with them. By the way, this is also a wonderful gift.
Valeria 08/30/2017
Last year, we made a Christmas tree topiary with our daughter from spiral pasta painted green. It turned out very non-standard and beautiful, this year we want to build a Christmas tree from acorns - the material has already been prepared.
Add a commentOn the eve of the New Year, the entire population of our vast country is seized with a pre-holiday fever: bright decorations are hung in every house, snowflakes are cut out of paper and gifts are wrapped. Today we want to contribute to the exciting preparation and teach you how to create crafts from improvised material. A Christmas tree made from can be a wonderful gift that will decorate the house of your friends or relatives. Such a souvenir will look great on your desktop and transform a strict office environment. To make this little miracle, you will need a good mood, junk material and fragrant coffee beans.
Crafts. Master Class
We will take:
Thick paper or a piece of foam for the base.
Coffee beans.
Twine or dark colors.
Beads, ribbons and sequins for decoration.
Glue gun.
There are many options for decorating a Christmas tree made from coffee beans, but we will start with the simplest.
Stages of making crafts

First you need to make the base for the holiday tree. Roll up a cone of the desired size from thick paper and secure it securely with glue. If you want the structure to be more stable, then cut out the foam base for it.
Cover the base with dark paint so that the gaps between the coffee beans are not conspicuous. You can also use to braid the cone. Don't forget to fix the thread with glue, otherwise it will start to slide down and your work will look sloppy.
When everything is ready, you can start working with grains. First you should draw the top, and then gradually go down.
Christmas tree made of coffee beans is almost ready. In order to decorate it, you can use any means at hand. For example, form bows from ribbons, tie them with threads and pin them to the base. Nearby you can place large and small beads.
Christmas trees from coffee beans. Second option
This product will look more elegant, but you will have to spend a little more effort and time to make it. But the result will surely please you. You will need the following materials:

Sequence of work
Braid the base with twine so that no gaps are visible. Fix the rope with glue.
We fold the thin wire in half, tie a thread on the fold and wrap the “tail” with it. We insert the ends into the top of the future Christmas tree and fix it with glue.
We insert a thick wire into the base of the cone and also wrap it with twine.
Using a gun, glue the grains. In this case, you should start with a sharp bottom edge. After that, close the entire lower part and rise up. The top should be left open.
We randomly wrap the glass jar with burlap and fix it with hot glue.
To make the tree stable, we fill the pot with diluted alabaster or any material similar to it. Close the surface or coffee beans.
We decorate the finished tree with threads, bronze pendants and dried lemon slices.
The coffee bean Christmas tree is ready and can delight you until the next New Year.
The third version of the craft
If you liked working with such a wonderful material as coffee beans, then we advise you not to stop there. Now you can easily make funny animals, stylish clocks from coffee beans or an original panel yourself. Decorate your home with cute little things, and it will immediately become cozier and warmer.
Now there is a very common trend to replace live Christmas trees with artificial ones. You can easily buy an artificial Christmas tree in any supermarket, but it is much more interesting to make it yourself from improvised materials.
There are quite a few options for making Christmas trees. A Christmas tree can be made from almost anything: from paper, from candy, from feathers, from cones, from fabric, etc. And it is not at all necessary to be a professional designer in order to create your own unique, one and only Christmas tree.
Fantasy and a little patience, and you can make any kind of Christmas tree with your own hands. Those who love coffee and the aroma of coffee beans will surely like it. coffee tree. Such a Christmas tree will not only be a wonderful, and most importantly, incredibly fragrant New Year's interior decoration, but also an original gift option for friends and relatives.
Dimensions trees made from coffee beans may be different, but it is better to make small coffee trees that can be placed on a table or bedside table. As a basis, you can use both a foam cone and a cardboard cone.
So, before proceeding to the description of the manufacturing process coffee trees, we will figure out what materials you will need in your work:
- coffee beans (the number of beans depends on the size of the Christmas tree you are going to make),
- foam or cardboard cone,
- band-aid,
- brown acrylic paint (can be replaced with instant coffee mixed with PVA glue),
- brush,
- hot glue (glue gun),
- scissors.
If the Christmas tree is with a curved crown, then in addition there is a little wire with a diameter of 3 mm.
For twine stand:
- jute twine,
- wire 3mm,
- thick cardboard.
Decorations for the Christmas tree at will: beads or large beads, sparkles, etc.
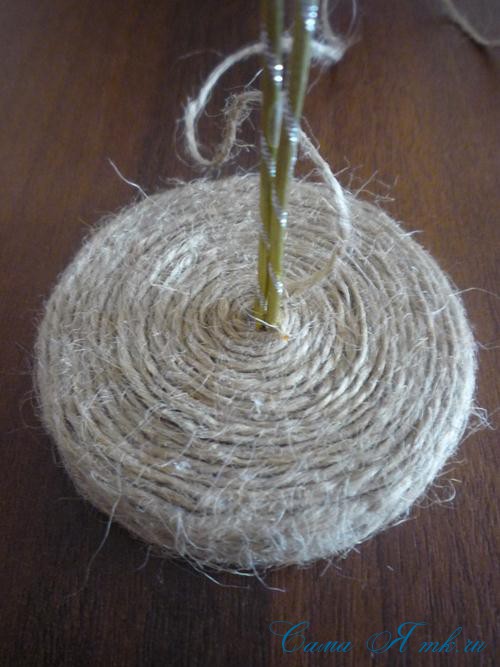
Let's prepare first twine stand for our tree. You will need: thick corrugated cardboard, twine and some wire with a diameter of 3 mm.
Using any improvised means (a glass or a compass), draw 2 circles on cardboard, cut them out. We make a hole in one of them.
We fix 3-4 wires to the lower circle with hot glue, bring them together in the center (as in the photo).

We coat with hot glue and from above, bringing out a bundle of their wire in the middle of the upper circle, we fix the entire structure.

Carefully wrap the entire stand with twine in a spiral.


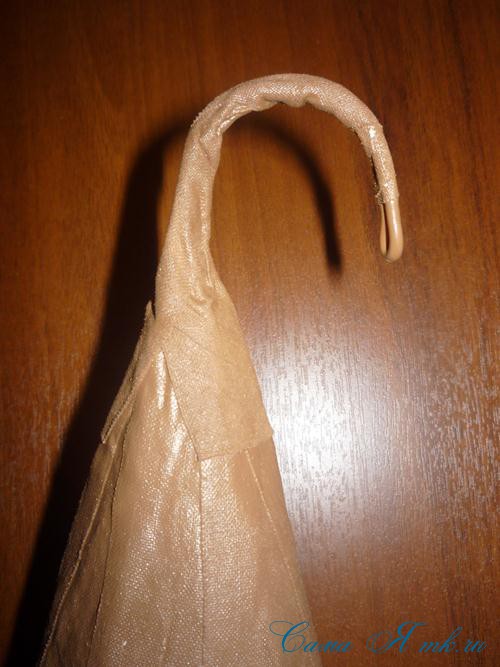
Now you need to decide which Christmas tree you will make: with a flat or curved crown. The cone can be used both from foam and cardboard.
If the Christmas tree is with a curved crown, then in the center of the top we fix the wire of the desired length. The length depends on how exactly the top of the Christmas tree will be curved.
We wrap the entire cone with adhesive tape.

From the bottom in the middle we make a hole and carefully fit the cone onto the leg of the base.

We paint the entire cone with brown acrylic paint, if you don’t have it, then you can replace it with ordinary gouache or make the following mixture (1: 1 water and PVA, and generously add instant coffee). We apply all compounds with a regular brush, covering the entire cone. We are waiting for complete drying.

or with a curved crown ... At the end, do not forget to make a loop for attaching jewelry.
After our blank is completely dry, it will be possible to start decorating it with coffee beans.
How exactly to glue the coffee beans is up to you, here, as in decorating the Christmas tree, it's all a matter of taste and personal preferences.
You can simply glue the coffee beans to each other as close as possible, trying to close all the gaps. Spin the grain in different directions, choosing the best placement option. If the grain does not fit or does not fit well, you need to take another one, since coffee beans only look the same, but in fact they have slightly different shapes and sizes. If it is not possible to completely close all the gaps, then later you can fix this when decorating the Christmas tree.
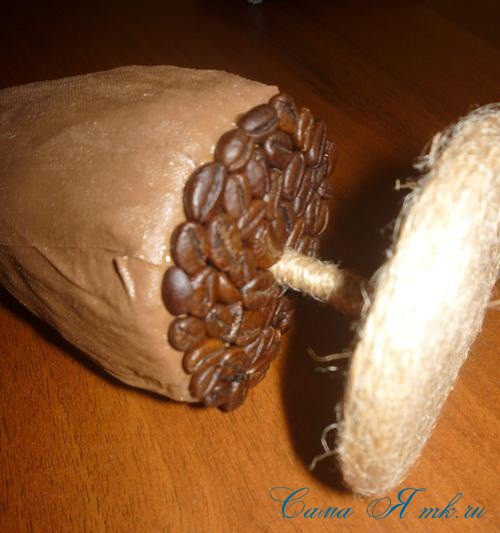
You can glue the grains like a bump, each next row is glued with a slight overlap on the previous one in a checkerboard pattern.

In this case, I used paper twine for decoration: I untwisted the twine, cut the rolls for my coffee tree.
For decoration, you can use any decorative elements: small Christmas decorations, sequins, rhinestones, braid and ribbons, feathers, nuts and much more.
You can create the effect of a snow-covered Christmas tree, for this, semolina is used. The places where it will be applied are smeared with transparent nail polish, and semolina is sprinkled on top. Some grains may crumble, but the main part will stick.
By this principle, you can make any coffee Christmas tree, this is the beauty of this master class. I hope that it will be to the liking of the readers of the site. And you can decorate such Christmas trees in different ways. Fantasize, surprising your loved ones and friends with original gifts!
Today I got this Christmas tree made of twine and coffee beans! It remains only to rejoice and inhale its wonderful aromas.

Such a coffee tree will be a wonderful decoration for the New Year's table and will create a festive atmosphere in any home. And you can also give it to relatives, friends or work colleagues, I am sure that they will be satisfied with such a creative gift.
I was glad to help!
A DIY Christmas tree made from coffee beans is a great New Year's gift for every coffee lover. Such a topiary can become not only a pretty table decoration at home or in the workplace, but also a kind of flavoring: many coffee lovers love the smell of coffee beans. The advantage of this gift is that it is quite inexpensive: to make it, you will need simple improvised materials, many of which can be found in almost every home. But its value is not in the cost, but in the fact that you put your soul into such a gift, painstakingly, grain by grain, creating the future tree with your own hands.
- Actually, coffee beans are approximately 150-200 grams.
- Thick cardboard or paper - A4 size sheet.
- Glue (it is better to take a transparent "Moment" and PVA).
- Thick threads, such as jute twine.
- Scissors.
- Small flower pot.
- Sackcloth.
- Plasticine or plaster to fill the pot.
- A wooden stick for the trunk of a future Christmas tree (for example, a pencil, a sushi stick or a skewer).
- Cotton wool or newsprint.
In addition, you will need various decorations for the future Christmas tree. Here you can give free rein to your imagination, for example, make balls of shiny beads, snow from semolina or cotton wool, decorate the Christmas tree with braid, miniature snowflakes, cover some of the grains with gold paint.
Gallery: coffee bean tree (25 photos)


We make a Christmas tree from coffee with our own hands: job description
 The first step is to prepare base on which our Christmas tree will be held. We take a small flower pot (it can be purchased at a regular flower shop) and wrap it with burlap, fixing it with glue. We fill the pot with heavy contents (gypsum or plasticine) so that the Christmas tree is stable enough.
Now you can start making the Christmas tree itself. Cut out two circles from cardboard or thick paper. One is large, its diameter should be the height of the crown we want to make at the Christmas tree. From this circle we turn and glue the cone. The second circle should be slightly wider than the base of the resulting cone, with allowances for gluing along the edges. Allowances must be made about a centimeter and a half, make cuts in a circle and bend. In the center of the base, you also need to make a small hole: a tree trunk will be inserted into it.
When the glued cone dries, we cut off its edges from below so that they turn out to be as even as possible. Then the cone must be filled with contents so that it is light enough, but at the same time does not bend under the weight of the coffee beans glued to it. For this purpose, you can use cotton wool or cut and crumpled newspaper sheets. We also insert a stick in the middle of the cone - the future trunk.
By the way, the stem does not have to be straight: you can make it from rolled wire and give it an interesting curved shape, only in this case the main thing is to make sure that the finished structure is stable.
We glue the edges of the cone and allowances on a small circle with glue and glue the “bottom” of the future Christmas tree. Again we wait until the glue dries.
If you do not want to cut and glue, you can purchase at the needlework store foam cone, which can also become the basis for the Christmas tree.
 Using glue, we fix a jute thread on the tree trunk and begin to carefully wrap it with threads - in one layer, but tightly enough. We do the same with the cone, having previously coated it with PVA glue so that the threads do not fall off. Why wrap the cone? The fact is that coffee beans are oval in shape, and no matter how tightly you glue them, there will still be small gaps between them, in which the base will be visible. Jute thread will look much neater and prettier as a base than ordinary cardboard. In addition, if you glue the grains directly onto smooth cardboard, there is a risk that they will fall off.
The leg of the tree does not need to be wrapped completely: we leave a part, and insert the future tree into the pot with the base just to the point where the threading begins. Now our Christmas tree stands firmly, and you can start pasting it with grains.
We will stick coffee beans on the Christmas tree from the base and from the bottom up, in two layers. Apply a thin layer of glue to the base (here it is better to take a transparent "Moment" so that it is not visible) and glue the grains on the base with the flat side, in a checkerboard pattern. At the same time, it is important to arrange them so that there are as few gaps between them as possible - this way the Christmas tree will look more neat. We glue the second layer of grains outward with the already flat side, so as to close the gaps remaining in the first layer as much as possible.
Available another option for gluing grains: Flat side up and at a slight angle. Then they will resemble real spruce paws, and our Christmas tree will turn out not so smooth, more like a living tree.
We decorate the Christmas tree from coffee beans with our own hands
Decorating the future Christmas tree is not limited by anything but your imagination! Can be used the following ideas:

Remember that each next stage of decoration must be started only after dried glue on the previous so that nothing falls off in the process!