Cube template for gluing print a4. How to make volumetric geometric shapes out of paper (diagrams, templates)? simple paper cube
Engaging in applied arts is a fascinating process. Three-dimensional figurines made from familiar materials such as plain paper or cardboard are mesmerizing. Having seen at least once the work of origami masters or yoshimoto, it is impossible to fight the desire to comprehend the basics of this art and create your own masterpiece. Let's remember our childhood, but let's take the basics of craftsmanship seriously and learn how to make a cube out of paper or cardboard.
If someone does not remember school geometry, then we are talking about a hexagon with equal sides. What size it will be depends on your imagination and the size of the sheet of paper. For the figure you will need:
- paper or cardboard;
- ruler;
- triangle;
- pencil;
- scissors;
- glue.
 In order for the output to turn out to be a beautiful product without flaws, it is necessary to meticulously and scrupulously complete the first stage - to draw the paper cube diagram correctly. The geometry of corners and lines depends on the accuracy of the pattern.
Consider a diagram of how to make a paper cube in the simplest way. The development of the future volumetric product is built on paper or cardboard using a conventional ruler. For clarity and ease of calculation, we will construct a drawing for a cube with an edge of 10 cm.

On the sheet we draw a rectangle with sides of 10x40 cm. Divide the long sides into four equal segments and put small marks. We connect them in pairs with a ruler so that all lines are parallel to the short side of the rectangle and perpendicular to the long one. It turns out four identical squares with a side of 10 cm . Let's number them from left to right. 1, apt. 2, apt. 3 and apt. four.
Before the full development, two more squares should be drawn. Let's move on to the drawing. We mark 2 points to the right and left of the corners of the square. 2 is perpendicular to the long side of the rectangle drawn earlier. We carefully connect the marks and get a cube sweep, consisting of four fields horizontally and three vertically, visually resembling a cross, in which sq. 2 plays the role of a crosshair. Denote the new figures square. 5 and apt. 6.
We finish the allowances on which glue is applied. The width depends on the size of the cube. In our case, it is enough to make 0.5 cm. We draw allowances on three sides of squares 5 and 6 and on one side of square 1 (the top of a stylized cross). Be sure to draw the corners at an angle of 45 °.
We cut out the workpiece and bend all the traced edges. It remains only to glue the product. We apply PVA to the allowance fields and assemble the finished cube. You can unfold:
- draw with hands;
- execute it in a graphical editor and print it out on a printer.
The second option is preferable in the manufacture of thematic cubes for the education or development of kids. Such a product will look neater. You can make a cube out of cardboard using other techniques.
The Japanese technique of turning a sheet of paper into intricate figures dates back to the Middle Ages. Temples were decorated with such crafts, they were identified with significant events in people's lives.
Today, origami is a hobby that enthusiastic people all over the world passionately give themselves to. Consider how to make a three-dimensional paper cube. The diagram is attached to it.
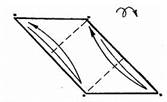
A paper square is suitable for work. We connect the opposite sides and form an inflection strictly in the center of the sheet. We bend the free edges in the opposite direction to the middle. We get an "accordion", in origami this blank is considered the initial one and is designated as a "door".
![]()
We unfold the figure and see three horizontal fold stripes on our square.

We bend the upper right and lower left corners inward so that we get isosceles triangles with sides equal to one quarter of the length of the sheet. We return the free sides of the sheet with folded corners to the center.
Now we take the upper left and lower right corners and bend them to the middle of the opposite side of the workpiece. We hide the corners inside the structure, as if in pockets. It turns out a rhombus.
![]()
We turn the workpiece on the reverse side.

We bend the sharp left corner of the rhombus to the right, and the right corner to the left, respectively.

As a result, we get a module of one side of the cube with two corners for fastening and corresponding pockets.

The cube is assembled from six modules. You don't need to glue anything.
Assembly diagram:

The top of ingenuity was shown by the Japanese Yoshimoto. His transformer cube conquered the world, as did the Rubik's Cube. The uniqueness of the Japanese miracle lies in the fact that the construction, which is mobile and consists of eight cubes, can transform into different forms: a strip, a snake, break up into two stars, each of which is also transformed.
You can make a Yoshimoto cube yourself from paper or cardboard. To do this, you need the same set that we used to create a paper cube from a scan, supplemented with tape.
![]()
The connection of adjacent elements is done with adhesive tape. Be sure to leave a gap of 1.5-2 mm. To obtain initial skills, they master the assembly of the simplest transformer cube of eight elements.
It doesn't matter which type of technique you find more interesting and easier. The main thing is that you will plunge into the wonderful world of creativity and childhood, get a charge of vivacity and a feeling of delight that disappears with age when you create a miracle with your own hands that also works.
You can make original things out of paper, such as, but today we will learn how to make a paper cube with your own hands. This is a pretty simple craft. If you follow the instructions, then you can assemble the figure easily and quickly. In geometry lessons at school, students sometimes need to have a cube on hand to use it to help solve problems. How to make a paper cube? Pretty simple.
To create we need regular scissors and six sheets of A4 plain drawing paper.
1. Take a simple sheet of paper and carefully fold it just diagonally so that you get a regular triangle. Cut off the excess sheet with scissors. Expand the sheet.
2. Then the resulting square must be folded in half. We return it back to its original position and then in the center of it we will see a fold line. Fold the sheet to the fold line itself on one side and the other.

3. Now bend any of the corners to the opposite corner. Do the same with the other corner, and we have a simple rhombus. But after that, it is imperative to carefully iron the resulting figure and then fully open the workpiece. As a result of opening the workpiece, we will see the ends bent towards us. We need to turn them in a completely different direction, necessarily from ourselves, inward. After that, fold one side and cover with a sheet on top, and push the second, opposite side inside the figure. The result is a rhombus.

4. Then we need to bend both ends to the middle so that we get a small square. We have one side of the cube ready. We need to make only six such squares, as many as necessary according to the number of faces of the cube. Therefore, the whole operation must be repeated five more times. When you have all the parts of the cube completely ready, you will need to connect them face to face. So we answered the question of how to make a paper cube. It turns out that this is quite easy to do.

5. But how to make a paper cube colorful, bright and joyful? To do this, you can collect faces from paper of different colors. The resulting craft is perfect for decorating your home, stylish workplace, it can be used as a small souvenir for a child or a friend.
A hexahedron or cube is a polyhedron whose sides are all squares. Love riddles and puzzles? This article will teach you how to make a cube out of paper or cardboard. Consider such unusual products as the Yoshimoto Cube and the Transformer Cube.
From sweep
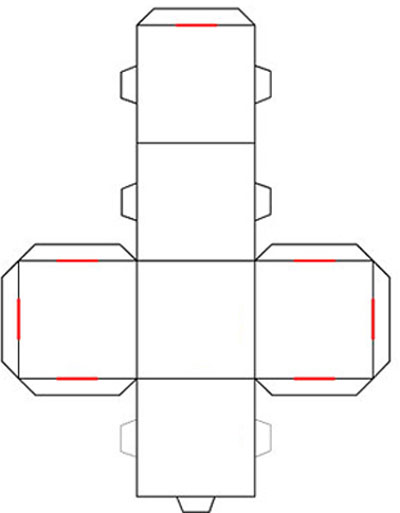
Sweeps are schemes that allow you to make a three-dimensional figure out of paper or cardboard. First, let's learn how to build a sweep. To make it, you need paper, a pencil, a ruler and scissors.
All sides of a cube are squares. So, first you need to draw a square on a piece of paper. At the same time, do not forget about the rules of geometry - for a square, all sides are equal, and the angles are 90 °. Next, remember how many faces a cube has - six. That is, there should also be six of them on the diagram for gluing. Draw four squares around the central square. Where to put another one? Just draw it on the side of one of the squares. The edges are in place, there are not enough allowances for gluing. They need to be drawn on three side squares. They are 0.5-1 cm.
Don't forget to cut their corners at a 45° angle so they won't get in the way when gluing the figure.
The sweep is ready! Here is what you should get:

Now you need to arm yourself with scissors and glue and assemble the figure. Cut out the fold with scissors. Next, you need to bend all the faces of the cube, as well as allowances. Lubricate the edges with glue and connect the cube together. Volumetric paper cube is ready!

origami cube
Origami is a very ancient technique. Its appearance is associated with the manufacture of paper in ancient China. The Japanese adopted her secret, and it was there that the art of origami was born. Previously, figurines made of paper had a sacred meaning. They decorated temples, wedding and mourning ceremonies. The Japanese believed that origami origami balls hung over the patient's head would help ward off illness and evil spirits. Later, this art began to be not only religious, but also entertaining.
Most origami schemes have been going on since ancient times, but modern masters have also made a significant contribution to the development of this unusual type of creativity. We suggest you try to fold a cube using the origami technique. To do this, take a square sheet of paper and make a fold in the center, and then bend the edges to the middle. Such an initial figure is called a door.


Fold the edges towards the center and tuck the top and bottom corners into the pockets:


Turn the workpiece over and bend along the lines indicated in the diagram:
Got a module. Six such modules are needed to complete the cube. Each part has pockets, it is into them that neighboring modules are inserted. Connect the parts according to the diagram:


Origami cube is ready. For beauty, you can make each face of paper of different colors.

Unusual puzzle
Do you want to please your beloved children with an unusual puzzle or make an unforgettable photo album? Then a small master class on creating a transformer cube will come in handy. On each face of such a cube, you can place a picture or a photograph, and inside there are as many as six more pictures.
To make this cube you will need:
- 12 pictures or photographs;
- Glue;
- 8 cubes with sides of 4 cm;
- Scotch.
You can take the most ordinary children's cubes or glue them yourself according to such a scan:
First, look at the attachment points of the cubes:

It's important to understand! The whole secret of the transformation of such a puzzle lies in the correct gluing of pairs of cubes.
To make it clearer, let's look at this process step by step. First, glue two pairs of cubes as shown by the yellow stripes in the diagram:

Place these four cubes side by side and glue them in the places indicated in blue:

Arrange the cubes as shown in the diagram. In this case, the yellow gluing will be on the opposite side of the red one. Glue along the red lines:

The photo must be placed on the four cubes. The size of the photographs is 8 by 8 cm.
It is important to glue the photo carefully, especially if you are doing it with glue. Otherwise, you can inadvertently glue those faces that are responsible for the correct transformation of the puzzle. So it is better to use hot glue or double-sided tape.
An unusual photo album from a transformer cube is ready! How you can lay it out and view pictures, you can see in the photo.
To make a cube, you will have to learn how to weave several identical paper parts.
Mark the middle line on the square, bending it in half, then bend two sides to this middle line, fix the folds and also turn it back.
You will get a square, which has three stripes across, horizontally. Bend the upper right and lower left corners of the square to the center so that they do not go beyond the fold line marked near them. After that, the sides must again be folded to the center line.
The resulting workpiece must be bent along the lines that are formed by the bent corners, fix the fold lines. In this case, the sides must be filled into the formed "pockets". As a result, you should get an oblique quadrilateral. It has two pockets and two insert corners, which will be used to fasten it with other details.
Turn it over to face you and place it in front of you on the narrow side. On it you need to make new bends. Connect together first the two right corners - the lower and upper, then the two left - also the lower and upper.
To assemble a cube, you will need a total of six of these parts, because the cube has only six sides.
Make at least one more of the same detail and connect it to the first one by inserting the corner into the pocket on the right. Insert the third blank with an angle into the pocket on the left. You have a detail that looks like the wings of a windmill.
It is necessary to make a second complex part, also from three components, and it remains to connect these two large parts with each other using corners and pockets. The cube is dense and quite durable. Only when making parts, try to make them very carefully, because otherwise the constituent parts of the cube may leave empty gaps between themselves.
Fold the square twice diagonally, then unfold and mark the center point. Lay to this center
all four corners of the square. Turn the workpiece over with the right side towards you, fold along one of the sides and mark the middle line. Then fold the sides to the right and left to this midline. You will get a rectangle.
Bend back all four corners of the rectangle and carefully push the craft apart with your hands along the middle line to form a box.
It remains to iron clearly all the formed places of the folds.
DIY paper cube video
Have you ever thought about how to make a paper cube and why you need it? Let's say how to make a cardboard cube on our own, we will tell you and even show you. And what useful functions will you give the origami cube? Let's give a hint: remember your children's blocks with letters, from which you learned to add the first words, not yet knowing how to write. And if a paper cube is pasted over with pictures from old children's books, it will turn out to be no less interesting than in our distant childhood, a puzzle constructor.
There are countless options for playing the use of a colored paper cube. And at the same time, you don’t have to worry that the children will hurt each other by throwing such a toy. Our wooden ones were heavier. We are ready to show you how to make a paper cube with your own hands right now. Ready to get started?
simple paper cube
A 3D volumetric hexagonal cube is folded from a square piece of paper without glue. And you don't even need scissors. Is it possible to cut off the extra "tail" from the A4 sheet to get a square blank. But the skill of inflating balloons will come in handy, because we will now teach you how to make an inflatable cube. Intrigued? Then let's start:

- Diagram 1 is your visual guide. It should be used every time the folding algorithm seems complicated. Take a paper square and fold it diagonally, then in half - it's all just markings;
- Focusing on the diagonal folds, form a triangle by bending the side planes of the workpiece inward (see diagram). 4 walking corners at the base of the triangle must be bent to the top, 2 on each side of the workpiece;
- Bend the opposite side corners to the center - you have a vertical reference axis here. Repeat the action on the other side. The walking corners of one of the conical protrusions (the corners are “closed” on the second) are folded over twice so that they can be carefully tucked into the middle corners-pockets;
- Similarly, fill the double-folded corners into the pockets on the back of the workpiece. The cube model is ready, it remains to give it volume. Find an open corner and inflate the layout through it.
Cube from modules: modular cube 6 colors
We have already discussed how to make a cardboard cube on our own above, and for this modular cube, multi-colored paper of 6 colors (or 3 repeating ones) will be enough. Even without cardboard, it will turn out to be quite dense due to the algorithm for folding the modules (each separately and all together). Let's get started step by step. We will immediately warn you that the whole process will be divided into 7 steps - folding the modules and assembling the cube (you can use glue - it will be stronger). Some time will be spent, but the result will definitely please you: the cubes will turn out to be bright, multi-colored, which do not need additional decorations or painting.

- Take a square piece of paper and fold it so that you get a visible division into 4 identical rectangular planes (see Fig. 2). Bend the small corners along the diagonal corners of the starting square;
- Roll up the "sashes" of the sheet like closing a window shutter. Using the corner guides (folded in earlier), fold in the previously unused corners, then tuck them in on both sides. Get a parallelogram;
- Turn the structure face down, bend the corners towards you so that you get a small square with triangular folded ears. Make 5 more. such modules.
Connect the blocks into a cube, introducing the corners of the modules into the middle planes-pockets of neighboring blocks. Be smart, in extreme cases, the scheme will help. How to make an origami cube from bright modules, you have mastered in practice. Try gluing the cube together at the assembly stage so that it is even stronger and does not crumble into modules in the game. You can, of course, take a standard cube scan, just print it and glue it - ready-made templates are always at hand. And if the typical pattern does not suit you and the game needs an original counting cube, you can fold it yourself for one or two. What is easier when you know how to make less wisdom out of paper. You may be interested in folding schemes or.


